
Summary of Contents for Lowry GSOFR2003
- Page 1 1500 Watt Oil Filled Radiator User manual Model number: GSOFR2003 Please read these instructions carefully and keep them for future reference...
-
Page 2: Table Of Contents
Contents Page Unpacking your appliance..………......Safety instructions..........Feature diagram............Wheel base assembly…………………………………………. Using your appliance…..………......... Cleaning and care........... Problem solving............Connection to the mains supply......Guarantee.….….……………………………………………………... -
Page 3: Unpacking Your Appliance
Unpacking your Appliance Before you use your appliance 1. Remove all the packaging. 2. Check the appliance after unpacking for any visual damage such as: ● Misaligned or damaged cabinet parts ● Damage to the controls ● Damage to the plug or cable ●... -
Page 4: Safety Instructions
Safety instructions When using electrical appliances, basic safety precautions should always be observed, including the following: ➢ Read all instructions. ➢ Check that the your mains voltage corresponds with the rating on the appliance. ➢ The appliance must not be left unattended while it is connected to the mains supply. ➢... - Page 5 Safety instructions ➢ Never remove parts from the appliance, such as the feet, screws and so on ➢ Never use the appliance near a bath, shower or a swimming pool. ➢ Never place flammable objects or clothing on top of the appliance. ➢...
- Page 6 Safety instructions ➢ Do not operate this appliance for anything other than its intended use. ➢ This appliance is not intended for commercial use. This product is intended for household use only. Do not use outdoors. This product is only intended for heating and cooling. Warning: it is hazardous for anyone other than a competent person to carry out any service or repair operation which involves the removal of a cover which gives protection against exposure to electrical parts.
-
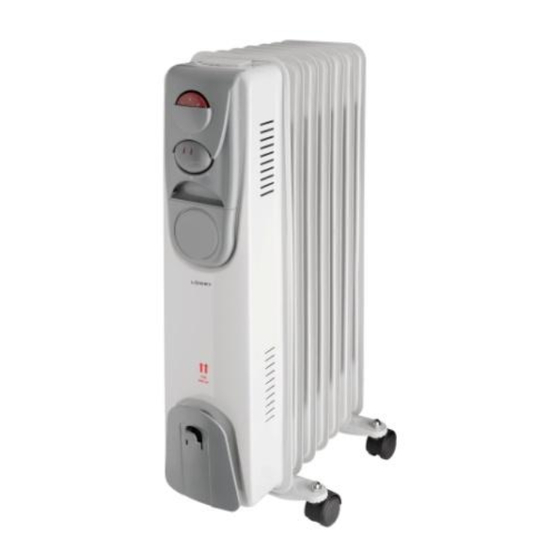
Page 7: Feature Diagram
Feature diagram Power setting Thermostat Control Oil filled fins Carry handle Castor wheels Ventilation Cord storage Warning - Do not touch hot surfaces, do not block openings or cover appliance. -
Page 8: Wheel Base Assembly
Wheel base assembly Turn the heater upside down Position the 2 x wheel base assemblies between the end fins Attach the wheel base assemblies to the heater using the 2 x U-bolts and 4 x wing nuts supplied Tighten the 4 x wing nuts and turn the heater the right way. -
Page 9: Using Your Appliance
Using your Appliance 1. Before connecting your appliance to the mains socket, position the appliance upright on the floor, at least 90cm away from the wall, away from curtains, furniture or wall coverings. 2. Insert the mains plug into a suitable 13Amp mains socket. 3. -
Page 10: Thermostat Control
Using your Appliance 4. Turn the Thermostat Control to the desired position. It is recommended to select the highest position to pre heat the appliance. It will take 5 -10 minutes for the appliance to fully heat up. Please note, this appliance will not operate unless positioned on a flat stable surface or if the thermostat has been set too low. - Page 11 Using your Appliance Safety Protective Devices The appliance is fitted with an over heat protection system. 1. Overheat protection - the power to the heating elements will automatically cut off if the temperature of the heating elements exceeds a certain limit. In the event of overheating, the heater will stop operating.
-
Page 12: Cleaning And Care
Cleaning and care WARNING: Electrical Shock Hazard. Before you clean the appliance, disconnect the mains plug from the wall socket. ➢ Allow the appliance to cool down completely before cleaning. ➢ Do not immerse cord, plug or appliance in any liquid or allow moisture to come into contact with electrical parts. -
Page 13: Problem Solving
Problem Solving My appliance does not work when I turn it on 1. Check that your appliance is plugged in and the power is turned on at the mains socket. 2. Try another mains socket. 3. Check that the thermostat setting has not been set too low. 4. -
Page 14: Connection To The Mains Supply
Connection to the mains supply WARNING- THIS APPLIANCE MUST BE EARTHED This appliance is designed to operate from a mains supply of AC 220V – 240V ~50Hz. Check that the voltage marked on the product corresponds with your supply voltage. This product is fitted with a 13A plug complying with BS1363 and is fitted with an appropriate fuse complying with BS1362. -
Page 15: Guarantee
Guarantee This product is guaranteed for 12 months from the date of the original purchase. If any defect arises due to faulty materials or workmanship the faulty product must be returned to the place of purchase. Refund or replacement is at the discretion of the store. The following conditions apply: •... - Page 16 For Customer Services please call 01204 664 081 Opening times: Monday - Friday 9am until 5pm Revision 1 This symbol is known as the 'Crossed-out wheelie bin Symbol'. When this symbol is marked on a product/batteries, it means that the product/batteries should not be disposed of with your general household waste. Only discard electrical/electronic/battery items in separate collection schemes, which cater for the recovery and recycling of materials contained within.
Need help?
Do you have a question about the GSOFR2003 and is the answer not in the manual?
Questions and answers