Table of Contents
Advertisement
Advertisement
Table of Contents

Summary of Contents for ThermoTex Thermo-Ident 1
- Page 1 Operating manual for Thermo-Ident 1 and Thermo-Ident 2 - Translated version of the original operating manual - ThermoTex Nagel GmbH Schutterstr. 14, 77746 Schutterwald, GERMANY Phone +49 781 9616-0, fax +49 781 9616-50 info@thermo-tex.de, www.thermo-tex.de GBTHIDBA_V(2).DOC...
-
Page 2: Table Of Contents
Contents Contents Product description ......................3 General description and intended use ......................3 Machine versions ............................4 Layout ................................4 Technical data ............................. 4 Declaration of Conformity ..........................5 Safety advice ........................ -
Page 3: Product Description
6.31 Heat-seal removal ..........................21 Label layout ........................22 Examples for Thermo-Ident 1 ........................22 Examples for Thermo-Ident 2 ........................23 Remote control ........................ 24 Serial interface ............................24 ... -
Page 4: Machine Versions
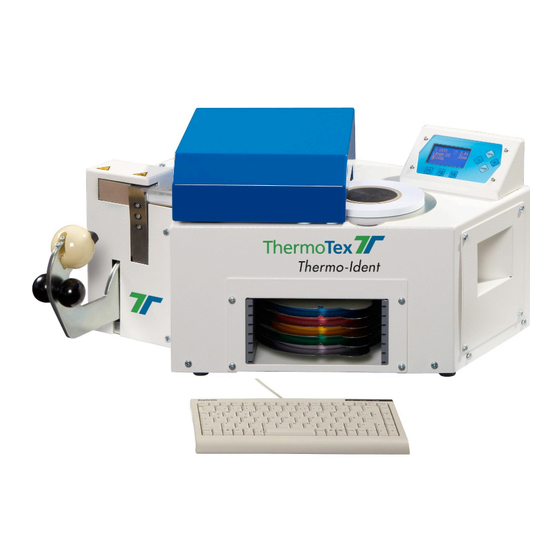
Keyboard Hand lever with heat-seal rubber Roll holder Figure 1-1 1.4 Technical data Type name: Thermo-Ident 1 / Thermo-Ident 2 Electrical connection values: 230 V, 50 Hz, 500 W Nominal current: 2.2 A Fuse: 4.0 A (time-lag) Noise emissions: Workplace-related emission value < 70 dB (A) -
Page 5: Declaration Of Conformity
ThermoTex Nagel GmbH Schutterstraße 14 77746 Schutterwald Device description: Type: Marking machine Thermo-Ident 1 / Thermo-Ident 2 Production status: April 2012 The device fulfils the health and safety requirements of the following EC directives: • Machinery directive 2006/42/EC Applied standards:... -
Page 6: Dangerous Spots On The Machine
Safety advice "Warning of dangerous spots" "Warning of dangerous electrical voltages". "Warning of hot surfaces" "Warning of hand injuries" 2.2 Dangerous spots on the machine Caution, hot surfaces! The heating element can reach temperatures • above 200°C. The heat-seal rubber on the hand lever can •... -
Page 7: Basic Safety Measures For Maintenance And Servicing
Safety advice beginning production! The materials to be processed must be checked with respect to possible risks before • processing (temperature resistance, gases or toxicity). The Teflon film on the heating plate must be immediately replaced if damaged. • The machine must always be switched off after finishing work (mains switch). •... -
Page 8: General Advice
3.2 Unpacking the machine When unpacking the marking machine, make sure that all of the parts listed as follows are definitely included in the delivery and are not damaged: Thermo-Ident 1 or Thermo-Ident 2 marking machine • Compressed air hose •... -
Page 9: Properties Of The Thermal Print Head
General advice Power connector and main switch Compressed air connection Serial interface Figure 3-1 USB connection Ethernet connection Figure 3-2 3.5 Properties of the thermal print head The thermal print head is the most sensitive part of your machine. It is compulsory to pay attention to the following advice. -
Page 10: Materials And Parameters
You will find the possible combinations of materials in the following table. 10 mm wide marking tapes are used for the Thermo-Ident 1 (e.g. IT2050-10). 15 mm wide marking tapes are used for the Thermo-Ident 2 (e.g. IT2050-15). -
Page 11: General Operation
General operation 4 General operation 4.1 Principal work sequence Depending on the set operating mode (see chapter 5.4) you can enter the text to be printed with the help of the keyboard or the text can be sent by a connected PC to the marking machine. The machine now prints a label on to the marking tape and slides up to the heating element. -
Page 12: Changing Between Temporary And Permanent Marking
General operation Figure 4-2 Guide to the tape up to the tape guidance rail as shown in the illustration (4). • Slide the tape as far into the tape guidance rail until it is against the print head. • Press the PLUS button on the operating panel. The tape is now automatically retracted. •... -
Page 13: Operation Of The Control Unit
General operation Figure 4-4 Permanent marking: Remove the locking pin from the opening on the hand lever. The heat-seal rubber is now held with a spring in an angled position (see figure 4-5). This means that the label is pulled a little to the left when heat-sealing and the full surface is heat-sealed. -
Page 14: Menus
Operation of the control unit 5.2 Menus There are four different menu levels: Also refer to chapter... Menu level 1 1.1 Numbering 1.2 Automatic printing 1.3 Delete text after print 1.4 Print logo 1.5 Label type 1.6 Barcode type 1.7 Check digit Menu level 2 2.1 Label alignment 2.2 Print position... -
Page 15: Quick Access Buttons
You enter the text to be printed using the connected keyboard in the "keyboard" operating mode. This text is shown in the lower half of the display. You can enter two lines each with up to 24 characters with the Thermo-Ident 1. You can enter four lines each with up to 24 characters with the Thermo-Ident 2. -
Page 16: Saving The Settings
Operation of the control unit You can set the cursor to the beginning or end of the current line with the buttons "Pos1" and "End". With the "backspace" or "remove" buttons you can delete characters. Press the enter button (enter) to print out the current text. Important: After printing a label, the machine waits until you press the hand lever to heat-seal the label. -
Page 17: Description Of Menu Points
Description of menu points 6 Description of menu points 6.1 Numbering This menu point only appears if the "keyboard" operating mode is set (see chapter 5.4) The Thermo-Ident can automatically number the labels. Text must be entered that ends with a number. This number is increased automatically after each label or after each position as required. -
Page 18: Label Type
Description of menu points Providing logos: see chapter 6.29. 6.5 Label type Texts and numbers, both in legible form and as a barcode, can be printed with the Thermo-Ident. A choice is made between three types of labels: Text: The text is printed as seen on the display •... -
Page 19: Font Size
Description of menu points Yes: The label is cut in a single step and the ends are simultaneously glued together. • 6.14 Font size The desired font size for the different lines of text is set here. 6.15 Heat-seal temperature for temporary marking The temperature of the heating plate for the "temporary marking"... -
Page 20: Keyboard Allocation
The logos are printed with a resolution of 300 dpi (dots per inch). A logo with 100 pixels therefore needs around 8.5 mm. File name Height of logo for Height of logo for Logo length Thermo-Ident 1 Thermo-Ident 2 "small" logo logo1.bmp 100 pixels 150 pixels max. -
Page 21: Gluing Teflon
Description of menu points 6.30 Gluing Teflon The self-adhesive Teflon film on the heating element must be replaced in case of wear and tear. In order to glue the new Teflon film perfectly with the heating element, the film must be pressed down onto the heating element for several minutes at a high temperature. -
Page 22: Label Layout
Labels should be a maximum of 40 mm long so that they can be fully heat-sealed. When entering long texts, possibly together with a logo, labels can be produced that are longer than 40 mm. 7.1 Examples for Thermo-Ident 1 Entry Plain text... -
Page 23: Examples For Thermo-Ident 2
Label layout 7.2 Examples for Thermo-Ident 2 Entry Plain text 2/5 Interleaved Data matrix Comment Barcode Barcode+Text Barcode Barcode+Text 123;ABC 123;ABC 123;ABC 123;ABC 123 ABC (Not possible) (Not possible) (Not possible) (Not possible) ABC ABC (Not possible) (Not possible) (Not possible) (Not possible) 123;DEF (Not possible) -
Page 24: Remote Control
Label layout 2. A maximum of one barcode can be printed on the label. Several barcodes would lead to problems later on when scanning them. 3. Barcode type 2/5 Interleaved can only represent actual numbers. If the line contains letters or other characters it is printed as plain text. -
Page 25: Pc Data Transfer → Thermo-Ident
*) The text can consist of a maximum of 24 characters per line. The individual lines are separated by a Carriage Return (0x0D). A maximum of two lines are possible for the Thermo-Ident 1, and a maximum of four lines for the Thermo-Ident 2. -
Page 26: Error Messages
Only one single number is allowed when printing 2/5-Interleaved-Barcodes. The allowed! other lines may only contain text but no numbers. Perform Please contact ThermoTex to arrange for maintenance to be carried out. maintenance! Print head The print head is not locked. Close and lock print head. -
Page 27: Assistance With Faults
Assistance with faults 10 Assistance with faults Should any functional faults occur when operating the machine, immediately consult specialist personnel. Operators must immediately inform their superior. Never try to rectify electrical faults (e.g. on the heating plate)! Please contact our technical hotline with any questions Tel.: 0781/9616-36, Fax: 0781/9616-30, E-mail: hotline@thermo-tex.de For customers in Switzerland: Tel. -
Page 28: Servicing (Maintenance)
The typical maintenance and cleaning work is described in this chapter. Should any problems occur with the machine that cannot be solved independently please contact the technical hotline at the company ThermoTex Nagel GmbH Tel.: 0781/9616-36 (Fax: -30, E-mail: hotline@thermo-tex.de) to rectify the problem as quickly as possible. -
Page 29: Air Filter
Perform maintenance! Figure 11-1 Please contact ThermoTex to arrange for extensive machine maintenance to be carried out. Irrespective of this message, you must regularly carry out the maintenance work listed in the above sections. 12 List of spare parts Position... -
Page 30: Circuit Diagram
Circuit diagram 13 Circuit diagram Page - 30 GBTHIDBA_V(2).DOC...
Need help?
Do you have a question about the Thermo-Ident 1 and is the answer not in the manual?
Questions and answers
Чипинатор не видеть чёрную ленту.