Advertisement
Table of Contents
- 1 Box Contents
- 2 Functions
- 3 Instructions for Use
- 4 Setting up the Camera
- 5 Changing the Mode of the Camera
- 6 Menu and Settings
- 7 Video Mode Settings
- 8 Photo Mode Settings
- 9 Playback Mode Settings
- 10 File Download
- 11 Care for Your Observer Dash Camera
- 12 Specification
- 13 Troubleshooting
- Download this manual
H D
D A S H
C A M E R A
User Manual
All trademarks are acknowledged as the property of their respective owners.
Unless otherwise stated their use does not imply that the trademark owner is
affiliated with Kitvision or endorses the products herein.
Please recycle this packaging responsibly.
JB. 4714 / Made in China. © Kitvision 2016. Christchurch, Dorset, BH23 4FL, UK
1
1
Advertisement
Table of Contents

Subscribe to Our Youtube Channel
Summary of Contents for Kitvision Observer
- Page 1 Unless otherwise stated their use does not imply that the trademark owner is affiliated with Kitvision or endorses the products herein. Please recycle this packaging responsibly. JB. 4714 / Made in China. © Kitvision 2016. Christchurch, Dorset, BH23 4FL, UK...
-
Page 2: Box Contents
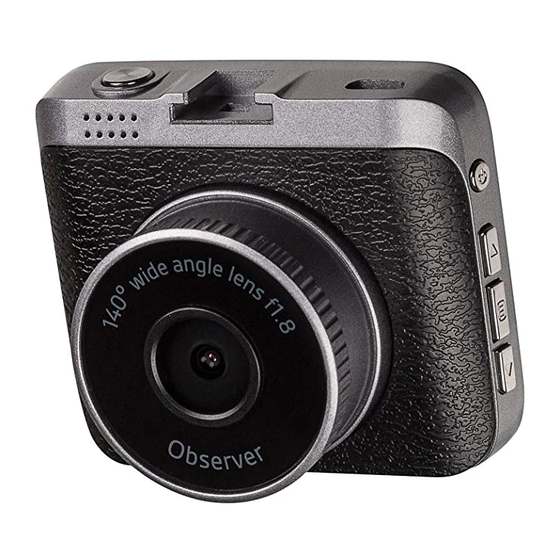
Box contents Kitvision Observer Dash Camera • 8 GB memory card • Carry pouch • In-car charger with USB port • RESET Window suction mount • User manual • Functions 1. Micro USB input 8. Record start/stop/OK 2. LCD screen 9. - Page 3 Instructions for use Setting up the camera 1. Insert a micro SD card into the Micro SD card input (12) and Warning connect the camera to your car’s 12 V/24 V cigarette lighter using the included car charger USB cable with the other end For your safety and the safety of others around you, the menu plugged into the Micro USB input (1).
- Page 4 Setting up the camera Changing the mode of the camera [...continued] Note: the camera will only operate when connected to power using There are three modes of the camera: video recording, still photo the USB cable included. capture, and playback file viewer. To change mode, press and hold the Menu button (6) to cycle through the modes.
- Page 5 Changing the mode of the camera Menu and settings [...continued] When the camera is set to video recording mode you can manually With the camera powered, you enter the menu by pressing the • start or stop the recording by pressing the Record start/stop Menu button (6).
- Page 6 Video mode settings Turn this feature on to use the dash camera as a Setting Information Motion detection security device. When turned on the camera will start 1080i offers higher detail, the 720p offers Resolution recording as soon as it detects any motion and for smoother video.
- Page 7 Photo mode settings Higher ISO settings would be used in darker situations. Setting Information [Auto] / [100] / [200] Change the size of the image depending on use Resolution The exposure value can be raised or lowered to Exposure intended. 12 megapixel is the best quality and is the increase or decrease the brightness of the photos.
- Page 8 Playback mode settings Typically UK/Europe would be 50 Hz, whereas Frequency America would typically be 60 Hz. You can use the Delete option to delete the current image displayed [50Hz] / [60Hz] in the background or delete all of the images on the micro SD card. Use this option to format your memory card.
- Page 9 Video Format • G-Sensor Get the Observer Dash Camera wet • Motion detection Drop the Observer Dash Camera as this will invalidate your warranty • Microphone Open up the Observer Dash Camera. There are no user • Display 2.4" TFT LCD...
- Page 10 PC USB connection, and then try holding the Power on/off button (4) to see if the Observer dash camera powers up and operates correctly again. We hope you’ve now got all the information you need to get started, but if you’re having problems with anything, please feel free to...
Need help?
Do you have a question about the Observer and is the answer not in the manual?
Questions and answers
How do I reset my kitvision observer HD dash camera, memory filled
You can reset the memory of the Kitvision Observer HD dash camera by formatting the micro SD card. To do this, navigate to the settings menu and select the option to format the memory card. This will erase all stored data and free up space for new recordings.
This answer is automatically generated