Table of Contents
Advertisement
Quick Links
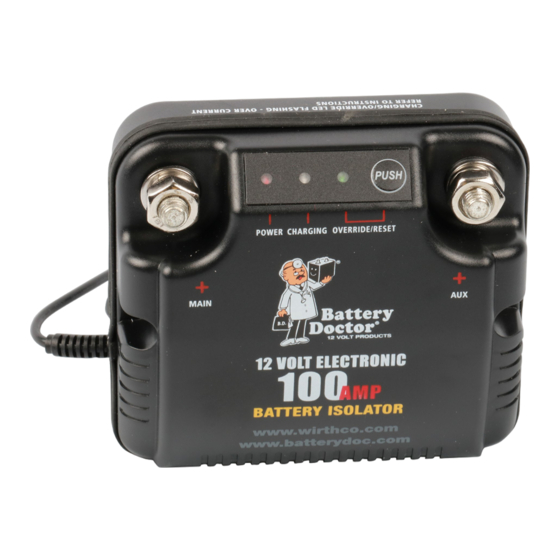
BATTERY ISOLATOR
WARNING
PLEASE READ THESE INSTRUCTIONS COMPLETELY PRIOR TO INSTALLATION.
BATTERIES PRODUCE EXPLOSIVE GASES - Ensure no sparks or flames are present.
Wear eye protection.
Vehicles must be in "NEUTRAL "or "PARK ", park brakes "ON "
Follow all vehicle manufacturers' instructions.
Beware of moving parts.
Battery Isolators are designed for negative ground alternator systems with batteries of the
same nominal voltage.
Batteries of differing voltages cannot be used.
FEATURES
Easy to Install - The electronic isolator does not require any changes to the vehicle's existing
wiring. It can be fitted to all 12V vehicle types.
Priority Charging for Starting Battery - Ensures that the starting battery is fully charged before
connecting the auxiliary battery in parallel.
Manual Override - If the starting battery is flattened and the auxiliary battery is charged, the
electronic isolator allows the batteries to be manually paralleled to jumpstart the vehicle.
Over-Current Protection – Protects the Isolator and charging system from over current
damage, which could occur due to a short circuit in the wiring.
Surge Protection - Provides surge protection for vehicles with electronic ignition/
management systems.
SPECIFICATIONS
PART NO.
VOLTAGE
CHARGING
CURRENT
CHARGE TYPE
CONTROL
MOUNTING
CURRENT DRAW
VOLTAGE DROP
SURGE
PROTECTION
USER'S MANUAL
#20090
12V
75A/100A peak
Parallel
Electronic
Surface/firewall/battery side
Charging 500mA
(Standby 30mA)
None
Built in
1
#20092
12V
125A/150A peak
Parallel
Electronic
Surface/firewall/battery side
Charging 500mA
(Standby 30mA)
None
Built in
Advertisement
Table of Contents

Summary of Contents for Wirthco battery doctor 20090
- Page 1 USER’S MANUAL BATTERY ISOLATOR WARNING PLEASE READ THESE INSTRUCTIONS COMPLETELY PRIOR TO INSTALLATION. BATTERIES PRODUCE EXPLOSIVE GASES - Ensure no sparks or flames are present. Wear eye protection. Vehicles must be in “NEUTRAL ”or “PARK ”, park brakes “ON ” ...
- Page 2 ITEMS NEEDED Charged auxiliary battery - Deep cycle recommended for most applications Auxiliary battery cradle & battery clamp Battery terminals & lugs 150A fuse or circuit breaker Battery cable - 14mm² (6 B&S) minimum for engine bay mounted auxiliary batteries (up to 3m) - 20mm²...
- Page 3 INSTALLATION – CONNECTION To make the electrical connections, battery cables will need to be made to the correct length using cable lugs and heat shrink. Cable lugs should be crimped or soldered to the stripped battery cable and then protected with the heat shrink. 1.
- Page 5 TESTING FOR NORMAL OPERATION 1. With the installation complete and the engine ‘Off’ only the red ‘Power’ LED should be on. 2. Start the vehicle’s engine. Within a few seconds the blue ‘Charging’ LED will turn on indicating that the starting battery is above 13.4V and the isolator will start charging the auxiliary battery. 3.
-
Page 7: Frequently Asked Questions
FREQUENTLY ASKED QUESTIONS Q. Is the Battery Isolator “waterproof”? A. No! Battery isolators are designed to be dust and shower resistant (water-resistant). Normal use, including river crossings and light engine washing, should not pose any problem. Direct high pressure washing of the battery isolator (or if the vehicle is submerged for a period of the time) may cause some water damage and this will not be covered under warranty.
Need help?
Do you have a question about the battery doctor 20090 and is the answer not in the manual?
Questions and answers