Table of Contents
Advertisement
Advertisement
Table of Contents

Summary of Contents for Eyeclon L3 POP
- Page 1 L3 POP USER’S MANUAL EYECLON HD Driving Image Recorder www.eyeclon.com...
- Page 2 < NOTE > ■ Customer is responsible for obeying all Federal, State, and Local laws concerning the operation of the L3 POP device. Regulations for use may vary by region. ■ Eyeclon is not responsible for damages that can occur from using unauthorized parts and accessories.
- Page 3 Before Using Eyeclon’s L3 POP... < FCC Statement > This device complies with Part 15 of the FCC Rules. Operation is subject to the following two conditions : 1. This device may not cause harmful interference, and 2. This device must accept any interference received, including interference that may cause undesired operation.
-
Page 4: Table Of Contents
Table of Contents 1. Warning and Caution .....5 2. Product Features .....9 3. Product Overview ....12 4. Device Installation ....16 5. Basic Operation ....21 - Using the Touch Screen - Device Control - LED Indicator Light - File List Management - Firmware Update 6. -
Page 5: Warning And Caution
Warning and Caution... - Page 6 Warning and Caution These cautions are provided for user’s safety and prevent damages in the device. Please take the time to read the manual for proper product usage. Warning Information to prevent factors that can cause physical damage Caution Information to prevent service errors or system damage Warning ■...
- Page 7 Warning and Caution Caution ■ Always keep the camera lens cleaned. ■ Make sure the device is firmly mounted during installation as it has a tendency to shift when driving over speed bumps or unpaved roads. ■ If the device breaks, call or bring it to a service center. Do not touch the device as your hands might get hurt from the broken parts.
- Page 8 Warning and Caution Caution ■ Do not use a pin or a nail to push the LCD. ■ Do not use excessive force when using the control buttons. ■ Do not use chemicals to clean the device. ■ Keep the product away from children and pets. Warning and Caution...
-
Page 9: Product Features
Product Features... - Page 10 Product Features ■ 3.5” TFT LCD Provides clean and clear video quality. ■ Format Free Technology Provides automatic memory format and maximizes the stability and minimizes file errors of Micro SD Card. Automatically overwrites files when storage capacity is needed. ■...
- Page 11 Product Features ■ Operation Temperature Sensor Automatically senses over heating and high temperature of the devices and shuts off the power for protection. ■ PC Viewer PC Viewer for Windows/MAC is used to watch recorded videos. ■ Location and Speed Limit Sensor Provides information about the vehicle’s location and speed.
-
Page 12: Product Overview
Product Overview... - Page 13 1. Package Components ※ Check to see if any components are missing. ※ The product and manual contents can be changed or modified at anytime without prior notice for improvements or customization. ※ Optional parts and accessories are sold separately. Quick Start Main Unit Adhesive Mount...
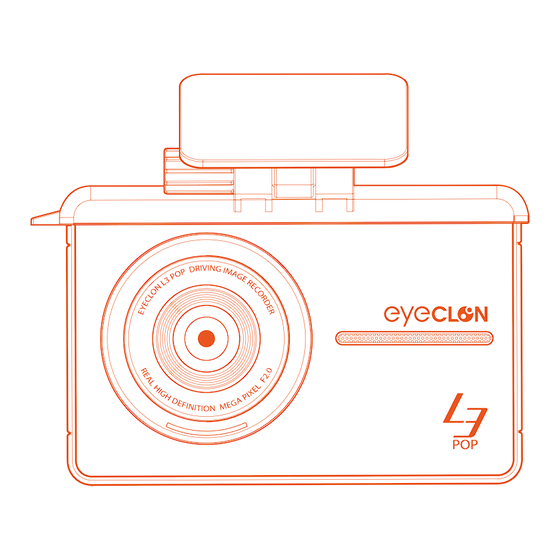
- Page 14 2. Product Overview ■ Main Unit (Front Camera) Product Overview...
- Page 15 2. Product Overview ■ Main Unit (Front Camera) DC-IN Power cable port GPS Port GPS module port R-CAM Rear camera port Camera Lens Front camera for video recording Speaker Voice guidance Front LED Indicates vehicle is equipped with dash cam Microphone Voice and audio record LCD Screen...
-
Page 16: Device Installation
Device Installation... - Page 17 Device Installation < Caution > - It is dangerous to operate this device while driving. - Please check if the Micro SD card is inserted correctly before connecting to power. - Make sure the installation area is clean. - Disconnect the power cable if you are not using the device for a long period of time. - Handle the device with care.
- Page 18 Device Installation 1) Insert / Remove Micro SD Card Do not apply excessive force on the Micro SD card or insert it in the wrong direction. Insert Remove - Refer to the above image and check the direction before inserting the Micro SD card into the slot. - Push the Micro SD card all the way.
- Page 19 Device Installation 2) Main Unit Installation ① Installation Location ④ Connecting the Cables ① ② ③ Before installation, make sure the Connect all the related cables (rear engine is turned off. Clean the area camera, GPS, power) and adjust the where the product will be installed.
- Page 20 Device Installation Connecting to power (using car charger) 3) Rear Camera Installation(optional) ① Installation Location Before installation, make sure the engine is turned off. Clean the area where the product will be installed. ② Attaching the Device Remove the double-sided tape and attach the device.
-
Page 21: Basic Operation
Basic Operation... -
Page 22: Using The Touch Screen
1. Using the Touch Screen ■ Main Screen Front / Rear View Front and rear live view (2CH) Switch to front / rear view LCD OFF LCD screen OFF menu SD Card Format SD Card format menu Manual Record Manual record menu File List List of recorded files (recording will stop in menu mode) -
Page 23: Using The Touch Screen
1. Using the Touch Screen 1) Live View Current Date and Time Settings → System Settings → Time Settings * Will set automatically if GPS is connected GPS Status GPS ON / OFF Voice & Audio Record Settings → Audio Settings MIC ON : recording / MIC OFF : not recording Recording Status REC : continuous record... -
Page 24: Using The Touch Screen
1. Using the Touch Screen 1-1) Screen Saver Mode Recording Status REC: continuous record EVENT: incident / manual record Voice & Audio Recording Status MIC ON : recording / MIC OFF : not recording GPS Signal Status GPS ON / OFF Current Time and Date Shows current time and date ▶... -
Page 25: Using The Touch Screen
1. Using the Touch Screen 2) Micro SD Card Format ▶ Micro SD Card Format ▶ Saved files will be deleted. Backup the files before formatting. Basic Operation... -
Page 26: Using The Touch Screen
1. Using the Touch Screen 3) File List Front / Rear Camera File List Sorts the file list according to front / rear recordings File List : Up Moves file list up File List : Down Moves file list down File List Select the file to play from the list HOME... -
Page 27: Using The Touch Screen
1. Using the Touch Screen 3-1) Video Playback Screen Video Play Time ex) 10/60 : current play time (sec) / total play time (sec) Number of Files ex) 4/200 : 4th file out of 200 files Previous Play previous file Play / Pause Play or pause Next... -
Page 28: Using The Touch Screen
1. Using the Touch Screen 4) Settings → ADAS Settings Lane Departure Warning System (LDWS) A voice or a tone alerts the driver if the vehicle is outside of lane. Front Vehicle Start Alarm (FVSA) Alerts the driver when front vehicle starts to move from a complete stop. -
Page 29: Using The Touch Screen
1. Using the Touch Screen 4-1) LDWS(Lane Departure Warning System) Driving Speed Set driving speed * mph : 40mph, 45mph, 50mph * km/h : 60km/h, 70km/h, 80km/h Start LDWS Enable the LDWS feature by ON / OFF LDWS Installation Guide Calibrate the ADAS settings guide LDWS Sensitivity Settings Use the right / left key to set the lane departure area... -
Page 30: Using The Touch Screen
1. Using the Touch Screen 4-1) LDWS Installation Guide Adjust device angle parallel to red horizontal line. Align blue line with the front edge of the hood using the top / down keys. If the front edge of the hood is not shown on the screen, align blue line to the lowest level. Red Horizontal Line Blue Hood Line ADAS Calibration... - Page 31 1. Using the Touch Screen 4-1) LDWS Sensitivity Settings Lane Departure Warning System (LDWS) Sensitivity Settings ① / ④ : Low → High ② / ③ : High → Low Lane Departure sensitivity level settings ▶ Set the timing of the lane departure notification alert by using the left / right buttons.
-
Page 32: Using The Touch Screen
1. Using the Touch Screen 4-1) FVSA(Front Vehicle Start Alarm) ▶ Front Vehicle Start Alarm (FVSA) alerts the driver when the front vehicle starts to move from a complete stop. ▶ Enable the FVSA feature by selecting ON / OFF. ▶... -
Page 33: Using The Touch Screen
1. Using the Touch Screen 4-2) Display Settings Touch Calibration LCD Auto ON / OFF System will restart after calibration is completed LCD screen will turn OFF automatically Screen Saver Multi Screen view – front / rear view simultaneously Enable screen saver – 1mins / 3mins / 5mins / OFF Screen Saver Settings for LCD auto OFF and screen saver Basic Operation... -
Page 34: Using The Touch Screen
1. Using the Touch Screen 4-3) Audio Settings Audio / Voice Record Audio / voice record using the microphone Audio / Voice Guide Set the volume control in 3 levels (3 being the loudest) ▶ Use the HOME or BACK button to save the settings. Basic Operation... -
Page 35: Using The Touch Screen
1. Using the Touch Screen 4-4) System Settings Memory Partition Allocate storage capacity on memory card for recording modes (OFF / 25% / 50%) OFF : disable in parking mode Collision Sensitivity Enable the sensitivity levels (low / mid / high) of collisions while driving or during parking ※... -
Page 36: Device Control
2. Device Control Control Function Description Power ON - Main power ON button - Once the device is connected it will automatically turn ON / OFF by vehicle’s ignition. Green LED light means the device will start to record. A voice guide will alert the driver “continuous recording mode”. - The device is set at continuous recording mode when the power is connected. -
Page 37: Led Indicator Light
3. LED Indicator Light Recording Type Rear Green LED Front Blue LED Meaning Continuous Blinks every 1 sec Continuous Record Motion Detection Blinks every 0.5 sec Motion Detection / Incident Record Parking Blinks every 1 sec Record during Parking Basic Operation... -
Page 38: File List Management
4. File List Management ▶ Recorded files are saved in Micro SD card by date and hour. ▶ Files are saved in the following format below. Year-Month-Date Hour-Minute-Second Front View Recording_Recording Type Recording Type Description Saved Folder Normal Continuous Record Dashcam Motion Record during Parking (motion detection) -
Page 39: File List Management
4. File List Management ▶ Recording Time by Memory Size Chart below is maximized recording time by storage capacity. [ Car Charger ] : HD+VGA 2CH / Memory Partition : 0% 16GB 32GB Memory Partition : 0% Percent Maximum Storage / Time Maximum Storage / Time Continuous(89%) 13.4GB / 98mins... -
Page 40: Firmware Update
5. Firmware Update 1) Select Micro SD Card Select Micro SD Card (EYECLON) in My Computer Right click and select “Format” 2) Micro SD Card Format In the Disc Format Window, select the : ▶ File System : FAT32 ▶ File Size : 32KB ▶... -
Page 41: Pc Viewer
PC Viewer... - Page 42 PC Viewer 1) Installation Download the Setup.exe file at eyeclon.com or use the pre-installed file in Micro SD Card and follow the steps like below. English(United States) English Select English (United States) if you are located in USA. Or select English if you are located in other countries other than USA.
- Page 43 PC Viewer 1) Installation Download the Setup.exe file at eyeclon.com or use the pre-installed file in Micro SD Card and follow the steps like below. ⑦ ⑧ PC Viewer...
- Page 44 PC Viewer 2) Main Screen / Control Keys Functions and images of the PC Viewer can change without notice due to version update. ① Configuration / Minimize / Exit ② Main Screen ③ Control Keys ④ Acceleration Sensor Information ⑤ Navigation Map (if GPS is not connected, logo will appear) ①...
- Page 45 PC Viewer 3) File List ① Add File - Click on add file button( ) and select the directory - Drag and drop to add the files ② Delete File - Click on either “trash” ( )or “delete” button to delete the files ③...
- Page 46 PC Viewer 4) File Zoom In / Out ① File Zoom In - Select the area of the file to zoom in - The enlarged area is shown on the right screen ② File Zoom Out or Cancel - Right click on screen to zoom out 5) Full Screen Mode ①...
- Page 47 PC Viewer 7) Map If the GPS is connected, map icon will appear on the bottom right corner. If not, Eyeclon logo will appear. 8) Screen Capture Click on the “screen capture” button in the playback screen. Can save or print file.
- Page 48 PC Viewer 10) System Settings Setting menu for device features. - Continuous : set functions for continuous mode - Parking : set functions for parking mode - LDWS : set functions for LDWS - Others : set functions for others - Viewer : set functions for PC Viewer ※...
- Page 49 PC Viewer 11) System Settings – Continuous Mode Continuous mode function settings. ① Resolution Quality : Resolution settings by Low / Mid / High ② Audio / Voice Record : Record : ON / Disable Record : OFF ③ G-Sensor Sensitivity : Settings for collision sensitivity by Low / Mid / High PC Viewer...
- Page 50 PC Viewer 12) System Settings – Parking Mode Parking mode function settings. ① Recording Resolution Settings : Resolution quality by Low / Mid / High ② G-Sensor Sensitivity Settings : Collision sensitivity by Low / Mid / High ③ Collision Sensitivity Settings : Collision feedback sensitivity by OFF / Low / Mid / High ④...
- Page 51 PC Viewer 13) System Settings – LDWS LDWS mode function settings. ① LDWS : Enable or disable LDWS feature by selecting OFF / ON Driving Speed Settings ② : Basic default driving speed settings for LDWS is 40 / 45 / 50 mph ③...
- Page 52 PC Viewer 14) System Settings – Others Other mode function settings. ① Indicate Vehicle Speed Settings : Indicate the speed of the vehicle on the screen display by selecting OFF / ON ② Speaker Volume Settings : Set the volume level by 1 / 2 / 3 / Mute ③...
- Page 53 PC Viewer 15) System Settings – Viewer Viewer mode function settings. ① Speed Measurement Settings : Set the vehicle’s speed measurement by km/h / MPH PC Viewer...
-
Page 54: Others
Others... -
Page 55: Product Specifications
1. Product Specifications Item Description Item Description L3 POP Size / Weight 98 x 63 x 30mm / 95.5g Model 3.9 x 2.5 x 1.2in / 3.37oz External GPS port Capacity Micro SD Card 3.5” TFT LCD 16GB / 32GB / 64GB (FAT32 format) -
Page 56: Troubleshooting
2. Troubleshooting Condition Description No Power Check if power cable is properly connected. Check if power is ON. Unplug the power cable and reconnect after 3 mins. LCD Display doesn’t turn ON LCD display doesn’t turn on in parking mode. LCD is ON during continuous mode. - Page 57 3. Limited Warranty on Parts & Labor Eyeclon provides a warranty to the original purchaser of a new Product against defects in workmanship and materials for a period of one (1) year. If a product covered by this warranty is determined to be defective within the warranty period, Eyeclon will either replace or repair the product at its sole option and discretion.
- Page 58 L3 POP USER’S MANUAL EYECLON HD Driving Image Recorder www.eyeclon.com...
Need help?
Do you have a question about the L3 POP and is the answer not in the manual?
Questions and answers