
Subscribe to Our Youtube Channel
Related Manuals for Radiant EASYREMOTE

Summary of Contents for Radiant EASYREMOTE
- Page 1 Instruction manual remote control device EASYREMOTE EASYREMOTE - RAD - ING - MAN.INST - 1010B - 40-00017 Technical specification RADIANT BRUCIATORI S.p.A. Montelabbate (PU) ITALY ENGLISH...
- Page 3 GENERAL INFORMATION Technical features Supply by communication bus Number of temperature levels 2 (DAY / NIGHT) Temperature setting range DAY 5 ÷ 30 °C Temperature setting range NIGHT 5 ÷ 30 °C Temperature setting range MANUAL 5 ÷ 30 °C Differential operation temperature OFF 0.0 ÷...
- Page 4 GENERAL INFORMATION Dear customer, Our compliments for buying the remote control device EASYREMOTE, a product of latest technologies which will give you superior comfort. In order to get top performance and to learn how to best use features and functions of this remote control device, carefully read this manual and keep it always readily accessible in case you need to refer to it.
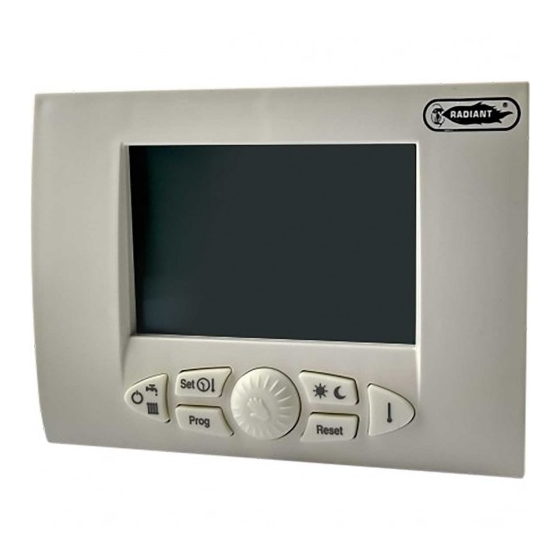
- Page 5 GENERAL INFORMATION Select operation status Set time and temperature Weekly program Change displayed value (turn) Select automatic / manual (press) Alarm reset Select temperature level (day/night) Temperature display...
- Page 6 GENERAL INFORMATION LCD symbols ICON STEADY BLINKING Current temperature Fault code Time/temperature Current day of the week Change day of the week Domestic hot water Domestic hot water enabled requested Heating enabled Heating requested Manual mode Burner on Heating program Change heating program Storage tank program Change storage tank...
-
Page 7: Table Of Contents
CONTENTS 1. How to use this instruction booklet ………...…………….………………..…1 2. General instructions.………………………………………………………...…..2 3. Main features…………………………………………………………..………...3 4. Installation….……………………………………………………………..……...4 5. Configurating operating parameters………..………………………………….8 6. Disabling thermo-regulation…………………………………………………..12 7. Boiler configuration (TSP)…… ………………………………………….…...13 8. Selecting operating mode……………….…………………………………….14 9. Setting up clock and temperature…..………………………………………..17 9.1. Setting up clock…………………………………………………………18 9.2. -
Page 8: How To Use This Instruction Booklet
User section, this gives detailed instructions regarding the steps to • carry out in order to personalize the functioning of the EASYREMOTE remote control device. Some hints When a numeric value is blinking you can change it by turning button •... -
Page 9: General Instructions
INSTALLER INSTRUCTIONS 2. General instructions Carefully read this manual because it will give you important • instructions regarding the safety of use, installation and maintenance. The system must be implemented in compliance with the safety • regulations in force. After unpacking and before installing check that the product is intact. •... -
Page 10: Main Features
INSTALLER INSTRUCTIONS 3. Main features The EASYREMOTE remote control device has been designed to guarantee ideal temperature conditions at any moment of the day offering the possibility to set the boiler from remote. The programming of the EASYREMOTE remote control device is extremely easy a large LCD-display makes it possible to check and change the set values at any time. -
Page 11: Installation
In case this is impossible, any interference due to electric wires may cause poor working of the remote control device. Install the EASYREMOTE remote control device at approx. 1.5 m over floor in a place suitable for correct sensing of the room temperature. - Page 12 3. Insert both ends of the connecting wire into their proper seat on the fixing template. Use the proper holes to install the EASYREMOTE remote control device directly onto the wall or onto a housing. The necessary screws are supplied together with the device.
- Page 13 INSTALLER INSTRUCTIONS 4. Connect electricity to the terminal box. N.B.: The connection is not polarized. 5. Fix your remote control device to its template. First insert the upper part and then press and turn until its completely closed. 6. Check in the boiler if there is a request to eliminate the jumper on the room thermostat terminals (if installed).
- Page 14 INSTALLER INSTRUCTIONS 7. Supply power to the boiler. Now the installation is completed. If it was done correctly the remote control device is now powered and the LCD display will show the following message for a few seconds: As soon as the connection is established the normal operating condition will be displayed:...
-
Page 15: Configurating Operating Parameters
INSTALLER INSTRUCTIONS 5. Configurating operating parameters This operation must be done by technical service personnel only. Errors in the configuation of your EASYREMOTE remote control device may lead to malfunctioning. This operation configures the remote control device to be compatible with the boiler and the system to which it is connected. - Page 16 INSTALLER INSTRUCTIONS 4.Turn button to select the parameter number to be displayed. The temperature display will show the corresponding parameter value. 5. Press button : to change this value. The corresponding parameter value will start blinking. 6. Turn button to change the displayed value. 7.
- Page 17 INSTALLER INSTRUCTIONS Hereafter you can find the definition of parameters you can change: P00 - Room temperature sensor compensation • It is the value (-5.0°C ÷ +5.0°C) to be added to/detracted from the displayed room temperature in order to compensate any possible error. P01 - Room anti-frost Start temperature Range •...
- Page 18 INSTALLER INSTRUCTIONS Tset point - P03 = 20.0 - 0.5 = 19.5 °C The central heating demand starts whenever the room temperature is lower then 19.5°C. P04 - Thermo-regulation type • 0 = ON/OFF 1 = Modulating on Room Temperature sensor 2 = Modulating on External Temperature Sensor (Outside Temperature Compensation) 3 = Modulating on Room and External Temperature sensors...
-
Page 19: Disabling Thermo-Regulation
INSTALLER INSTRUCTIONS 6. Disabling thermo-regulation In case the remote controller is installed inside a generic environment and you do not need to control its temperature (i.e.garage, boiler room…), you can disable the Central Heating demand request trough proper configuration of parameter P04 = 4 (see chapter 5 – Configurating operating parameters). -
Page 20: Boiler Configuration (Tsp)
INSTALLER INSTRUCTIONS 7. Boiler configuration (TSP) This operation must be carried out by Technical Assistance personnel exclusively. The remote control device does not know the meaning of what appears on the display but only acts as a “graphic interface” for the boiler electronic board. -
Page 21: Selecting Operating Mode
USER INSTRUCTIONS 8. Selecting operating mode Subject to the type of boiler connected, some of the following modes may not be available. Select the operating mode of the boiler by pressing key several times. The operating modes you can set are: SELECTED STATUS ID ICONS SUMMER... - Page 22 USER INSTRUCTIONS 2. SUMMER: the boiler is enabled to only produce domestic hot water. 3. WINTER: the boiler is enabled to produce domestic hot water and to heat the room.
- Page 23 USER INSTRUCTIONS 4. ONLY HEATING: the only operation mode enabled is heating. No matter which function has been selected, the room anti-freeze function is always operative (cfr. respective section).
-
Page 24: Setting Up Clock And Temperature
USER INSTRUCTIONS 9. Setting up clock and temperature Subject to the type of boiler connected, some of the following modes may not be available. To set the clock and the temperature set points of this remote control device and of the boiler press key several times. -
Page 25: Setting Up Clock
USER INSTRUCTIONS 9.1. Setting up clock 1. Press key : the hour will blink. 2. Turn button to set the requie value. 3. Press button to confirm the input value. The hour will stop blinking and the minutes will start blinking. - Page 26 USER INSTRUCTIONS 4. Turn button to set the value you want. 5. Press button to confirm value. The minutes stop blinking and the day of the week will start blinking. 6. Turn button to set the value you want. 7. Press button to confirm value.
-
Page 27: Setting Up Room Day Temperature
USER INSTRUCTIONS 9.2. Setting up room DAY temperature 1. Press key until icon starts blinking. 2. Turn button to set the value you want. -
Page 28: Setting Up Room Night Temperature
USER INSTRUCTIONS 9.3. Setting up room NIGHT temperature 1. Press key and release when icon starts blinking. 2. Turn button to set the temperature you want. -
Page 29: Setting Up Heating Temperature
USER INSTRUCTIONS 9.4. Setting up HEATING temperature If the remote control device has been configured as modulating, this parameter determines the max. temperature value as computed by the modulation algorithm. 1. Press key until icon starts blinking. 2. Turn button to set the value you want. -
Page 30: Setting Up Domestic Hot Water Temperature
USER INSTRUCTIONS 9.5. Setting up DOMESTIC HOT WATER temperature 1. Press key until icon starts blinking. 2. Turn button to set the value you want. -
Page 31: Setting Up Outside Probe Kd Value
USER INSTRUCTIONS 9.6. Setting up outside probe KD value This setting option is available only if the outside probe is connected, the remote control device is set as modulating and the use of the outside probe for modulation (P04 = 2 or 3) is enabled. This parameter allows to select a curve to determine the outside temperature –... - Page 32 USER INSTRUCTIONS Flow temperature calculation diagram...
-
Page 33: Setting Up Clock And Temperatures
10. Setting up clock and temperatures If the operation mode selected is WINTER or HEATING ONLY, the EASYREMOTE device allows you to manipulate the room temperature either MANUALLY or AUTOMATICALLY. • In MANUAL mode the user selects the room temperature he wants, and this temperature will be maintained until a change is made. -
Page 34: Manual Operation
USER INSTRUCTIONS 10.1. MANUAL operation 1. Press key until icon appears. The central digits on the display will show the set temperature blinking. 2. Turn button to set the temperature you want. 3. After 30 secs the central display will go back to showing the current temperature. -
Page 35: Automatic Operation
USER INSTRUCTIONS 10.2. AUTOMATIC operation 1. Press button until the heating clock corona will be displayed. 2. Icon will light up to show which is the currently set temperature level. -
Page 36: Weekly Heating Program
USER INSTRUCTIONS 11. Weekly heating program When operation mode WINTER or HEATING ONLY is selected, the remote control device allows operation in AUTOMATIC mode in which a priorly set program manages the room temperature during the various times of the day. The room temperature can be set to two independent levels: DAY ( and NIGHT ( );... -
Page 37: Display Heating Program
USER INSTRUCTIONS 11.1. Display heating program . Icons PROG and 1. Press key will appear on the display and show the first day of the week. Icons and the jumper are ON or OFF matching the DAY / NIGHT level of the displayed time. 2. -
Page 38: Change Heating Program
USER INSTRUCTIONS 11.2. Change heating program 1. Press key . Icons PROG and will appear on the display and show the first day of the week. Icons and the jumper are ON OFF matching the DAY/NIGHT level of the displayed time. 2. -
Page 39: Weekly Storage Tank Program
This function is available only if the boiler connected to the remote control device has been designed to control it. The EASYREMOTE remote control device can run (same as for heating program) a weekly program to enable ( ) or disable ( ) the storage tank by time ranges. -
Page 40: Display Storage Tank Program
USER INSTRUCTIONS 12.1. Display storage tank program 1. Press key . Icons PROG and will appear on the display and show the first day of the week. 2. Press key . Icon will light up on the display and show the storage tank program. -
Page 41: Change Storage Tank Program
USER INSTRUCTIONS 12.2. Change storage tank program 1. Press key . Icons PROG and will appear on the display and show the first day of the week. 2. Press key . Icon will light up on the display and show the storage tank program. -
Page 42: Temporary Change Room Temperature Set Point
USER INSTRUCTIONS 13. Temporary change room temperature set point When operating in AUTOMATIC mode the room set point DAY ( NIGHT ( ) can be increased or reduced. The change will be valid until the next level change (DAY-NIGHT) takes place. Thereafter it will be void. 1. -
Page 43: Fault Signalling
USER INSTRUCTIONS 14. Fault signalling The remote control device will display any faults with code Exx blinking in place of the temperature display. To learn about the type of fault refer to the boiler instruction booklet. There can be two kinds of faults: those which can be restored by the user and those which cannot be restored. -
Page 44: Not Restorable Faults
USER INSTRUCTIONS 14.2. Not restorable faults You recognize these faults because icon will light up; these faults cannot be reset by the user but require technical service. Also code E66 falls under this error class (room temperature probe of remote control device in fault). -
Page 45: Display Values
15. Display values Subject to the type of boiler connected some of the below described functions may not be available. Pressing key repeatedly your EASYREMOTE control device is able to display the following quantity values: SELECTED QUANTITY ID ICON SET ROOM TEMPERATURE... -
Page 46: Display Set Room Temperature
USER INSTRUCTIONS 15.1. Display set room temperature This is the temperature set for the activated temperature level (DAY - NIGHT - MANUAL). 15.2. Display temperature domestic hot water probe This is the temperature read by the domestic hot water probe fitted in the boiler. -
Page 47: Display Temperature Delivery Probe
USER INSTRUCTIONS 15.3. Display temperature delivery probe This is the temperature read by the delivery probe fitted in the boiler. 15.4. Display temperature outside probe This is the temperature read by the outside probe connected to the boiler. -
Page 48: Reset Of Default Values
USER INSTRUCTIONS Reset of default values If necessary the original values of the remote control device as set by the manufacturer can be restored. The restored values are as follows: Temperature DAY: 20°C • Temperature NIGHT: 16°C • Temperature MANUAL: 20°C •... - Page 49 USER INSTRUCTIONS 1. Move the remote control device to OFF position. 2. Press keys and keep them pressed for longer than 5 secs. 3. The operation is confirmed when dEF appears on the display.
-
Page 50: Complete Resetting
USER INSTRUCTIONS 17. Complete resetting Faults or other technical reasons may require ‘complete resetting’ of the remote control device. For this operation the remote control device must be taken off its fixing template - do this by gently pressing with a screwdriver on the lower splines. -
Page 51: Room Anti-Freeze Function
USER INSTRUCTIONS 18. Funzione antigelo ambiente The EASYREMOTE controller is able to support the room-antifrost function. In all the operating modes the central heating demand is generated whenever the measured room temperature is lower then the activation threshold (parameter P01). This grants protection of the central heating installation from the freezing risk. - Page 52 RADIANT BRUCIATORI s.p.a. Via Pantanelli, 164/166 - 61025 Loc. Montelabbate (PU) Tel. +39 0721 9079.1 • fax. +39 0721 9079279 e-mail: tecnico@radiant • Internet: http://www.radiant.it THE TECHNICAL DATA AND MEASUREMENTS ARE PROVIDED FOR INFORMATION PURPOSES ONLY AND ARE NOT BINDING. THE COMPANY RESERVES THE RIGHT TO APPLY VARIATIONS WITHOUT PRIOR NOTIFICATION.
Need help?
Do you have a question about the EASYREMOTE and is the answer not in the manual?
Questions and answers