Table of Contents
Advertisement
Quick Links
Advertisement
Table of Contents

Related Manuals for Insulet OmniPod


Summary of Contents for Insulet OmniPod
- Page 2 Name Name Address Address Telephone and Fax Telephone and Fax Email Address Email Address OmniPod System Start Date: ______________________ PDM Model: CAT 35 E Serial Number: ____________________ Nurse/Educator Distributor: Name GlaxoSmithKline Inc. Address 7333 Mississauga Road, Mississauga, Ontario, Canada L5N 6L4...
- Page 3 Copyright © 2011 Insulet Corporation. All rights reserved. Copyright © 2011 GlaxoSmithKline Inc. All rights reserved. ® OmniPod is a registered trademark of Insulet Corporation, used under license by GlaxoSmithKline Inc. ® FreeStyle is a registered trademark of Abbott Laboratories.
-
Page 4: Table Of Contents
No tubing............2 The OmniPod Setup Wizard....... . 10 Automated cannula insertion. - Page 5 Contents Enter minimum BG allowed for use in bolus calculation ..13 What is the maximum basal rate? ......27 Enter insulin-to-carbohydrate ratio .
- Page 6 Contents 5 Using the Pod ........42 Reset the date.
- Page 7 Fill the blood glucose test strip with blood ....88 Your Role: Safely Using the OmniPod System... . . 104 Wait for the reading .
- Page 8 Contents Water and Your Pod ........106 11 Communication Failures.
- Page 9 Blood Glucose Meter Specifications..... . . 147 OmniPod System Label Symbols......148 Personal Diabetes Manager Icons.
-
Page 10: Introduction
Indication This User Guide is intended for use only with PDM The OmniPod Insulin Management System is intended for sub- model CAT35E. To learn which version of the PDM cutaneous (below the skin) delivery of insulin at set and variable you have, turn it over. -
Page 11: You And Your Healthcare Provider
You and Your Healthcare Provider The OmniPod System is designed to use rapid- The contents of the OmniPod® user manual are not intended to acting U-100 insulin. The following U-100 rapid- replace or substitute the advice of your physician or other quali- acting insulin analogs have been tested and found fied healthcare professionals. -
Page 12: Your Role: Safely Using The Omnipod System
Your healthcare provider is a valuable resource. You will rely on ing proper techniques him or her for a lot of critical information about your OmniPod System, especially during the first few weeks and months. When • Visiting your healthcare provider... -
Page 13: About This User Guide
An image on the PDM screen that indi- Offers a suggestion for successful use Icon cates a menu option or item of informa- of the OmniPod Insulin Management tion. A table of screen icons appears in the System. Appendices. Customer Care: 1 855 POD INFO (1 855 763 4636). Outside of Canada: 647-788-3132. -
Page 14: Your New Omnipod Insulin Management System
(CSII) therapy changes in daily routine. The OmniPod System is a great option in a way no conventional insulin pump can. The System’s innova- for people with diabetes who require insulin. -
Page 15: How Does The Omnipod System Work
Manager. The cannula is inserted only once with each Pod. Automated cannula insertion The Personal Diabetes Manager (PDM) is a wireless, handheld With the OmniPod System, you don’t have to insert the infusion device that: set manually or carry around a separate inserter. You simply press a button on the PDM and the Pod’... -
Page 16: Suggested Bolus Calculation
Your New OmniPod Insulin Management System Suggested bolus calculation Record keeping Another convenient part of the OmniPod System is record keep- Calculating bolus doses has never been easier. After you check ing. Paper charts are useful, but sometimes they can be your blood glucose, enter the carbs for your snack or meal. -
Page 17: The Pod
Your New OmniPod Insulin Management System The Pod The Personal Diabetes Manager The Pod (Figure 1-1) is applied to your skin with an adhesive All Pod operations are programmed and controlled through the backing, similar to an adhesive bandage. palm-sized Personal Diabetes Manager (PDM; Figure 1-2). -
Page 18: Buttons That Program And Control The Omnipod
Your New OmniPod Insulin Management System Buttons that program and control the OmniPod System Button Action Button Action Home/ User Info/ Pressing opens a User Info/Support screen that Pressing and holding turns the PDM on and off. Support Power displays additional information about the cur- When the PDM is on, pressing this button dis- rent screen you are viewing. -
Page 19: Primary Screens
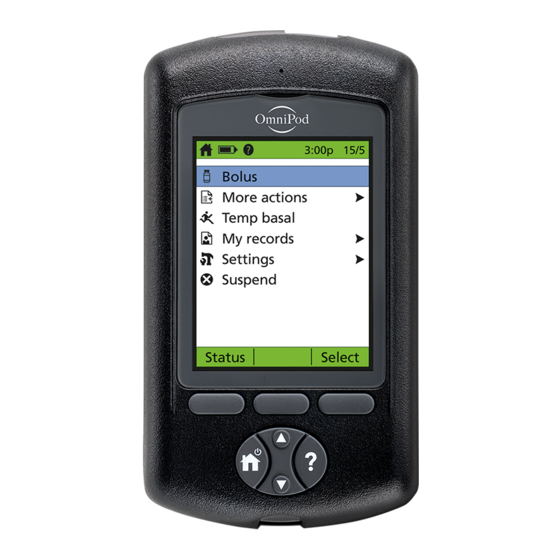
Your New OmniPod Insulin Management System Primary screens Status screen Messages on the screen either: Lists the System’ s current operating status. • Tell you how the System is operating From top to bottom, the Status screen displays: • List menu choices •... - Page 20 Your New OmniPod Insulin Management System Status support screen Home screen From the Status screen, press the User Info/Support button to Lists all the major menus (Figure 1-4 on previous page). see details about the current • Bolus menu to deliver bolus doses Insulin on board (IOB) in your body (Figure 1-5).
-
Page 21: Safety Features
Alerts and alarms primes and performs a safety check on the Pod, then inserts For your safety, the OmniPod System provides a range of alerts and primes the cannula (see Chapter 5, Using the Pod). Micro- and alarms to tell you that your attention is needed, or to warn processor technology makes it possible to complete thousands you of hazardous situations. -
Page 22: Getting Started
Chapter 6 describes the PDM options in detail. The instructions in this chapter are simplified to help you get started. If you are a first-time OmniPod System user, you need to meet with your healthcare provider for training and System setup Turn on the PDM before using it. -
Page 23: The Omnipod Setup Wizard
• Press Back to return to the previous screen. Hard Reset You can adjust these settings later as your needs change or you fine-tune your OmniPod System. See Do not use any other type of batteries than AAA “OmniPod System Options and Settings” in the alkaline batteries to power the PDM. -
Page 24: Set Date And Time
Getting Started The Wizard’ s Welcome screen (Figure 2-3) gets you started. Press Enter basal settings Next to begin setting up your PDM. 1. Choose a maximum basal rate, then press Next. (The default maximum basal rate is 3 U/hr.) Figure 2-3 2. -
Page 25: Enter Blood Glucose Sound Setting And Bg Goal
Getting Started Enter blood glucose sound setting and BG goal Enter target blood glucose value 1. To set the sound for the blood glucose meter, choose On or 1. Use the Up/Down Controller buttons to enter a target blood Off, then press Next. glucose (BG) value, then press Next. -
Page 26: Enter Minimum Bg Allowed For Use In Bolus Calculation
Getting Started e. Use the Up/Down Controller buttons to enter the “cor- 2. To save the ratio, press Done. To change the ratio, select the rect above” value or correction threshold (the BG value segment you wish to change and press Edit. above which you want the PDM to suggest a correction You can define up to 4 insulin-to-carbohydrate time seg- bolus), then press Next. -
Page 27: Set Reverse Correction
Getting Started You can define correction factors for up to 4 time segments. Enter the duration of insulin action To enter additional correction factors, choose [add new], 1. Use the Up/Down Controller buttons to enter the duration then: of insulin action (how long insulin lasts in your body), then press Next. -
Page 28: Set Low Reservoir Advisory
Getting Started Set low reservoir advisory • Press Yes if you are ready to activate a new Pod. See Chap- ter 5, Using the Pod, to learn how to activate a new Pod. 1. Choose the level of insulin in the reservoir at which the PDM should give you an alarm. -
Page 29: Understanding And Adjusting Basal Rates
For people insulin. A sample basal program with three basal segments using the OmniPod Insulin Management System, the Pod mim- might be: ics a healthy pancreas by delivering insulin at the rate that you’ve programmed into the Personal Diabetes Manager (PDM). -
Page 30: Create A Basal Program
Understanding and Adjusting Basal Rates In addition to normal daily changes, insulin needs can vary with 1. On the Home screen, use the Up/Down Controller buttons different routines or days of the week. For example, regular to choose Settings; then press Select. school or workday routines may differ from weekend routines, 2. - Page 31 Understanding and Adjusting Basal Rates b. Press the middle soft key (labeled with the right arrow) to As a safety feature, the words “Invalid basal program move the underscore to the next character. name” (Figure 3-4) appear if the name you entered does not have at least one character or if the name is c.
-
Page 32: Enable An Existing Basal Program
Understanding and Adjusting Basal Rates Basal rates outside the changed segment do not Figure 3-5 Figure 3-6 change. e. Repeat steps a–d for each new segment and rate you want, then press Done. Press and hold the Power button to turn the screen back on. -
Page 33: Change, Rename, Copy, Or Delete A Basal Program
Understanding and Adjusting Basal Rates 3. Choose the program you want from the list (Figure 3-7), then A diamond icon ( ) appears next to the program that press Enable. is active. You cannot select the active program to enable it, because it is already running. Figure 3-7 4. - Page 34 Understanding and Adjusting Basal Rates 3. Enter a start time for the segment you want to change, then Figure 3-8 Figure 3-9 press Next. 4. Enter an end time for this segment, then press Next. 5. Enter a basal rate for the new segment, then press Enter. 6.
-
Page 35: Temporary Basal Rates And Presets
Understanding and Adjusting Basal Rates To rename a basal program To delete a basal program 1. After choosing a program from the list, choose Rename, then 1. After choosing a program from the list, choose Delete and press Select. then press Select. 2. -
Page 36: Enable A One-Time Temporary Basal Rate
12 hours. Once the time limit is reached, the PDM automatically returns to the active basal program. When using units per hour, the OmniPod System allows you to set temporary basal rates from 0.0 U/hr, up to your max basal rate. -
Page 37: Cancel A One-Time Temporary Basal Rate
3. Choose Temp basal presets, then press Select. Figure 3-13 4. Choose [add new], then press New. 5. To use the OmniPod System’ s default naming system, simply press Next. The default naming system automatically assigns program names in numerical order, such as temp basal 1, temp basal 2, temp basal 3. -
Page 38: Enable An Existing Temporary Basal Preset
Understanding and Adjusting Basal Rates Enable an existing temporary basal preset Figure 3-14 1. On the Home screen, use the Up/Down Controller buttons to choose Temp basal; then press Select. 2. Choose the temporary basal preset you want to use from the list (Figure 3-15), then press Select. -
Page 39: Cancel An Active Temporary Basal Preset
Understanding and Adjusting Basal Rates Cancel an active temporary basal preset To change a temporary basal preset 1. On the Home screen, use the Up/Down Controller buttons 1. Choose Edit, then press Select (Figure 3-16). to choose Suspend/cancel; then press Select. Figure 3-16 2. -
Page 40: Maximum Basal Rate
Understanding and Adjusting Basal Rates To rename a temporary basal preset Change the maximum basal rate 1. Choose Rename, then press Select. 1. On the Home screen, use the Up/Down Controller buttons to choose Settings; then press Select. 2. Press the Up/Down Controller buttons to enter the charac- ters that spell out the name you want;... -
Page 41: Understanding And Delivering Bolus Doses
• The type and amount of food you eat • Lower blood glucose when it gets too high—also known as a With the OmniPod System, it is easy to adapt to any situation. correction bolus With just a few button presses, you can adjust to unexpected or This extra dose is in addition to the basal rate delivered through- changing insulin needs. -
Page 42: Bolus Dose Options
Suggested Bolus Calculator So that you can fully enjoy freedom and flexibility in your life, the The suggested bolus calculator lets the OmniPod System recom- OmniPod System offers the following bolus dose options: mend your bolus based on your personal settings. To review or adjust these settings—including turning the suggested bolus... -
Page 43: Deliver A Normal Bolus
The amount of time insulin remains “on board” or “active” depends on what you set for your duration of insulin action. The OmniPod System can only subtract insulin on board (IOB) from a suggested bolus when the current BG is known. - Page 44 Understanding and Delivering Bolus Doses A blood glucose value is current for up to 10 minutes 2. If you are not going to eat now, press No (Figure 4-2). The after it is tested. So you can wait up to 10 minutes, Suggested Bolus screen appears (Figure 4-3).
- Page 45 Understanding and Delivering Bolus Doses To view detailed information about the calcula- Figure 4-4 tions used for this suggested bolus, press the User Info/Support button and scroll through the infor- mation screens. Press Close to return to the Suggested Bolus screen. 3.
-
Page 46: Deliver A Bolus Manually (Suggested Bolus Calc Is Off)
4. If you have set the blood glucose reminder option to On and Deliver an Extended Bolus you want to add a reminder: The extended bolus feature lets the OmniPod System deliver a. Press Yes. some (or no) insulin now and the remainder over a period of b. - Page 47 Understanding and Delivering Bolus Doses If you have set the Extended bolus option to Off, 3. Enter the time (up to 8 hours, in 30-minute increments) over the PDM will not display the Extend soft key. For which to deliver the remainder of the bolus, then press Enter information on turning this feature on and off, see (Figure 4-7).
-
Page 48: Cancel Active Boluses
Cancel Active Boluses delivered first and cannot be extended. Only the The OmniPod System is extremely flexible, so you can use it to meal bolus can be extended. For example: respond to your changing insulin needs. It is easy to cancel an... -
Page 49: Replace An Extended Bolus
Understanding and Delivering Bolus Doses If the bolus has already been completely delivered, If your suggested bolus contains both a correction the “Delivering bolus” message and Cancel do not bolus and a meal bolus, the correction bolus is always appear, but the Status screen does appear. delivered first. -
Page 50: Bolus Presets
4. Choose [add new], then press New. return to the Suggested Meal Bolus screen. 5. To use the OmniPod System’ s default naming system, simply press Next. The default naming system automatically assigns You can add what remained of the old extended program names in numerical order, such as bolus 1, bolus 2, bolus to the new one. -
Page 51: Enable An Existing Bolus Preset
Understanding and Delivering Bolus Doses Or, to give a different name to the program: 6. Enter the new bolus preset amount, up to the maximum bolus you entered during setup; then press Next. a. Press the Up/Down Controller buttons to enter the char- acters that spell the name you want. -
Page 52: Cancel An Active Bolus Preset
5. Choose [add new], then press New. not already on. An on-screen message appears as long as a 6. To use the OmniPod System’ s default naming system, simply bolus is being delivered. press Next. The default naming system automatically assigns 2. -
Page 53: Change Or Edit A Carb Preset
Understanding and Delivering Bolus Doses b. Press the middle soft key (the right arrow) to move the 7. Enter the grams of carbohydrate in the meal, then press Next. underscore to the next character. 8. If you want, enter the grams of fiber, fat, and protein in the c. -
Page 54: Delete A Carb Preset
Understanding and Delivering Bolus Doses To change the category for a carb preset 3. To rename the carb preset, press the Up/Down Controller buttons to enter the characters that spell out the name you 1. Choose the carb preset you want to move to another cate- want, then press Next. -
Page 55: Using The Pod
CHAPTER 5 Using the Pod The Pod Change Process • Clean the infusion site with soap and water. • Keep sterile materials away from any possible germs. Refer to the insulin labeling and follow your healthcare provider’ s • Do NOT use a Pod if you are sensitive to or have allergies to directions for how often to replace the Pod. -
Page 56: Gather Equipment And Supplies
(DKA). • An unopened Pod • Alcohol prep swab If you are a first-time OmniPod System user, your healthcare provider will guide you through the steps for initializing and applying your first Pod. Do NOT attempt to apply or use a Pod until you have been trained by your healthcare provider. - Page 57 Using the Pod 4. If an extended bolus or temporary basal or both are actively Figure 5-5 Figure 5-6 running, you will see the message in Figure 5-3. Press Con- firm to accept the cancellation. Or press Back to return to the More actions menu. Figure 5-3 Figure 5-4 b.
-
Page 58: Fill A New Pod
Using the Pod Fill a new Pod 3. Pull outward to remove the protective cap from the needle (Figure 5-8). Save the cap; you will need it later. Before filling a Pod with insulin, ensure that the Pod is above 10° Celsius (50° Fahrenheit). If the Pod has Use care after removing the needle cap and been exposed to temperatures below 10°... - Page 59 Using the Pod 7. Turn the vial and syringe upside down. Withdraw insulin from To ensure proper fill, do not insert fill syringe at an the vial into the syringe, expelling any air bubbles. Fill at least angle into the fill port. to the MIN (minimum) fill line (Figure 5-9).
- Page 60 The fill syringe is intended for single use only and should be used only with the OmniPod System. 13. After you fill the Pod, it will beep twice. After you hear the beeps, press Next (Figure 5-11).
-
Page 61: Select The Infusion Site
Using the Pod Select the infusion site Figure 5-13: Infusion Sites Before applying a new Pod, you must first select an appropriate infusion site. Due to ease of access and viewing, the abdomen is often used. Your healthcare provider may suggest other poten- tial sites that, like the abdomen, typically have a layer of fatty tissue, such as the hip, back of upper arm, upper thigh, or lower back (Figure 5-13, and Figure 5-14 on the following page). -
Page 62: Prepare The Infusion Site
Using the Pod Prepare the infusion site Apply the new Pod You can reduce the risk of infection at the infusion site by follow- Prepare the Pod for applying to your infusion site: ing aseptic technique and disinfecting the infusion site. Before 1. - Page 63 Using the Pod 2. Using the pull tabs, remove and discard the white paper The Pod’ s adhesive keeps it securely in place for up to backing from the adhesive tape (Figure 5-15). 3 days. However, if necessary, several products are available to enhance adhesion.
-
Page 64: Insert Cannula And Begin Insulin Delivery
Using the Pod 4. After you securely apply the Pod, press Next (Figure 5-17). Insert cannula and begin insulin delivery 1. To insert the soft cannula, press Start (Figure 5-18). Figure 5-17 Figure 5-18 Figure 5-19 The adhesive is designed for one-time use. Once removed, a Pod cannot be reapplied. - Page 65 Using the Pod The Pod automatically inserts the soft cannula below your Check the infusion site after insertion to ensure skin. It takes a few seconds to complete the insertion process. that the cannula was properly inserted. It is also a Once the cannula is inserted, the Pod delivers a prime bolus to good idea to check your blood glucose about fill the cannula with insulin (Figure 5-20).
-
Page 66: Check Pod Status
Using the Pod 2. Press Yes if you can see that the cannula is properly inserted. Check Pod Status The PDM returns to the Status screen. To check Pod status, if the PDM is turned off, press and hold the Or press No if you see a problem with the cannula. -
Page 67: Suspend Insulin Delivery
Sometimes you may need to briefly stop insulin delivery (for then press Enter. example, when editing an active basal program or changing the time or date). The OmniPod System lets you suspend all insulin Figure 5-23 Figure 5-24 delivery for up to 2 hours. While in suspension, the Pod beeps once every 15 minutes, reminding you that insulin delivery is suspended. -
Page 68: Resume Insulin Delivery
Using the Pod At the end of the suspend time, a Pod Advisory alarm occurs Resume Insulin Delivery (Figure 5-25). 1. On the Home screen, use the Up/Down Controller buttons to choose Resume (Figure 5-26); then press Select. Figure 5-25 Figure 5-26 2. -
Page 69: Get The Most From Your Pod
Using the Pod Get the Most From Your Pod Water and your Pod The Pod is waterproof to a depth of 7.6 m (25’) for up to 60 min- utes (IPX8). After exposure to water, rinse off the Pod with clean Avoid extreme temperatures water and gently dry it with a towel. -
Page 70: Using The Personal Diabetes Manager
CHAPTER 6 Using the Personal Diabetes Manager The Status Screen Figure 6-1 When a Pod is active and the PDM is turned on, the PDM estab- lishes communication with the Pod to obtain a status check. During the status check, the PDM collects information from the Pod about bolus deliveries, active basal programs, and Pod expi- ration. -
Page 71: Insulin Gauge And Display
Using the Personal Diabetes Manager If a Pod has not yet been activated (as during Pod changes), PDM settings the screen displays “No active Pod. Would you like to acti- You can adjust the PDM settings to meet your individual needs. vate a Pod now?”... -
Page 72: The System Setup Menu
The System setup menu lets you personalize the settings that Occasionally, you need to change date and time settings (for control the OmniPod System. These include: example, to adjust for daylight savings time or after resetting the PDM). As a safety feature, you can change date and time settings •... -
Page 73: Reset The Date
You and your healthcare provider entered initial bolus and basal System settings using the Setup Wizard. Using the System setup menu, you can edit all the OmniPod System bolus and basal set- tings as your needs change. Check with your healthcare provider before making any changes. -
Page 74: Bolus Calcs
Using the Personal Diabetes Manager 4. Choose one of the options (Figure 6-5a and Figure 6-5b), then Bolus calcs press Select. Each option is described below. When the suggested bolus calculator is turned Off and you want to turn it On, press On and follow these steps: 1. - Page 75 Using the Personal Diabetes Manager 3. Insulin to carb (IC) ratio—You can edit existing time seg- c. When you have completed all time segments, press ments and add segments, up to a total of four. Done, then Save. a. To edit an existing IC ratio time segment, choose the seg- 4.
-
Page 76: Ratios/Factors/Targets
Using the Personal Diabetes Manager Ratios/factors/targets 1. Target BG and correct-above value—You can edit existing segments and add segments, up to a total of four. When the suggested bolus calculator is turned On, you can view and change all the settings using the Ratios/factors/targets a. -
Page 77: Temp Basal
Using the Personal Diabetes Manager c. When you have completed all time segments, press Extended Done, then Save. Choose %, Units, or Off to set the mode for extended boluses, then press Select. 4. Correction factor—You can edit existing time segments and add segments, up to a total of four. -
Page 78: Alert And Reminder Notifications
In addition to automatic safety alarms (see Chapter 10, Alerts and ing and holding the PDM’ s Power button. This alert can be Alarms), the OmniPod System offers a number of notifications especially reassuring if you are prone to hypoglycemia unaware- that you can set to help you manage your diabetes. -
Page 79: Set Alert And Reminder Notifications
4. Choose the notification you want to set (Figure 6-8), then instructions, so you become familiar with the operation of the press Select. OmniPod System and feel confident that you are getting the insulin you need. These notifications include: Figure 6-8 •... - Page 80 New. • If you chose On, you are taken to a new screen where you • To use the OmniPod System’ s default naming system, sim- can add, edit or delete reminders: ply press Next. The default naming system automatically...
-
Page 81: Change Blood Glucose Meter Settings
Using the Personal Diabetes Manager Change Blood Glucose Meter Settings Figure 6-9 Figure 6-10 You can adjust blood glucose (BG) meter settings: • BG goal lower and upper limits (for BG history) • Manage BG tags list • BG sound—On or Off 1. -
Page 82: Manage The Blood Glucose Tags List
Using the Personal Diabetes Manager Manage the blood glucose tags list 1. To hide or show a standard BG tag, choose the tag, and press Show (if it is marked as hidden) or Hide. You can create up to 15 custom blood glucose tags and hide any of the standard tags you do not plan to use. -
Page 83: Customize The Personal Diabetes Manager
Using the Personal Diabetes Manager Customize the Personal Diabetes Manager Backlight time-out: The backlight is on by default while you are using the PDM. The time-out setting dims the backlight and Additional options let you customize how the PDM operates: causes the screen to dim when you have not used it within the time interval that you set. -
Page 84: Set Diagnostic Functions
Using the Personal Diabetes Manager When the screen times out and goes black, turn it on again by Figure 6-12 Figure 6-13 pressing the Home/Power button. Set the Backlight time-out Choose a time interval, then press Select. When the screen dims, turn it on again by pressing any button. The PDM will ignore the usual command and relight the screen. -
Page 85: Diagnostic Options
Using the Personal Diabetes Manager Reset PDM (soft reset): Restores all settings in the PDM to the To reset the PDM factory defaults. 1. Choose Reset PDM, then press Select. 2. If the Pod is deactivated, the PDM asks for confirmation and Resetting the PDM deletes all basal programs, temp reminds you that you will lose all user settings (Figure 6-14). -
Page 86: Set A Notification To Vibrate
Using the Personal Diabetes Manager Use the form at the end of this User Guide to write 3. Choose Vibrate, Vibrate then beep, or Off (beep only), then down all your settings from the Setup Wizard. If you press Select. (Vibrate then beep means the PDM will repeat ever need to reset your PDM, having these settings the reminder twice using vibration. -
Page 87: Water And Your Pdm
Using the Personal Diabetes Manager Water and your PDM Electrical interference The PDM is not waterproof. Do NOT place it in or near water. The PDM is designed to withstand normal radio interference and electromagnetic fields. However, as with all wireless communica- Do NOT use IV Prep wipes, alcohol swabs, soap, tion technology, certain operating conditions can interrupt detergent, or solvents to clean the screen or any... -
Page 88: Checking Your Blood Glucose
CHAPTER 7 Checking Your Blood Glucose The Built-in FreeStyle® Blood Glucose Meter We recommend that you test on your fingers if you are checking for hypoglycemia (low blood glucose) or With the FreeStyle® blood glu- Figure 7-1 if you suffer from hypoglycemia unawareness. Blood cose meter, you can check your from the fingertips may show changes in blood glu- blood glucose on your finger,... -
Page 89: The Freestyle® Blood Glucose Test Strips
Checking Your Blood Glucose • Store test strips in their original vial only; never transfer them Only use FreeStyle® test strips and FreeStyle® control to another vial or any other container. solution with the system. Using other brands of test •... -
Page 90: The Freestyle® Control Solution
Checking Your Blood Glucose The FreeStyle® Control Solution Check that the meter and test strips are working A control solution test follows the same procedure as a blood The FreeStyle® control solution (Figure 7-2) is a glucose reading, except that you use a sample of control solution Figure 7-2 liquid that contains a fixed amount of glucose instead of a drop of blood. -
Page 91: Out-Of-Range Control Solution Results
Checking Your Blood Glucose Out-of-range control solution results Use only FreeStyle® control solution with the sys- Out-of-range test results may be caused by: tem. Other brands of control solution may pro- duce inaccurate results with this system. • Expired or bad control solution •... -
Page 92: Performing A Control Solution Test
Checking Your Blood Glucose Performing a Control Solution Test If you need to adjust the code number after the PDM has moved to the next screen, just press the Up/Down 1. Grasp the bottom of the test strip with the printed side facing Controller buttons. - Page 93 Checking Your Blood Glucose The code number on the screen should match Figure 7-6 Figure 7-7 the code number on the side of your test strip vial (Figure 7-5 on previous page). They must always match, or your results will be inaccurate. (See “Set the blood glucose test strip code”...
- Page 94 Checking Your Blood Glucose The “Checking” screen appears while the sample is process- 6. To mark the result as a control solution result rather than a ing (Figure 7-8). The strip-port light turns off when the sam- blood glucose test: ple is accepted.
-
Page 95: Performing A Blood Glucose Reading
Checking Your Blood Glucose 9. Remove the test strip. If the strip-port light was turned on, it Figure 7-10 now turns off. If you remove the test strip before this step, you will still see the available soft keys. Cocking handle Be sure to discard used test strips. -
Page 96: Prepare The Lancing Device
Checking Your Blood Glucose Prepare the lancing device 4. Replace the cap until it snaps or clicks into place (Figure 7-14). Be careful not to touch the exposed needle on the lancet. 1. Snap off the cap on the lancing device at an angle (Figure 7-11). -
Page 97: Insert The Blood Glucose Test Strip
Checking Your Blood Glucose 5. The lancing device offers four different depth settings. Level 1 6. Pull out the dark gray cocking handle until it clicks (Figure 7- is the shallowest depth; level 4 is the deepest. Move the dial 16). -
Page 98: Set The Blood Glucose Test Strip Code
Checking Your Blood Glucose and Figure 7-18). Set the blood glucose test strip code After you insert the strip, the PDM displays a code number Figure 7-17 Figure 7-18 (Figure 7-19). This number must match the code on the side of the vial. -
Page 99: Lance Your Finger
Checking Your Blood Glucose If you need to adjust the code number after the PDM 4. Press the release button. has moved to the next screen, just press the Up/Down 5. Gently squeeze your finger, if needed, until a blood drop the Controller buttons. -
Page 100: Lance Your Forearm, Upper Arm, Hand, Thigh, Or Calf
Checking Your Blood Glucose Lance your forearm, upper arm, hand, thigh, or calf 4. Press the release button. Do not lift up; continue to hold the button and gradually increase pressure against the site for 1. To bring fresh blood to the surface of the test site, rub the site several seconds (Figure 7-25). -
Page 101: Fill The Blood Glucose Test Strip With Blood
Checking Your Blood Glucose 2. Bring the strip to the blood sample at a slight angle Avoid lancing areas with obvious veins or moles, (Figure 7-27). to avoid excess bleeding. Also avoid lancing areas where tendons or bones stick out (for If you do not apply the sample within 10 seconds, the strip- example, hand bones). -
Page 102: Wait For The Reading
Checking Your Blood Glucose Do not: Figure 7-30 Figure 7-31 • Press the strip against the test site • Scrape the blood onto the strip • Apply blood to the flat side of the strip • Apply blood to the strip when it is out of the meter •... -
Page 103: Remove The Lancet
Checking Your Blood Glucose 4. To mark the result as a pre- or post-meal test, to indicate a b. Press OK to return to the reading screen (Figure 7-31 on level of exercise, or to indicate other situations connected to the previous page), then press Next. -
Page 104: Blood Glucose Results And The Suggested Bolus Calculator
Checking Your Blood Glucose Blood Glucose Results and the Suggested Bolus Figure 7-34 Calculator If the suggested bolus calculator feature is turned On when you check your blood glucose, the PDM will display the result. From here, press Next to enter carbs (if eating) and have the System calculate a suggested bolus. -
Page 105: Entering Blood Glucose Readings Manually
Checking Your Blood Glucose Entering Blood Glucose Readings Manually Editing Tags You can enter blood glucose readings manually into the PDM. Within 2 hours of a blood glucose reading, you can remove or This is particularly helpful if you use a separate blood glucose change a tag or add one. -
Page 106: Low And High Blood Glucose Readings
Checking Your Blood Glucose 4. Use the Up/Down Controller buttons to choose the first tag 6. Press OK to return to the list of readings. you want, then press Select (Figure 7-36). A diamond icon If no BG readings have been entered into the PDM within the appears next to selected tags, as in “Pre-meal”... -
Page 107: High Readings
Checking Your Blood Glucose Low reading with symptoms High reading without symptoms If you get a “LOW Treat your low BG!” reading and feel symptoms If you get a “HIGH Check for ketones!” reading, but have no such as weakness, sweating, nervousness, headache, or confu- symptoms of high blood glucose, then retest with a new test sion, follow your healthcare provider’... -
Page 108: Important Health-Related Information
Checking Your Blood Glucose Important Health-Related Information • Blood circulation is different between the finger and other test sites like the forearm, upper arm, hand, thigh, and calf. You may see differences in blood glucose measurements WARNINGS! between the other test sites and your finger after eating, insu- lin medication, or exercise. -
Page 109: Understanding Your Records
CHAPTER 8 Understanding Your Records Record Keeping Special symbols in record screens In the record screens, you may encounter several special symbols: Record keeping is an important part of successful diabetes man- agement. The Personal Diabetes Manager (PDM) helps simplify Records with a question-mark symbol next to them have this task. -
Page 110: Insulin Delivery Records
Understanding Your Records The record for this item is “unconfirmed. ” Figure 8-1 Figure 8-2 When you power on the PDM, it will request a status update from the active Pod and then update the insulin history. If the PDM does not receive a status update from the Pod, the PDM will update history with “unconfirmed”... - Page 111 Understanding Your Records Press Event to use the Up/Down Controller buttons to scroll Figure 8-3 Figure 8-4 through the list of information on the screen. Choose a record, then press the User Info/Support button to view details about that record. Record details may include insulin delivery that was interrupted due to a Pod alarm, Pod deacti- vation, or user cancellation.
-
Page 112: Blood Glucose Records
Understanding Your Records Blood Glucose Records Figure 8-5 Figure 8-6 The PDM stores blood glucose records for the past 90 days. You can choose to view individual readings, single-day trends with individual readings, or trends for the previous 7, 14, 30, 60, or 90 days. -
Page 113: View Multiple-Day Trends
Understanding Your Records In the List view, press Event to select individual readings. View multiple-day trends Readings with a question-mark icon next to them have addi- 1. On the Home screen, use the Up/Down Controller buttons tional information available (Figure 8-7). To see this informa- to choose My records, then press Select. -
Page 114: Alarm Records
Alarm Records of the trends (Figure 8-11). (Graphs are not available for 60-, or The PDM lists the entire alarm history for the OmniPod System. 90-day trends.) Press Stats to return to the detail view. The PDM can store over 90 days’ worth of alarm records. -
Page 115: All Records
All Records The user information screen also displays product information The PDM displays the combined insulin delivery, blood glucose, for your OmniPod System (make, model, serial number). You can- alarm, and carbohydrate records. not change this information. 1. On the Home screen, use the Up/Down Controller buttons to choose My records, then press Select. -
Page 116: Add Or Change User Information
Understanding Your Records The User Info/Support icon is also displayed on 4. Press the Up/Down Controller buttons to scroll through the the suggested bolus screen. For information about list of characters. An up-and-down-arrow symbol ( ) on the the support information displayed on these screen indicates the character you are changing. -
Page 117: Living With Diabetes
OmniPod System, as well as the responsibil- • Keeping a diabetes emergency kit with you at all times. (See ities that come with insulin pump therapy. ”... -
Page 118: Daily Diabetes Management Activities
Inspect the infusion site daily At least once a day, use the Pod’ s viewing window to inspect the To ensure proper OmniPod System operation and your contin- infusion site. Check the site for signs of infection, such as pain, ued good health: swelling, redness, discharge, or heat. -
Page 119: Prepare For Emergencies
Introduction for insulins provider. approved for use in the OmniPod System.) Water and Your Pod • Syringes for injecting insulin • Instructions from your healthcare provider about The Pod is waterproof to a depth of 7.6 m (25’)for up to 60 min-... -
Page 120: Traveling And Vacationing
Living with Diabetes Traveling and Vacationing • Insulin syringes or pens in case you need injections • Several vials of insulin or insulin cartridges if you use a pen Plan for changing time zones • Glucagon kit (Make sure any person you are traveling with knows how to give the injection.) If you’re planning a vacation or business trip to a different time zone, you may need to adjust your basal rate programs. -
Page 121: Minimize Airport Security Delays
• Personal Diabetes Manager (PDM) • A signed letter from your healthcare provider explaining that • An emergency kit you need to carry insulin supplies and OmniPod System • Vials of insulin (cargo area temperatures may affect insulin) equipment • A copy of your healthcare provider’ s letter (see “Minimize air- •... -
Page 122: Avoid Lows, Highs, And Dka
Hypoglycemia unawareness is a condition in which you do not realize when your blood glucose level is You can avoid most risks related to using the OmniPod System low. If you are prone to hypoglycemia unawareness, by practicing proper techniques and by acting promptly at the you may want to use the OmniPod System’... - Page 123 Living with Diabetes To avoid hypoglycemia (low blood glucose) Always carry medical identification (emergency wallet card) and wear an emergency medical neck- Make sure your blood glucose is at least 5.6 mmol/L lace or bracelet such as the Medic Alert tag. before driving or working with dangerous machinery or equipment.
- Page 124 Living with Diabetes 1. If blood glucose is below 3.9 mmol/L, eat or drink 15 grams of How much is 15 grams of carbohydrate? fast-acting carbohydrate, such as glucose tablets, juice, or Examples of fast-acting foods: hard candy (see “How much is 15 grams of carbohydrate?” Three 5-gram glucose tablets, or four 4-gram tablets below).
- Page 125 Living with Diabetes Possible causes of hypoglycemia (low blood glucose) Possible cause of low Suggested action Possible cause of low Suggested action Incorrect basal Confirm that correct basal program Incorrect target Consult healthcare provider about program is active. blood glucose levels refining these settings as needed.
-
Page 126: Hyperglycemia (High Blood Glucose)
Living with Diabetes Hyperglycemia (high blood glucose) Possible cause of low Suggested action Insulin Pods use rapid-acting insulin, so you have no long-acting insulin in your body. If an occlusion (interruption of insulin deliv- Prolonged or intense Adjust insulin delivery as instructed ery from the Pod) occurs, your blood glucose can rise rapidly. - Page 127 Living with Diabetes To avoid hyperglycemia (high blood glucose) 4. Check blood glucose again after 2 hours. Check your blood glucose at least 4–6 times a day (when you 5. If blood glucose levels have not decreased, take a second wake up, before each meal, and before going to bed).
- Page 128 Living with Diabetes Possible causes of hyperglycemia (high blood glucose) Possible cause of high Suggested action Possible cause of high Suggested action Expired insulin Deactivate and remove used Pod. Empty Pod Deactivate and remove used Pod. Apply new Pod filled with insulin Apply a new Pod in a different Insulin exposed from a new vial.
- Page 129 Living with Diabetes Possible cause of high Suggested action Possible cause of high Suggested action High-protein or Calculate protein/fat intake and Weight loss or gain Consult your healthcare provider high-fat meal account for it in your bolus timing for guidance. Menstrual cycle and bolus type.
-
Page 130: Diabetic Ketoacidosis (Dka)
Living with Diabetes Diabetic ketoacidosis (DKA) To avoid DKA Insulin Pods use rapid-acting insulin, so you have no long-acting The easiest and most reliable way to avoid DKA is by checking insulin in your body. If insulin delivery from the Pod is interrupted your blood glucose at least 4–6 times a day. -
Page 131: Handling Special Situations
Living with Diabetes Handling Special Situations • Follow your healthcare provider’ s guidelines for taking addi- tional insulin on sick days. • Drink plenty of noncaffeinated fluids to prevent dehydration. Sick days Any physical stress can cause your blood glucose to rise, and ill- If you are well enough to eat, drink sugar-free bever- ness is a physical stress. -
Page 132: X-Rays, Mris, And Ct Scans
Living with Diabetes Be sure to check your blood glucose levels before removing the Surgery or hospitalization Pod and after applying a new one. Pods are designed for one- For scheduled surgeries or hospitalization, you should tell the time use. Do not attempt to reapply a used Pod. doctor/surgeon or hospital staff about your insulin Pod. -
Page 133: Alerts And Alarms
If you are having symptoms that are not consistent with your blood glucose test and you have followed The OmniPod System has a very important safety feature: It can all instructions described in this User Guide, call your check its own functions and let you know when something healthcare professional. - Page 134 Alerts and Alarms Alert error message Possible causes Action Meter Error 1 • Blood sample is too small. 1. If you have symptoms such as weakness, sweating, nervousness, headache, or confusion, follow the recommendations of your health- • Problem with the test strip. care See user manual for •...
- Page 135 Alerts and Alarms Alert error message Possible causes Action Meter Error 3 • Incorrect test procedure. 1. Be sure you see the Blood Drop and Test Strip symbols on the display For example, putting blood screen before you apply blood or control solution. on the test strip before 2.
-
Page 136: Alarms
(as noted in the following table). The OmniPod System provides alarms to make you aware of Some advisory alarms are controlled by levels you set in the serious or potentially serious conditions. When a condition Settings screen. - Page 137 Alerts and Alarms Use the form at the end of this User Guide to write If you ever need to return the PDM for repair or down all your settings from the Setup Wizard. If you replacement, contact your healthcare provider ever need to reset your PDM, having these settings for instructions on going back to treatment by handy will make setup very easy.
- Page 138 Alerts and Alarms Alarm Type Source Beep Pattern Action Auto-off. Hazard Continuous tone Pod has been deactived. Insulin Alarm delivery stopped. Press OK to Remove pod now. acknowledge. Change Pod. Check blood glucose. Low reservoir. Advisory 2 sets of beeps every minute for 3 min- Press OK to acknowledge.
- Page 139 Alerts and Alarms Alarm Type Source Beep Pattern Action Pod expiration advisory. Advisory 2 sets of beeps that repeat periodically. Press OK to acknowledge. Alarm Change pod now. Repeats every 15 minutes during the Change Pod (see Chapter 5, Using last hour of the Pod’...
- Page 140 Alerts and Alarms Alarm Type Source Beep Pattern Action Occlusion detected. Hazard Continuous tone Press OK to acknowledge. Alarm Insulin delivery stopped. Change Pod. Change pod now. Check blood glucose. Pod Error. Hazard Continuous tone This alarm occurs when the Pod Alarm detects an unexpected error.
- Page 141 Alerts and Alarms Alarm Type Source Beep Pattern Action PDM Error. Hazard Continuous tone This alarm occurs after the PDM is Memory corruption. Alarm reset and a memory corruption error occurs. Press OK to acknowl- Press “Ok” to reset PDM edge.
-
Page 142: Manual Shutoff Of A Hazard Alarm
Alerts and Alarms Alarm Type Source Beep Pattern Action Pod deactivation required. Hazard Continuous tone This alarm occurs after a PDM error Alarm occurs that requires the user to Press “Ok” to deactivate. reset the date and time. Press OK to acknowledge. -
Page 143: Communication Failures
• Too far from the Pod—It must be within 61 cm (24”) when you are entering or changing settings. • Interrupted by outside interference—See the “OmniPod System Notice Concerning Interference” in the Appendix. Customer Care: 1 855 POD INFO (1 855 763 4636). Outside of Canada: 647-788-3132. - Page 144 Communication Failures Figure 11-1 Figure 11-2 Figure 11-3 Figure 11-4 2. Move across the room or to a different room. Then press b. If the status check fails, you will see Figure 11-4. Press OK Retry. to try checking Pod status again, or press Discard to begin the deactivation process.
-
Page 145: Failure During Pod Deactivation
Communication Failures 3. If at any point in this process the PDM can communicate Failure During Pod Deactivation again with the Pod, you will see either: To review the deactivation process, see “Deactivate the current a. Figure 11-5, indicating that your original instruction or Pod”... -
Page 146: Failure During Request For Status
Communication Failures 2. Press Discard. The PDM will consider the Pod lost, and ask Failure During Request for Status whether you want to activate a new Pod. If you turn on the PDM or press Status and the PDM cannot If you have an unconfirmed correction bolus when you communicate with the Pod, it displays a communication icon discard a Pod, then the bolus calculator will be... -
Page 147: Failure During Bolus Cancellation
Communication Failures If the Pod has expired, you will see the screen in the “Communication error” screen (Figure 11-12). Figure 11-11 instead. Figure 11-12 Figure 11-13 Figure 11-11 1. Move the PDM close to the Pod. The PDM tries to communicate with the Pod again. - Page 148 Communication Failures 3. Move across the room or to a different room. Then either: 4. If at any point in this process the PDM can communicate again with the Pod, you will see Figure 11-15. The message a. Press Discard to begin the deactivation process. indicates that your original instruction to cancel the bolus b.
-
Page 149: Appendix
Appendix Appendix The OmniPod Insulin Management System has no user-serviceable parts. If you require assistance operating or maintaining the System, please contact Customer Care. Pod Care and Maintenance Personal Diabetes Manager Care and Maintenance Storage Store unopened Pods in a cool, dry place. Extreme heat or cold Storage can damage Pods and cause them to malfunction. -
Page 150: Cleaning And Disinfecting
Appendix Cleaning and Disinfecting While cleaning, do NOT allow debris or liquid to get into the test strip port, USB port, battery compartment, or Keep your PDM test strip port and USB port free of debris and liq- buttons. uids. Dirt, dust, blood, and control solution may impair the functionality of your PDM or damage it. - Page 151 Appendix The PDM automatically alerts you when its battery power gets If the batteries run out, data in the memory is at risk. low (see Figure A-1). When you see the “Low PDM battery” alert, DO NOT remove the old batteries until you have press OK to turn off the alert.
-
Page 152: If The Pdm Becomes Submerged In Water
Appendix 2. Insert 2 new AAA alkaline batteries into the compartment. 5. Do not put in fresh batteries or attempt to use the PDM until it has thoroughly air-dried. The diagram inside the compartment shows you which direction to insert the batteries. If you drop the PDM The PDM is built to withstand reasonable amounts of abuse, but 3. -
Page 153: Storage And Supplies
Ordering supplies Example of reverse correction bolus: You can order all OmniPod System products and supplies by Target BG: 5.6 mmol/L contacting Customer Care at 1 855 POD INFO (1 855 763 Current BG: 4.2 mmol/L... -
Page 154: Meal Bolus Calculation
Appendix Meal bolus calculation Example of meal IOB Carbs entered ÷ insulin-to-carb (I/C) ratio Duration of insulin action: 3 hours Time since previous meal bolus: 2 hours Example of meal bolus Previous meal bolus: 4.5 units Carbs entered: 45 grams of carb 3 hours –... - Page 155 Appendix Example 1 Example 3 Current BG level: 8.4 mmol/L Current BG level: 5.6 mmol/L Carb intake: 0 grams of carbohydrate (carbs) Carb intake: 45 carbs Meal IOB: 1 units Meal IOB: 1 units Correction IOB: 1 units Correction IOB: 0 units Correction bolus: 8.4 mmol/L (current) –...
-
Page 156: Calculator Guidelines
• The calculated insulin on board (IOB) is rounded up to the nearest 0.05U. When the suggested bolus calculator is turned On, the OmniPod System applies these guidelines to the suggested bolus doses: • A reverse correction only occurs if the meal bolus is greater than 0.00U. -
Page 157: Omnipod System Options And Settings
Appendix OmniPod System Options and Settings Suggested bolus calculator On or Off Time 12-hour or 24-hour clock Default is On Date MM/DD/YY 4 time segments; 3.9 to 11.1 Target BG value and DD/MM/YY correction threshold mmol/L in 0.1 mmol/L increments MM.DD.YY... -
Page 158: Pod Specifications
Appendix Waterproof rating: IPX8 (7.6 m (25’) for 60 minutes) Suspend 30 minutes to 2 hours Low reservoir volume 10 to 50 units in 5-unit increments Insulin concentration: U-100 indicator Default is 10.0 units Alarm type: Audible Pod expiration alert 1 to 24 hours in 1-hour increments Operating relative humidity range: 20–85%, noncondensing Default is 4 hours... -
Page 159: Accuracy Test Results
Appendix Accuracy Test Results Flow rate error The following trumpet curve shows the accuracy of the delivery The following graphs are designed to show flow accuracy of the rate in relation to the observation period. The measurements Pod against given time periods. were made using a Pod with a basal rate of 1.0 U/h at high oper- ating temperature. -
Page 160: Personal Diabetes Manager Specifications
Appendix Personal Diabetes Manager Specifications Blood Glucose Meter Specifications Size: 6.4 cm x 11.4 cm x 2.5 cm (2.5" wide x 4.5" long x 1.0" high) Assay method: Coulometric electrochemical sensor Weight (with batteries): 125 grams (4.4 oz) Calibration: Plasma equivalent Screen: 3.6 cm x 4.8 cm (1.4"... -
Page 161: Omnipod System Label Symbols
Appendix OmniPod System Label Symbols Symbol Meaning Symbol Meaning Storage temperature Do not reuse this device; single-use only Do not use if package is damaged Caution: Consult accompanying documents Product is designed and manufactured in accor- dance with applicable standards/guidelines and Refer to instruction manual may be sold in the EU (European Union). -
Page 162: Omnipod System Notice Concerning Interference
There are no guarantees that interference will Battery 1/4 full Battery half full not occur in a particular installation. If the OmniPod System does Basal program Battery empty cause harmful interference to radio and television reception, the interference may be corrected by one of the following measures: “Lost”... -
Page 163: Electromagnetic Compatibility
FCC and CISPR emissions requirements. distances) is, in general, specifically written with regard to the The OmniPod System communicates with the following OmniPod System. The numbers provided will not guarantee characteristics: faultless operation but should provide reasonable assurance of Frequency: 13.56 Mhz, ASK modulation, with an effective... - Page 164 Appendix Electromagnetic Emissions This equipment is intended for use in the electromagnetic environment specified below. The user of this equipment should assure that is used in such an environment. Emissions Compliance according to Electromagnetic environment RF Emissions (CISPR 11) Group 2 The Pod and the PDM emit low level electromagnetic energy (RF) in order to communicate.
- Page 165 Appendix Electromagnetic Immunity (Continued) Conducted RF 3 Vrms 3 V/m Portable and mobile RF communications equipment should (IEC 61000-4-6) 150 kHz to 80 Mhz be used no closer to any part of the System than the recom- mended separation distance calculated from the equation applicable to the frequency of the transmitter as below.
- Page 166 Appendix Recommended separation distances between portable and mobile RF communications equipment and the System You can help prevent electromagnetic interference by maintaining a minimum distance between portable and mobile RF communi- cations equipment (transmitters) and the System, as recommended below, according to the maximum output power of the commu- nications equipment.
-
Page 167: Limited Warranty For The Personal Diabetes Manager
PDM is within the warranty period must be (5) years from the date of delivery. If Insulet Corporation determines presented to obtain warranty service. that the PDM is defective during the warranty period, Insulet... -
Page 168: Privacy Code
The contents of the OmniPod® user manual are not intended to replace or substitute the advice of your physician or other quali- apply to you. -
Page 169: Glossary
Glossary Glossary Blood glucose (see glucose) Blood glucose level A1c (see Hemoglobin A1c) The amount of glucose, or sugar, in the blood. Advisory alarm Blood glucose meter Notification by the PDM that a serious condition exists. A device used to check blood glucose content. Aseptic technique Bolus dose A method for maintaining sterilization and preventing... - Page 170 1 diabetes, which showed that good blood An amount of insulin taken to compensate for high blood glucose glucose control significantly helped prevent or delay diabetes levels. The OmniPod System calculates the correction bolus by complications. taking the difference between your current blood glucose level...
- Page 171 Extended bolus the past 2 to 3 months. Also called glycosylated hemoglobin, the A feature of the OmniPod System that allows a meal bolus dose to test shows the amount of glucose that sticks to the red blood cell, be given over an extended period of time.
- Page 172 The amount of insulin that is still “active” in the body from a previ- Ketoacidosis (diabetic ketoacidosis or DKA) ous bolus dose. In the OmniPod System, insulin on board (IOB) is considered in two parts: the IOB from a previous correction bolus A very serious condition in which extremely high blood glucose and the IOB from a previous meal bolus.
- Page 173 BG goal meal bolus dose when the patient’s blood glucose level is below after a meal. The OmniPod System calculates a meal bolus by their blood glucose target. This feature is an option in the...
- Page 174 The bolus calculator can be turned Off or On in the PDM. Target blood glucose level The ideal number at which you would like your blood glucose level to be. The OmniPod System uses this number in calculating bolus doses. Temp basal A basal rate that is used to cover predictable, short-term changes in basal insulin need.
-
Page 175: Index
Index Index confidence alerts ....66 basal settings ......11 custom alerts . - Page 176 Index cancel ......35 buttons carbohydrate bolus ..See meal bolus dose.
- Page 177 Index Pod activation ....131 carb preset ......39 diabetes mellitus.
- Page 178 Index basal program..... 19 causes ......115 bolus preset .
- Page 179 ..... 58 OmniPod System ..... . .2 maximum basal rate .
- Page 180 Index PDM options, System setup... .70 Pod expiration advisory ....126 personal contact information..102 Pod expired hazard alarm .
-
Page 181: Specifications
Index special symbols ....96, 100 safety checks ......120 Status screen. - Page 182 Index text, entering and changing17, 22, 24, 27, 38, 39 tag a BG test result ....81 time ....... 11, 59 tags time segment .
- Page 183 My PDM Settings Use this form to keep track of your important PDM settings. Remember to update your information as you change or add settings. Basal Program 1 Basal Program 2 Name _________________________________ Rate Name _________________________________ Rate 12:00 AM to ________ ___________ U/hr 12:00 AM to ________ ___________ U/hr...
- Page 184 My PDM Settings Duration of Insulin Action Bolus Presets Time that insulin will remain “active” in the body Name Units from a previous bolus. ___________ hrs ________________________________________ _____________ U ________________________________________ _____________ U ________________________________________ _____________ U Correction Factor ________________________________________ _____________ U ________________________________________ _____________ U Correction factor for each time segment defined,...
- Page 185 Notes _____________________________________________________________________________________________________________ _____________________________________________________________________________________________________________ _____________________________________________________________________________________________________________ _____________________________________________________________________________________________________________ _____________________________________________________________________________________________________________ _____________________________________________________________________________________________________________ _____________________________________________________________________________________________________________ _____________________________________________________________________________________________________________ _____________________________________________________________________________________________________________ _____________________________________________________________________________________________________________ _____________________________________________________________________________________________________________ _____________________________________________________________________________________________________________ _____________________________________________________________________________________________________________ Customer Care: 1 855 POD INFO (1 855 763 4636). Outside of Canada: 647-788-3132.
- Page 186 Notes _____________________________________________________________________________________________________________ _____________________________________________________________________________________________________________ _____________________________________________________________________________________________________________ _____________________________________________________________________________________________________________ _____________________________________________________________________________________________________________ _____________________________________________________________________________________________________________ _____________________________________________________________________________________________________________ _____________________________________________________________________________________________________________ _____________________________________________________________________________________________________________ _____________________________________________________________________________________________________________ _____________________________________________________________________________________________________________ _____________________________________________________________________________________________________________ _____________________________________________________________________________________________________________ Customer Care: 1 855 POD INFO (1 855 763 4636). Outside of Canada: 647-788-3132.
- Page 187 Notes _____________________________________________________________________________________________________________ _____________________________________________________________________________________________________________ _____________________________________________________________________________________________________________ _____________________________________________________________________________________________________________ _____________________________________________________________________________________________________________ _____________________________________________________________________________________________________________ _____________________________________________________________________________________________________________ _____________________________________________________________________________________________________________ _____________________________________________________________________________________________________________ _____________________________________________________________________________________________________________ _____________________________________________________________________________________________________________ _____________________________________________________________________________________________________________ _____________________________________________________________________________________________________________ Customer Care: 1 855 POD INFO (1 855 763 4636). Outside of Canada: 647-788-3132.
- Page 188 Notes _____________________________________________________________________________________________________________ _____________________________________________________________________________________________________________ _____________________________________________________________________________________________________________ _____________________________________________________________________________________________________________ _____________________________________________________________________________________________________________ _____________________________________________________________________________________________________________ _____________________________________________________________________________________________________________ _____________________________________________________________________________________________________________ _____________________________________________________________________________________________________________ _____________________________________________________________________________________________________________ _____________________________________________________________________________________________________________ _____________________________________________________________________________________________________________ _____________________________________________________________________________________________________________ Customer Care: 1 855 POD INFO (1 855 763 4636). Outside of Canada: 647-788-3132.
- Page 189 Notes _____________________________________________________________________________________________________________ _____________________________________________________________________________________________________________ _____________________________________________________________________________________________________________ _____________________________________________________________________________________________________________ _____________________________________________________________________________________________________________ _____________________________________________________________________________________________________________ _____________________________________________________________________________________________________________ _____________________________________________________________________________________________________________ _____________________________________________________________________________________________________________ _____________________________________________________________________________________________________________ _____________________________________________________________________________________________________________ _____________________________________________________________________________________________________________ _____________________________________________________________________________________________________________ Customer Care: 1 855 POD INFO (1 855 763 4636). Outside of Canada: 647-788-3132.
Need help?
Do you have a question about the OmniPod and is the answer not in the manual?
Questions and answers