Table of Contents
Advertisement
Advertisement
Table of Contents

Subscribe to Our Youtube Channel
Related Manuals for Owandy RX


Summary of Contents for Owandy RX
- Page 1 Ow-Rx: Service Manual 0051 Version May 30, 2014 (Rev. 1)
- Page 2 Page/s Modification description 20.02.14 Document approval. 30.05.14 11, 21, 24, 25, Replaced CEI X-ray tube with Toshiba D-045 model. 48, 66, 67, New FW for wireless X-ray button. 68, 72, 86, 92 (Ref. RDM 7887, RDM 7904) (Rev. 1) Ow-RX...
- Page 3 SERVICE MANUAL Revision history THIS PAGE IS INTENTIONALLY LEFT BLANK Ow-RX (Rev. 1)
-
Page 4: Table Of Contents
4.2 Curves tube features ................24 4.3 Reference standard ................26 4.4 Dimensions................... 27 PRE-INSTALLATION 5.1 Mounting methods................28 5.2 Electric pre-setting ................29 INSTALLATION 6.1 Wall installation..................30 6.1.1 Timer set up (standard configuration) ..........31 (Rev. 1) Ow-RX... - Page 5 10. REPLACING PARTS 10.1 Replacing the tubehead and the Driver board ........74 10.1.1 Replacing the tubehead..............75 10.1.2 Replacing the Driver board ..............76 10.2 Replacing the CPU board ..............77 10.3 Replacing the keypad ................78 Ow-RX (Rev. 1)
- Page 6 13. SPARE PARTS 14. FIXING TEMPLATES This publication can only be reproduced, transmitted, transcribed or translated into any human or computer language with the written consent of the Manufacturer. This Manual in English is the original version. (Rev. 1) Ow-RX...
- Page 7 SERVICE MANUAL Contents THIS PAGE IS INTENTIONALLY LEFT BLANK Ow-RX (Rev. 1)
-
Page 8: Introduction
The manual may not reflect changes to the product that do not affect operating modes or safety. The Ow-RX intra-oral X-ray unit takes high quality intra-oral X-rays thanks to reduced exposure times and the small dimensions of the focus spot. -
Page 9: Safety Aspects
X-ray generating units. The manufacturer cannot be held responsible for: • use of Ow-RX equipment different from the purpose for which it was originally designed, • damage to the unit, the operator or the patient, caused both by... -
Page 10: Warnings
Before performing any maintenance operation, disconnect the unit from the power supply using the provided circuit breaker. Ow-RX is an electro-medical device and therefore it can be used only under the supervision of suitably qualified medical personnel, with the necessary knowledge on X-ray protection. -
Page 11: Electromagnetic Emissions
Safety aspects 2.1.1 Electromagnetic emissions In accordance with the IEC 60601-1-2 standard, Ow-RX is suitable for use in the electromagnetic environment specified below. The customer or user of the system must ensure that it is used in the said environment. -
Page 12: Electromagnetic Immunity
Safety aspects 2.1.2 Electromagnetic immunity In accordance with the IEC 60601-1-2 standard, Ow-RX is suitable for use in the electromagnetic environment described below. The customer or user of the system must ensure that it is used in the said environment. - Page 13 EMC environment of use IEC 60601-1-2 level The RF portable and mobile communications units should not be used closer to any part of the Ow-RX, including cables, than the recommended separation distance calculated from the equation applicable to the frequency of the transmitter.
-
Page 14: Recommended Separation Distances To Portable And Mobile Radio Equipment
2.1.3 Recommended separation distances to portable and mobile radio equipment Ow-RX is designed to operate in an electromagnetic environment in which radiated RF disturbances are controlled. The customer or user of the system can help prevent electromagnetic interference by ensuring a minimum distance between mobile and... -
Page 15: Protection From X-Rays
In particular, the device contains the following materials and/or components: • Tube-head: non biodegradable plastic materials, glass, dielectric oil, lead, tungsten, aluminium, copper. • Other parts of the device: non biodegradable plastic materials, metal materials, printed circuits, iron-plastic materials. Ow-RX (Rev. 1) -
Page 16: Symbols In Use
SERVICE MANUAL Safety aspects Symbols in use In this manual and on the Ow-RX itself, apart from the symbols indicated on the keypad, also the following icons are used (see chapter 6 of User's Manual): Symbol Description Device with type B applied parts... -
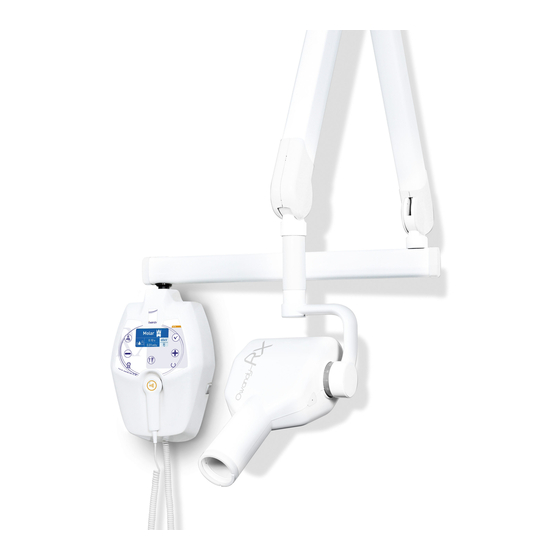
Page 17: Description
SERVICE MANUAL Description DESCRIPTION Identification plates Ow-RX (Rev. 1) - Page 18 SERVICE MANUAL Description Ow-RX plate Tube-head DP arm Extension arm plate plate plate Collimator 30 cm (optional) Wireless RX button (optional) plate plate (Rev. 1) Ow-RX...
-
Page 19: Functions, Models And Versions
(sensitivity), the phosphor sensor, the digital sensor or a customised user mode "Custom mode". The Ow-RX X-ray unit has an LCD display with dimensions of 84mm x 45mm (240x128 pixel) which makes it easier for the operator to perform all operations, guaranteeing the immediate and complete display of the exposure parameters. -
Page 20: High Frequency (Hf) Generator
X-rays while reducing the patient dose of rays. Conventional systems generally use the intrinsic capacity of the RX generator tube to conduct the electric current in one direction only. This generates a "train" of RX impulses. The Ow-RX unit instead uses constant-voltage technology that generates continuous and stable emission of X-rays. -
Page 21: Tube-Head
One contact signals the status of the unit as operative and ready to be used, the second emits the X-rays. The connection methods and the requirements necessary for the signalling devices are described in the "Service Manual". Ow-RX (Rev. 1) -
Page 22: Configurations
SERVICE MANUAL Description Configurations 3.3.1 Standard configuration Figure 3-1 Tubehead Scissors arm Extension arm Timer X-ray button (Rev. 1) Ow-RX... -
Page 23: Remote Timer Configuration
SERVICE MANUAL Description 3.3.2 Remote timer configuration Figure 3-2 Tubehead Scissors arm Extension arm Wall support Remote timer X-ray button Ow-RX (Rev. 1) -
Page 24: Mobile Stand Configuration
SERVICE MANUAL Description 3.3.3 Mobile stand configuration Figure 3-3 Tubehead Scissors arm Mobile stand Timer X-ray button (Rev. 1) Ow-RX... -
Page 25: Remote X-Ray Button Configuration
SERVICE MANUAL Description 3.3.4 Remote X-ray button configuration Figure 3-1 Remote X-ray button (optional) Ow-RX (Rev. 1) -
Page 26: Configuration With Wireless X-Ray Button
SERVICE MANUAL Description 3.3.5 Configuration with wireless X-ray button Figure 3-2 Wireless X-ray button (optional) (Rev. 1) Ow-RX... -
Page 27: Technical Data
SERVICE MANUAL Technical data TECHNICAL DATA Technical characteristics Equipment Ow-RX Manufacturer OWANDY RADIOLOGY 77183 Croissy-Beaubourg - France Class Class I with type B applied parts (according to EN 60601-1 classification) Protection degree IPX0 standard device Line voltage 99-264 V∼ Rated voltage 110-240 V∼... - Page 28 SERVICE MANUAL Technical data Tube-head characteristics Manufacturer Owandy Radiology Rated voltage 60-65-70 kV (selectable) Tubehead power 420 W ≥ 2.5 mm Al eq. @ 70 kV Total filtration HVL (Half value Layers) > 2 mm Al eq. Transformer insulation Oil bath...
- Page 29 23 kg configuration Extension arm 60 cm (standard) 2.9 kg Extension arm 80 cm 3.5 kg Extension arm 30 cm 1.9 kg Scissors arm with tube-head support 10 kg Timer + wall support 5.05 kg Tube-head 5 kg Ow-RX (Rev. 1)
-
Page 30: Method For Measuring Technical Factors
75% of the peak value and the moment in which it goes down below this value. (Rev. 1) Ow-RX... -
Page 31: Curves Tube Features
SERVICE MANUAL Technical data Curves tube features D-045 Emission & Filament characteristics Load Ow-RX (Rev. 1) - Page 32 SERVICE MANUAL Technical data Anode cooling curve Curv a raffre ddame nto monoblocco Tube-head cooling curve Time [min] (Rev. 1) Ow-RX...
-
Page 33: Reference Standard
Medical Electrical Equipment - Part 1: General Requirements for Basic Safety and Essential Performance UL 60601-1 (1st edition) Medical Electrical Equipment - Part 1: General Requirements for Safety 0051 Guarantees Ow-RX compliance with Directive 93/42 and as amended. (subsequent amendments and additions) Ow-RX (Rev. 1) -
Page 34: Dimensions
SERVICE MANUAL Technical data Dimensions FRONT VIEW Figure 4-1: Dimensions of the wall version Figure 4-2: Dimensions of the mobile stand version (Rev. 1) Ow-RX... -
Page 35: Pre-Installation
SERVICE MANUAL Pre-installation PRE-INSTALLATION Ow-RX does not ask for special pre-installation works, still it is necessary to grant an adequate grounding for EMC compatibility and safety. Section of grounding cable must be at least equal of greater than the section of line cables. It is advisable to use a grounding cable with section 2.5mm². -
Page 36: Electric Pre-Setting
Country of use and report at least one quality/safety mark released by a recognized Notified Body. NOTE: Ow-RX can be connected to signaling devices outside the installation room; please make reference to chapter 6.4.1. It is also possible to mount the system with remote keyboard: in this case it is necessary to use a RJ45 cable provided by the Manufacturer. -
Page 37: Installation
Installation INSTALLATION Wall installation Ow-RX intraoral X-ray equipment is shipped pre-assembled in sub-assys. Mechanical assembly work consists solely in assembling these units. All the mechanical components are therefore adjusted before delivery; not only is there no need to carry out any adjustment on these parts but it would also cause the equipment to malfunction;... -
Page 38: Timer Set Up (Standard Configuration)
To make the operation easier, disconnect all wires between wall plate and cover. 4. Fix the timer to the wall using the relevant screws verifying the perpendicularity of both axes with respect to the wall. Figure 6-1 (Rev. 1) Ow-RX... -
Page 39: Assembling The Mobile Stand And Timer Installation
Figure 6-2) with the four screws (7 - Figure 6-2). Figure 6-2 5. Assemble the timer support plate (8 - Figure 6-3) to the stand column, fixing it with the two screws (9 - Figure 6-3) present on the stand column. Ow-RX (Rev. 1) - Page 40 6-3) taking care to thread the supply cable and the cables coming from the scissors arm inside the hollow one (15 - Figure 6-3). Check that the upper level is level using a bubble level. Figure 6-3 (Rev. 1) Ow-RX...
-
Page 41: Assembling The Arms
(code 2100014800) is included in the mounting hardware packaging. 4. Tighten the two lateral screws (3 - Figure 6-4 – one on each side) ensuring that they block the arm rotation without interfere with the extension arm pin. Ow-RX (Rev. 1) - Page 42 SERVICE MANUAL Installation NOTE: The purpose of the frictioning mechanism and the rotation stop pin is to prevent the extension arm from becoming detached. Spring washers sequence Figure 6-4 (Rev. 1) Ow-RX...
-
Page 43: Assembling The Scissors Arm (Dp Arm)
Assembling the scissors arm (DP arm) NOTE: To help assembly Ow-RX is shipped with the tubehead already mounted on the scissors arm; it is recommended to let the tape wrapping the arm in place. In case it is removed, besides making more difficult the assembly it is possible that the installer is hurt or the arm damaged. - Page 44 Figure 6-7 4. Insert the extension arm pin in the bushing; during insertion take care to the O-Rings present in the bushing. The friction group fixing holes must be toward tube head support. Figure 6-8 (Rev. 1) Ow-RX...
- Page 45 It has to be adjusted only if necessary. 7. Remove the safety clamp and completely open the scissors arm to locate the position where the cable is more recovered inside the arm itself. Ow-RX (Rev. 1)
- Page 46 10. Run the cables inside the extension arm until they come completely out at the opposite end. 11. Insert the cables inside the rotation pin as shown in the following figure (fase 2 and 3). Figure 6-11 (Rev. 1) Ow-RX...
- Page 47 15. Check the ergonomics of the arm opening movement, otherwise adjust the tension of the arm balance springs (see paragraph 7.1.3). 16. Assemble the front covers of the extension arm included in the mounting hardware packaging. Ow-RX (Rev. 1)
-
Page 48: Assembling The Stand Arms Set
NOTE: Keep the arm perfectly orthogonal to the pole when inserting the extension arm rotation pin. Do not release the scissors arm from their sealing packing. 3. Secure the arm tighten the two screws (1). Figure 6-13 (Rev. 1) Ow-RX... -
Page 49: Installation Of The Optional Parts
External signaling devices Ow-RX allows connecting additional signaling devices outside the room, as specified here below: • A signaling device indicating "READY" and "RX ON" status can be connected to X11 connector of the "External signal" board A5 (Figure 6-14). •... -
Page 50: Remote X-Ray Button
The connecting cable between Timer and remote X-ray button (not provided) must have a 1mm minimum section. The connecting cable must always be put inside a metal conduct to avoid any disturbance to the signals passing through the cable. (Rev. 1) Ow-RX... - Page 51 The connecting cable between Timer and remote X-ray button must be connected to X6.1 and X6.2 connectors (Timer side) and to the terminal strip of the support plate. The support plate has to be fixed on the wall using the fisher type screws provided. Ow-RX (Rev. 1)
-
Page 52: Wireless X-Ray Button
1. Unscrew the two screws located on the back of the button 2. Open the two half-shells, keeping the green button facing upwards and paying attention to the electronics located inside 3. Insert the batteries respecting the indicated polarities 4. Reclose the two half-shells and tighten the screws. (Rev. 1) Ow-RX... -
Page 53: Wireless Upgrade Kit Assembling
2. Remove the CPU board from the timer cover. 3. Assemble the hexagonal spacer on the CPU board A2 (component side) as shown in Figure 6-15 and Figure 6-16. Figure 6-15 Figure 6-16 Ow-RX (Rev. 1) - Page 54 5. Reassemble the CPU board on the timer cover. 6. Connect the X7 cable between CPU board – connector X7 - and Radio board – connector J7. 7. Reconnect the cables between timer and CPU board and reassemble the plastic timer cover. (Rev. 1) Ow-RX...
-
Page 55: Wireless X-Ray Button - Timer Matching
If the LED blinks quickly, the matching failed; switch off the equipment and repeat the procedure from point 2. 6. If you wait more than 10 seconds, the LED flashes ten time quickly, and you have to repeat the procedure from point 4. Ow-RX (Rev. 1) -
Page 56: Remote Timer Configuration
The maximum distance between wall support and timer must not exceed the cable length. 6.4.4.1 Wall support set-up For the Remote Timer wall support set-up follow the instruction listed in paragraph 6.1.1 – Timer set-up (standard configuration). (Rev. 1) Ow-RX... -
Page 57: Remote Timer Set Up
(2 - Figure 6-18) placed on the top part. Fix the timer to the wall using the provided screws (4 - Figure 6-18) verifying its perpendicularity with the wall accordingly to both axis. Figure 6-18 Ow-RX (Rev. 1) -
Page 58: Installation Of Chemical Screws
SERVICE MANUAL Installation 6.4.5 Installation of chemical screws You are recommend to use chemical screws when installing the equipment on hollow bricks. (Rev. 1) Ow-RX... -
Page 59: Electrical Connection
(L = line, N = neutral, Ground = yellow/green cable). The conductors have to be secured to the timer base. 4. Assemble the two pins lock (1 - Figure 6-19) on the timer cover; these pins (code 2100511300) are included in the mounting hardware packaging. Ow-RX (Rev. 1) - Page 60 6. Place the cover on the timer taking care that the cover is positioned under the upper plate (4 – Figure 6-1). Push the cover against the locking pins and tighten the two upper screws (2 – Figure 6-1). Main power supply terminal strip Figure 6-19 (Rev. 1) Ow-RX...
-
Page 61: Electrical Connection For Remote Timer Version
7. Place the cover on the timer taking care that the cover is positioned under the upper plate (4 - Figure 6-1). Push the cover against the locking pins and tighten the two upper screws (2 - Figure 6-1). Remote Interconnection Timer board (A8) Figure 6-20 Ow-RX (Rev. 1) -
Page 62: Remote Timer Connection
5. Place the cover on the remote support taking care that the cover is positioned under the upper plate (3 - Figure 6-21). Push the cover against the locking pins and tighten the two upper screws. Remote Interconnection Timer board (A9) Figure 6-21 (Rev. 1) Ow-RX... -
Page 63: Power-Up Sequence
The "CH0" message must not be displayed any more. If this happens again, replace the EEPROM on the CPU board and proceed to the set-up sequence. WARNING: Replacing the EEPROM, all the custom tables will be lost. Ow-RX (Rev. 1) -
Page 64: Checks, Calibrations And Adjustments
• the scissors arm is not perfectly balanced; in this case you must adjust the springs. (Rev. 1) Ow-RX... -
Page 65: Adjusting The Extension Arm Support Frictioning Mechanism
Be careful to the cables connecting the timer and the plastic cover. 2. Using a 10 mm wrench, adjust the frictioning mechanism nuts (2 - Figure 7-1) until the movement of the arm is ergonomic. 3. Reposition the plastic cover when you have finished. Figure 7-1 Ow-RX (Rev. 1) -
Page 66: Adjusting The Extension Arm Frictioning Mechanism
NOTE: The purpose of this frictioning mechanism is to prevent the scissors from becoming detached, so it must not be loose. 3. Assemble the cover again. Figure 7-2 (Rev. 1) Ow-RX... -
Page 67: Adjusting The Balance Scissors Arm
P/N 6661209900). This wrench must rotate clockwise if the arm tends to go down compared to the release position; anticlockwise if it tends to go up. When you have finished the adjustment, reposition the plastic covers. Ø13 Ø13 Figure 7-3 Ow-RX (Rev. 1) - Page 68 P/N 6661209900). This wrench must rotate clockwise if the arm tends to go down compared to the release position; anticlockwise if it tends to go up. 3. When you have finished the adjustment, reposition the plastic covers Ø13 Figure 7-4 (Rev. 1) Ow-RX...
-
Page 69: Set-Up
SERVICE MANUAL Set-up SET-UP The Ow-RX system has a modifiable configuration that can be adapted to specific usage needs. To enter the "set-up" function press the "Increase" "Decrease" keys simultaneously during the software / hardware version display phase; the display will show:... - Page 70 Size selections to the film speed used by the user. The available values are shown in the following table: Value (multiplies the Film type pre-set exp. time) 0.75 1.00 1.25 1.50 2.00 Default value = 1.00 (F) (Rev. 1) Ow-RX...
- Page 71 Do not modify factory configuration. P07: Language Using "Increase" and "Decrease" keys, select the desired language between: English, Italian, French, Spanish, German, Portuguese, Russian, Dutch, Arabic, Turkish, Chinese (traditional), Chinese (simplified), Symbols only (visualize only the tooth symbol). Ow-RX (Rev. 1)
- Page 72 SERVICE MANUAL Set-up P08: Manufacturer's Logo This parameter allows to visualize / hide Owandy logo at system start- Default value = Show Logo. P09: Disable X-Rays (demo mode) This parameter make it possible to enable / disable the X-Rays emission.
- Page 73 Default value = ON P13: Exposure extra time This parameter is used only during factory test. NOTE: Do not modify factory configuration. P14: Custom ID This parameter is used only during factory test. NOTE: Do not modify factory configuration. Ow-RX (Rev. 1)
- Page 74 P16: Restore Factory Settings Select value = ON to restore the system configuration and the custom time tables to factory default. After confirmation, the system will restart with factory settings. NOTE: All custom settings will be lost. (Rev. 1) Ow-RX...
- Page 75 Restore Factory Settings //// WARNING: Parameters shown with (1) in the previous table can not be changed; the perfect running of the system or its compliance with Directive CE 93/42 cannot be guaranteed if any change is made. Ow-RX (Rev. 1)
-
Page 76: Troubleshooting
CPU and the Driver board − integrity of fuses F1 and F3 (if present) − measure the presence of the main power supply. If no anomalies are found, start replacing boards in the following order: CPU, Driver board (including tubehead). (Rev. 1) Ow-RX... -
Page 77: Error Messages On The Display
SERVICE MANUAL Troubleshooting Error messages on the display As described in chapter 3, the Ow-RX is totally controlled by a microprocessor which, not only checks the programming of exposure parameters but also signals the various machine statuses and any anomalies and errors, by messages in code on the display unit. -
Page 78: Fatal Errors Upon Power-Up And In The Ready, Idle And Cooling Statuses
Code Description 0001 Function key (F) 0002 Increment key (+) 0004 Tooth key 0008 Decrement (-) key 0010 Size key Table 1 All other key codes identify a combination of two or more pressed buttons. (Rev. 1) Ow-RX... -
Page 79: Fatal Errors During X-Ray Emission
Driver board and the tubehead. WARNING: When an error signal appears and the buzzer sounds, always switch the system off. In any case when the back-up timer is triggered it always interrupts X-ray emission. Ow-RX (Rev. 1) -
Page 80: Non Fatal Errors
X-ray button. Release of X-ray button Reset the error and repeat exposure. during pre-heating phase Make sure NOT to release the X-ray button before the buzzer stops. If the message is still present, replace the X-ray button. (Rev. 1) Ow-RX... -
Page 81: Replacing Parts
Failure to follow these instruction may harm both the technician and damage the arm itself. NOTE: Before carrying out the following operations, disconnect the equipment from the line. NOTE: No specific actions are required after replacing the tubehead and the Driver board. Ow-RX (Rev. 1) -
Page 82: Replacing The Tubehead
The spare tubehead is always shipped with a new set of plastic covers and with a new identification plate, giving the new serial numbers of the tubehead itself and of RX tube. 1. Remove the tubehead covers removing the front fixing ring of the extension cone and loosing the two screws (one on each part) located under the lateral triangular labels;... -
Page 83: Replacing The Driver Board
X5 (Figure 6-19). Remove the board and assemble the new one, fixing it. Connect the cables disconnected at step 2. Connect all the connections cables between wall plate and cover; close the timer again. Ow-RX (Rev. 1) -
Page 84: Replacing The Cpu Board
Switch the system on and enter the setup procedure (chapter 8). Check all configuration parameters. NOTE: It is possible to save the stored customized table, removing the EEPROM from the old CPU to the new one. (Rev. 1) Ow-RX... -
Page 85: Replacing The Keypad
Replacing the keypad consists in replacing the adhesive membrane: remove the timer covering panel, remove the old membrane carefully and clean the surface where the membrane was attached. NOTE: Do not use solvent, but only alcohol. Attach the new membrane. Ow-RX (Rev. 1) -
Page 86: Replacing The Scissors Arm
6.3.2, steps 1 and 2; remove the arm. Assemble the new arm as described in paragraph 6.3.2, steps 3 and following. Connect the cables ad described in paragraph 6.5.1. Reassemble the tubehead as described in paragraph 10.1.1, steps from 4 to 6. (Rev. 1) Ow-RX... -
Page 87: Replacing The Scissor Arm On Mobile Stand
Fix the support plate and the timer as described in paragraph 6.2, steps 5 and following. Connect the cables as described in paragraph 6.5.1. Reassemble the tubehead as described in paragraph 10.1.1, steps from 4 to 6. Ow-RX (Rev. 1) -
Page 88: Maintenance
NOTE: Interventions carried out by the Service Engineer must be noted in the Maintenance Record page at the end of the User Manual, with a short description of the actions done (Rev. 1) Ow-RX... -
Page 89: Schematics And Drawings
SERVICE MANUAL Schematics and drawings SCHEMATICS AND DRAWINGS 1. Ow-RX – General connection diagram Ow-RX (Rev. 1) - Page 90 SERVICE MANUAL Schematics and drawings Ow-RX General connection diagram Code 39599001 - Rev. 1 Page 1 of 1 (Rev. 1) Ow-RX...
- Page 91 SERVICE MANUAL Schematics and drawings THIS PAGE IS INTENTIONALLY LEFT BLANK Ow-RX (Rev. 1)
-
Page 92: Spare Parts
SERVICE MANUAL Spare parts SPARE PARTS 1 – TIMER: Ow-RX 2 – EXTENSION ARM / SCISSOR ARM 3 – MOBILE STAND 4 – TUBEHEAD 5 – OPTION (Rev. 1) Ow-RX... - Page 93 SERVICE MANUAL Spare parts 1 – TIMER: Ow-RX WARNING: The Driver board and the tubehead are matched in the factory and therefore MUST be replaced as a couple. Ref. VSM code Description Note 6159300100 Frictioning mechanism assy 8459400400 A2 Driver board and Tubehead...
- Page 94 SERVICE MANUAL Spare parts (Rev. 1) Ow-RX...
- Page 95 Extension arm 30 cm 8161200502 Extension arm 60 cm 8161200402 Extension arm 80 cm 6661210002 Scissor arm joint covers kit (DX + SX) 6659210002 Extension arm end-covers kit 6659210100 Extension arm frictioning mechanism Busher ∅ 28 mm 5160249500 Ow-RX (Rev. 1)
- Page 96 SERVICE MANUAL Spare parts (Rev. 1) Ow-RX...
- Page 97 SERVICE MANUAL Spare parts 3 – MOBILE STAND Ref. VSM code Description Note 8160120000 Mobile stand complete 4890310400 Wheel with brake 80x24 4890307000 Wheel 80x24 6661305600 Mobile stand spacer 5259300105 Timer fixing plate Ow-RX (Rev. 1)
- Page 98 SERVICE MANUAL Spare parts (Rev. 1) Ow-RX...
- Page 99 The tubehead and the Diver board are matched in the factory and therefore MUST be replaced as a couple. Ref. VSM code Description Note 6660475005 Tubehead covers kit (without plate) 5460461802 Front fixing ring 5160423800 Angle indicator 5460420802 Tubehead lateral cover 8459400400 Tubehead complete assembly including Driver board Ow-RX (Rev. 1)
- Page 100 SERVICE MANUAL Spare parts (Rev. 1) Ow-RX...
- Page 101 7659303100 External lamp connection kit 6159400002 Extension cone for 30cm Source to Image Distance 6159410002 Rectangular beam limiting device 45x35mm 6159410102 Rectangular beam limiting device 25x35mm 6159410202 Rectangular beam limiting device 20x30mm 6659200100 Allen wrenches kit Ow-RX (Rev. 1)
- Page 102 SERVICE MANUAL Spare parts THIS PAGE IS INTENTIONALLY LEFT BLANK (Rev. 1) Ow-RX...
- Page 103 SERVICE MANUAL Spare parts THIS PAGE IS INTENTIONALLY LEFT BLANK Ow-RX (Rev. 1)
-
Page 104: Fixing Templates
SERVICE MANUAL Fixing templates FIXING TEMPLATES The system is equipped with a set of templates, composed of the following elements: Code Description 39599100 Template for standard version 39599101 Template for remote version (Rev. 1) Ow-RX... - Page 105 SERVICE MANUAL Fixing templates THIS PAGE IS INTENTIONALLY LEFT BLANK Ow-RX (Rev. 1)
- Page 106 Cod. 6959902303_Rev.1 0051...
Need help?
Do you have a question about the RX and is the answer not in the manual?
Questions and answers