Advertisement
Advertisement
Table of Contents

Subscribe to Our Youtube Channel
Summary of Contents for Capehart CH196B/R
- Page 1 MODEL: CH196B/R 3-Speed Stereo Turntable With Built-in Speakers...
-
Page 2: Fcc Warnings
WARNINGS To reduce the risk of fire or electric shock, do not expose this appliance to rain or moisture. • To reduce the risk of electric shock, do not open the cabinet. No user serviceable parts are inside. Refer servicing to •... -
Page 3: Component Identification
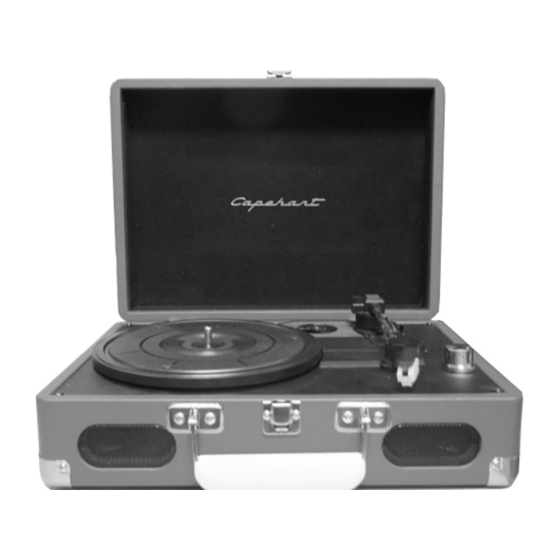
COMPONENT IDENTIFICATION FRONT REAR 1. SPEAKERS 9. POWER INDICATOR LIGHT 2. TONEARM 10. 45 RPM ADAPTER 3. TONEARM LOCK 11. 3.5mm HEADPHONE JACK 4. TONEARM REST 12. AUDIO OUTPUTS (Standard RCA Red & White) 5. TONEARM LEVER 13. AC 120V~50Hz to DC 5V INPUT 6. - Page 4 UNPACKING YOUR TURNTABLE 1. Carefully remove the turntable and accessories from the box. 2. Place the turntable on a flat, level surface and carefully open the lid. 3. Remove the white protective Stylus Cover by gently pulling it away from the TONEARM (2) as shown below.
-
Page 5: Playing A Record
VOLUME The Speaker Volume is also controlled by the POWER/VOLUME KNOB (8). • To Increase the Volume: Turn the POWER/VOLUME KNOB (8) clockwise. • To Decrease the Volume: Turn the POWER/VOLUME KNOB (8) counterclockwise. PLAYING A RECORD 1. Set the SPEED CONTROL SWITCH (7) to the correct speed for your record (33⅓, 45, or 78 RPM). - Page 6 AUTO STOP The AUTO STOP feature allows the turntable to automatically stop playing when the STYLUS (15) reaches the end of the record. • To turn the AUTO STOP feature ON: Set the AUTO STOP CONTROL SWITCH (6) to AUTO. •...
- Page 7 2. Remove the white protective Stylus Cover (if necessary). 3. Hold the bottom of the CARTRIDGE (14) with your thumb & index finger as shown below in Fig. 3a. With your other thumb carefully push down on the top edge of the the Red Stylus Assembly (Red piece includes the needle) until the Stylus Assembly separates from the CARTRIDGE (14) as shown in Fig 3b.
- Page 8 4. Carefully remove the entire Stylus Assembly from the Cartridge by pulling the Stylus Assembly away from the CARTRIDGE (14) (fig 4a). FIG 4a INSTALLING THE NEW STYLUS (NEEDLE) NOTE: DO NOT DIRECTLY TOUCH THE STYLUS (NEEDLE) (15) DURING INSTALLATION, OR YOU MAY CAUSE PERMANENT DAMAGE TO THE STYLUS (15).
- Page 9 2. While applying gentle pressure on the top of the TONEARM (2) with your index finger, carefully push the Stylus Assembly upwards until you hear a click and the Stylus Assembly locks into place (Fig 6a). FIG 6a 3. The new STYLUS (15) is now ready to use. FIG.
-
Page 10: Troubleshooting
TROUBLESHOOTING MUSIC SOUNDS TOO SLOW OR TOO FAST • Check to confirm the SPEED CONTROL SWITCH (7) is correctly set for the record being played (33⅓, 45, or 78 RPM). RECORDS KEEP SKIPPING • Carefully look at the surface of the record under a strong light to see if there are any significant scratches or other damage to the record which will cause it to skip. - Page 11 We warrant this product to be free from defects in material and workmanship under normal use for a ninety-day period from the original date of purchase from an authorized CAPEHART dealer. Should you be missing any of the included accessories or other components (screws, pieces, etc.), please contact the Customer Support Center to secure a replacement.
- Page 12 Schoenfeld International Inc. and CAPEHART 5001 American Boulevard West Suite 275 Bloomington, Minnesota 55437 ©Schoenfeld International Inc., 2014 CH196B/R Ver. 1.0 February 2014...
Need help?
Do you have a question about the CH196B/R and is the answer not in the manual?
Questions and answers