Advertisement
Available languages
Available languages
Quick Links
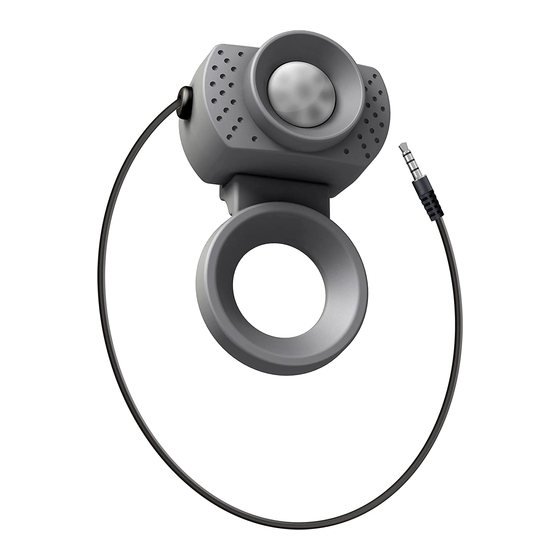
Motion Sensor
ATM100
User Manual
w w w . b r i n n o . c o m
1- Device Components
M
Motion Sensor
1
1
Plug
Pl
2
2
M
Magnetic Holder
3
3
2 - Package Contents
Motion Sensor(ATM100) • • • • 1
1
2
Magnetic holder • • • • • • • • • 1
3
Metal Lens ring • • • • • • • • • • 2
User manual • • • •• • • • • • • • • 1
4
3 - Installation on Time Lapse Camera
Clean the Time Lapse Camera lens, and lens ring, then
3-1
remove the adhesive paper and adhere the metal lens
ring around the camera lens.
Attach your Motion sensor magnetic holder to the Time
3-2
Lapse Camera lens ring, and insert the plug into Time
Lapse Camera Extension port.
Turn on the Time Lapse Camera and the screen will
3-3
display Motion mode.
3-4
Press OK, go to the preview screen.
3-5
Press OK again for one second, until the LCD panel turns
off, and the Time Lapse Camera is recording images.
During the recording period, the LCD panel will turn off to
save power.
Preview screen
Preview screen
Recording
.
.
REC
REC
4- Installation on Weather Resistant Housing
4-1 Turn on the Time Lapse Camera.
Insert the Time Lapse Camera into the Weather
4-2
Resistant Housing , put extension port cover at the
extended space, and latch the buckles.
Extended Space
4-3 Remove the Motion Sensor magnetic holder.
Insert the Motion Sensor into the top of the Weather
4-4
Resistant Housing, and plug the jack into the I/O socket
in the expansion port.
4-5
The screen will display Motion mode, press the OK
button to go to the Preview screen.
4-6
Press the OK button for one second, until the LCD panel
turns off, indicating the Time Lapse Camera is recording
images.
During the recording period, the LCD panel will turn off to
save power.
Preview screen
Preview screen
Recording
.
.
REC
REC
5-Overwrite Mode
The camera will be automatically activated overwrite mode
once Motion Sensor (ATM100) is plug in camera, you can go to
camera Setting Menu to change if necessary.
B
A
Menu
Overwrite
Overwrite
off
Mode
on
Press MENU, select the Overwrite Mode.
A
Choose on or off to set up overwrite mode.
B
6- Dokončení nahrávání
While recording, hold the OK button until the LCD light turns
on and shows the text "Done!". This indicates the recording
session is over. Remove the SD card from the camera, and
insert it into your computer or laptop to enjoy your amazing
Time Lapse Videos!
7- LED indicator
Green LED light: indicates image
capture in process.
When the Green LED light flashes,
the Motion Sensor is activated and
the Time Lapse Camera is capturing
photos.
Red LED light: Memory is full or Battery is empty.
When the SD card memory is full, the Time Lapse
Camera will STOP RECORDING. Please remember to
replace the SD card to continue recording.
8- Technical Specification
Weight
15 g
Size(DxWxH)
56x34x23 mm
Waterproof
IPX4
Detect Distance
4 meters(13 feet)
Detect Angle
90
Capture Time
10 seconds per trigger
Time Interval Capture 1~4 frames per second.(Depends
on SD card speed)
9- Limitation of Motion sensor
Bright sunlight, severe weather, and fast changing clouds may
cause the Motion Sensor (ATM100) to be mis-activated. Please
avoid using your Time Lapse Camera and Motion Sensor in
these environments.
Avoid facing Air Conditioner outflow vents, car exhaust pipes,
or any reflective surface (mirror, glass etc.) directly. This may
cause mis-activation.
7F, No.75, Zhou Zi St., Taipei City 11493, Taiwan
Phone:+886-2-8751-0306
Fax:+886-2-8751-0549
customerservice@brinno.com
Advertisement

Summary of Contents for TimeLapse ATM100
- Page 1 The camera will be automatically activated overwrite mode 4-1 Turn on the Time Lapse Camera. Size(DxWxH) 56x34x23 mm once Motion Sensor (ATM100) is plug in camera, you can go to Motion Sensor camera Setting Menu to change if necessary. Waterproof...
- Page 2 15 g De camera gaat automatisch naar de overschrijfmodus nadat Schakel de Time Lapse Camera in. Size(BxLxD) 56x34x23 mm de Bewegingssensor (ATM100) is aangesloten; dit kunt u naar Bewegingssensor wens in het instelmenu van de camera wijzigen. Waterbestendig IPX4 Detectie-afstand...
-
Page 3: Capteur De Mouvement
Poids 15 g La caméra va automatiquement entrer en mode écrasement Installation du boîtier résistant aux intempéries lorsque le capteur de mouvement (ATM100) est branché. Vous Dimensions(LxIxP) 56x34x23 mm Capteur de mouvement pouvez accéder au menu de paramétrage de la caméra pour Étanchéité... -
Page 4: Návod K Použití
SD-Karty) Stiskněte MENU und zvolte Overwrite Mode (přepisovací mód). Pohybový senzor (ATM100) • • • • 1 Zvolte on nebo off k zapnutí či vypnutí přepisovacího Magnetický držák • • • • • • • • • 1 Odstraňte magnetický držák od pohybového senzoru. - Page 5 La fotocamera accederà automaticamente alla modalità di Accendere la fotocamera TimeLapse. Dimensioni(LxHxP) 56x34x23 mm Sensore di movimento sovrascrittura quando è collegato il sensore di movimento (ATM100), è possibile andare al menu d’impostazione della Impermeabile IPX4 fotocamera per modificare, se necessario. Connettore Distanza di rilevamento 4 metri(13 piedi) Inserire la fotocamera TimeLapse nell’alloggio...
-
Page 6: Sensor De Movimiento
La cámara automáticamente se configurará en modo de Encender la cámara Time Lapse. Dimensión(WxLxD) 56x34x23 mm reemplazo una vez que el Sensor de Movimiento (ATM100) Sensor de Movimiento esté conectado. Se puede modificar en el menu de Resistencia a Agua IPX4 configuración si es necesario.
Need help?
Do you have a question about the ATM100 and is the answer not in the manual?
Questions and answers