
Summary of Contents for spovan BRAVO II
- Page 1 TO BE BE GREAT GREAT GREAT GREAT spovan spovan spovan spovan BRAVO Ⅱ Ⅱ Ⅱ Ⅱ user manual...
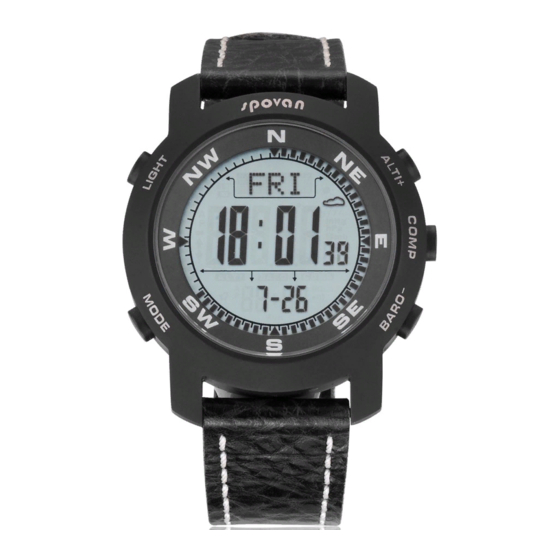
- Page 2 1.0 Introduction Thank you for purchasing of this watch. Your watch features electronic sensors which measure and shows the outdoor conditions: temperature, pressure, altitude and compass directions. Your Watch provides the essential information at the time during you are performing hiking, wild camping and other outdoor activities especially for a prolonged period.
- Page 3 2.0 Buttons And Its Functions A key: : : : back light: to turn on the EL back light for 3seconds. B key: : : : setting mode:To select among the current time, daily alarm, stop watch, time, pacer, and dual time mode. Press and hold B key to switch to the setting mode.
- Page 4 3.0 Major Function Modes...
- Page 5 4.0 Current Time Mode—Functional Display Functional Display: The current mode includes 4 kinds of functional display: Day of week display Temperature display Altitude tendency display, and Sea level pressure tendency display To select among different functional display, press and hold E button following the adjacent diagram.
- Page 6 4.1 Current Time Mode-Setting the current time How to Set the Current Time 1. Press and hold B button for about 2 seconds in current time mode. In setting display, the flashing “SET” icon will appear. 2. In setting display, Press the B button to change the selection following the adjacent current time setting sequence.
- Page 7 5. When month-day order setting is selected, press the E or C button to select between month-day and day-month format. When 12/24 hour format setting is being selected, press the E or C button to select between 12 and 24 hour format. 6.
- Page 8 5.0 Daily Alarm Mode-Daily Alarm and Chime Display Daily Alarm mode 1. The watch includes two daily alarms: Daily Alarm 1 and Daily Alarm 2, the Daily Alarm 1 and Daily Alarm 2 are working independently. 2. Press the E button to switch among the Daily Alarm 1 and Daily Alarm 2 and Chime Display following the adjacent diagram.
- Page 9 2. When the Daily Alarm 1(2) is ON, the alarm indicator will appear. 3. If the Alarm indicator is appeared, the watch will sound at the preset alarm time every day. When the alarm sounds, press any button to stop the beep. How to Turn ON/OFF the Hourly Chime 1.
- Page 10 5.1 Daily Alarm Mode-Setting the Alarm How to set the Alarm 1 and Alarm 2 1. To select the setting display, hold the B button for about 2 seconds in Alarm 1(2) Display, then the flashing “SET” icon will appear. 2.
- Page 11 6.0 Chronograph Mode-Start/Stop the Chronograph Chronograph Mode The watch includes a function to measure elapsed times, accumulative elapsed time and lap times - Chronograph Mode. The display shows the “All Zero”display when the chronograph is being selected the first time or the chronograph has been reset.
- Page 12 button once to start the chronograph(counting); press the E button once again to stop the chronograph(not counting). 2. The elapsed time between the two keystrokes will appear on the display. Repeat the above mentioned steps to get the accumulative elapsed time of which the chronograph is running. How to Reset the Chronograph 1.
- Page 13 6.1 Chronograph Mode-Recording and Recalling Lap Time How to Record Lap Time 1. The chronograph can measure elapsed time without stopping the counting - lap time. 2. The chronograph mode allows recording lap time up to 100 laps. 3. When The Chronograph is counting, press the C button once to record a lap time(this key operation will not affect the counting).
- Page 14 How to recall lap times 1. To recall lap times, press and hold the B button in the chronograph display. 2. When the total time display is appeared, press the E button or C button to check the next/previous lap time. 3.
- Page 15 7.0 Timer Mode-Countdown Timer and the Quick-Set-Value Countdown Timer: The watch includes a countdown timer feature: the timer mode. The timer starts counting from the preset value to zero and stops at zero. The Quick-Set-Value(QSV) The Quick-Set-Value is a set of default values which preset in the watch for using the timer more easily.
- Page 16 and these values can NOT be changed by the user. The User Preset Value(UPV) The User Preset Value is a value which can be changed by the user. The setting range is up to 99 hours 59 minutes 99 seconds. Once the User Preset Value has been set, such as 30 minutes, that value is stored into the watch for the user to recall next time.
- Page 17 7.1 Timer Mode-Setting the User Preset Value How to set the User Preset Value 1. To select setting display, press and hold the B button for 2 seconds, and the flashing “SET” icon will appear. 2. In setting display, press the B button to change the selection among hour, minute and second.
- Page 18 7.2 Timer Mode-Using the Timer How to Use the Timer 1. When the Timer is set, press the E button to start the timer. Press the E button once again to stop the timer. 2. The timer to “Zero” will be shown on the display continuously. 3.
- Page 19 How to reload the timer 1. To reload the timer(existing preset counting time) for a new counting, press the C button when the timer was stopped. 2. To start a new counting using a new preset counting timer, set the timer again.
- Page 20 8.0 Pacer Mode-Using the Pacer Pacer Mode When the pacer is activated, it will generate beep rate pre - defined beeping rate. The beeping rate can be set from 30 to 180 beats per minute(BOM) in step of 5. How to Use the Pacer Mode Once the beeping rate has been set (for example 30 BPM), press the E button will start the beeping.
- Page 21 the step counter will advance one. 2. When the pacer is activated and the step counter starts counting, pressing the E button can stop the pacer and step counter at the same time. 3. The maximum counting range of the step counter is 99999 steps. 4.
- Page 22 8.1 Pacer Mode-Setting the Pacer value How to set the beeping rate 1. To select the setting display, press and hold the B button for 2 seconds in the pacer mode. 2. When the beeping rate digits start to flash, press the E or C button to increase/decrease the number.
- Page 23 How to use the pacer when it links with chronograph mode 1. When pacer mode is ON: press the B button to select chronograph mode. 2. Press the E button will start the counting and beeping at the same time. 3.
- Page 24 9.0 Dual Time Mode-Dual Time and Setting the Dual Time Dual Time Mode The watch includes a function to show the time for a second time zone- Dual Time Mode. The second digit of the dual time synchronizes with the current time How to set the Dual Time 1.
- Page 25 between minute and hour. 3. When the digits are flashing(selected), press the E or C button to increase/decrease the number. (Hold down the button change the number at a higher speed). 4. When the setting is completed, press and hold the B button to exit the setting display.
- Page 26 10.0 Altimeter Mode-Temperature and History Display Function display The watch includes two altimeter functional displays: Temperature and History Display. One of the two functional displays will be appeared on the top row of the display. The current(history) altitude and the current(history) time shows on the middle row and bottom row of the display respectively.
- Page 27 Temperature Display In temperature Display, the top display shows the current temperature in degree Celsius (℃ ℃ ℃ ℃ ) or degree Fahrenheit(℉ ℉ ℉ ℉ ). IMPORTANT: If you want to have an accurate reading of air temperature, you must remove the watch from the wrist that allows no body temperature effect on your watch.
- Page 28 10.1 Altimeter Mode-Unit Selection and Altimeter Adjustment How to switch between Units? The watch can display altitude in meter(m) or feet(ft); the watch can display temperature in degree Celsius(℃) or degree Fahrenheit(℉). To switch among different unit, press and hold the E button to change the units following the adjacent units select sequence.
- Page 29 Altimeter Adjustment There are 4 kinds of adjustment method: Zero Altitude: Adjust altitude mandatory to zero for relative altitude measurement, then a indicator “ ” will be appeared on the display. Absolute Altitude: Set altitude to a known value and it can recall for next setting.
- Page 30 NOTE: Altitude is adjusted independently, so that the effects of the previous sea level pressure adjustment will be ignored if the absolute altitude is selected. NOTE: The watch includes an automatic Sea Level Pressure comparison feature, this smart feature allows NO fluctuation altitude readings will be recorded even staying at the same altitude.
- Page 31 10.2 Altimeter Mode-Zero Altitude Adjustment How to measure the relative altitude? The watch can measure relative altitude, for example, it can measure the ascending or the descending altitude between the starting point and the finish point of a trail. To measure the ascending or descending altitude of a trail by setting the current altitude to “zero”...
- Page 32 reference point such as the starting point of a trail. An “ ” indicator will be appeared on the display. Adjust the altimeter by using zero altitude adjustment 1. To select the adjustment display, press and hold the B button in altimeter mode.
- Page 33 10.3 Altimeter Mode-Absolute Altitude Adjustment Before adjusting the altitude Adjusting the altimeter at a place where the altitude is determined, such as sea level(0m) or beside an altitude sign pole(e.g., 89m), because that altitude will be inputted into the watch during the adjustment.
- Page 34 among the zero altitude, absolute altitude, sea level pressure and factory default adjustment. 2. To adjust the watch by using absolute altitude adjustment, press the E button in absolute altitude display, and the altitude reading will appear. 3. When altitude reading is appeared, press the E or C button to increase or decrease the number to the target one.
- Page 35 10.4 Altimeter Mode-Sea Level Pressure Adjustment Why need to adjust the sea level pressure As altitude is calculated by the difference between current and sea level pressure, so the sea level pressure changing or using the watch in a place which has a different sea level pressure will effect the altitude reading.
- Page 36 2. To select the adjustment display, press and hold the B button in altimeter mode. Then press the B button to select among the zero altitude, absolute altitude, sea level pressure and factory default adjustment. 3. To adjust the watch by using sea level pressure adjustment, press the E button in sea level pressure display, and the sea level pressure reading will appear.
- Page 37 10.5 Altimeter Mode-Factory Default Adjustment How to adjust the altimeter by using factory default adjustment 1. The watch can also adjust the altitude reading calculation back to using factory default value. 2. To select the adjustment display, press and hold the B button in altimeter mode.
- Page 38 altitude, absolute altitude, sea level pressure and factory default adjustment. 3. To adjust the watch by using factory default adjustment(restore to factory default by setting sea level pressure to 1013.2mb), press the E button in factory default display, and the indicator “NO” will appear.
- Page 39 11.0 Barometer Mode-Temperature and History Display Function Display The watch includes three barometer functional displays: Temperature, Sea Level Pressure and History Display. One of the three functional displays will be appeared on the top row of the display. The current(history) pressure and the current(history) time shows on the middle row and bottom row of the display respectively.
- Page 40 To perform force detect function which get one reading immediately, press and hold C button. Temperature Display In temperature display, the current temperature in degree Celsius(℃) or degree Fahrenheit(℉) shows on the top row of the display. IMPORTANT: If you want to have an accurate reading of air temperature, you must remove the watch from the wrist (for 20 to 30 minutes) that allows no body temperature effect on your watch.
- Page 41 11.1 Barometer Mode-Unit Selection and Adjustment How to switch between units The watch can display pressure in mb/hPa or inHg; the watch can display temperature in degree Celsius(℃) or degree Fahrenheit(℉). To switch among different unit, press and hold the B button to change the units following the adjacent units selection sequence.
- Page 42 Why the barometer need to be adjusted The watch was calibrated for you in the factory. For normal use, you need not to calibrate the barometer. But for vigorous users, the watch includes a adjustment procedure. Barometer adjustment There are 2 kinds of barometer adjustment method: absolute pressure and factory default adjustment.
- Page 43 11.2 Barometer Mode-Absolute Pressure Adjustment Before calibrating the barometer Before calibrate the barometer, you must have the absolute pressure of your current position, because that pressure value will be inputted into the watch during the adjustment.
- Page 44 Consult the nearest observatory station to get the ambient barometric pressure of your current position. IMPORTANT: Input an incorrect pressure during the calibration procedure, it results a mistaken pressure reading in future. How to adjust the barometer by using absolute pressure adjustment 1.
- Page 45 11.3 Barometer Mode-Factory Default Adjustment How to adjust the barometer bu using factory default adjustment 1. The watch can also adjust the pressure reading calculation back to using factory default value. 2. To select the adjustment display, press and hold the B button in barometer mode.
- Page 46 absolute pressure adjustment and factory default adjustment. 3. To adjust the watch by using factory default adjustment, press the E button in factory default display, and the indicator “NO” will appear. 4. When the indicator “NO” is appeared, press the E or C button to select between “YES”(reset the watch to factory default) or “NO”(abort the resetting).
- Page 47 12.0 Compass Mode-Precautions The precautions when using the compass Keep your watch away from magnets or the appliances which may contain magnetic objects such as mobile phones, speakers, motors and etc The watch, like most magnetic compass, point to the magnetic north which is slightly different from the true north.
- Page 48 To achieve a accurate result, you should avoid measuring direction on the following conditions: 1. The watch is placed close to a magnetic objects. 2. The watch is placed closed to a metal objects. 3. The watch is placed close to an electrical appliances. 4.
- Page 49 12.1 Compass Mode-Compass and Bearing Directions The direction of an object The direction of an object from a point can be specified in either compass directions or bearing directions. The watch includes both compass directions and bearing directions. The compass directions The compass directions are shown on the adjacent table.
- Page 50 Southeast. The compass direction of object D from point A is Northwest. The nearing directions The bearing direction of an object is defined as the angular difference between North and the object.(Assume 0°for North, and the measuring range is from 0°to 359°) For example, in the figure, the bearing direction of object B from point A is 90°.
- Page 51 12.2 Compass Mode-Compass Mode Compass Mode In the compass mode, the top of the displays shows the compass direction. The middle display shows the bearing direction. The bottom display shows the current time in hour and minute. The pointer encircled the display shows the direction of magnetic north analogically.
- Page 52 compass mode, the watch will go to the IDLE Mode automatically. During the IDLE mode, press any button except A button to activate the compass again. Distortion If distortion is detected, the indicator “OFF CAL” with flashing direction digits will appear. Please refer to the coming section “Calibrating the compass”...
- Page 53 12.3 Compass Mode-Backward Bearing Backward Bearing Direction The watch includes a backward bearing function. The backward bearing direction is the bearing direction that on the opposite direction from normal bearing direction. When the “Backward Bearing” indicator “ ” is appeared, the watch is showing the backward bearing direction of the navigation direction.
- Page 54 12.4 Compass Mode-Applications of the Compass Check your position by backward bearing directions Spot two distant identifiable landmarks such as mountains, light-house, fort and building of your current position, for example the mountain A and B. Check out the backward bearing directions of mountain A and B of your current position such as 135°from mountain A and 270°from mountain B.
- Page 55 starting from the mountain B. You current positon on the map will be the inter section point (point A) of the lies 135°and 270°. Check the Trek course correct During a trekking, the watch can keep your course correct. For example, the correct trail start from point A and finishes at point E as it is drawn on the adjacent map.
- Page 56 12.5 Compass Mode-Magnetic Declination What is Magnetic Declination The Magnetic North Pole which is slightly different from the True North Pole. Like most magnetic compass, points to the Magnetic North Pole. On the contrary, everything measure from a map is related to the True North Pole.
- Page 57 For serious compass user or who intends to perform accurate navigation, compass must be adjusted for magnetic declination. The watch also includes a compensation setting for Magnetic Declination. Check the coming section “Calibrating the compass-Magnetic Declination Mode”for more detail. Magnetic Declination information Most topographic maps include a small arrow which shown magnetic north pole and or the magnetic declination information.
- Page 58 12.6 Compass Mode-Magnetic Declination Compensation Magnetic Declination Compensation To compensate an object’s bearing by subtract westerly (W) magnetic declination or add westerly (E) magnetic declination with the magnetic bearing. Example 1: 23°Westerly magnetic declination and the compass needle points 323°. TB=MB-W.
- Page 59 The true bearing will be 300°. Example 2: 22°Easterly magnetic declination and the compass needle points 278°. TB=MB+E. While MB=278°; E=22° TB=278°+22° TB=300° The true bearing will be 300°. The watch allows you compensate the compass bearing at a place where the magnetic declination is either Westerly declination or Easterly declination.
- Page 60 12.7 Compass Mode-Magnetic Declination at Major Cities NOTE: Since Magnetic declination will be changed as going with time,recommend to check the update data from following site:http://www.magnetic-declination.com/& http://www.ngdc.noaa.gov/geomagmodels/Declination.jsp...
- Page 61 Calibrating Mode-Calibration the Compass 12.8 When to Calibration the Compass The watch has to employ a compass calibration in one of the following conditions: The watch is using for the first time The battery has been replaced The bearing direction digits are flashing, and the “OFF CAL”indicator appear The compass use in a location that is apart from the place in which the compass had been calibrated...
- Page 62 The compass calibration includes two different processes: Rotation Calibration Mode and Magnetic Declination Setting. It is advisable to carry out them both from time to time, that achieves a more accurate reading. IMPORTANT: If the watch has not been calibrated, the direction made by the watch may be a inaccurate direction.
-
Page 63: Calibration Mode
Calibrating the compass-Rotation 12.9 Calibration Mode Rotation Calibration Display 1. Press and hold the B button, into the Rotation Calibration Display. 2. Press the B button to switch between the rotation calibration and magnetic declination. 3. Press the E button to start rotation calibration in rotation calibration stop display, the pointers will start rotating, turning the watch (keep parallel to the horizon) in the same direction of the rotating pointers). - Page 64 Calibrating the compass-Magnetic 12.10 Declination Mode Magnetic Declination Mode 1. Check the coming section “Magnetic Declination at Major Cities” to get the magnetic declination of the city which is close to your current position. That angle will be inputted into the watch during the calibration.
-
Page 65: Battery Replacement
13.0 Battery Replacement Low Battery Detection When the battery-low indicator appears on the display, it means that the capacity of the battery is low. It is recommended to replace the battery with a new CR2032. However, if the appearance of battery-low indicator is caused by using the watch under very cold condition, the indicator will be disappeared when normal temperature returns. -
Page 66: Specifications
Specifications 14.0 Current Time Mode Hour, minute, second, am, pm, month, date, and Day of week Sea Level Pressure Tendency Display, Altitude Tendency Display, Temperature. Time System 12-hour or 24-hour format. Calendar System Auto-Calendar pre-programmed from the year 2000 to 2099. Daily Alarm Mode 2 daily alarms. - Page 67 Operation Mode countdown. Quick Set 6 quick set Value(1, 3, 5, 10, 15 and 45 minutes Timer Sounds Sounds for 30 seconds when count to zero. Pacer Mode Measuring Range 30 BPM to 180 BPM. 5 BPM per step. Step counter Up to 99999 steps.
- Page 68 inHg). Sampling Interval First 5 minutes: 1 second. After 5 minutes: 1 minute. History Recall Last 24 hour. Thermometer Resolution 0.1 ℃ (0.1℉). Measuring Range -10.0℃ to 60 ℃ (14.0 ℉ to 140 ℉). Compass Mode Resolution 1°display (digital). 1 of 60 pointers (graphical). Measuring Range 0°...
Need help?
Do you have a question about the BRAVO II and is the answer not in the manual?
Questions and answers