Table of Contents
Advertisement
Advertisement
Table of Contents

Summary of Contents for Watermaid ecoblend
-
Page 3: Table Of Contents
Contents Chlorinator Overview ..........................- 3 - Important Safety Instructions ........................- 4 - Installation ..............................- 5 - Cell Installation ..........................- 5 - Power Supply Installation ........................ - 6 - Connecting Pool Equipment ......................- 6 - Operating Modes ............................- 9 - System Configuration .......................... - Page 4 14.1 How Much Salt Do I Need To Add? ....................- 31 - 14.2 Chlorine Output and Pool Capacity ....................- 32 - 15 Warranty ..............................- 33 - Contact Us ............................... - 36 - - 2 - Copyright © 2017 Watermaid Pty Ltd Version 20170223...
-
Page 5: Chlorinator Overview
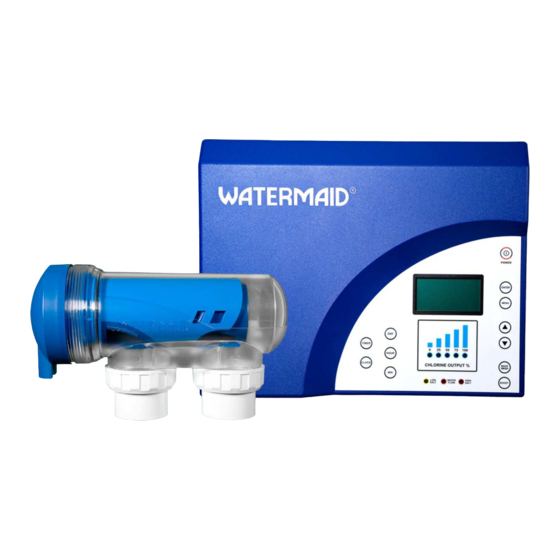
1 Chlorinator Overview 1. TIMER button Used to set and enable timers 2. CLOCK button Used to set the clock 3. DAY button Used to set the day in timer and clock setting 4. HOUR button Used to set the hour in timer and clock setting 5. -
Page 6: Important Safety Instructions
10. CAUTION: Store ALL chemicals AT LEAST 1 metre (3.2 feet) away from the WATERMAID® chlorinator to prevent corrosion. Ensure the pool equipment area is well ventilated. -
Page 7: Installation
If a variable speed pump has been installed, ensure there is adequate water flow through the cell at all times. The WATERMAID® WM44 cell has been supplied with plumbing to suit either 40 or 50 mm pool pipe and a 'Removal Tool' for ease of cell union nut removal. -
Page 8: Power Supply Installation
3.3 Connecting Pool Equipment Once the WATERMAID® WM44 power supply and cell have been installed, and 24 hours have passed for the pressure cement to dry, the WM44 is ready for start-up. Plug the pump's power cord into the socket located at the base of the WM44 power supply. - Page 9 The following two diagrams show incorrect installations (marked with a red cross). To correct the installation, the pump MUST be plugged into the base of the WATERMAID® chlorinator so that the pump and chlorinator run simultaneously. Copyright © 2017Watermaid Pty Ltd...
- Page 10 Power Connections (utilising an external time-clock) The following two diagrams show incorrect installations (marked with a red cross). To correct the installation, the pump MUST be plugged into the base of the WATERMAID® chlorinator so that the pump and chlorinator run simultaneously.
-
Page 11: Operating Modes
4 Operating Modes The WATERMAID® WM44 offers seven operating modes as detailed below. Prior to configuring the chlorinator, determine the operating mode that best suits your requirements. Timer Mode: This is the most commonly utilised mode which turns the chlorinator on at user-defined times of the day. -
Page 12: System Configuration
5.1 Adjusting the Output The WATERMAID® WM44 uses an ascending series of five (5) blue lights (or "LEDs") to indicate the output from "0%" to "100%" of chlorine production. The "0%" light indicates true and means there is no chlorine production taking place. -
Page 13: Setting The Clock
5.3 Setting Timers The WATERMAID® WM44 has six (6) inbuilt timers. Any number between one (1) and six (6) timers may be used at any one time. Timers may be set for all days of the week (Monday to Sunday), individual days, weekends only, or weekdays only. - Page 14 (i.e. timer set to run from 09:00 until 17:00 and the current time is 16:02), the chlorinator will turn on (displaying "RUNNING" mode on the LCD screen) when returning to the home screen. - 12 - Copyright © 2017 Watermaid Pty Ltd Version 20170223...
-
Page 15: Disabling The Inbuilt Timers
5.5 Manual ON/OFF The WATERMAID® WM44 can be turned on or off temporarily at any time by pressing the POWER button. Please note: if timers have been set, these will take priority and either turn the unit on/off during the next scheduled time event. -
Page 16: Main Menu
6.2 Summer, Winter and Spa Modes The WATERMAID® WM44 has a Summer, Winter and Spa mode to suit sanitation needs. A warning message "WINTER MODE" or "SPA MODE" will be displayed on the LCD if the unit is operating in either winter or spa modes respectively to indicate a reduced output level. -
Page 17: Cell Menu
Step Action Display Press MENU to access the "MAIN MENU" screen. With the cursor highlighting "Mode", press the ENTER button to display the selectable options. Press the ▼ button to move the cursor to highlight "Winter" and press ENTER. "Winter" will now be displayed next to "Current Mode:" Press MENU twice to save and return to the home screen. -
Page 18: Cell Reversing
In some pool installations, pump protection may not be advantageous, in which case it can be turned off (the factory set default is "OFF"). The WATERMAID® WM44 cell must be installed as per the instructions set out in this handbook to maximise the effectiveness of the pump protection feature. -
Page 19: Turning Pump Protection On/Off
• Max retries – This is the maximum number of times (between 0 and 4) that the WM44 will attempt to apply power to the pump socket after an interruption to water-flow is detected. The factory default for this setting is 2. 6.4.1 Turning Pump Protection ON/OFF Step Action... -
Page 20: History Menu
▼ button to highlight "Invert". To invert the display colours, press ENTER. To return to the original setting, press the ▼ button and press ENTER again. Once set, press MENU twice to return to the home screen. - 18 - Copyright © 2017 Watermaid Pty Ltd Version 20170223... -
Page 21: Back Wash
7 Back Wash The WATERMAID® WM44 has a back wash feature to minimise the risk of any damage to the pool equipment whilst back washing the filter. Step Action Display Press BACKWASH to enter the "BACKWASH" menu. Press ENTER to start the back wash program. Then adjust the back wash time (in minutes) using the ▲... -
Page 22: Boost
During periods of high chlorine demand (such as high bather load or a heat wave), it may be desirable to use the boost feature. The WATERMAID® WM44 allows you to set a boost period between 1 and 24 hours running time at 100% production. Simply set the desired boost time and when the cycle is complete, the WM44 will revert back to its normal operating state. -
Page 23: Manual Cell Cleaning
(Low Salt) 10 Manual Cell Cleaning The WATERMAID® WM44 uses the most up-to-date self-cleaning technology, known as "reverse polarity". In simple terms, the polarity to the cell changes continuously at factory pre-set intervals from negative to positive, and sheds the built-up calcium deposits from the electrodes. -
Page 24: Power Outages
If located within a Tariff 33 area, it is advised to check with the local electricity provider and ascertain the times when the power outages are most likely to occur, and where possible, set the WM44 timers around these power outages. This would ensure maximum and continuous sanitation. - 22 - Copyright © 2017 Watermaid Pty Ltd Version 20170223... -
Page 25: Troubleshooting
* Please contact an authorised service agent or Watermaid Pty Ltd for repair. N.B. There are no user serviceable parts inside the WM44 power supply. * Battery may need to be replaced (please contact an authorised repair agent). In... -
Page 26: Pool Chemistry And General Information
CHLORINATION The WATERMAID® pool chlorinator takes care of the chlorination requirement. As mild saline water flows through the WATERMAID® cell, it is converted by electrolysis into chlorine as sodium hypochlorite. Chlorine is required after filtration to react with any remaining debris (both visible and invisible), remove stains by oxidation and sterilise the water of harmful bacteria. - Page 27 A solution with pH 7 is neutral; below 7 is acidic; and above 7 is alkaline. By electrolysis, the WATERMAID® cell produces sodium hypochlorite (NaOCl), which in water dissociates into sodium (Na+) and hypochlorite (OCl-) ions. It is the hypochlorite ions that then form with the hydrogen (H+) ions (from the water) to form hypochlorous acid (HOCl), the active agent that destroys bacteria and algae, and oxidizes organic matter.
-
Page 28: Salt Level
For every eight (8) bags of salt added to the water, it is recommended that one (1) bag (25 kg or 55 lb) of magnesium chloride be added to protect the cell electrodes. The entire bag may be added at the one time, to the deep end of the pool. - 26 - Copyright © 2017 Watermaid Pty Ltd Version 20170223... -
Page 29: Running Times
13.3 Running Times Ideally, the time clock should be set to operate the WATERMAID® chlorinator from late afternoon (when the sun is off the pool) to continue throughout the night as necessary. As UV rays destroy chlorine, a chlorine stabiliser is recommended during summer for outdoor pools. -
Page 30: Zero Chlorine
(5) years as the edges become rounded over time due to the constant abrasion during filtering and will not work as effectively. With sufficient running times, the WATERMAID® chlorinator should be able to maintain a clean clear (iii) pool for about a 20 bather/hour ratio (e.g. -
Page 31: Algae
The Langelier Index was originally designed to protect boiler feed devices, such as steel boilers in steam engines, although it has been adopted by the pool industry as a means of determining non-scaling water in swimming pools. When using the Langelier Index to balance water in swimming pools with electrolytic chlorinators, never use calcium compounds;... - Page 32 (4) weeks, as chlorine is incompatible with nitrogen compounds. As a guide, the WATERMAID® chlorinator may need to be run non-stop for several days to overcome the addition of an algaecide.
-
Page 33: Useful Tables
14 Useful Tables 14.1 How Much Salt Do I Need To Add? Calculating required salt level based on pool volume in litres (L) Salt needed (kg) = (Required salt level / 1,000,000) x Pool Volume (L) 1 kg of salt in 1,000 litres of water raises the salt level by 1,000 ppm Converting Cubic Metres (m3) to Litres (L) 1 Cubic Metre = 1,000 Litres or 1 Litre = 10 Cubic Centimetres (10 cm Pool Volume in Litres = (Length x Width x Average Depth) x 1,000... -
Page 34: Chlorine Output And Pool Capacity
(grams / hour) (ppm) (Litres) (Litres) 3000 – 4000 100,000 50,000 3000 – 4000 120,000 75,000 RP11 3000 – 4000 160,000 100,000 RP13 1000 – 2000 100,000 50,000 (Low Salt) - 32 - Copyright © 2017 Watermaid Pty Ltd Version 20170223... -
Page 35: Warranty
Limitation of Liability, Warranties and Guarantees Limitation of Liability The obligation and liability of Watermaid Pty Ltd ("WM") to you with respect to goods and services supplied and all terms, conditions, guarantees, warranties and representations that might otherwise be implied by statute or otherwise are hereby excluded to the maximum extent allowed by law. Certain legislation, including Schedule 2 of the Competition and Consumer Act 2010, imply guarantees and impose obligations upon WM which cannot be excluded, restricted or modified. - Page 36 If a problem with a WATERMAID® power supply occurs within the warranty period set out in clause 6.1, and it is: (i) a manufacturing fault – then it will be repaired or replaced (at WM’s option) at no charge; (ii) caused by a condition outside WM’s control, then the cost to repair the power supply will be borne by the customer.
-
Page 38: Contact Us
Contact Us WATERMAID PTY LTD 24 Tepko Road | PO Box 460 TERREY HILLS NSW 2084 AUSTRALIA Phone: (02) 9450 0244 / +61 2 9450 0244 Fax: (02) 9450 0188 / +61 2 9450 0188 Email: info@watermaid.com Website: www.watermaid.com...
Need help?
Do you have a question about the ecoblend and is the answer not in the manual?
Questions and answers