Table of Contents
Advertisement
Quick Links
Designed by & manufactured for:
Bio-Medical Research Ltd.,
Parkmore Business Park West,
Galway, Ireland.
Copyright © 2015 BMR Ltd. All rights
reserved. Innovo™ is a trade mark
of BMR Ltd.
Part No.: 2400-0804
Rev.: 2 - Issue Date: 12/15
For further information, please contact us at:
Für weitere Informationen kontaktieren Sie uns bitte unter:
Pour plus d'informations, contactez-nous :
www.restorethefloor.com
UK:
Freephone 0800 0285687
IRL:
Freephone 1800 800045
FR:
Appel Gratuit Depuis Une Poste Fixe 0805 542 027
DE:
Anrufe aus dem Festnetz sind kostenfrei 0800 5894965
INT:
+353 1 9075393
Advertisement
Table of Contents

Related Manuals for Restore The Floor INNOVO


Summary of Contents for Restore The Floor INNOVO
- Page 1 Parkmore Business Park West, Pour plus d’informations, contactez-nous : Galway, Ireland. www.restorethefloor.com Copyright © 2015 BMR Ltd. All rights reserved. Innovo™ is a trade mark Freephone 0800 0285687 of BMR Ltd. IRL: Freephone 1800 800045 Appel Gratuit Depuis Une Poste Fixe 0805 542 027 Part No.: 2400-0804...
-
Page 2: Part No.
INSTRUCTION MANUAL GEBRAUCHSANWEISUNG MODE D’EMPLOI restorethefloor.com... - Page 3 Innovo is suitable for men and women. Easy and convenient to use, it can be used in a sitting, lying or standing position. Innovo will allow you to embrace life’s freedom. *93% of Innovo users noted a significant reduction (more than 50%) in the amount of involuntary urinary leakage.
-
Page 4: Table Of Contents
Step 6: Innovo Programme Selection Step 7: Get Into The Correct Position For You Step 8: Using Programme 1 On Innovo To Treat Stress Incontinence 8.1 Turning On The Controller And Starting A Session 8.2 Intensity Levels And What To Expect During A Stress Treatment Session 8.3 How To Pause A Treatment Session... -
Page 5: Before You Start Using Innovo
To ensure that you use this product safely and effectively, please follow the safety information provided in this instruction manual. Innovo should only be set-up and operated according to the instructions laid out in this manual, the Quick Start Guide and on the website - www.restorethefloor.com •... -
Page 6: How Does Innovo Work
This is caused by overactivity in the muscle mechanism that controls bladder function. Programme 2 on Innovo delivers a gentle signal to the nerve that controls this muscle mechanism, helping to control the overactivity. The sensation experienced when using Innovo to treat urge incontinence is a tapping sensation directly under the gel pads which are activated when using Programme 2. -
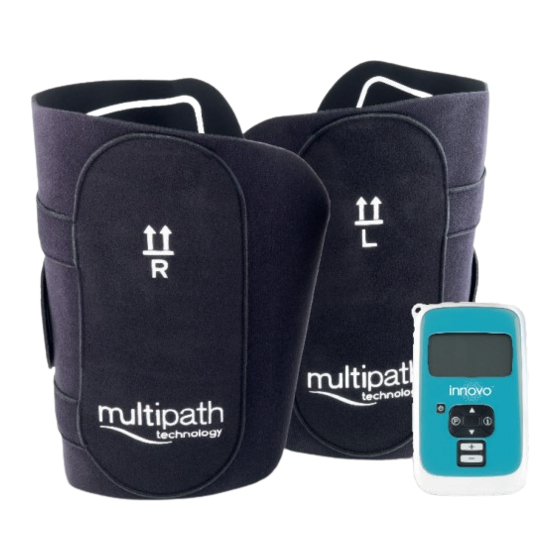
Page 7: Innovo Pack Contents
This connects your Innovo controller to the garments. 7. Neck Strap: The neck strap can be clipped onto your Innovo controller to allow it to be worn around the neck. 8. Instruction Manual: Read these easy to follow instructions to understand how to set up and use Innovo. -
Page 8: Innovo Controls
Fig.1 3. Socket Isolators: These sliders ensure that Innovo cannot be connected to you and to an electrical power source at the same time. To charge the controller, these must be slid inwards to cover the Lead Socket (Fig. 1). To run a treatment programme, they must be slid outwards to cover the Battery Charger Socket and PC Connector Socket (Fig. -
Page 9: Controller Display
CONTROLLER DISPLAY Full screen with all icons displayed. Battery Power indicator: Average intensity indicator: Shows the remaining battery power. This is displayed when viewing the average of all treatment sessions run to date. Warning indicator: Indicates that there is a problem with your Pause symbol: product - either the leads, garments, gel Appears whenever a treatment session has... -
Page 10: Step 1: Charger Assembly
Innovo treatment programmes successfully (Fig. 6). 4. Follow this instruction manual and the Quick Start Guide carefully to ensure you set up and apply Innovo correctly. We strongly recommend that you watch the application video prior to use on www.restorethefloor.com... -
Page 11: Step 3: Setting Up The Garments And Gel Pads
STEP 3: SETTING UP THE GARMENTS AND GEL PADS Fig. 7 1. Unpack all contents from the box. Remove the garments from the plastic bags and lay both garments on a flat surface, with the side containing the white markings and metal studs facing you and the arrows facing upwards (Fig. 7). You can identify which is the right and which is the left by the R and L letter on both sides of the garments. -
Page 12: Step 4: Applying The Garments
STEP 4: APPLYING THE GARMENTS 1. To put on the right garment, pick it up from the outer side by putting the tips of your right hand fingers into the slit and your left index finger in the small hole at the other end of the garment (Fig. 12). 2. -
Page 13: Step 5: Connecting The Lead To The Garments And Controller
When the garments are correctly positioned, the gel pads will be positioned as shown here. STEP 5: CONNECTING THE LEAD TO THE GARMENTS AND CONTROLLER Fig. 18 1. Connect the blue end of the lead to the blue pin on the left garment and click fully into place. -
Page 14: Step 6: Innovo Programme Selection
STEP 6: INNOVO PROGRAMME SELECTION Remember that you can use Innovo to treat Stress, Urge and Mixed Incontinence. Below are suggested weekly treatment plans for each. It is recommended that you complete just one treatment session per day and that you follow a minimum 12-week treatment plan to achieve optimum results. -
Page 15: Step 7: Get Into The Correct Position For You
STEP 7: GET INTO THE CORRECT POSITION FOR YOU Before you turn the controller on, get into the position that is most comfortable for you: Fig. 20 Position A: To optimise the results from a treatment session, it is recommended that you remain standing with your feet flat on the floor, shoulder width apart. -
Page 16: Step 8: Using Programme 1 On Innovo To Treat Stress Incontinence
Fig. 23 8.1 TURNING ON THE CONTROLLER AND STARTING A SESSION 1. Turn on your Innovo controller by pressing the On/Off Button ( 2. Ensure that you have selected Programme 1. The programme number is indicated at the top of the screen (Fig. 23). You can change programmes by pressing the Fig. -
Page 17: How To Pause A Treatment Session
8.3 HOW TO PAUSE A TREATMENT SESSION Fig. 28 If you wish to pause a treatment session before it is finished, simply press the On/off Button ( ) briefly. The stimulation will stop and the display will indicate that the controller is paused (Fig. -
Page 18: Step 9: Using Programme 2 On Innovo To Treat Urge Incontinence
Complete Steps 1-7 and when in position, you are ready to begin your Urge treatment. Fig. 33 9.1 TURNING ON THE CONTROLLER AND STARTING A SESSION 1. Turn on your Innovo controller by pressing the On/Off Button ( Fig. 34 2. Ensure that you have selected Programme 2. This programme number is indicated at the top of the screen (Fig. -
Page 19: How To Pause A Treatment Session
9.3 HOW TO PAUSE A TREATMENT SESSION If you wish to pause a session before it is finished, simply press the On/Off Button ( briefly. The stimulation will stop and the display will indicate that the controller is paused (Fig. 38). To resume the session, briefly press the On/Off Button again. The display will return to the timer countdown and the stimulation will begin again. -
Page 20: Additional Product Functions
Fig. 47 Reset Data The Innovo controller can store the data from 90 treatment sessions to enable you to review your treatment progress. Once this is reviewed, the controller can be reset and the data cleared by pressing and holding the Decrease Intensity Button (... -
Page 21: Information Button
INFORMATION BUTTON The Information Button ( ) is used to display various information about your current and previous treatment sessions. Each time you press the button a new element of your treatment progress is displayed on screen. This information remains on screen for 3 seconds and will then revert back to the countdown timer unless you press the Information Button again. -
Page 22: In-Programme Information
IN-PROGRAMME INFORMATION Your Innovo controller stores three pieces of data from every session you run. This allows you to monitor your treatment progress if you wish: a) The maximum intensity for each session. b) The average intensity for each session. -
Page 23: Problem Solving Guide
** * Remember that your Innovo gel pads will become worn over time, and will need to be replaced. If you can see visible signs of wear on your gel pads, visit www.restorethefloor.com to reorder. -
Page 24: Gel Pad Detection Function
GEL PAD DETECTION FUNCTION During a treatment session, the controller continuously monitors its connection with the gel pads and can detect if they are in proper contact with both the garment and your skin. If the controller detects poor contact, it will alert you to the problem and you can take the necessary steps to correct the issue. -
Page 25: Warnings & Precautions
• To isolate this equipment from the mains, the charger/power supply plug should be removed from the socket. • Do not attach any cables or connectors to Innovo, other than those supplied by Atlantic Therapeutics. Never connect any computer leads to the controller. -
Page 26: Safety Information
Bio-Medical Research Ltd. and may be used and disseminated only for the purpose of and to the exact specifically authorised writing by the company. Each Innovo controller is assigned a unique serial number, which is located on the back of the controller. -
Page 27: Caring For Your Innovo
• Always ensure your skin is clean and free from oils, creams and other lotions before use. • The lifetime of your Innovo gel pads, depends on how you use, store and care for them. It also depends on your skin type, the number and duration of treatment sessions. -
Page 28: Replacing The Battery
Battery Power Fig. 66 Your Innovo controller is powered by a rechargeable battery. The full performance of a new battery is achieved only after two or three complete charge cycles (fully charged and discharged). The battery symbol is displayed in the upper-right corner of the screen. When the battery is fully charged, the battery symbol will have 5 bars. -
Page 29: Technical Specifications
This controller is not suitable for use in an oxygen-rich environment. Intended use: Electrical muscle stimulator. Innovo is intended for rehabilitation of the pelvic floor muscles in stress urinary incontinence and/or re-education of the detrusor neuromuscular mechanism in the treatment of urge urinary incontinence. - Page 30 Humidity: Atmospheric Pressure: 50-106kPa If required, always seek assistance to set-up, use or maintain your Innovo from Atlantic Therapeutics. You should report any unexpected operation or event to Atlantic Therapeutics. Atlantic Therapeutics is a division of Bio-Medical Research Ltd. Accessories Under no circumstances should anything other than Atlantic Therapeutics accessories be used with your Innovo controller (Type 207).
- Page 31 Description of the controller’s symbols There are a number of technical markings on your controller. These can be explained as follows: The controller and garments are manufactured for Bio-Medical Research Ltd, Parkmore Business Park West, Galway, Ireland. The controller requires 1 x 7.2V (6 x 1.2 AAA) (NiMH) DC battery pack; DC is indicated by the symbol: Power ( P ): Maximum power output measured in Watts (W) into a 500 load.
-
Page 32: Warranty
Bio-Medical Research Limited (BMR Ltd.) warrants (a) that your Innovo controller will be free from defects in material and workmanship for a period of two years from the date of original purchase and (b) that the Innovo garments will be free from defects in material and workmanship for a period of six months from the date of original purchase.
Need help?
Do you have a question about the INNOVO and is the answer not in the manual?
Questions and answers
Could you tell me how to get a replacement charging cord for a power unit labeled “V02 BO Type: 208 SN B7180852”?