Table of Contents
Advertisement
Advertisement
Table of Contents

Summary of Contents for DR 11.5 Chipper Shredder
- Page 1 ® 11.5 CHIPPER SHREDDER SAFETY & OPERATING INSTRUCTIONS DR Power Equipment Toll-free phone: 1-800-DR-OWNER (376-9637) Serial No. Fax: 1-802-877-1213 Order No. Website: www.DRpower.com Read and understand this manual and all instructions before operating the DR 11.5 CHIPPER SHREDDER.
- Page 2 ® 11.5 CHIPPER SHREDDER...
-
Page 3: Table Of Contents
Table of Contents Chapter 1: General Safety Rules ................................4 Chapter 2: Setting Up The DR 11.5 CHIPPER SHREDDER ......................... 8 Chapter 3: Operating the DR 11.5 CHIPPER SHREDDER ........................13 Chapter 4: Maintaining The DR 11.5 CHIPPER SHREDDER ....................... 17 ... -
Page 4: Chapter 1: General Safety Rules
Labels Your DR 11.5 CHIPPER SHREDDER carries prominent labels as reminders for its proper and safe use. Shown below are copies of all the Safety and Information labels that appear on the equipment. Take a moment to study them and make a note of their location on your CHIPPER SHREDDER as you set up and before you operate the unit. - Page 5 Protecting Yourself and Those Around You This is a high-powered machine, with moving parts operating with high energy. You must operate the machine safely. Unsafe operation can create a number of hazards for you, as well as anyone else in the nearby area. This machine can crush, grind, cut, and sever parts of your body if they enter the inlet or discharge area of your CHIPPER SHREDDER.
- Page 6 Never operate your unit on a slippery, wet, muddy, or icy surface. Exercise caution to avoid slipping or falling. See manufacturer’s instructions for proper operation and installation of accessories. Only use accessories approved by DR Power Equipment. ...
- Page 7 No list of warnings and cautions can be all-inclusive. If situations occur that are not covered by this manual, the operator must apply common sense and operate this DR 11.5 CHIPPER SHREDDER in a safe manner. Contact us at www.DRpower.com or call Toll Free: 1-800-DR-OWNER (376-9637) for assistance.
-
Page 8: Chapter 2: Setting Up The Dr 11.5 Chipper Shredder
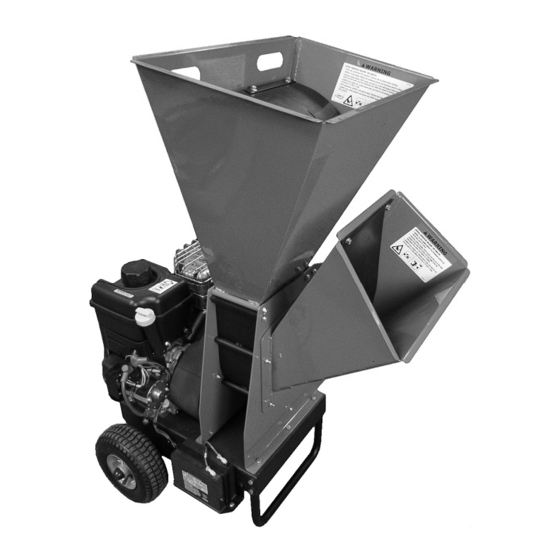
Chapter 2: Setting Up The DR 11.5 CHIPPER SHREDDER It may be helpful to familiarize yourself with the controls and features of your DR 11.5 CHIPPER SHREDDER as shown in Figure 2 before beginning these procedures. If you have any questions at all, please feel free to contact us at www.DRpower.com. - Page 9 Specifications Model 11.5 Chipper Shredder Engine Briggs & Stratton (See engine manual.) Gross Torque 11.50 Ft-Lbs Starting Manual or Electric w/ Recoil Backup 3500 Chipping Capacity 4” Max Diameter Branches Shredding Capacity 3/4” Max Diameter Woody Material Chipper Knife Hardened Tool Steel, 4.75” x 1.25” x .28”...
- Page 10 Assembly Parts Supplied in Shipping Box: - 11.5 CHIPPER SHREDDER Power Unit - Shredder Hopper - Product Pack: --Safety and Operating Instructions Manual --Engine Manual --Hardware (listed below) Hardware in Product Package: Part# Description 38640 ..Bolt, HCS, 5/16-18 X 6", GR5, ZP ....2 11076 ..
- Page 11 Note: Use only the recommended high detergent Engine oil. Other types of oil could cause problems operating your machine. Please refer to your Engine Owner’s Manual for more detailed oil information. 1. Position the machine so the Engine is level. Remove the Oil Fill/Dipstick (Figure 4).
- Page 12 Connecting the Battery Wire (Electric Start Models) Connect Negative We ship all Electric Start DR CHIPPER SHREDDERS with the green negative Battery terminal Battery Wire disconnected. This prevents the Battery from discharging Wire during shipment. Before using your DR CHIPPER SHREDDER, you must connect the Battery Wire.
-
Page 13: Chapter 3: Operating The Dr 11.5 Chipper Shredder
Chapter 3: Operating the DR 11.5 CHIPPER SHREDDER This chapter covers the procedures for starting and stopping your new DR 11.5 CHIPPER SHREDDER and discusses basic operation features. It may be helpful to better familiarize yourself with the features of your CHIPPER SHREDDER by reviewing Figure 2 in Chapter 2 before beginning the steps outlined in this chapter. - Page 14 Choke Control Lever Switch 1. Check the Oil and Fuel level every time you use the DR 11.5 CHIPPER SHREDDER. 2. Check Inlet Hoppers and Discharge Chute and remove any debris buildup from the machine by following the instructions on page 16.
- Page 15 Chipper Chute and wait until the Engine returns to full speed before continuing. Your DR 11.5 CHIPPER SHREDDER can process dry or green material. Green material will process quicker and easier than dry material. Soft wood processes easier than hard wood.
- Page 16 Shred a wood stick of up to 1" diameter to clear the Shredder clogged wet material. Screen 8. If the clog does not clear repeat the above process. 9. Be certain the cutting chamber is clear before trying to process more Figure 11 material. ® 11.5 CHIPPER SHREDDER...
-
Page 17: Chapter 4: Maintaining The Dr 11.5 Chipper Shredder
Chapter 4: Maintaining The DR 11.5 CHIPPER SHREDDER Regular maintenance is the way to ensure the best performance and long life of your machine. Please refer to this manual and the Engine Manufacturer's Owner's Manual for maintenance procedures. Service intervals listed in the checklist below supersede those listed in the Engine Manufacturer's Owner's Manual. - Page 18 6. When the Belt is adjusted properly, tighten all four Engine Bolts, then Engine Nuts retighten the Tension Bolt by 1/4 turn. Tension Bolt Figure 16 Belt Figure 18 Right Side Engine Bolts and Locknuts Figure 17 ® 11.5 CHIPPER SHREDDER...
- Page 19 7. Install the Belt Cover and secure with the two Bolts and Washers. Note: Ensure the Belt Cover Tab is resting on top of the round Bolt Head and not below it before securing the Cover (Figure 19). Belt Cover Round Bolt Head Figure 19...
- Page 20 Remove Bolt and Locknut The DR 11.5 CHIPPER SHREDDER is shipped with a sharp Chipper Knife and depending upon material being chipped we've found it can remain acceptably sharp for 40 plus hours. When you notice diminished feeding, it is time to replace the knife.
- Page 21 Knife Sharpening You should never attempt to sharpen the Chipper Knife freehand; take the Knife to a machine shop for proper sharpening. It is extremely important to consistently maintain the 45-degree angle for proper performance. Excessive heat generated during the sharpening process will damage Knives and weaken the metal. ...
- Page 22 After Use Plain Face Opposite With Spacers Direction Hole Hammer Shaft J Hammers on Opposite Hammer Shafts Screw and Face Same Locknut Direction J Hammer Flat J Hammer Hammer Direction of Rotation Figure 30 Figure 29 ® 11.5 CHIPPER SHREDDER...
- Page 23 The Clutch obtains its power from the Engine RPM. The lower the engagement speed, and the higher the maintained Engine speed, the more torque the Clutch can transfer to the driven unit. NEVER operate the DR CHIPPER SHREDDER Engine at less than full RPM.
- Page 24 ® 11.5 CHIPPER SHREDDER...
-
Page 25: Chapter 5: Troubleshooting
Most problems are easy to fix. Consult the Troubleshooting Table below for common problems and their solutions. If you continue to experience problems, contact us at www.DRpower.com or call toll-free 1-800-DR-OWNER (376-9637) for support. Shut down the Engine and wait 5 minutes for all parts to cool. Remove the Spark Plug Wire, keeping it away from the Spark Plug to prevent accidental starting before performing any maintenance procedure or inspection on the CHIPPER SHREDDER. - Page 26 Belt burns or Clutch overheats. Turn the Flywheel/Hammer assembly with a wooden stick to be sure it turns freely. Remove any built-up debris from the Chipper/Shredder Hopper Inlet(s) and Discharge Chute. Check the Drive Belt tension. ® 11.5 CHIPPER SHREDDER...
- Page 27 CONTACT US AT www.DRpower.com...
-
Page 28: Chapter 6: Parts Lists And Schematic Diagrams
Chapter 6: Parts Lists and Schematic Diagrams Parts List – Hopper, Chute and Discharge Note: Part numbers listed are available through DR Power Equipment. Ref# Part# Description Ref# Part# Description 11076 Nut, Nylon Lock, 5/16-18, ZP 39282 Label, Danger, Safety... - Page 29 Schematic – Hopper, Chute and Discharge CONTACT US AT www.DRpower.com...
- Page 30 Parts List – Drive Assembly Note: Part numbers listed are available through DR Power Equipment. Ref# Part# Description Ref# Part# Description 13443 Bolt, HCS, 5/16-18 X 1-1/2", GR5, ZP 16513 Bolt, HCS, 3/8-24 X 1-1/4", GR8 W/Patch 11076 Nut, Nylon Lock, 5/16-18, ZP 14229 Key, Square, 1/4"...
- Page 31 Schematic – Drive Assembly CONTACT US AT www.DRpower.com...
- Page 32 Parts List – Cutting Chamber Note: Part numbers listed are available through DR Power Equipment. Ref# Part# Description Ref# Part# Description 11076 Nut, Nylon Lock, 5/16-18, ZP 38663 Bolt, SHCS, 5/16-18 X 5/8", ZP 38669 Label, Screen Bolt 38646 Screen, 1" Holes...
- Page 33 Schematic – Cutting Chamber CONTACT US AT www.DRpower.com...
- Page 34 Notes: ® 11.5 CHIPPER SHREDDER...
- Page 35 CHIPPER SHREDDER is fit for ordinary purposes for which a product of this type is used. DR Power Equipment however, limits the implied warranties of merchantability and fitness in duration to a period of two (2) years in consumer use, ninety (90) days for any other use.
- Page 36 If your DR 11.5 CHIPPER SHREDDER will be idle for more than 30 days, we recommend using a gas stabilizer. This will prevent sediment from gumming up the Carburetor. If there is dirt or moisture in the gas or tank, remove it by draining the tank.
Need help?
Do you have a question about the 11.5 Chipper Shredder and is the answer not in the manual?
Questions and answers