Advertisement
Quick Links
R D B 2 0 5
E L E C T R O N I C D R U M S E T
U S E R M A N U A L
E L E C T R O N I S C H E S S C H L A G Z E U G
B E D I E N U N G S A N L E I T U N G
G U I D E U T I L I S A T E U R P O U R L ' E N S E M B L E D E
P E R C U S S I O N S E L E C T R O N I Q U E S
6
Advertisement

Subscribe to Our Youtube Channel
Summary of Contents for ROCK JAM RDB205
- Page 1 R D B 2 0 5 E L E C T R O N I C D R U M S E T U S E R M A N U A L E L E C T R O N I S C H E S S C H L A G Z E U G B E D I E N U N G S A N L E I T U N G G U I D E U T I L I S A T E U R P O U R L ' E N S E M B L E D E P E R C U S S I O N S E L E C T R O N I Q U E S...
-
Page 2: Operation Warning
Operation Warning Instruction for Prevention of Fire, Electric Shock, & Physical Injury About Warning & Caution Signs This sign indicates the risk of serious physical injury or even death. Please operate the machine according to WARNING instructions. This sign indicates the risk of serious physical injury and even death. - Page 3 Betriebswarnung Anweisung zum Schutz vor Brand, Stromschlag und Körperverletzung Zu den Warnungs- und Vorsichtszeichen Dieses Symbol weist Sie auf mögliche schwere WARNHINWEIS Verletzungsgefahren oder sogar Todesgefahr hin. Bedienen Sie bitte die Maschine vorschriftsmäßig. Dieses Symbol weist Sie auf mögliche schwere Verletzungsgefahren oder sogar Todesgefahr hin.
- Page 4 Avertissement pour le fonctionnement Instructions pour prévenir les risques d'incendie, d'électrocution et de blessures physiques A propos des signaux d'avertissement et d'attention Ce signe indique un risque de blessure physique grave AVERTISSEMENT ou même de mort. Veuillez utiliser l'appareil conformément aux instructions. Ce signe indique un risque de blessure physique grave et même de mort.
- Page 5 WARNING WARNHINWEIS Please read the following Lesen Sie die Anleitung vor instruction before operation. Inbetriebnahme aufmerksam durch. Das Gerät oder den Do not open or, in any way, modify Wechselstromadapter nicht ö nen the machine or adapter. oder in irgendeiner Weise modifizieren. Versuchen Sie nicht, irgendwelche Do not attempt to repair the Teile der Maschine zu reparieren,...
- Page 6 AVERTISSEMENT WARNING Veuilles lire les instructions suivantes Use only the included adapter. Make avant la mise en marche. sure that the voltage of the socket matches the voltage indicated on N'ouvrez et ne modifiez en aucun your adapter to prevent damage or cas l'adaptateur secteur de electric shock.
- Page 7 WARNHINWEIS AVERTISSEMENT Verwenden Sie ausschließlich den Utilisez uniquement l'adaptateur beinhalteten Adapter. Stellen Sie sicher, secteur inclus. Assurez-vous que la dass die vom Netzgerät benötigte tension de la prise correspond à la Spannung der Spannung der Steckdose tension indiquée sur votre adaptateur entspricht, um elektrische Schläge oder afin d'éviter tout dommage ou choc Schäden zu verhindern.
- Page 8 WARNING WARNHINWEIS Should any of the following Im Falle einer der folgenden Situationen, bitte situations result, please stop unterbrechen Sie den Betrieb und ziehen Sie den operation and remove the adapter Stecker aus der Steckdose, und fragen Sie Ihren from the socket, and consult with Einzelhändler, den nächsten Kundendienst, oder your retailer, the nearest customer jeglichen anerkannten Einzelhändler, dessen...
- Page 9 CAUTION AVERTISSEMENT Si l'une des situations suivantes se produisait, Always place the machine and the arrêtez immédiatement d'utiliser l'appareil et retirez l'adaptateur secteur de la prise et contactez votre revendeur, le service client le When inserting or removing the plus proche, ou n'importe quel revendeur officiel power cable into/from the socket or listé...
- Page 10 ACHTUNG ATTENTION Stellen Sie immer das Gerät und den Placez toujours l'appareil et l'adaptateur Adapter in Zonen mit einer guten dans des espaces bien ventilés. Luftströmung. Wenn Sie das Stromkabel in die/aus der Lorsque vous branchez ou débranchez le Steckdose oder Maschine stecken, câble d'alimentation dans/de la prise de halten Sie immer den Stecker anstelle courant ou de l'appareil, tenez toujours...
- Page 11 Precautions Please read the following precautions aside from the safety instructions. Power Supply Additional Precautions • During operation, please handle with care • Do not share the power supply with other to prevent any damage. electronics that can produce cable statics, for example, electric motors.
- Page 12 Vorsichtsmaßnahmen Lesen Sie bitte die folgenden Vorsichtsmaßnahmen neben den Sich erheitsmaßnahmen. Stromversorgung Zusätzliche Vorkehrungen • Teilen Sie die Stromversorgung nicht mit • Während des Betriebs bitte mit Vorsicht anderen elektronischen Apparaten, die behandeln, um Schäden zu vermeiden. Kabel-Statik produzieren können, wie, zum •...
- Page 13 Précautions Veuillez lire les précautions suivantes en plus des instruction s de sécurité Alimentation Précautions supplémentaires • Ne partagez pas l'alimentation électrique • Pendant le fonctionnement, veuillez avec d'autres appareils électroniques qui manipuler l'appareil avec précaution afin risquent de produire de l'électricité statique, d'éviter tout dommage.
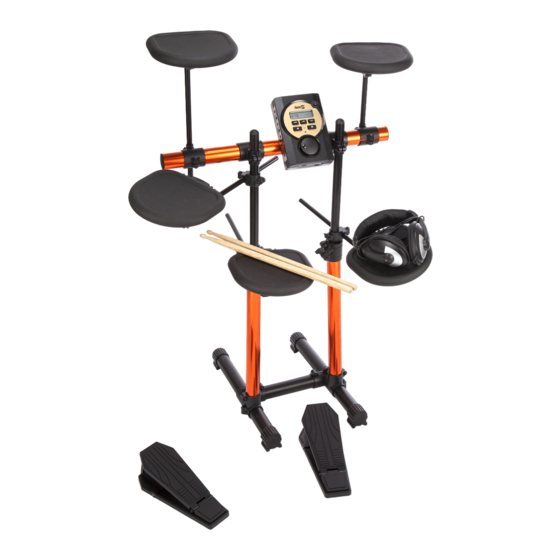
- Page 14 Accessories / Zubehör / Accessoire Sound Module MS310 Hi-Hat Controller Bass Drum Controller Soundmodul MS310 Hit-Hat Kontrolle Basstrommel Kontrolle Module audio MS310 Contrôle du Charleston Contrôle de la grosse caisse Drum Stick(1 set) User Manual Cable Tie Trommelschlegel (1 Paar) Bedienungsanleitung Kabelbinder Baguettes de batterie (1 paire)
- Page 15 Conn ector s / Anschlüsse / Connecteurs Ø1. 27 Ø3.81 - Ø1.27 Ø1.27 - Ø2.22 Ø3.81 - Ø2.22 Adjustable Connec tor P a d Connec tor Connec tor Connec tor P a d Anschluss Anschluss Anschluss Einstellbarer Anschluss Pad Connecteur Connecteur Connecteur Connecteur Réglable...
- Page 16 Connectors / Anschlüsse / Connecteurs Expansion / Erweiterung / Extension...
- Page 18 Step 1 / Schritt 1 / Étape 1 (40cm) x1 (left / links / gauche) Ø3.81cm (20cm) x1 (center / Zentrum / centre) Ø3.81cm (40cm) x1 (right / rechts / droit) Ø3.81cm 40cm 20cm 40cm...
- Page 19 Step 2 / Schritt 2 / Étape 2 (40cm) x2 (Orange) Ø3.81cm (40cm) x2 Ø2.22cm (57cm) x1 (Orange) Ø3.81cm 40cm Please note the direction of the screw. Bitte beachten Sie die Verschraubungsrichtung. Veuillez tenir compte du sens de vissage. 40cm...
- Page 20 Step 3 / Schritt 3 / Étape 3 (40cm) x3 40cm 40cm...
- Page 21 Step 4 / Schritt 4 / Étape 4 (40 cm) x1 (right / rechts / droit) (left / links / gauche) (20 cm)
- Page 22 Step 5 / Schritt 5 / Étape 5 Convex Depression Vertiefung Gewölbe Dépression Convexe Below are examples of wrong assembly. Hierunter finden Sie Beispiele von falschen Zusammenstellungen. Vous trouverez ci-dessous des exemples d'un mauvais montage.
- Page 23 Mounting on the stand Aufbauen des Ständers Montage du support Position the Sound Module onto the Bar and fold the U-Shape Plate upwards around the bar. Secure the U-Shape Plate to the back of the Sound Module with Screws. Remove the protective Platzieren Sie das Soundmodul auf die Stange und biegen Sie die...
- Page 24 S ound Cab le / Sound-Kabel / Câble audio (B lack / schwarz / Noir ) ① (B lack / schwarz / Noir ) HI-HAT /CHARLESTON ② SNARE / KLEINE TROMMEL / CAISSE CLAIRE ③ ⑦ TOM1 ⑧ ⑧ TOM2 ③...
- Page 25 Conecting the Pads / Anschließen der Pads / Connecter les pads ① HI-H CHARLESTON ② SNARE / KLEINE TROMMEL / CAISSE CLAIRE ① (Black / Schwarz / Noir) ② ③ TOM1 ③ optional / optional / en option ④ ④ CYMBAL1 / BECKEN 1 (Blue / Blau / Bleu) / CYMBALE1 ⑤...
- Page 26 Console Control Introduction ③ POWER ① MENU ⑤ ⑥ ② ⑤ LINE IN ④ VOLUME For connection of a sound input source like a portable music player, a microphone, other instruments or another sound source. The sound is directed to both Phone and Line Out. ①...
- Page 27 Bedienungskonsole Einführung ③ Strom ① MENU ⑤ ⑥ ② ⑤ LEIN - EINGANG ④ LAUTSTÄRKE Um eine Tonquelle anzuschließen, wie einen tragbaren Musik - Player, ein Mikrofon, andere Instrumente oder eine andere Tonquelle. Der Ton wird sowohl zum Kopfhörer und zum Lein - Ausgang gerichtet. ①...
- Page 28 Introduction de la commande de la console ③ MARCHE ① MENU ⑤ ⑥ ② ⑤ ④ LINE IN VOLUME Pour connecter une source d'entrée audio telle qu'un lecteur de musique portable, un microphone, d'autres instruments ou une autre source audio. Le son est dirigé à la fois vers la sortie casque et la sortie Line out.
- Page 29 Metronome Press this button to Switch to the Metronome Display, above, and Turn On the Metronome. While the Metronome Display is shown, press Click Mode this button again to Turn Off the (Metronome) Metronome. If the Metronome is not Turned Off nor its settings adjusted, the Metronome Display will eventually revert back to the Drum Style &...
- Page 30 Metronom Drücken Sie diese Taste, um den Metronom anzuzeigen, darüber, und das Metronom einzuschalten.Während der Metronom angezeigt wird, drücken Sie nochmals diese Taste, um das Metronom auszuschalten. Falls das Metronom Click-Modus nicht ausgeschaltet ist, und die Parameter nicht (Metronom) eingestellt sind, kann die Metronom-Anzeige zurück zur Anzeige des Trommelstils und der Toneinstellung schalten, und das Metronom spielt weiter.
- Page 31 Métronome Appuyez sur ce bouton pour passer à l'affichage du métronome, au-dessus, et allumer le métronome. Quand le métronome s'affiche, appuyez de nouveau sur le bouton pour éteindre le métronome. Si le métronome n'est Mode Click pas éteint et que ses paramètres ne sont pas (Métronome) réglés, l'affichage du métronome peut laisser place à...
-
Page 32: Console Operation
Console Operation Percussion Sound Module Percussion Sound Module & Metronome Press these buttons to Select a Drum Style. The Selected Drum Style will be displayed on the left side of the Sound Module’s screen; the picture of the Sound Module, above, displays Selection of ROCK Style. - Page 33 Konsolbedienung Perkussionen Soundmodul Perkussionen Soundmodul & Metronom Drücken Sie diese Tasten, um einen Trommelstil auszuwählen Der ausgewählte Trommelstil erscheint auf der linken Seite des Bildschirms des Soundmoduls; die Abbildung des Soundmoduls, hier oben, zeigt die Auswahl des ROCK-Stils.Wenn das Soundmodul eingestellt ist, geht die Standardeinstellung auf den ROCK-Stil.
-
Page 34: Utilisation De La Console
Utilisation de la console Module audio de percussion Module audio de percussion & Métronome Appuyez sur ces boutons pour sélectionner un style de percussion. Le style de percussion sélectionné s'affichera du côté gauche de l'écran du module audio l'image du module audio ci-dessus affiche la sélection du style ROCK. - Page 35 Press this button to Select a Sound Set for the current Drum Style. There are up to 4 Sound Sets per Drum Style. TECHNO, MARCH, and TAIKO Styles only have 1 Sound Set. The Selected Sound Set Number will be displayed to Sound Set the right of a hyphen on the right side of the screen;...
- Page 36 Drücken Sie diese Taste, um eine Toneinstellung für den aktuellen Trommelstil auszuwählen. Es gibt bis zu 4 Trommeleinstellungen pro Trommelstil. TECHNO, MARCH, und TAIKO Stile besitzen nur 1 Toneinstellung. Toneinstellung Die Nummer der ausgewählten (Sound Set) Toneinstellung erscheint auf der rechten Seite des Bildschirms;...
- Page 37 Appuyez sur ce bouton pour sélectionner une gamme sonore pour le style de percussion actuel. Il y a jusqu'à 4 gammes sonores par style de percussion.Les styles TECHNO, MARCH, et TAIKO n'ont qu'1 Sound Set seule gamme sonore.Le numéro de la (Gamme sonore) gamme sonore sélectionnée s'affiche à...
- Page 38 Audio Sampling Frequency 16bit 44.1kHz WAV Maximum Polyphony 32 notes Voices 11 Categories, 168 high sound quality audio Drum kits 32 preset drum modes Sensor 128 level ultra realistic velocity sensor Effect Reverb Metronome 30-250 BPM, 3 kinds of beats Wiring Terminal MIDI OUT(5-pin DIN), DC IN(AC adaptor) Connectors...
- Page 39 Styles & Sounds List / Liste der Stile und der Töne / Liste des styles et des sons ROCK HI-HAT HI-HAT SNARE SNARE TOM1 TOM1 TOM2 TOM2 TOM3 TOM3 CRASH1 CRASH1 CRASH2 CRASH2 BASS BASS HI-HAT SNARE TOM1 TOM2 TOM3 CRASH1 RIDE BELL BASS...
- Page 40 How to adjust hight : Wie man die Höhe einstellt : Comment régler la hauteur : STEP1 Loose wing-bolts. SCHRITT1 Lockern Sie die Flügelschrauben. ETAPE1 Desserrez les vis papillon. STEP2 Pull up or down the S5 pipe to adjust the height. SCHRITT2 Ziehen Sie das S5 - Rohr hoch oder runter, um die Höhe einzustellen.
Need help?
Do you have a question about the RDB205 and is the answer not in the manual?
Questions and answers