Advertisement
Quick Links
The operation guide of ML-7
This is a guide to instruct the user to use ML-7 properly. You can find the information
to define every parameter of ML-7 at the following chapters. If you still have any
questions, please send your valuable comments to sanav@sanav.com. We shall
reply you in the soonest time.
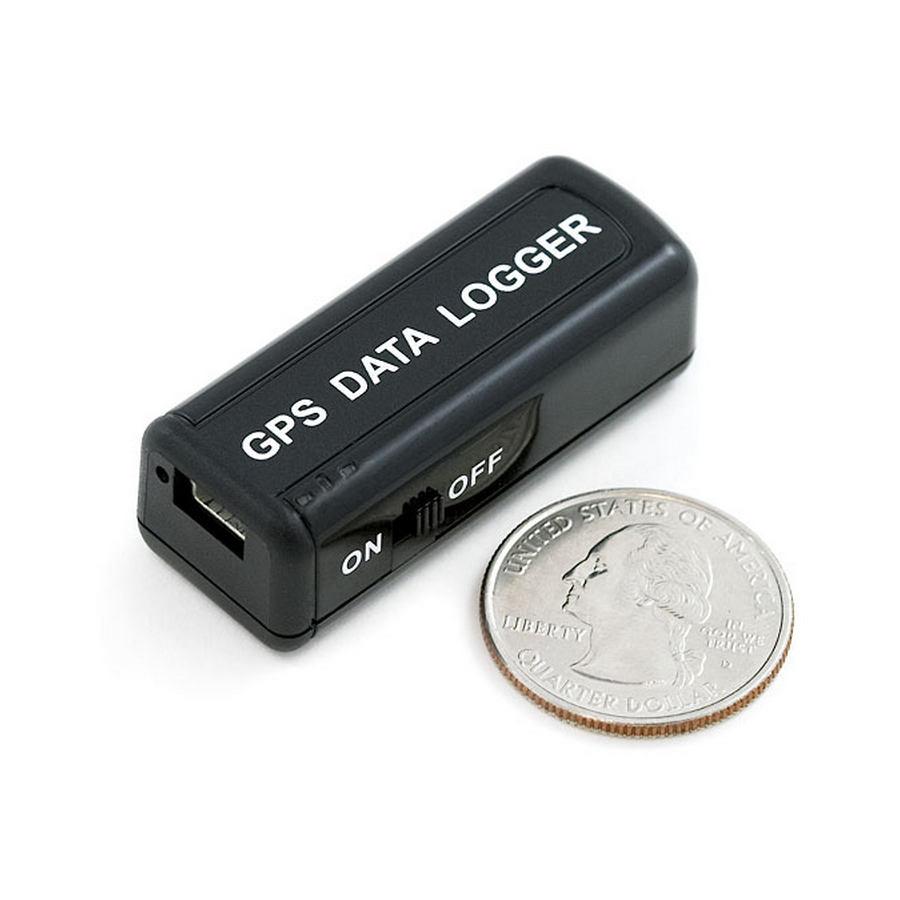
1. Appearance
2. Package Contents
- ML-7 device
- AP data cable
- Power Adapter
- A CD disk with user guide and utility
3. Introduction
ML-7 is the smallest GPS data logger in the world! With small in size, light in weigh
and mini to hidden, ML-7 is the most suitable GPS data logger for you to apply the
GPS logger to difference applications such as dove tracking, photo management,
sport tracking and vehicle tracking. It will definitely be your best helper on your
journey.
Advertisement

Summary of Contents for Sanav ML-7
- Page 1 The operation guide of ML-7 This is a guide to instruct the user to use ML-7 properly. You can find the information to define every parameter of ML-7 at the following chapters. If you still have any questions, please send your valuable comments to sanav@sanav.com. We shall reply you in the soonest time.
- Page 2 4. Features 51 independent tracking channels Ultra small size 16Mb flash memory The data will be just logged only when the GPS is fixed 5. Applications LED Light Status Blue Orange AP and Battery charge Power Light Low Power Light Light...
-
Page 3: Specifications
6. Specifications General Descriptions Parameters L1 frequency; 1575.42MHz support 51 independent Frequency tracking channels Sensitivity -146dBm Update Rate Cold Start: 36 sec. Acquisition Warm Start: 33 sec. Hot Start: 1 sec. Reacquisition <1 sec. Altitude: 18000m (max.) Dynamics Velocity: 515 m/sec. (max.) Vibration: 4G (max.) Supply Voltage DC 5V... - Page 5 ! Please note the install password is “demover”. ! Please install the USB driver before operating the AP utility. b. When the AP is installed, make the connector between the ML-7 and computer. Press the Port to select the communication Choose the Comm.
- Page 6 This bar shows how much percentage of data has been downloaded. The downloaded data The data is completely downloaded...
- Page 7 If you would like to erase the data, please choose “Yes”; otherwise, please choose “No” d. Log Setting Choose the log setting to define the interval of logged data PS: The data downloaded will be fixed data only...
- Page 8 You are able to define the interval of the logged by the number between 1-999 seconds This window represents that the setting is defined successfully.
- Page 9 e. To erase the data. Choose “Erase” to erase the logged data If you would like to erase the data, please choose “Yes”; otherwise, please choose “No”...
- Page 10 f. Connect to Google Earth Map Choose “Google Earth” to link to Google Earth Map. Choose a .nme file and the utility will automatically to link the file to Google Earth. The route should be C:\nme\..You can also download the free software from Locr.
- Page 11 Locr Demo: The demo window will be like following: -Locate the point. -Locate your digital photos.
- Page 12 g. To check the version of the utility. Choose “About” to check the version of utility. Click Google Earth to download the Google Earth map. The version of utility Press OK to exit this window...
- Page 13 8. Mechanical...
Need help?
Do you have a question about the ML-7 and is the answer not in the manual?
Questions and answers