
Subscribe to Our Youtube Channel
Summary of Contents for AXESS ELECTRONICS FX1
-
Page 3: Table Of Contents
Table of Contents 1. Warranty............................ 5 2. Precautions ..........................5 3. Introduction ..........................6 Features List ..............................6 4. Fundamentals ........................... 7 5. Quick Start ..........................8 6. Display............................9 7. Switches & LED’s........................10 Primary Switch Functions..........................10 7.1.1 EDIT/2 ................................10 7.1.2 UP &... - Page 4 16.7 Data Dump / Load............................61 16.7.1 Remote Data Dump/Load ...........................61 16.8 Delete / Restore ............................62 16.9 Firmware Version & Update ........................64 16.9.1 Updating The FX1 Firmware..........................64 17. Cables ............................. 66 17.1.1 XPDL & External Switch .............................66 17.1.2 XPDL & External Volume Pedal..........................66 17.1.3...
-
Page 5: Warranty
Axess Electronics’ liability to the owner and under this warranty is limited only to the repair or replacement of the defective product. Call or write to Axess Electronics prior to shipping the product for repair. -
Page 6: Introduction
“finest”, “most powerful” and “ultimate” MIDI footcontrollers around. I would also like to thank the following people without whom the FX1 would not have been possible for one reason or another. My wife, daughter and dog – for hesitantly allowing me to work crazy hours and sacrificing a whole lot of quality family time, Daryl Speers –... -
Page 7: Fundamentals
(banked) presets, arranged so that all the presets necessary during the performance of a song are available in one bank (conveniently called a song). The SET0 – SET9 Operating Mode(s) allow up to 50 of the FX1’s 99 songs to be arranged in any order to create a setlist. The FX1 can support 10 different setlists. -
Page 8: Quick Start
516. The MIDI specification stipulates that a single MIDI event (such as when a preset switch is pressed) should be kept to 255 bytes or less. The FX1 will not place a restriction on how many or which of its MIDI messages can be enabled and used, so this is one of the reasons that the FX1 is shipped with all its MIDI messages and features turned off. -
Page 9: Display
(when a preset is selected via preset switches P1 - P6). To have the display always show the song name, apply power to the FX1 while pressing the P3 switch. To revert back to displaying the song and preset names as described above, apply power to the FX1 while pressing the P4 switch. -
Page 10: Switches & Led's
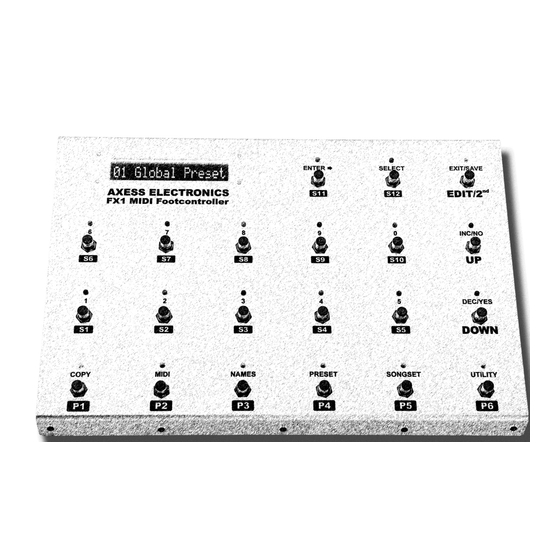
Switches & LED’s The FX1 top panel is fitted with 21 heavy-duty Carling stomp switches. Each switch has dual functions, the primary function is listed underneath the switch and the secondary function is listed between the switch and its LED. The primary function is used when the FX1 is in one of the above mentioned “Operating Modes”... -
Page 11: P1 - P6
Only one preset can be active at a time and the LED’s above the preset switches are used to indicate which it is. Though the FX1 has six preset switches, it is actually capable of recalling seven presets. -
Page 12: Secondary Switch Functions
These switches are used to move/scroll through and select parameters to be edited or to enter alpha-numeric values and characters for other parameters, when held down these switches are repetitive accelerating. Alternatively they are also used to select “Y/N” when prompted on the display in some sub-menu’s. Axess Electronics : FX1 MIDI Footcontroller User Manual... -
Page 13: Exit/Save
FX1’s regular presets, which can be (and probably are) used in other songs, the FX1 will first check to see if the preset being updated is used in another song. If the preset is not used in another song, the FX1 will proceed with updating the preset at its current location. -
Page 14: Rear Panel
This is a standard ¼” TRS (stereo) jack and it allows an external expression pedal (or a switch) to be connected to the FX1. The ring and sleeve of this jack are internally protected with resistors so that a short circuit will not damage the port input circuitry and/or the FX1. -
Page 15: 9Vac:0.4A
8.1.7 MIDI IN This is a standard 5-pin DIN jack and it allows the FX1 to receive MIDI information and commands such as control change, program change and system exclusive messages from external MIDI devices such as a sequencer, a computer, another FX1 or another MIDI footcontroller (see Section 16.7, Section 18 and Section 19 for details on its... -
Page 16: Power On
Power On When power is first applied to the FX1, all of its LED’s (and those on the expander – if connected) will remain OFF and the display will show the current software version number for two seconds, as follows (the actual version number may differ depending on when this manual was published). -
Page 17: Edit Mode
The SongSet Menu allows for the FX1’s regular presets to be organized in a custom bank to create a song. Multiple songs can then be arranged into a collection of customs banks (each bank represents a song) to create a setlist. -
Page 18: Copy Menu
LED above switches 7, 8 and 9 will turn OFF since there are no such presets. ENTER Press to begin the copying process. While the FX1 is copying a preset, the display will show. After the copying process is complete the display will be updated with the bank and preset numbers that were shown when first entering this sub-menu. -
Page 19: Bank Copy
Copy sub-menu is selected. ENTER Press to begin the copying process. While the FX1 is copying a bank, the display will show. After the copying process is complete the display will be updated with the bank numbers that were shown when first entering this sub-menu. -
Page 20: Song Copy
Copy sub-menu is selected. ENTER Press to begin the copying process. While the FX1 is copying a song, the display will show. After the copying process is complete the display will be updated with the song numbers that were shown when first entering this sub-menu. -
Page 21: Setlist Copy
Copy sub-menu is selected. ENTER Press to begin the copying process. While the FX1 is copying a setlist, the display will show. After the copying process is complete the display will be updated with the setlist numbers that were shown when first entering this sub-menu. -
Page 22: Instant Access Switch Copy
ENTER Press to begin the copying process. While the FX1 is copying an instant access switch, the display will show. After the copying process is complete the display will be updated with the instant access switch numbers that were shown when first entering this sub-menu. -
Page 23: Midi Menu
• o and p indicate the MIDI channel that the FX1 will receive MIDI messages on (01 to 16 or NO). The LED above the following switches will turn ON indicating the switches can be used while in this sub-menu. -
Page 24: Program Change Starting Number
12.2 Program Change Starting Number This sub-menu allows setting the starting number (000 or 001) that the FX1 will use to display MIDI program change numbers for each MIDI channel. Some MIDI devices/processors display presets starting at 000 (and ending at 127) and others start at 001 (and end at 128). -
Page 25: S1 - S24 Control & Program Changes
MIDI program change message the instant access switch will transmit when the instant access switch is OFF. Press the ENTER switch again to return to the top… Axess Electronics : FX1 MIDI Footcontroller User Manual... - Page 26 000 & 127 or 001 & 128 (depending on the MIDI Program Change Start setting for the MIDI channel shown). Entering 999 will stop the FX1 from transmitting the MIDI control change or MIDI program change message and the MIDI channel will automatically be changed to two asterisks.
-
Page 27: Internal Control Changes
Press two switches to enter a MIDI channel number between 01 & 16 and press three switches to enter a MIDI control change number between 000 & 127. Entering 999 will stop the FX1 from transmitting the MIDI control change message and the MIDI channel will automatically be changed to two asterisks. -
Page 28: Xp1 - Xp4 Global Settings
MIDI control change value (000 to 127) that the expression pedal port can send when its pedal/switch is moved/pressed. Press the ENTER switch again to return to the top… Axess Electronics : FX1 MIDI Footcontroller User Manual... - Page 29 444 for the BegValu will cause the FX1 to transmit MIDI data corresponding to the actual pedal position when a preset is first selected. Entering 999 for the BegValu will cause the FX1 to NOT transmit any MIDI data associated with the expression pedal port when a preset is first selected, instead the FX1 will ONLY transmit the MIDI data associated with the expression pedal port when the pedal/switch connected to it is physically moved/pressed.
-
Page 30: S1 - S12 Custom Hex / Midi Message
When creating a custom hex / MIDI message, always start with the 1 byte. Need help creating a custom hex / MIDI message ? Visit the FX1 page on our website and download the MIDI/Hex Calculator (PC) or the FX1 Editor (Mac/PC), which includes a calculator…... - Page 31 13 to 16 of a custom hex message. Press the ENTER switch again to return to the top (first display on the previous page). Axess Electronics : FX1 MIDI Footcontroller User Manual...
-
Page 32: Midi Messages For Guitar Players 101
#7 replace n with 6 #11 replace n with A #15 replace n with E #4 replace n with 3 #8 replace n with 7 #12 replace n with B #16 replace n with F Axess Electronics : FX1 MIDI Footcontroller User Manual... - Page 33 ON and the other turns the audio loop or switching function OFF. To turn an audio loop or switching function ON replace vv with 7F. To turn an audio loop or switching function OFF replace vv with 00. Axess Electronics : FX1 MIDI Footcontroller User Manual...
- Page 34 #62 replace pp with 3E #94 replace pp with 5E #126 replace pp with 7E #31 replace pp with 1F #63 replace pp with 3F #95 replace pp with 5F #127 replace pp with 7F Axess Electronics : FX1 MIDI Footcontroller User Manual...
-
Page 35: Names Menu
13.1 Song Names This sub-menu allows a custom name, up to 13 characters in length, to be created/modified for each of the FX1’s 99 songs. From the Edit Menu, press the NAMES switch one time, the display will show. -
Page 36: Setlist Names
13.2 Setlist Names This sub-menu allows a custom name, up to 13 characters in length, to be created/modified for each of the FX1’s 10 setlists (SET0 – SET9 Operating Modes). From the Edit Menu, press the NAMES switch two times, the display will show. -
Page 37: Midi Channel Names
Press to move the cursor from left to right (and back) when creating/modifying the MIDI channel name. The LED above this switch will only turn ON when the MIDI channel name is displayed. Axess Electronics : FX1 MIDI Footcontroller User Manual... -
Page 38: Instant Access Switch Names
Press/hold to move/scroll through the 24 instant access switches when the instant access switch number is displayed (as shown above) and press/hold to move/scroll through the available characters/fonts when the instant access switch name is displayed. Axess Electronics : FX1 MIDI Footcontroller User Manual... -
Page 39: Internal Control Change Names
Press/hold to move/scroll through the 24 internal control changes when the internal control change number is displayed (as shown above) and press/hold to move/scroll through the available characters/fonts when the internal control change name is displayed. Axess Electronics : FX1 MIDI Footcontroller User Manual... -
Page 40: Preset Menu
01 & 21. When the cursor is at one of the preset locations the LED above switches 7, 8 and 9 will turn OFF since there are no such presets. Axess Electronics : FX1 MIDI Footcontroller User Manual... -
Page 41: Preset Name
From the Preset Select sub-menu, press the PRESET switch one time. The display will show the name assigned to the preset selected in the Preset Select sub-menu. On a new FX1, the following name will be displayed for the preset shown on the previous page. -
Page 42: Program Change Messages
This sub-menu allows assigning up to 16 MIDI program change messages (one for each MIDI channel) to the preset selected in the Preset Select sub-menu. From the Preset Select sub-menu, press the PRESET switch two times, the display will show (on a new FX1). •... -
Page 43: Instant Access Switch On / Off Status
Any changes made while in this sub-menu will result in the ON/OFF MIDI messages of the displayed instant access switch being transmitted via the MIDI OUT and TO RACK jacks. Axess Electronics : FX1 MIDI Footcontroller User Manual... -
Page 44: Internal Control Change On / Off Status
Any changes made while in this sub-menu will result in the ON/OFF MIDI control change message of the displayed internal control change being transmitted via the MIDI OUT and TO RACK jacks. Axess Electronics : FX1 MIDI Footcontroller User Manual... -
Page 45: Xp1 - Xp4 Preset Settings
MIDI control change value (000 to 127) that the expression pedal port can send when its pedal/switch is moved/pressed. Press the ENTER switch again to return to the top… Axess Electronics : FX1 MIDI Footcontroller User Manual... - Page 46 000 & 127 for the BegValu, MinValu and MaxValu. Entering 444 for the MIDI control change number will cause the FX1 to use the global settings for the expression pedal port when the preset is selected. Entering 999 for the MIDI control change number will turn the expression pedal port off.
-
Page 47: Preset Custom Hex / Midi Message
When creating a custom hex / MIDI message, always start with the 1 byte. Need help creating a custom hex / MIDI message ? Visit the FX1 page on our website and download the MIDI/Hex Calculator (PC only) or the FX1 Editor (both Mac/PC), which includes a built-in calculator…... -
Page 48: Midi Messages For Guitar Players 101
#7 replace n with 6 #11 replace n with A #15 replace n with E #4 replace n with 3 #8 replace n with 7 #12 replace n with B #16 replace n with F Axess Electronics : FX1 MIDI Footcontroller User Manual... - Page 49 ON and the other turns the audio loop or switching function OFF. To turn an audio loop or switching function ON replace vv with 7F. To turn an audio loop or switching function OFF replace vv with 00. Axess Electronics : FX1 MIDI Footcontroller User Manual...
- Page 50 #62 replace pp with 3E #94 replace pp with 5E #126 replace pp with 7E #31 replace pp with 1F #63 replace pp with 3F #95 replace pp with 5F #127 replace pp with 7F Axess Electronics : FX1 MIDI Footcontroller User Manual...
-
Page 51: Songset Menu
15. SongSet Menu The SongSet Menu allows for the FX1’s regular presets to be organized in a custom bank to create a song and multiple songs can then be arranged into a collection of customs banks (each bank represents a song) to create a setlist. -
Page 52: Setlist Create / Edit
Setlists allow songs to be organized in the order they will be preformed so that during a live performance only one bank switch has to be pressed (once) in between songs. The FX1 can support 10 setlists, each with a unique 13 character name, and they are accessed via the SET0 –... -
Page 53: Utility Menu
16. Utility Menu The Utility Menu allows configuring the FX1’s general functionality by selecting its operating mode and defining how the preset switches, instant access switches and expression ports will function when used. Its sub-menu’s also provide access to the user data/dump, delete/restore, expression pedal port calibration and firmware version/update utilities. -
Page 54: S1 - S12 Switch Link
LED combinations. Linking instant access switches on the FX1 will result in one instant access switch (and it’s LED) being assigned to each amplifier channel. So selecting a channel is only one instant access switch press away and figuring out what channel is ON is clearly displayed by a single LED at all times. - Page 55 …). Pressing a linked instant access switch that is OFF, will turn it ON and cause the FX1 to transmit its ON state MIDI messages and turn OFF the other linked instant access switch without transmitting its OFF state MIDI messages.
-
Page 56: Instant Access Switch Type
ON. Releasing the switch transmits its OFF state MIDI messages and turns its LED OFF. When changing presets, switches setup as HOLD type switches do not send any MIDI messages as part of the preset. Axess Electronics : FX1 MIDI Footcontroller User Manual... -
Page 57: Xp1 - Xp4 Port Type
(LogVP) or a switch (SWTCH). Please note that selecting the LinVP option will cause the FX1 to track the pedal taper directly. So if a linear tapered volume pedal is connected, the transmitted MIDI data will be linear and if an audio/logarithmic tapered volume pedal is connected the transmitted MIDI data will be logarithmic. -
Page 58: Xp1 - Xp4 Port Calibration
Typically when using expression pedals, heel down is the minimum position and heel up is the maximum position. To reverse this when using the FX1, simply calibrate the desired expression pedal port(s) with heel up for MINimum and heel down for MAXimum. - Page 59 Press the SELECT switch to assign a MIDI control value of 127 to the current pedal/switch position. The SELECT switch LED will turn OFF and the display will show. Repeat steps 3 to 8 to calibrate the other ports or press the EXIT/SAVE or UTILITY switch to go elsewhere. Axess Electronics : FX1 MIDI Footcontroller User Manual...
-
Page 60: Global Preset Availability
This sub-menu allows the Global Preset to be enabled or disabled when in the PRST and SONG/SET Operating Modes. If enabled, pressing the active preset switch will select the Global Preset and will cause the FX1 to transmit the MIDI data associated with the Global Preset. If the Global Preset is disabled, pressing the active preset switch will cause the FX1 to re-transmit the MIDI data associated with the active preset. -
Page 61: Data Dump / Load
This sub-menu allows the FX1 user data to be DUMPed (transmitted) or LOADed (received) to/from a computer, another FX1 or a MIDI data storage device, via the FX1’s MIDI OUT (not the TO RACK jack) and MIDI IN jacks. User data is DUMPed and LOADed as a MIDI sysex (system exclusive) message. -
Page 62: Delete / Restore
16.8 Delete / Restore This sub-menu allows deleting/restoring a preset, song, setlist, instant access switch or the FX1. From the Edit Menu, press the UTILITY switch eight times, the display will show. • g indicates the preset (1 to 6 or 0 for the Global Preset) that is going to be deleted/restored. - Page 63 (and the bank it’s in), a song, a setlist or an instant access switch. Press the NO switch to abort the delete/restore process, any numbers entered will return to question marks. Press the YES switch to begin the delete/restore process. While the FX1 is deleting/restoring a parameter, the display will show.
-
Page 64: Firmware Version & Update
MIDI IN jack. Visit the FX1 page on our website to see what the current firmware version is and how to get an update (if available). From the Edit Menu, press the UTILITY switch nine times, the display will show (the actual version number may differ depending on when this manual was released/published). - Page 65 Updating The FX1 Firmware (Cont’d) “!RCVG!” will start to flash indicating that the FX1 is receiving the new firmware sysex file. File reception will take approximately 1 minute, so please be patient and let it finish. FYI – the EXIT/SAVE switch LED should be ON and the UTILITY switch LED should still be flashing.
-
Page 66: Cables
17. Cables Using the XPDL:1 – XPDL:4 and/or S11:S12 jacks on the FX1 requires that the proper SHIELDED cable(s) be used. 17.1.1 XPDL & External Switch Using an external switch such as the Boss FS-5L (latching) or FS-5U (momentary) requires the use of a standard ¼”... -
Page 67: S11:S12 & External Dual Footswitch
[ S ] [ R ] [ T ] To FX1 S11:S12 To Boss FS-5U (or similar) = S12 Sleeve = Ground Tip = Inst. Acc. Sw. S11 Ring = Inst. Acc. Sw. S12 Axess Electronics : FX1 MIDI Footcontroller User Manual... -
Page 68: S11:S12 & Single External Footswitch (S11)
¼” TRS (stereo) plug (with its Tip unconnected) on one end and one standard ¼” mono plug on the other end. Axess Electronics : FX1 MIDI Footcontroller User Manual... -
Page 69: Remote Control
When in one of the ten Setlist (SET0 – SET9) Operating Modes, MIDI control change and MIDI program change messages received (via the MIDI IN jack – see Section 8.1.7) on the MIDI channel that the FX1 is set to receive them on (see Section 12.1) will allow for remote selection of the FX1 songs/presets by a sequencer... -
Page 70: Master / Slave Loop
As such, two options exist for powering a Master/Slave Loop of FX1’s. Option #1 – The master FX1 or one of the slaved FX1’s is supplied with power (via its power jack) from an adapter or a power supply capable of supplying enough current for all the FX1’s being used – phantom power will be distributed This option requires that Cable #1 (in the above diagram) has its via the interconnecting MIDI cables. -
Page 71: Master/Slave Cable Details
50ft., but the shorter the better because cable quality will determine the maximum length usable. Cable #1 – The end of this cable that plugs into the TO RACK jack on the FX1 should be a Neutrik 5-pin XLR female plug (p/n NC5FX). -
Page 72: Factory Default Settings
S1 – S12 Switch Link: Link A & B (all switches) = x • XP1 – XP4 Port Type (4 of them) = LinVP • Instant Access Switch Type (24 of them) = LTCH Axess Electronics : FX1 MIDI Footcontroller User Manual... -
Page 73: Midi Implementation Chart
16 byte hex/MIDI message. So though it may not be indicated in the above chart, the FX1 can transmit more messages than just those shown with an O. -
Page 74: Controlling Multiple Gcx's
GCX they are - either GCX#1, GCX#2, GCX#3 or GCX#4. The DMC Ground Control (old version) and the Ground Control Pro do this “behind the scenes” with a short MIDI sysex message. To enable the FX1 to do the same, simply create the following custom hex/MIDI message;... -
Page 75: User Manual Revision History
NAMES switch can be pressed to display the name assigned to the MIDI channel shown and how entering 444 for the BegValu (for the Global Settings only) will cause the FX1 to transmit the MIDI data corresponding to the actual expression pedal position when a preset is first selected. - Page 76 Axess Electronics : FX1 MIDI Footcontroller User Manual...
Need help?
Do you have a question about the FX1 and is the answer not in the manual?
Questions and answers