
Related Manuals for AquaMetrix 2300

Summary of Contents for AquaMetrix 2300
- Page 1 AquaMetrix 2300 Multi-Input Controller Installation and Operation Manual 2300 Controller User’s Manual, Rev. 1.6 Page 0...
-
Page 2: Table Of Contents
Specifications .......................... 4 Installation .......................... 5 2.1. Panel Mounting .......................... 5 2.2. Power, Probe, and Network Cabling .................... 6 2.3. Relay Wiring .......................... 8 2.4. Powering Up the 2300 ........................ 8 2.5. Configuring the 2300 for Network Operation ................ 8 Operating the 2300 from the Front Panel ................ 9 3.1. Front Panel Display ........................ 9 3.2. Optional Pre‐configured Operation ..................... 1 0 3.3. ... - Page 3 6.4.1. Configuring a Totalizer Probe...................... 48 6.4.2. Configuring Differential Sensors .................... 50 6.4.3. Configuring a Flow Sensor for Batch Control ................ 51 Appendix .......................... 52 7.1. Optional I/O Card Types ...................... 5 2 7.1.1. 3‐channel Digital Input + 4‐channel Digital Relay Output card ........... 52 7.1.2. 6‐channel Relay Output card ...................... 53 7.1.3. 7‐channel Digital Input card ...................... 53 7.1.4. 4‐channel Analog Output card .................... 53 7.2. Rebuilding a Corrupted Internal microSD Card ................ 5 6 2300 Controller Quick Start Guide Page 2...
- Page 4 7.3. Email Keyword List ........................ 5 6 7.4. Panel Mounting .......................... 5 8 Register and Get the Latest Firmware .................. 58 2300 Controller Quick Start Guide Page 3...
-
Page 5: Overview
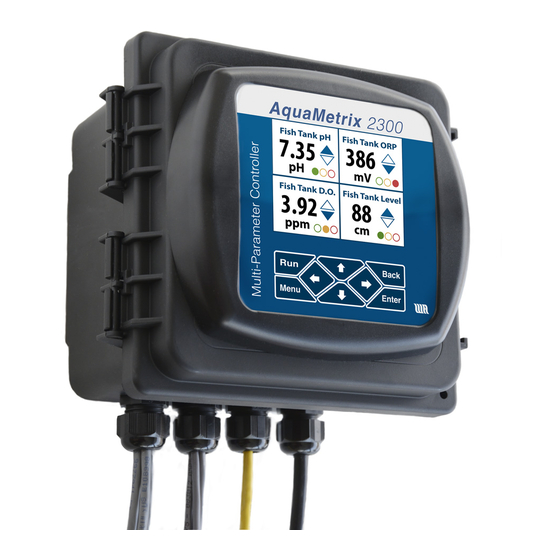
1.1. Introduction The AquaMetrix 2300 Controller is the first multi-input controller that brings web-based operation down to a price that can be afforded by just about any facility. Its combination of features—remote control, data logging, email alerts and seven inputs—are unparalleled in the water monitoring market. Its Setup Wizards make set-up and operation a snap. -
Page 6: Installation
2.1. Panel Mounting Mount the 2300 Controller through the front panel, with the gasket on the outside of the mounting panel. Hook the sliding mounting blocks on each side of the back of the 2300 Controller enclosure and tighten the set-screws against the mounting panel with a torque of 4 in-lb, as shown in Figure 2-1. -
Page 7: Power, Probe, And Network Cabling
2.2. Power, Probe, and Network Cabling A picture of the rear of the 2300 is shown below in Figure 2-2. We recommend removing the Molex connectors and connecting wires to them and then attaching the connectors to the unit. Connect the: ... - Page 8 3-wire probes, which differ in the power connection of the 4-20 mA wiring. Figure 2-3 - Probe wiring diagrams. There are other possible three-wire probe setups, so please refer to your specific probe’s instructions for proper hook up. 2300 Controller Quick Start Guide Page 7...
-
Page 9: Relay Wiring
Relay Wiring The 2300 controller has 4 relays that can be expanded to 10 with the addition of a second card. The relays are capable of handling 120 V @ 10 A or 240 V @ 5 A. They can also be part of a 24 VDC circuit. Unlike the Shark-120 the relays are not powered. -
Page 10: Operating The 2300 From The Front Panel
Front Panel Display The 2300 front panel display shows a series of RUN screens and MENU screens. It does not have the full functionality of the web interface and is meant to be a local display and secondary user interface. -
Page 11: Optional Pre-Configured Operation
3.2. Optional Pre-configured Operation If specified in the order the 2300 controller can come software-preconfigured for six probes, allowing the user to wire up probes and start operation without configuring the unit over the web interface. This 2300 Controller Quick Start Guide... - Page 12 Figure 2-2). Figure 3-2 – The 2300 comes preconfigured to start working without the web-based configuration that still has to be done. The RUN screen showing four analog probe inputs. On the left is a display showing that no probes have been connected. On the right, four analog probes have been connected.
-
Page 13: Front Panel Menu
Commit and Restart The front panel menu choices are limited as the 2300 is designed to be configured and operated over a network via a web browser. However, there are several key functions available to the user on the front panel. -
Page 14: Front Panel Menu 1
Calibrate Analog In Password protected for factory calibration only View Precision Input Not Used Changes from DCHP to Static IP or vice versa, allowing Network Setup settings for network type and web server port. 2300 Controller Quick Start Guide Page 13... -
Page 15: Calibrating Sensors From The Front Panel
3.4. Calibrating Sensors from the Front Panel Most routine operation of the 2300 is most conveniently done through the web interface. However, for some installations—especially industrial ones—calibration may be more conveniently done through the front panel. Note that front panel calibration only allows 2-point calibrations. -
Page 16: Setting Relays From The Front Panel
7. The next screen (not shown) asks you to either Cancel or Proceed with your choice. Select and click on Proceed. 8. The final screen shows the new set points. Click on Run to return to the default quad screen. 2300 Controller Quick Start Guide Page 15... -
Page 17: Saving And Restoring Your Configuration From The Front Panel
Saving and Restoring Your Configuration from the Front Panel Once you have configured the 2300 with probe definitions, relay/alarm set pings and email and server set ups, you can save these settings to the external microSD card via the front panel menu. This is a very feature that is very helpful in case you unit loses its configuration. -
Page 18: Operating The 2300 From A Web Interface
4.2.1. Assigning an IP address via DHCP The easiest method for configuring the 2300 on a LAN is to use DHCP for assigning an IP address for the 2300. (See Section 2.5) You only need to set the Ethernet connection on your computer or smart device to configure the 2399 via DHCP. -
Page 19: Assigning A Fixed Ip Address
In order to access the 2300 from a Wide Area Network (WAN), i.e. outside your facility, you will need the address of your router and the port number of the 2300. If you have only one 2300 to be accessed on a WAN, you can use the Demilitarized Zone (DMZ) on your router so that you don’t need to set up a port... -
Page 20: Setting Up A Direct Ethernet Connection
DMZ he cannot penetrate past this sub-network into your LAN. Most routers’ control centers will allow you to place one IP address in the DMZ—in this case that of the 2300. To access the 2300 within a DMZ from a WAN you only need to enter the external IP address of your LAN. -
Page 21: Settings For Windows
Network). Don’t worry if you see the “Unidentified network” in the Ethernet description. (You can also double click on Ethernet and click on the Properties button in the lower left of the ensuing window.) 2300 Controller Quick Start Guide Page 20... - Page 22 Default Gateway are arbitrary but must be equal to each other. Figure 4-5 - Manual IP v4 settings. The actual values for the IP address and Default gateway are arbitrary but must match. 2300 Controller Quick Start Guide Page 21...
-
Page 23: Settings For The 2300
System Information screen. 5. If the 2300 does not connect to the private network then you will see a screen with the title No IP Address Assigned followed by the message, The system has a network cable inserted but... -
Page 24: Configuring The 2300 Via The Web Interface
The 2300 and the probes are configured using the five buttons along the top of this screen. Their functions and their submenus are described below in Table 2. Note that there are two other levels of password protection, that don’t access everything that the admin level does. -
Page 25: Probe Status
15 minutes. Logging into the 2300 via the web brings up the Probe Status page, an example of which is shown in Figure 5-1Error! Reference source not found. -
Page 26: Remote Display
Email. Select the email address (set up in Setup > Network Setup > Email Setup > Email TO Addresses.) In order to email data logs you must enable email delivery in the Data Logging Configuration Wizard (Section 5.5.1). 2300 Controller Quick Start Guide Page 25... -
Page 27: Alarm Logs
5.4. Setup Configuring a probe with the 2300 using the web interface is easy and fast. The Configuration Wizard will guide you through the entire process. Set-up involves naming the probe, choosing the correct analog input, calibrating the probe and setting alarms and relays. - Page 28 After configuring a sensor, your inputs are summarized on a single screen, as shown on Figure 5-5. Click Submit to lock in the configuration and enable the sensor. The Probe Configuration screen returns so that you can configure another sensor. 2300 Controller Quick Start Guide Page 27...
-
Page 29: User Maintenance
The password may only contain letters or numbers, and a PIN may be added at this point for front panel (LCD) access. User access to the 2300 is logged, allowing traceability of changes made to the controller by username and by time. -
Page 30: Data Logging Configuration
The Data Logging Configuration Wizard allows the user to change these values. Page 1 of the Wizard determines the number of days for which the 2300 keeps log file. Page 2, shown in Figure 5-7, determines the Logging Frequency in seconds and the Delivery Method, either via Manual Download from your... -
Page 31: Network Setup
Ethernet cable connected to a router. The easiest way to enable this is to choose Dynamic Host Control Protocol (DHCP) to allow the router to choose an IP address for the 2300. To do you simply make sure that the checkbox for Use DHCP is checked. -
Page 32: Modbus/Tcp Server Setup
5.6.4. Email Setup Sending Email alerts is an invaluable feature of the 2300. There are two steps to setting up Email alerts: 1. Setting up the Email SMTP server information 2. Setting up the Email receiver information There are four submenus for doing this. - Page 33 Email receiver addresses you set up in the Email To Addresses menu. Click on Send Test Email and look for the message to appear in your inbox. 2300 Controller Quick Start Guide Page 32...
- Page 34 Most wireless phone carriers have email addresses, which allow the content of emails to be sent to a phone as a text message. Emails sent by the 2300 may therefore be sent to most cell phones for instant action, eliminating the delay of checking one’s email. To use this feature you must know the cell phone carrier of the recipient and the domain name of the carrier’s email receiver.
-
Page 35: System Configuration
The time of day sets automatically if the 2300 is connected to the web via an NTP time server. The NTP server is already entered (pool.ntp.org). You may set the time manually if you wish. -
Page 36: Unit Configuration
5.7.3. Unit Configuration During the configuration of a probe the user must specify the units of measurement. The 2300 already has units that are already installed in the firmware this screen allows you to add as many as 9 custom units. -
Page 37: Adding An Analog Sensor
6.2.1. Probe Selection After clicking on the available probe slot you will be asked to select a probe type. Select Analog Probe from the drop-down menu and click on Submit. 2300 Controller Quick Start Guide Page 36... -
Page 38: Probe Information
In the Enter Probe Name field write a short descriptive name for the probe. In the example shown in Figure 6-3, the probe is simply titled “pH.” Figure 6-3 – After choosing the connector to which the probe attaches choose a name for the probe and the type of scaling. 2300 Controller Quick Start Guide Page 37... -
Page 39: Scaling
In the case of the latter, the signal coming into the 2300 simply needs to be scaled to translate current readings to process variable units. However, since we make no distinction in this manual between sensors and transmitters, we use the two terms interchangeably. -
Page 40: Scaling Of A Transmitter Signal
The procedure is similar to that of a true calibration. The difference is that the probe is connected to a transmitter instead of the 2300. The transmitter ‘s 4-20 mA output connects to one of the 2300’s four analog inputs. -
Page 41: Scale Factors
[Enter New Unit] choice at the top of the list and create your own unit. To delete or add units of measure, go to Setup > System Configuration > Unit List. 2300 Controller Quick Start Guide Page 40... -
Page 42: Probe Description
Figure 6-8 – This dialog box allows you to enter any information that might be of use to the user. In this case the probe model is the ES-5-2 and the probe is located in the sump. 2300 Controller Quick Start Guide Page 41... -
Page 43: First Action Configuration
Each probe can be configured to provide multiple alarms, relay activations, and email notifications. The 2300 is designed to allow full flexibility of assigning any or all of these outputs to any or all of the probes, including virtual probes. You are limited only by the number of hardwired relays on your controller, four of which are standard but more of which may be added using an optional card. -
Page 44: Acknowledging Alarms
Figure 6-10. Click on Enter in this new screen and the screen on the left of the figure returns—only this time with a steady red rectangle around the High Alarm row. To switch to the four-up screen press the Run button. 2300 Controller Quick Start Guide Page 43... -
Page 45: Selecting A Relay
6.2.14. Selecting a Relay The relay connector on the back of the 2300 consists of 4 pairs of connectors. An optional card allows the use of an additional 4 pairs. Each pair is a NO (normally open) switch. There is no NC (normally close) input. -
Page 46: Emailing Alarms And Controls
Figure 6-12 - Relay connections on the back of the 2300. The red shaded rectangle shows the relay chosen in the Wizard. 6.2.15. Emailing Alarms and Controls The radio buttons on the bottom of the First Action Configuration enable the 2300’s web server to email (or text) an alarm or relay trip to the addresses. -
Page 47: Probe Selection
(Dig in 1 and Dig in 2) before connecting a flow sensor to the single pulse input probe connector (Dig in 3). Clicking on the Select Input button brings up a picture of the back of the 2300 with a red rectangle surrounding the unused pulse probe (Dig in) connectors. -
Page 48: K-Factor Scaling/Calibration
2300 calculates flow in the correct units. Figure 6-16 shows the screen in which one enters the factory-supplied K-factor. In order for the 2300 to calculate flow in the correct units you must also enter the units of volume and time. In the example in the figure those units are gallons and minutes. -
Page 49: Probe Description
Connecting Virtual Probes One of the most powerful features of the 2300 is its ability to construct “virtual” sensors from real ones. The most common type of virtual sensor is the totalizer, which integrates the flow over time to calculate a total volume. - Page 50 Figure 6-21 - The description for the totalizer is consistent with that for the flow probe to which the totalizer is connected. 2300 Controller Quick Start Guide Page 49...
-
Page 51: Configuring Differential Sensors
Similarly, controls and alarms may also be assigned to the differential value. Be aware that the difference value is already scaled from the input current values, so that further scaling is liable to provide non-meaningful values. The difference value may be either positive or negative. 2300 Controller Quick Start Guide Page 50... -
Page 52: Configuring A Flow Sensor For Batch Control
They are specialized flow totalizers that are used to fill containers in an automated batch filling operation. There are two types of Dispenser Probes selectable in the 2300 Controller. Both are used to action a flow in order to dispense a fixed volume of fluid. The vast majority of users will select the Manual Start Dispenser, which initiates the flow (via a relay) based on input from a contact switch closure. -
Page 53: Appendix
7.1.1. 3-channel Digital Input + 4-channel Digital Relay Output card The 3-channel Digital Input + 4-channel Relay Output card is included with the 2300 standard model. A second card brings to 6 the number of digital inputs and to 8 the number of normally open relay outputs. -
Page 54: 6-Channel Relay Output Card
This card provides for 4 channels of 4-20 mA output loops, which may be programmed via the Action function in the Probe Configuration Wizard. More than one output may be set for an input, and the outputs may be used for the virtual channels as well. 2300 Controller Quick Start Guide Page 53... - Page 55 Select Input button the back of the 2300 showing the Analog Output connector appears, as shown in Figure 7-4. Figure 7-4 - During set-up of an analog probe to a 2300 with an analog output card, the analog output connector (on top) appears.
- Page 56 Figure 7-6 – In this example for linear (2 points) scaling a pH probe value of pH 4 outputs 4 mA and pH 10 outputs 20 mA. The Probe Status screen now displays the 4-20 mA output value. Figure 7-7 shows an example of a pH probe that measures a pH of 5.5 outputs 8.00 mA. 2300 Controller Quick Start Guide Page 55...
-
Page 57: Rebuilding A Corrupted Internal Microsd Card
The next action requires that the user choose Restore from SD Card to copy the configuration from the removable SD Card back to the internal SD Card. Once that has finished and the 2300 restarts, the system is fully operational. - Page 58 Keyword Name Email Keyword Description System Name {{#systemname}} Name of the AquaMetrix 2300 sensor that sent the email message System Time {{#systemtime}} Time that the email message was sent Sensor Name {{#sensorname}} Name of the Sensor that triggered the Alarm...
- Page 59 OPTIONAL ENCLOSURE 8. Register and Get the Latest Firmware Because the 2300 is so ground-breaking we are always working to improve the user interface with cool new features and easier to use old ones. To insure that you receive the latest firmware update please register your 2300 at: http://www.wateranalytics.net/content/registration-your-2300.
Need help?
Do you have a question about the 2300 and is the answer not in the manual?
Questions and answers