Table of Contents
Advertisement
Advertisement
Table of Contents

Related Manuals for Golbong 4901

Summary of Contents for Golbong 4901
- Page 1 PoE IP Bird Box Camera Model: 4901 en Operation and Installation Manual...
-
Page 2: Table Of Contents
WELCOME ................................3 PRODUCT OVERVIEW ............................. 4 HARDWARE INSTALLATION ..........................4 Attach the External Power Adapter........................4 SMARTPHONE OR TABLET APPS ......................... 5 ............................... 5 OWNLOAD APP ................................. 5 EGISTRATION ................6 ONNECTING TO YOUR IP CAMERA ON AN SMART PHONE OR TABLET ............................... -
Page 3: Welcome
Email GOLBONG Customer Support: support@golbong.com Important Security Warning In order to keep your GOLBONG camera secure and prevent unauthorized access, please make sure to follow the steps below: Never use the default password for your camera. Always ensure that your password is at least 8-10 characters long and contains a combination of lowercase characters, uppercase characters as well as numbers. -
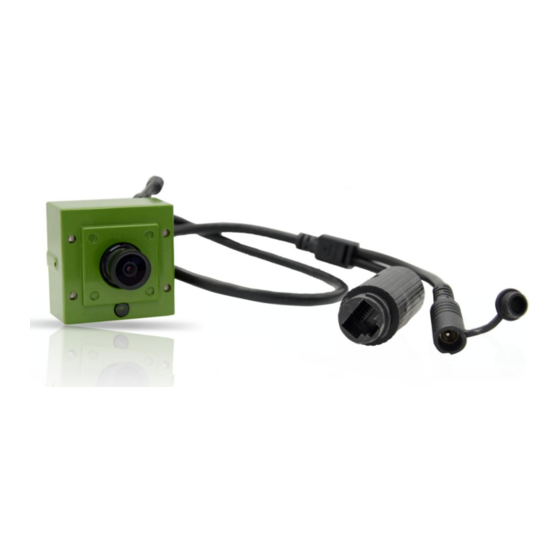
Page 4: Product Overview
Product Overview Hardware Installation Attach the External Power Adapter Connect the power adapter to the power connector on your camera, then plug the power adapter into a wall outlet... -
Page 5: Smartphone Or Tablet Apps
Smartphone or Tablet Apps Download app Download: Search and install the app “XMEYE” in app store or Google play. Registration Register: click “login problems”, press “register” to create a new account. Input E-mail, press the icon “get code” to receive a register code. Create a username and password after receive the code. -
Page 6: Connecting To Your Ip Camera On An Smart Phone Or Tablet
NOTE: the email must be valid to receive the code. The mail box also will use to recover the password in future. Login: return to the login page, input your username and password, click “Cloud Login”. Connecting to your ip camera on an smart phone or tablet. Click the icon “+”... - Page 7 NOTE: Make sure your phone has connected to your the local network. Select the check-box, then press the button icon“ Add” . NOTE: Input the password if required, the default password is blank.
-
Page 8: Live View Interface
Live view interface Click the camera name in the device list, the live view will display. Press the square icon on the upper right corner to enlarge the video to full screen. NOTE: The users can zoom in/out on the screen with fingers. Click “SD/HD”... -
Page 9: Set A Password For The Camera
Adjust the main stream and the sub stream to adapt to your network bandwidth. NOTE: higher frame rate and resolution require higher bandwidth Set a Password for the Camera. In the Live Video page, click the Home icon In the Menu page, press the “Change password ”... - Page 10 Input old password and a new password. Click “Save” NOTE: default password is blank.(No need) Click return icon to enter Device list click the edit icon , a new dialog pop up Select “Edit”...
-
Page 11: Saving Live Stream To Your Smart Phone
Name the device, key in the new password. Click OK to save. Saving live stream to your smart phone In Live Video page, press “camcorder” button to start recording NOTE: Camcorder button will change to Blue when recording is activated. Press camcorder button again to save the video Click return icon to enter Device list... -
Page 12: View Snapshot At Local Files
Press the list icon to enter the main menu Touch “local record” to locate the video on your smart phone. Press the snapshot will start play the video on your phone. Press the edit icon on top right corner, press snapshot to select the video. Press the save icon to save the video to your phone. -
Page 13: Playback Video On Tf Memory Card ( Cameras With Micro Sd Only )
Touch “Local Album” to view the snapshot. Press the edit icon on top right corner, select the snapshot to view the picture. Press the save icon to save the snapshot to your phone. Playback video on TF memory card (cameras with microSD only) Touch home icon in the live view page. -
Page 14: Download Video From Tf Memory Card (Cameras With Micro Sd Only )
The playback video will display. Press the button on right corner, you can select the time unit: h/m/s NOTE: the footage block in Yellow is the video with motion detection. You need to enable the motion recording function in the camera to see the yellow block. Press the speaker icon to activate the sound. - Page 15 2. Choose either download by file or by time Click the “Download” icon, the app start downloading by file Click icon twice to return to device list Press the icon to enter the main menu...
-
Page 16: Optional Receive The Ip Setting From Your Local Network (Dhcp)
Touch “local record” to view the download video. Optional Receive the IP setting from your local network (DHCP) If the IP camera don’t have correct IP setting, especially DDNS, it will failed to receive the push message. 1. Touch home icon in the live view page. 2. -
Page 17: Using Cms5 For Pc Or Mac
Using CMS5 for PC or Mac System Requirements Core 2 Duo 3.0GHz Windows™ 8/7/Vista Operating System Memory Video 512 MB of video memory and above Network (LAN) 10/100 Base-T Network Network (WAN) 1 Mbps upstream High-speed Internet service is required to remotely connect to your system. - Page 18 NOTE: The default username and password of the software is “admin” If you want to revise the login username and password of the software, go to the “Main” click "User Manager" , change the new password. , Click “Add Cameras” to enter a new screen. In the "Main"...
-
Page 19: Optional 1: How To Add The Cameras To Cms5 Outside Of Lan
under “operation”, a new dialog pop up, name the camera, Click “OK” Click the pen icon to save. NOTE: NO password required for camera/NVR in default. You can jump to page-11 to change camera’s password. NOTE: If you want to access the camera over internet, choose cloudID in “Login Type” Once the software has connected the camera successfully, the “Status”... -
Page 20: Optional 2: How To Configure The Network Setting Of The Camera Manually
Optional 2: How to Configure the network setting of the camera manually. , Click “Device Config”, a new screen appear. In the "Main" Select the camera from the list in the top left. All the icon will be activated with color NOTE: If the icon remain black/white, check the connection status of your camera. -
Page 21: Live Video
Modify the IP setting. Click ”OK” to save Important: The DNS should be configured correctly, otherwise the cloud connection and email notification may not be working. NOTE: If you don’t know you network setting, mark “enable DHCP” to receive the IP setting from your local network. -
Page 22: Digital Zoom
NOTE: Double click the name again can close the video. Digital ZOOM Right the video you want to operate digital zoom on the screen, select “Digital Zoom” Hold the left-button on mouse to selected area in red square. Release the mouse to zoom in. Right click mouse again, uncheck “digital zoom”... -
Page 23: Change The Password Of The Camera
Important: You need to enable the audio in the “encode” in order to record the footage with audio. Change the Password of the Camera , click ”Device Config”. Enter ”Tool Manager” on the right screen, A new In the "Main" screen appear. -
Page 24: Recording Live To Your Computer
Recording live to your computer , Click “Record Settings” In the "Main" Mark the check box on the storage setting to select the storage disk from your PC computer. Mark the checkbox to select “Record Schedule” Mark the checkbox in front of “Enable Record”, Click “Apply” button to Save. NOTE: this is the switch button to turn on/off recording. -
Page 25: Playback The Video On Your Computer
Playback the video on your computer , Click “Playback” icon In the "Main" , a new screen appear. Select the channel from the camera list in the upper right corner. Select the time period in the lower right corner. - Page 26 NOTE: It only can search footage within a single day. Click “Search”. The search result will display as below. Select the footage from the list, click play button , the software will start playing. NOTE: Click“ ” can locate the files in the PC computer. Choose the “Time”...
-
Page 27: Recording Live To Tf Memory Card (Cameras With Microsd Only)
Recording live to TF memory card (cameras with microSD only) Format TF memory card , Enter “Device Config” and Click “Disk Manager” In the "Main" Select the memory disk from the list NOTE: Only the model with TF memory card slot, and the TF memory card is installed will display memory information. -
Page 28: Playback The Video From Tf Memory Card ( Cameras With Micro Sd Only )
Important: All the data will be erased with format operation. NOTE: The TF memory card can not be viewed by windows PC directly. Playback the video from TF memory card (cameras with microSD only) , Click “Playback” In the "Main" Click “Device”... - Page 29 NOTE: If choose “Local”, The CMS5 will try to search the footage on the PC computer. Check and select the camera you want to playback. Select the time period in the lower right corner. NOTE: It only can search footage within a single day. Click “Search”.
-
Page 30: Download The Video To Your Computer Hard Drive ( Cameras With Micro Sd Only )
Move the mouse to the time frame, time will display in white. Click the mouse, the software will start playback the footage from this moment. NOTE: the time in red is current playing time stamp. Download the video to your computer hard drive (cameras with microSD only) Click the download icon on the time frame, the software will start download the footage... -
Page 31: Setting Camera Parameters
NOTE: You can find the download folder from “Main” -> System Config Setting Camera Parameters , click “Device Config” icon In the "Main" Click “Camera param” A new screen appear. Day/night Mode – Select “Color”, the camera will always stay on color. -
Page 32: Installing A New Firmware
NOTE: If the environment has significant street light at night, the camera can generate nice color night vision with color mode Slow Shutter – Select “None” will erase motion blur, but low down the sensitivity. Wide Dynamic – Turn on dynamic can improve the performance with strong constrat, but scarify the color reproduction and generate more noise in low light condition. -
Page 33: Web Browser Connection
IMPORTANT: Different model could use different firmware, unless you are sure all the mode share the same firmware, don’t check “Select All” Click the Browser to find the firmware. Click “Upgrade” to upload the firmware. WARNING! DO NOT power off the camera until it shows upgrade successfully in the “Result” Web Browser connection Checking your web browser security level When using the web browser interface, you can install ActiveX controls to connect and view... - Page 34 4. Change the ActiveX controls and plug-ins options that are signed or marked as safe to Enable. Change the ActiveX controls and plug-ins options that are unsigned to Prompt or Disable. Click OK. 5. Click Apply in the Internet Options Security tab window. Windows 7 or above users Internet Explorer for Windows 7 or above operating systems have increased security measures to protect your PC from any malicious software being installed.
-
Page 35: Access The Camera Over Internet
5. Clear the “Require server verification (https:) for all sites in this zone box 6. Enter the IP address in the “Add this website to the zone” field. 7. Click Add, and then click Close 8. Click OK in the Internet Options dialog window. Access the camera over internet 1. - Page 36 NOTE: Ensure that the Active X controls are enabled. 2. Enter your user name and password. Username: admin Password: (no require) 3. Click Login. The web browser window appears in live view mode.
- Page 37 All the designs and software here are subject to change without prior written notice. All trademarks and registered trademarks mentioned are the properties of their respective owners. To contact GOLBONG support, please do one of the following: Visit http://www.golbong.com/contact-us.asp and use the email form or Email GOLBONG Customer Support: support@golbong.com ©...
Need help?
Do you have a question about the 4901 and is the answer not in the manual?
Questions and answers