
Summary of Contents for Health in motion 421
- Page 1 Sunset Swings By Health In Motion ASSEMBLY & OPERATION MANUAL MODEL 421 LOUNGE SWING RECORD SERIAL NUMBER HERE www.sunsetswings.com by Health In Motion 5-01-09 LLC.
- Page 2 421 OWNERS MANUAL READ! VERY IMPORTANT RESIDENTIAL USE ONLY, FOR ADULTS ONLY Caution: Make sure swing has completely stopped before entering or exiting the swing. Be careful as swing may shift while entering or exiting. This swing is for casual relaxation swinging only.
-
Page 3: Table Of Contents
Assembly Instructions 5-14 Leveling Instructions Label Reference Images Label Placement___________________________________________17 General Maintenance_______________________________________ 18 Safety Tips Limited Warranty Warranty Claim Procedure Sunset Swings by Health In Motion reserves the right to alter the specifications of this product at any time. Page 2... -
Page 4: Positioning Your Swing
Positioning Your Swing The swing is designed to be installed on a level surface. There should be a minimum clearance of four feet in front and back, and two feet on each side of your swing. It should be placed in an area where children will not stray or walk into the path of the swing. -
Page 5: Parts List
Parts List 2…………………Male Base Tube 2…………………Female Base Tube 1…………………Lower Upright 1…………………Upper Upright 1…………………Cup Holder 1…………………Top Bracket Assembly 1…………………Canopy Support Assembly 2…………………Arc Support Tube 2…………………Bent Seat Tube 2…………………Separator Assembly 1…………………Seat Fabric 1…………………Head Cross Assembly 4…………………Canopy Rod 1…………………Canopy 1…………………Pillow 1…………………Bearing Assembly Hardware List 4………5/16”-18 x 1 3/4"... -
Page 6: Assembly Instructions
Lower Upright STEP 2 4 – ½” x 3 ¼” Carriage Bolts 4 – ½” Flat Washers 4 – ½” Lock Nuts Female Base Tube Male Base Tube Male Base Tube Female Base Tube STEP 1 Step 1: Connect the Male Base Tubes to the Female Base Tubes as shown in the diagram above. Step 2: Attach the Lower Upright to the Base Tubes using: Four (1/2”... - Page 7 Upper Upright STEP 3 2 – 3/8” x 3 5/8” Carriage Bolts 2 – 3/8” Flat Washers 2 – 3/8” Lock Nuts Cup Holder STEP 4 1 – 3/8” x 2 1/2” Carriage Bolt Lower Upright 1 – 3/8” Flat Washer 1 –...
- Page 8 STEP 5 2 – 3/8” x 4 1/4”” Carriage Bolts NOTE: The Button Head Adjustment 2 – 3/8” Flat Washers should face toward the Upper Upright. 2 – 3/8” Lock Nuts Bearing Assembly NOTE: Do NOT attach upside down! Bolt holes must be on bottom of Top STEP 6 Bracket Assembly 2 –...
- Page 9 Arc Support Tube Arc Support Tube Top Bracket Assembly STEP 8 4 – 3/8” x 2 ¾” Carriage Bolts 4 – 3/8” Flat Washers 4 – 3/8” Lock Nuts Step 8: Attach the Arc Support Tubes to the Top Bracket Assembly using: Four (3/8”...
- Page 10 Arc Support Tubes STEP 9 NOTE: Bolts do not get installed in these holes until step 10 Bent Seat Tubes threaded holes on this (with end to the outside) Step 9: Attach the Bent Seat Tubes (with threaded holes on bottom end to the outside) to the Arc Support Tubes using: Two (3/8”...
- Page 11 IMPORTANT: Do not tighten the bolts in Step 10 until fabric is installed. STEP 10 2 – 5/16” x 1 ¾” Button Head Bolts 2 – 5/16” Lock Washers (against bolt head) 2 – 5/16” Flat Washers 2 – 5/16” T-Nuts Arc Support Tubes STEP 11...
- Page 12 STEP 12 2 – 5/16” x 1 ¾” Button Head Bolts 2 – 5/16” Lock Washers (against bolt head) 2 – 5/16” Flat Washers Bent Seat Tubes Separator Assembly Step 12: Attach a second Separator Assembly to the Bent Seat Tubes using: Two (5/16”...
- Page 13 (Figure 1) Head Cross Assembly Enlarged View Note the orientation of the Head Cross Assembly If the holes do not line up correctly, rotate the Head Cross Assembly 180 degrees horizontally. STEP 13 2 – 3/8” x 2 ¾” Carriage Bolts 2 –...
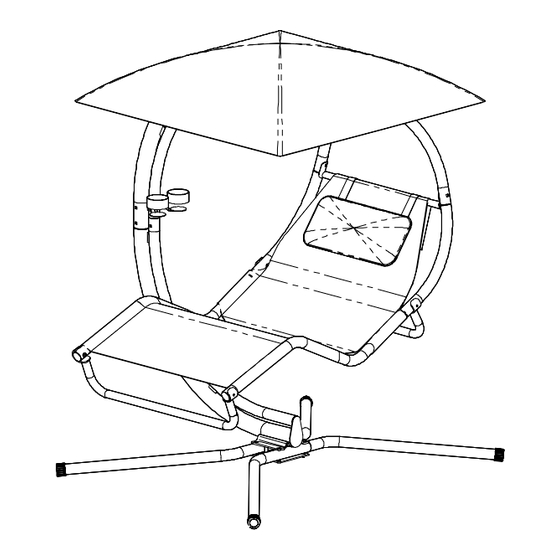
- Page 14 INSTALL THE FIBERGLASS CANOPY RODS STEP 16 Canopy Support Canopy Rod Assembly Canopy Rod Canopy Rod Canopy Rod STEP 15 Attach Pillow Step 15: Install Pillow by attaching the Pillow straps to the Velcro patches on the back of the Seat Fabric.
- Page 15 Canopy Rod Canopy Rod Step 17: The Canopy for the 421 Lounge Swing is a square piece of fabric with pocketed corners. Begin by laying the canopy on top of the Canopy Rods. Next, slide one of the pocketed corners of the Canopy onto one of the Canopy Rods.
-
Page 16: Leveling Instructions
Leveling the Seat (Optional) With the 4mm Allen wrench, make sure the two set screws are loose and do not come in contact with the inner shaft. Then rotate the button head adjustment, with the 6mm Allen wrench, clockwise to tilt swing up and down until seat is level and visually pleasing. Then tighten both set screws. -
Page 17: Label Reference Images
Label Reference Images Page 16... -
Page 18: Label Placement
Label Placement 421 Logo Label Serial # Label on black end cap Maximum Weight Capacity Label Warning Label Page 17... -
Page 19: General Maintenance
GENERAL MAINTENANCE INFORMATION Canopy: In freezing climates, the canopy option should be removed, folded and stored in a dry place before the first freeze or snow, and until the last freeze or snow has passed. The canopy option is not designed for high winds. If high winds are expected, please remove the canopy fabric. -
Page 20: Limited Warranty
PLEASE KEEP THIS FOR YOUR RECORDS Sunset Swings By Health In Motion LIMITED TEN YEAR WARRANTY Sunset Swings warrants this product to the original purchaser to be free from defects in workmanship and/or materials under normal use. If at any time a component part is defective, Sunset Swings shall repair or replace it (at Sunset Swings option) within a reasonable period of time.
Need help?
Do you have a question about the 421 and is the answer not in the manual?
Questions and answers