Table of Contents
Advertisement
Advertisement
Table of Contents

Related Manuals for ALDI Visage 93509

Summary of Contents for ALDI Visage 93509
- Page 1 User Manual Spend a little Live a lot. GROOMING KIT ID: #05007...
- Page 2 This type of software can be downloaded for free from your app store. Try it out now Just scan the QR code with your smartphone and find out more about the Aldi product you have purchased.* Your Aldi Service Portal All details mentioned above can also be found in the Aldi Service Portal at www.aldi.co.uk.
-
Page 3: Table Of Contents
Contents Overview .................... 4 Use ....................... 5 Scope of delivery/device parts ............6 General information ................7 Reading and storing the user manual ..........7 Explanation of symbols................7 Checking the grooming kit and pack contents ........10 Safety ....................10 Proper use ....................10 Safety notes ....................11 Charging .................... -
Page 6: Scope Of Delivery/Device Parts
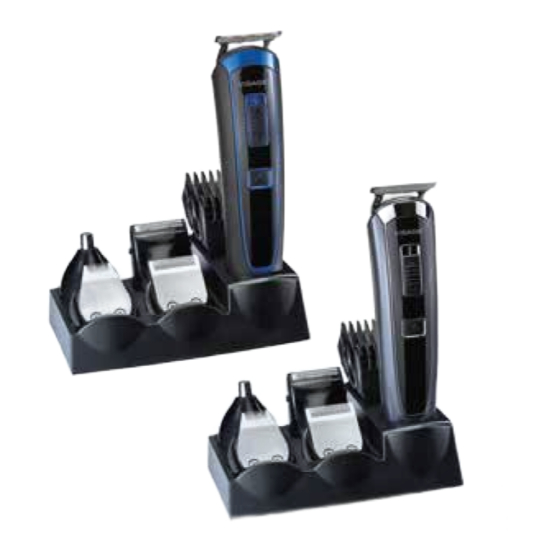
Scope of delivery/device parts Hair trimmer LED indicator symbols On/Off switch Sliding switch for fine adjustment Hair trimmer attachment AC adapter plug Mains cord Barrel plug Charging station Comb attachment for the beard trimmer attachment Comb attachment for the hair trimmer attachment 3 mm Comb attachment for the hair trimmer attachment 6 mm Comb attachment for the hair trimmer attachment 9 mm Comb attachment for the hair trimmer attachment 12 mm... -
Page 7: General Information
General information General information Reading and storing the user manual This user manual accompanies this grooming kit. It contains important information on start- up and handling. Before using the grooming kit, read the user manual carefully. This particularly applies to the safety notes. Non-observance of this user manual may cause damage to the grooming kit. - Page 8 General information Explanation of symbols The following symbols and signal words are used in this user manual, on the grooming kit or on the packaging. WARNING! This signal symbol/word designates a hazard with mod- erate degree of risk which may lead to death or severe injury if not avoided.
- Page 9 General information Protection class II; for mains mode (AC adapter plug). Protection class III; for the device in cordless operation. The grooming kit is equipped with a short-circuit proof safety transformer. The grooming kit has a switching power supply . The grooming kit may only be used in in- door spaces.
-
Page 10: Checking The Grooming Kit And Pack Contents
Safety Checking the grooming kit and pack contents 1. Take the grooming kit out of the packaging. 2. Check to make sure that the delivery is complete (see fig. A–C). 3. Check whether the grooming kit or the individual parts exhibit damage. If this is the case, do not use the grooming kit. -
Page 11: Safety Notes
Safety Safety notes WARNING! Risk of electric shock! A faulty electrical installation or excessive mains voltage may result in an electric shock. − Only connect the grooming kit if the mains voltage of the socket corresponds to the nameplate specification of the AC adapter plug. - Page 12 Safety repairs. Contact a qualified workshop for this. Liability and warranty claims are waived in the event of repairs performed by the user, improper connection of the device or incorrect operation. − Only parts that comply with the original device data may be used for repairs. Electrical and mechanical parts, which are essential for providing protection against sources of danger, are located in...
- Page 13 Safety − Keep the hair trimmer, the AC adapter plug and mains cord away from open flames and hot surfaces. − Lay the mains cord so that it does not pose a tripping hazard. − Do not kink the mains cord and do not lay it over sharp edges.
- Page 14 Safety WARNING! Risk of explosion and fire! Improper handling of the rechargeable bat- tery poses an increased risk of explosion and fire. − Protect the rechargeable battery against mechanical damage. − Never expose the rechargeable batter- ies to excessive heat such as sunlight, fire or similar.
- Page 15 Safety WARNING! Danger for children and persons with impaired physical, sensory or mental ca- pacities (e.g. partially disabled persons, older persons with reduced physical and mental capacities) or lack of experience and knowledge (e.g. older children). − This grooming kit may be used by chil- dren ages eight and over as well as per- sons with impaired physical, sensory or mental capacities or those lacking expe-...
- Page 16 Safety Safety − Do not allow children to play with the packaging wrapper. Children may get caught in it when playing and suffocate. − The pack contents contain small parts. Do not allow children to play with them. CAUTION! Risk of injury! Handling the grooming kit improperly may result in injury.
-
Page 17: Charging
Charging NOTICE! Risk of damage! Improper handling of the grooming kit may result in damage. − To prevent overheating, do not cover the AC adapter plug. − Do not let the hair trimmer fall down. − Do not place the grooming kit on hot surfaces or near sources of heat or open flames. -
Page 18: Charging The Hair Trimmer
Charging 3. Run the mains cord through the oval recess (see fig. G). 4. Insert the barrel plug through the round open- ing so that the jack extends into the charging station. 5. Then turn the locking mechanism 90 degrees over the barrel plug. - Page 19 Charging 1. Place the prepared charging station on a level surface. 2. Insert the AC adapter plug in an easily accessible socket. 3. Place the hair trimmer on the charging station. The hair trimmer has two LED indicator symbols that provide information about the power supply or the re- chargeable battery charge level (see fig.
-
Page 20: Operation
Operation Operation CAUTION! Risk of injury! Handling the hair trimmer improperly may result in injury. − If you use the grooming kit in a bath- room, disconnect the AC adapter plug after use. If water is nearby, there is a risk even if the hair trimmer has been switched off. -
Page 21: Changing The Trimmer Attachments
Changing the trimmer attachments Irrespective of the charge level of the rechargeable battery, you can use the hair trimmer in mains mode at any time. 1. For mains mode operation, make sure that the hair trimmer is switched off. 2. Take the barrel plug out of the charging station 3. -
Page 22: Changing The Comb Attachments
Changing the comb attachments 3. Push the top part of the attachment on the hair trim- mer until it audibly locks into place and is secure. Changing the comb attachments 1. To mount the comb attachments , carefully push the corresponding comb at- tachment over the trimmer attachment. -
Page 23: Beard Trimmer Attachment
Choosing the correct attachment of the head. Then cut the front part of the hair to- wards the middle of the head. 5. Hold the hair trimmer so that the comb attach- ment is flat on the head. Then run it evenly through your hair. -
Page 24: Contour Trimmer Attachment
Choosing the correct attachment 3. Use the beard trimmer attachment without the comb attachment to trim the beard very short or the mous- tache and contours. The cutting edge of the beard trimmer attachment is pointed towards the beard at a right angle. -
Page 25: Shaver Attachment
Choosing the correct attachment Shaver attachment Your skin must be clean and dry. 1. Select the shaver attachment 2. Hold the hair trimmer at a right angle to the sur- face of your skin and gently run it over your face. 3. -
Page 26: Cleaning
Cleaning Cleaning CAUTION! Risk of injury! Handling the hair trimmer improperly may result in injury. − Pull the AC adapter plug before you clean the hair trimmer or charging station. NOTICE! Risk of short circuit! Water that has penetrated the housing may cause a short circuit. -
Page 27: Cleaning The Charging Station
Cleaning such as knives, hard scrapers and the like. They could damage the surfaces. Clean the grooming kit and the attachments used after every use. Cleaning the charging station 1. Pull the AC adapter plug and the barrel plug out before cleaning. 2. -
Page 28: Cleaning The Shaver Attachment
Cleaning − Do not allow the blade oil to come into contact with your eyes. However, if blade oil does end up in your eyes, immediately rinse the blade oil out of your eyes with plenty of water. Consult a physician. - Page 29 Cleaning • When mounting it, make sure that the fastening clips on the shaving foil frame fit into the corresponding recesses on the shaver attachment. Gently push the shaving foil frame down until it audibly locks into place. • From time to time, apply a few drops of acid-free blade oil (e.g.
-
Page 30: Cleaning The Nose/Ear Hair Trimmer Attachment
Troubleshooting Cleaning the nose/ear hair trimmer attachment 1. Take the nose/ear hair trimmer attachment off. 2. Rinse it off with water and let it dry completely be- fore reusing it. Troubleshooting Problem Possible Solution cause The hair trim- The recharge- Use the hair trimmer mer is not able battery is... -
Page 31: Travel Guard
Travel guard The re- There may Make sure that the chargeable be a contact hair trimmer is care- battery is problem with fully positioned on the not charging the barrel barrel plug mount- although the plug. ed in the charging hair trimmer station. -
Page 32: Storage
Storage Deactivating the travel guard Connecting the hair trimmer with the barrel plug and inserting the AC adapter plug in a socket will automatically deacti- vate the travel guard. 1. Hold the On/Off switch down for approx. 3 seconds. The battery symbol will flash green and then illuminate in blue. -
Page 33: Technical Data
Technical data Technical data Article number: 93509 Weight: approx. 437 g Dimensions: approx. 4 × 3.7 × 16.3 cm Output: AC adapter plug Input voltage: 100–240 V ~ 50/60 Hz, 0.2 A max. Output voltage: 5.0 V , 1000 mA Protection class: Ambient conditions: only permitted for indoor... -
Page 34: Disposal
Disposal Disposal Disposing of the packaging Dispose of the packaging separated into single type materials. Dispose of cardboard and carton as waste paper and foils via the recyclable material collection service. Disposing of the grooming kit (Applicable in the European Union and other European states with systems for the separate collection of reusa- ble waste materials) Old devices must not be disposed of with... - Page 35 Disposal Batteries and rechargeable batteries must not be dis- posed of with household waste! As the end user you are required by law to bring all batteries and rechargeable batteries, regardless whether they contain harmful sub- stances* or not, to a collection point run by the communal authority or borough or to a retailer, so that they can be disposed of in an environmentally friendly manner.
- Page 36 00800 - 36 46 36 00 www.aquarius-service.com AFTER SALES SUPPORT...
-
Page 37: Warranty Card
WARRANTY CARD GROOMING KIT Your details: Name Address E-Mail Date of purchase*: * We recommend you keep the receipt with this warranty. Location of purchase Description of malfunction: AFTER SALES SUPPORT If after contacting the man- ufacturer you are requested 00800 - 36 46 36 00 to return the faulty product please return the completed... -
Page 38: Warranty Conditions
Warranty conditions Dear Customer, The ALDI warranty offers you extensive benefits: Warranty period: 3 years from date of purchase. Costs: Free repair/exchange. No transport costs. Hotline: Free hotline. ADVICE: Please contact our service hotline by phone, e-mail or fax before sending in the device. - Page 39 After the expiry of the warranty period, you still have the possibility to have your product repaired at your own ex- pense. If the repair or the estimate of costs is not free of charge you will be informed accordingly in advance. This warranty does not affect your statutory rights.
- Page 40 PRODUCED IN CHINA FOR: ALDI STORES LTD. PO BOX 26, ATHERSTONE WARWICKSHIRE, CV9 2SH ALDI STORES (IRELAND) LTD.
Need help?
Do you have a question about the Visage 93509 and is the answer not in the manual?
Questions and answers
Do you have a list of places in the US where this product can be purchased?