Advertisement
Table of Contents
- 1 Table of Contents
- 2 Safety Precautions and Usage Statements
- 3 Safety Precautions and Usage Statements
- 4 Parts List
- 5 Base Overview
- 6 Quick Reference Guide
- 7 Installation Guide
- 8 Remote Control
- 9 Head Board Bracket Installation
- 10 Emergency Power down Box
- 11 Pairing the Remote
- 12 Setting up Two Bases
- 13 Troubleshooting
- 14 Accessories
- Download this manual
Advertisement
Table of Contents

Summary of Contents for A.H.Beard Genius
- Page 1 Genius ADJUSTABLE BASE OWNER’S MANUAL...
-
Page 2: Table Of Contents
table of contents Safety Precautions and Usage Statements . . . . . . . . . . . . . . . . . . . . . . . . . . . . . . . . . . . . . . . . . . . . . . . . . . . . . . . . . . 1-2 Parts List . -
Page 3: Safety Precautions And Usage Statements
safety precautions and usage statements Attention: Important Safety Disclaimers Read all instructions before using your adjustable base. Save these instructions. To reduce the risk of shock, burns, fire or injury: void the electrical portion of your warranty . Always unplug the base from the electrical outlet before servicing Warranty Warning: any part of the base . -
Page 4: Safety Precautions And Usage Statements
safety precautions and usage statements Pets and Small Children: Acoustics: Immediately dispose of all packing materials as it may pose a The massage function will emit a noticeable tone during operation . smothering risk to small children and pets . To avoid injury, it is not As the massage intensity level is increased, the tone will intensify . -
Page 5: Parts List
parts list Before discarding the packing materials- ensure all the parts are accounted for. All electronics and components that need to be installed are located in boxes under the base or attached to the frame. Wireless Remote Control and (3) AAA batteries Mattress Retainer Bar (1)* Legs (4) Power Cord (1) -
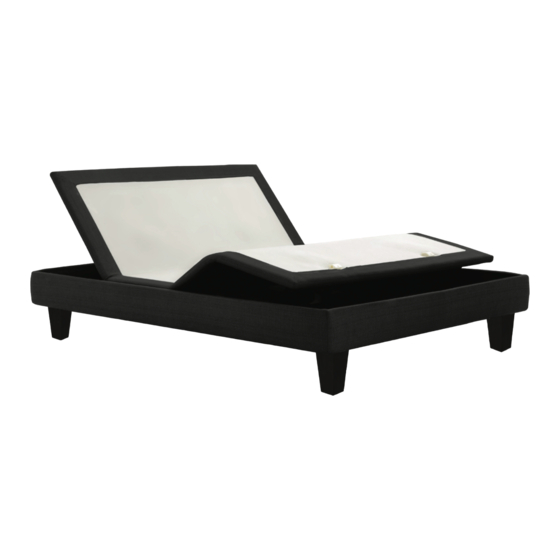
Page 6: Base Overview
base overview Power Foot Down Charger Motor Ports Foot Head Massage Massage Motors Motors Head Control Bluetooth Ports Motor Adapter... -
Page 7: Quick Reference Guide
quick reference guide Control connection ports to head and foot motors (massage and lift). Installed under the base. Power Power Cord Supply Input Power Cord 9V Batteries Bluetooth (not included) Adapter Power Down... -
Page 8: Installation Guide
installation guide Always use two people when setting up the base. STEP 1 STEP 4 Place the bed base box in a desired location with the bottom of the To sync two bases with the SmartSync™ cord - see page 15. box facing up . - Page 9 installation guide STEP 10 If setting up a Divided Queen adjustable base, please see the Attach female end of clip lock section to base . additional instructions that were provided for setup before Follow the bolting diagram to install the Clip Lock Strap . Repeat proceeding.
- Page 10 installation guide STEP 13 This is an optional accessory that can be used if the mattress does not have a Clip Lock System. Ensure batteries are correctly installed in the back of the remote . Quickly test functions to verify proper setup before placing mattress on base .
-
Page 11: Remote Control
remote control REMOTE OVERVIEW MASSAGE FEATURE The MASSAGE button activates and toggles through massage levels 1, 3 and 6 . 10, 20, 30 Minute A 4th press of the button will turn the massage off . Massage Timer Lights The HEAD button will turn on the head massage . Press '+' or '-' to cycle through 6 massage intensities . -
Page 12: Head Board Bracket Installation
headboard bracket installation guide Headboard Brackets are an optional accessory and can be purchased separately. HEADBOARD BRACKET COMPONENTS Headboard Bracket (2) T-Bracket (2) Spacer (2) Long Bolt (8) Short Bolt (10) Nut (18) A 9/16” & 1/2” socket and crescent wrench are necessary to complete installation. STEP 1 a .) Align the hole in the bracket to the brass sleeve into which the leg threads . - Page 13 headboard bracket installation guide STEP 2 STEP 3 You may now connect your headboard to the attachment plates Attach the plastic spacer and T-Bracket . using the remaining short bolts and nuts to secure it to the brackets . The heads of the bolts will face outward . Use a 9/16" a .) Measure the distance between the mounting holes on the socket and 1/2"...
-
Page 14: Emergency Power Down Box
emergency power down box In the event that the base is stuck in an articulated position during a power outage- the Power Down Box will return the base to a flat position. (2) 9 Volt batteries are required to operate the power down feature and are NOT included. STEP 1 STEP 2 Locate the Power Down Box under the base . -
Page 15: Pairing The Remote
pair remote The original remote that comes in the box is already paired to the bed base. No further action is required. In the event that the remote is not paired with the base, follow the steps below. STEP 1 STEP 2 Remove back cover from remote Press and hold button on the back of the remote . -
Page 16: Setting Up Two Bases
setting up two bases If any split setup is being installed, plastic connecting straps are provided (one per base) to secure the bases together. Use both straps to secure the head and foot portions together. STEP 1 STEP 2 With the bases in their Slide side (a) of the connecting strap onto leg bolt . - Page 17 setting up two bases If simultaneous operation of two bases is desired, use the SmartSync Cord to connect the ™ electronics of both bases together. STEP 1 STEP 4 Unplug base from power source . Connect each power-down box male connection to the sync cord female connection (Refer to the illustration below) .
-
Page 18: Troubleshooting
troubleshooting If one or more functions on the bed base have stopped operating: • Check under the bed base to verify that the wired connections are secure and that there are no cords or bedding obstructing the movement of the base . •... -
Page 19: Accessories
accessories 5" Black Powder Coated Leg 7" Black Powder Coated Leg 5" Black Powder Coated Caster 100125 100126 100063 8" Silver Tapered Leg Headboard 100058 Brackets For customer support, visit www.ahbeard.com or call: 1300 654 000... - Page 20 CUSTOMER SERVICE Phone: 1300 654 000 Email: serviceteam@ahbeard.com Web: www.ahbeard.com A.H. Beard Pty Ltd 1/35 Bryant Street ©2016 Ergomotion Inc Padstow NSW 2211 V001_02/2016...
Need help?
Do you have a question about the Genius and is the answer not in the manual?
Questions and answers