
Related Manuals for Quanmax OPS-2000 Series

Summary of Contents for Quanmax OPS-2000 Series
- Page 1 Content OPS-2000 Series Open Pluggable Specification (OPS) Compliant Digital Signage Player with 6th Generation Intel® Skylake-ULT Processor User’s Guide OPS-2000 Series User’s Manual...
-
Page 2: Table Of Contents
Chapter 3 AMI BIOS Setup ....................21 Overview ........................21 Main Menu ......................22 Ad vanced Menu ....................23 Power Menu......................32 Security Menu .......................33 Boot Menu......................34 Save & Exit Menu ....................35 Chapter 4 Driver Installation ....................37 OPS-2000 Series User’s Manual... -
Page 3: Figures
Figure 1 Front / Rear IO ..................15 Figure 2 DP signal output selection..............17 Figure 3 Mechanical Dimensions................18 Figure 4 Connect the DP/ HDMI cab le...............19 Figure 5 Connecting USB mouse & keyboard ..........20 Figure 6 Network cab le with RJ45 connector ...........20 OPS-2000 Series User’s Manual... -
Page 4: Tables
Tables Tables Table 1 OPS-2000 series Specification..............14 Table 2 OPS-2000 Series BIOS Main Menu .............22 Table 3 Advanced Menu ..................23 Table 4 Advanced Menu – Display Configuration..........24 Table 5 Advanced Menu – Super IO Configuration..........25 Table 6 Advanced Menu – Super IO Configuration – Serial Port 1 Configuration ....................25... -
Page 5: Safety Instructions
Turn off system power, turn off the power supply, and then disconnect the power cord from its source before removing the chassis cover. Turning off the system power switch does not remove power to components. OPS-2000 Series User’s Manual... -
Page 6: When Working Inside A Computer
ESD procedure to reduce the risk of damage to components. We strongly encourages you to follow proper ESD procedure, which can include wrist straps and smocks, when servicing equipment. You can also take the following steps to prevent damage from electrostatic discharge (ESD): OPS-2000 Series User’s Manual... -
Page 7: Instructions For Lithium Battery
Do not dispose of lithium batteries in domestic waste. Dispose of the battery according to the local regulations dealing with the disposal of these special materials (e.g. to the collecting points for disposal of batteries) OPS-2000 Series User’s Manual... -
Page 8: Preface
Reorient or relocate the receiving antenna. Increase the separation between the equipment and receiver. Connect the equipment to an outlet on a circuit different from that to which the OPS-2000 Series User’s Manual... - Page 9 The assembler of a personal computer system may be required to test the system and/or make necessary modifications if a system is found to cause harmful interference or to be noncompliant with the appropriate standards for its intended use. OPS-2000 Series User’s Manual...
-
Page 10: Maintaining Your Computer
Operating a system at a high altitude (low pressure) can cause electrical problems related to arcing and corona effects. This condition can also cause sealed components with internal pressure, such as electrolytic capacitors, to fail or perform at reduced efficiency. OPS-2000 Series User’s Manual... - Page 11 Surge protectors should be used with all UPS systems, and the UPS system should be Underwriters Laboratories (UL) safety approved. OPS-2000 Series User’s Manual...
-
Page 12: Chapter 1 Introduction
Chapter 1 Introduction Overview OPS-2000 Series is an OPS-Compliant media player for digital signage application. This embedded hardware platform boasts the 6th Generation Intel® Skylake-ULT Core™ i processor and therefore it is stunning by greatly enhanced graphics performance and energy efficiency to respond to the requirements for the state-of-the-art applications. -
Page 13: Product Specifications
Real Time Clock: Processor integrated RTC TPM: optional 1x Pow er Botton w / LED (on front) 1x Reset Button (on front) System Control & 1x HDD LED (on front) Monitoring 1x Wireless LED (on front) 1x CPU Smart Fan Cooling OPS-2000 Series User’s Manual... -
Page 14: Table 1 Ops-2000 Series Specification
Weight Operating Temperature: 0°C ~ 45°C / 32°F ~ 113°F Environmental Storage Temperature: -20°C ~ 80°C / -4°F ~ 176°F Characteristics Humidity: 0% ~ 90%, non-condensing CE, FCC Class A Certifications Table 1 OPS-2000 series Specification OPS-2000 Series User’s Manual... -
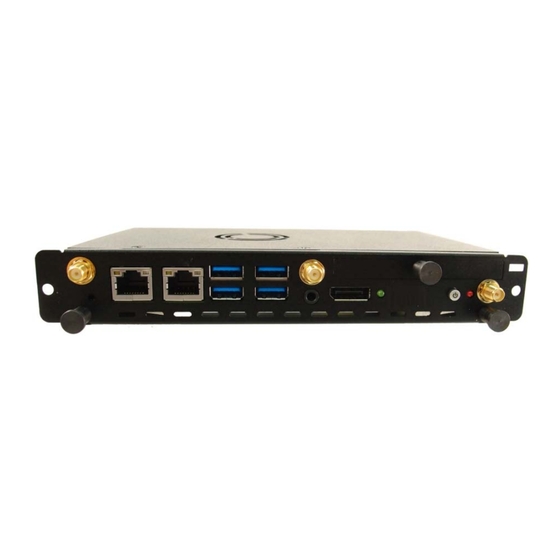
Page 15: System Tour
The power LED will light when the PC is power-on. HDD LED (Red) The hard disk LED blinks when data is being written into or read from the HDD. WiFi LED (Green) When the data is Transferring, the WiFi LED will blink. OPS-2000 Series User’s Manual... - Page 16 A connector to connect DP**, HDMI2.0*, Stereo Line-out, USB3.0, USB2.0, UART and System Fan Speed Control Signal. (*) HDMI2.0 function is not applicable to the follow ing m onitors: LG 27MU67-B, LG 27UD68, AOC U2879VF, LG 65UF850T, QD980, Dell S2817Q & ASUS MX27UQ. OPS-2000 Series User’s Manual...
-
Page 17: Figure 2 Dp Signal Output Selection
Chapter 1 (**) DP selectable by HW Sw itch DP to B2B (JAE Plug Connector) DP to Rear I/O Figure 2 DP signal output selection OPS-2000 Series User’s Manual... -
Page 18: Mechanical Dimensions
Chapter 1 Mechanical Dimensions Dimension: 200 x 30 x 119 mm (W x H x D) Figure 3 Mechanical Dimensions OPS-2000 Series User’s Manual... -
Page 19: Chapter 2 Getting Started
Getting Started Setting up your PC ■ Connect the monitor, mouse and keyboard Connecting the monitor Connect the DP/ HDMI cable from your display to the DP port. Figure 4 Connect the DP/ HDMI cable OPS-2000 Series User’s Manual... -
Page 20: Figure 5 Connecting Usb Mouse & Keyboard
Connecting to a network device Connect one end of a network cable to the LAN port on the system rear panel and the other end to a hub or switch. 2x LAN Figure 6 Network cable with RJ45 connector OPS-2000 Series User’s Manual... -
Page 21: Chapter 3 Ami Bios Setup
It is possible for the CMOS battery to fail, which will cause data loss in the CMOS only. If this happens you will need to reconfigure your BIOS settings. OPS-2000 Series User’s Manual... -
Page 22: Main Menu
The Main Menu provides System Overview information and allows you to set the System Time and Date. Use the “<” and “>” cursor keys to navigate between menu screens. Table 2 OPS-2000 Series BIOS Main Menu BIOS SETUP UTILITY A d v a n c e d... -
Page 23: Advanced Menu
> Network Stac k ESC: Exit > H/W Monitor Version 2.17.1255. C opyright (C) 2016, American M egatrends, Inc. Onboard LAN 1 Controller Options: Disabled, Enabled Onboard LAN 2 Controller Options: Disabled, Enabled Audio Controller Options: Disabled, Enabled OPS-2000 Series User’s Manual... -
Page 24: Table 4 Advanced Menu - Display Configuration
Options:32M, 64M, 96M, 128M, 160M, 192M, 224M, 256M, 288M, 320M, 352M, 384M, 416M, 448M, 480M, 512M, 1024M DVMT Total Gfx Mem Options: 128M, 256M, MAX OPS DDI Setting Options: By HW Jump Setting, Front DP Enabled, Back DP Enabled OPS-2000 Series User’s Manual... -
Page 25: Table 5 Advanced Menu - Super Io Configuration
IO=3F8h; IRQ=3, 4, 5, 6, 7, 9, 10, 11, 12; IO=2F8h; IRQ=3, 4, 5, 6, 7, 9, 10, 11, 12; IO=3E8h; IRQ=3, 4, 5, 6, 7, 9, 10, 11, 12; IO=2E8h; IRQ=3, 4, 5, 6, 7, 9, 10, 11, 12; OPS-2000 Series User’s Manual... -
Page 26: Table 7 Advanced Menu - Super Io Configuration - Serial Port
IO=2F8h; IRQ=3, 4, 5, 6, 7, 9, 10, 11, 12; IO=3E8h; IRQ=3, 4, 5, 6, 7, 9, 10, 11, 12; IO=2E8h; IRQ=3, 4, 5, 6, 7, 9, 10, 11, 12; Serial Port 2 Type Options: RS232, RS422, RS485 OPS-2000 Series User’s Manual... -
Page 27: Table 8 Advanced Menu - Cpu Chipset Configuration
Turbo Mode Options: Disabled, Enabled Hyper-threading Options: Disabled, Enabled VT-d Options: Disabled, Enabled Active Processor Cores Options: All, 1 Limit CPUID Maximum Options: Disabled, Enabled Execute Disable Bit Options: Disabled, Enabled Intel® Virtualization Tech Options: Disabled, Enabled OPS-2000 Series User’s Manual... -
Page 28: Table 9 Advanced Menu - Sata Configuration
[Enabled] Version 2.17.1255. C opyright (C) 2016, American M egatrends, Inc. SATA Controller(s) Options: Enabled, Disabled SATA Mode Selection Options: AHCI, R AID Serial ATA Port 1 Options: Disabled, Enabled mSATA Port 1 Options: Disabled, Enabled OPS-2000 Series User’s Manual... -
Page 29: Table 10 Advanced Menu - Usb Configuration
USB Mass Storage Driver Support [Enabled] ESC: Exit Version 2.17.1255. C opyright (C) 2016, American M egatrends, Inc. Legacy USB Support Options: Enabled, Disabled XHCI hand-off Options: Enabled, Disabled USB Mass Storage Driver Support Options: Disabled, Enabled OPS-2000 Series User’s Manual... -
Page 30: Table 11 Advanced Menu - Network Stack
Enter: Sel ect +/-: Change Opt. F1: General H elp F2: Previous Values F3: Optimized Defaults F4: Save & Reset ESC: Exit Version 2.17.1255. C opyright (C) 2016, American M egatrends, Inc. Network Stack Options: Disabled, Enabled OPS-2000 Series User’s Manual... -
Page 31: Table 12 Advanced Menu - H/W Monitor
: +0.872 V Version 2.17.1255. C opyright (C) 2016, American M egatrends, Inc. CPU Warning Temperature Options: Disabled, 80 C, 85 C, 90 C, 95 C Smart FAN Configuration CPU FAN Setting [Smart] ■ Options: Manual , Smart OPS-2000 Series User’s Manual... -
Page 32: Power Menu
Resume By LAN De vice Options: Disabled, Enabled Resume By PCI-E Device Options: Disabled, Enabled Resume By Ring De vice Options: Disabled, Enabled Resume By RTC Alarm Options: Disabled, Enabled Watchdog Timer Configuration [Disabled] WDT Function ■ Options: Disabled, Enabled OPS-2000 Series User’s Manual... -
Page 33: Security Menu
Version 2.17.1255. C opyright (C) 2016, American M egatrends, Inc. Secure Boot menu [Disabled] Secure Boot ■ Options: Disabled, Enabled [Custom] Secure Boot Mode ■ Options: Standard, Custom Key Management ■ [Disabled] Provision Factory Default keys Options: Disabled, Enabled OPS-2000 Series User’s Manual... -
Page 34: Boot Menu
Version 2.17.1255. C opyright (C) 2016, American M egatrends, Inc. Full Screen LOGO Display Options: Disabled, Enabled Bootup Numlock State Options: On, Off CSM Support Options: Enabled, Disabled Boot Option Filter Options: UEFI and Legacy, Legacy only, UEFI only OPS-2000 Series User’s Manual... -
Page 35: Save & Exit Menu
+/-: Change Opt. Save C hanges F1: General H elp Discard Changes F2: Previous Values F3: Optimized Defaults Restore Defaults F4: Save & Reset ESC: Exit Version 2.17.1255. C opyright (C) 2016, American M egatrends, Inc. OPS-2000 Series User’s Manual... - Page 36 Load Optimal Default values for all the setup values. This option allows you to load failsafe default values for each of the parameters on the Setup menus, which will provide the most stable performance settings. The F8 key can be used for this operation. OPS-2000 Series User’s Manual...
-
Page 37: Chapter 4 Driver Installation
Chapter 4 Chapter 4 Driver Installation If your OPS-2000 Series does not come with an operating system pre-installed, you will need to install an operating system and the necessary drivers to operate it. After you have finished assembling your system and connected the appropriate power source, power it up using the power supply and install the desired operating system.
Need help?
Do you have a question about the OPS-2000 Series and is the answer not in the manual?
Questions and answers