Table of Contents
Advertisement
Quick Links
Advertisement
Table of Contents

Subscribe to Our Youtube Channel
Related Manuals for Tiptop Audio CIRCADIAN RHYTHMS

Summary of Contents for Tiptop Audio CIRCADIAN RHYTHMS
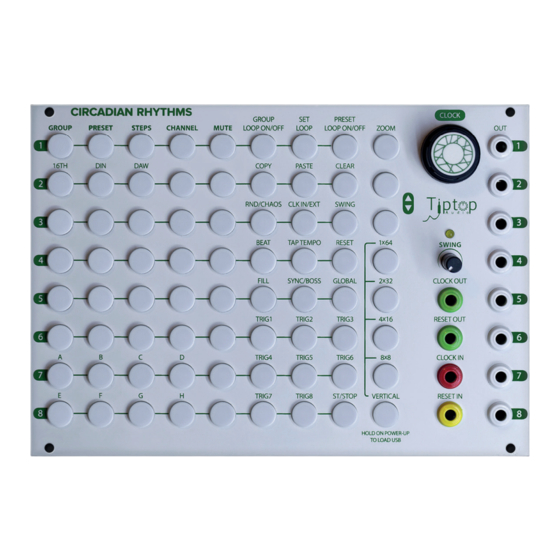
- Page 1 CIRCADIAN RHYTHMS User Manual...
- Page 2 Circadian Rhythms for modular music composers...
-
Page 3: Table Of Contents
INDEX Introduction Programming Triggers and Gates ..........p.02 p.41 Section 1 Channel Step Editing ......p.41 Quick Start Tutorials ......p.03 Trigger Buttons ........p.42 1 - Vertical View Basics ..... p.03 2 - Other Views ......... Fills p.07 3 - Groups and Presets Plus Copy, Trigger Recording Paste and Save ...... -
Page 4: Introduction
• Gate width outputs gates up to 64 steps long Introduction Thank you for purchasing the Circadian Rhythms. The CR (as we’ll refer to it henceforth) is a uni- que rhythm sequencer for the Eurorack format that takes the original idea behind the XOX step se- quencer and transforms it into a more flexible performance tool that encourages improvisation and experimentation. -
Page 5: Vertical View Basics
Quickstart Tutorial 1: Vertical View Basics For the purposes of this exercise, we’ll use the Tiptop 808 BD, Hihats, and Snares, but you can use any module that takes a gate or a trigger for an input to make a sound (for example, this could be an envelope generator triggering a VCA or a lo pass gate). - Page 6 Channel column and output Channel 1, steps and output...
- Page 7 Steps is where you can program your triggers/gates that will generate a rhythm. In Vertical view, the Steps will appear vertically. Steps are a collection of eight steps. It’s always a collection of eight steps, not six or three, just eight. Ok, so we’re viewing Channel 1’s fi rst set of Steps.
- Page 8 Snare out example QST 1: Review • CR has multiple views. The Vertical view is the primary view for editing and utility functions. • The CR’s outputs correspond to Channels. • Steps are a collection of eight steps. Steps output to Channels. •...
-
Page 9: Other Views
Quickstart Tutorial 2: Other Views Don’t reset the classic house/techno rhythm pattern we programmed in the previous tutorial. Let’s explore the other four views besides Vertical. As stated earlier, Vertical is the primary view for programming rhythms. However, the CR’s views can be used in performance to program and/or view your Steps on the fl y. - Page 10 You can edit your step patterns here in the 8x8 view also. Some users may prefer to start program- ming rhythms here in this view. The other three non-Vertical views besides the 8x8 view are similar except that they show patterns larger than eight steps in length.
- Page 11 Quickstart Tutorial 3: Groups and Presets Plus Copy, Paste, Clear, and Save So far, we’ve made a pretty simple rhythmic pattern, seen it in different views in the CR, and had the opportunity to edit in those views. Now, we’re going dive into groups and presets which will pave the way for more complex pattern programming.
- Page 12 You should have this pattern in Preset 1 which is the first button in Vertical under the Preset column. Now, press the button for Preset 2 below Preset 1. You should hear no sound being output. This pre- set is empty because you haven’t filled in this preset. Press the button for Preset 1 and you should hear your original pattern.
-
Page 13: Looping Presets And Groups For More Complex Patterns
Looping Presets and Groups for More Complex Patterns Let’s explore Groups. Groups are structurally similar to Presets except that Groups contain 8 Pre- sets. Right now, we should be in Group 1. If you Press Group 2 (one button down from Group 1 in the Group column), Group 2 will illuminate and you will hear no sound. - Page 14 An Aside: The Ladder of Being The Ladder of Being is an old concept used to describe a hierarchical set of containers that fit insi- de one another. The CR’s groupings are structured like the Ladder of Being. For more info: http:// en.wikipedia.org/wiki/Great_chain_of_being Going down the ladder: A Group has eight Presets.
- Page 15 Quickstart Tutorial 4: Looping Presets and Groups for More Complex Patterns “Yes,” you are saying, “groups and presets are interesting and all, but our patterns are still only 8 steps in length. How can I make patterns that are 16, 32, 64, or even 256 steps in length?” Enter looping.
- Page 16 Simple House/Techno pattern variation for Group 1, Preset 2 Switch back to Vertical View for the Loop programming. To Loop these two presets and create a longer pattern, we need to press the Set Loop button. Looking at the Presets column, this shows us which presets are currently part of our Preset loop.
- Page 17 Preset Looping active: Group 1, Preset 2 for Channel 3 (Snare) shown. Here’s what is really cool: Switch to the 4x16 View. You have a 16 Step Loop pattern of 2 Presets and you can now view and edit the Steps in this View (or any of the other nXn Views). If you want to add additional Presets to your loop, press the Preset Loop On/Off button.
- Page 18 From our Presets example, copy Group 1 to Group 2. For Presets 1 and 2 in Group 2, add an addi- tional Snare hit and add some variations to your HiHat pattern. To Loop Groups 1 and 2 and Presets 1 and 2 from each Group, we need to press the Set Loop button and the Group Loop On/Off.
-
Page 19: Zoom Programming
Advanced Tutorial 1: Zoom Programming Zoom is another view, but one with a very specifi c and micro-focused purpose: Zoom allows you to program your currently 8-step Step sequence at micro resolution. If we enter Zoom view, we can see our pattern, but instead of having only 8 steps, we have 48; the extra steps are between the standard 8 steps and we refer to them as Sub-Steps. - Page 20 PRIMARY HITHATS TRIGGERS SUB STEP Zoom view: HiHats example with Sub Steps. A little music math behind the Zoom resolution might be useful here: the 6 SubSteps increase the resolution from the standard 16th notes to a 96th note. In terms of Parts Per Quarter Note (PPQN), 16th notes are 4 PPQN (1⁄4 the duration of a quarter note) while Zoom is 24 PPQN (4 PPQN * 6) which is a popular resolution for a number of reasons.
- Page 21 Zoom view: HiHats example with Sub Steps. Note, you can only edit Zoom steps in Zoom view. You’ll need to switch to Zoom mode from Vertical or one of the NxN views if you want to make changes to your current pattern that contains Zoomed sub-steps.
-
Page 22: Fills And Programming Triggers
Advanced Tutorial 2: Fills and Programming Triggers Fills A Fill in the CR is a user-triggered drum fi ll that is designed to be used in performance to add accents or for whenever else you’d want to add a drum fi ll. The Fill that is generated in the CR is simply a set of consecutive triggers of varying note length (1/4, 1/8, 1/16, 1/32 and 1/64 either straight, as triplets, or dotted notes). - Page 23 Please note your fills are NOT recorded in your Step sequences. Fills are designed for live perfor- mance. Let’s have some fun and have a fill with 1/32 triplets. Press the Fill button again to select options for your fill. The Preset column has divisions from top to bottom of triplet notes of 1/4, 1/8, 1/16, 1/32 duration.
-
Page 24: Programming Gates
Advanced Tutorial 3: Programming Gates The CR doesn’t generate only triggers. It can also generate gates in Patterns. As a review, triggers and gates are both “on-off” voltage signals used to activate another module (for example, to start an envelope generator, advance a clock, or fire a Tiptop BD808). The main diffe- rence between the two is the length of each and how they are used. - Page 25 Gate Example in Vertical View Gates can run or be created in any view, not only Vertical as in our example. Gates can be looped and manipulated (for example, copied and pasted) just like triggers.
- Page 26 Advanced Tutorial 4: Syncing the Circadian Rhythm to Your DAW (or Any Clock) Because a true standard for synchronization has never been established, multiple methods for analog and digital clock synchronization have been developed for different electronic music devices and their manufacturers. We are hopeful this section can resolve some of the confusion that has emerged over the years due to the absence of standardization.
- Page 27 Before starting the application section, a few technical notes: • The rising edge of the pulse triggers the clock. Many audio interfaces have AC coupling which may invert the rising edge of the pulse. The clock input of the CR is designed with this in mind, so AC-coupled audio interfaces should work fine with the CR.
- Page 28 Applications Expert Sleepers Silent Way Expert Sleepers have a set of VST/AU plugins called ‘Silent Way’ which provide a range of utility functions from CV pitch control to Envelope and LFO generation to Synchronization. In this section, a standard audio interface will be used for signals and not the hardware made by Expert Sleepers for Eurorack.
- Page 29 To set up DAW sync using SW Sync, simply set the PPQN value to 24 as shown below. (24 pulses per quarter note x 4 for a four beat measure = 96th notes). Silent Way Sync Set for DAW Sync One last step: set the right sync on the CR.
- Page 30 Tiptop has provided some source clock audio files at various BPMs on the Tiptop Audio website. To use the audio sync file, simply follow the directions above for using SW Sync, but substitute the audio sync file.
- Page 31 The above image shows an audio pulse in the Ableton Clip window sent by Silent Way through the audio output and recorded back into a track in Ableton. Notice the silence at the start of the region, this is the delay Ableton has not automatically compensated internally. Measuring the exact number of samples of silence is the best method for compensation.
- Page 33 CR Tips: Performance and Programming Ideas • CR isn’t just for programming drums and beats. For example, you can use it to drive the clock for melodic sequencers, creating melodies that have more interesting rhythms. • The reset input can be used to create fascinating complexity out of a few simple ingredients. Triggering the CR’s reset input from other modules can create non-regular patterns that ge- nerate complex rhythms (and poly- or cross-rhythms).
-
Page 34: Functions In Detail
Circadian Rhythm Functions in Detail This section walks through each of the CR’s functions and describes them in detail. The functional details include some additional functional and technical details that are not covered in the quickstart tutorials above. We suggest using this as a reference after walking through the quickstart tutorials. View - a view is the UI display mode for the step data. -
Page 35: Views
Views Vertical view Vertical view displays access to most of the functions of the CR. It is arranged in vertical columns instead of in horizontal rows like the other views. The columns are from left to right: Group: Selects the Group for display and editing. The current Group is shown with a green LED. Preset: Selects a Preset to edit. - Page 36 In Beat Continue mode, groups and presets are switched immediately and the step is not reset. In Beat Sync mode, Groups or Presets are only switched at the end of each preset. Fill: Pressing the Fill button activates the Fill for the trigger buttons on and off. While Fill is active, press the Fill button a second time switches to Fill UI to select the fill rate.
-
Page 37: 8X8 View
Trigger 3/6: See trigger 1/4/7 above. Start/Stop: Starts and stops playback. When you press Stop, all current data is written to the internal memory (this can take up to 2 seconds to complete). The button will turn red when the save is com- plete. - Page 38 Zoom Zoom view offers editing of an additional 6 sub steps per 16th note and a single Channel in a Preset at a time. These additional 6 substeps are 24 PPQ (4 PPQ 16th note * 6 substeps) resolution and allow for the entry of intervals other than 16ths like triplets and dotted notes.
-
Page 39: Clock In
MIDI serial message to an analog clock pulse will sync the CR to MIDI. SyncBus: A parallel cable connection between Tiptop Audio modules that carries clock, reset and preset data. The next page has more detail on SyncBus including diagrams for cable connection. - Page 40 SyncBus The clock signal is the internal clock rate and effectively replaces the internal clock of the slave de- vice. This is the most precise method to sync multiple Tiptop Syncbus devices like the CR or Trigger Riot. When multiple CR are connected, not only is the clock shared, but the slave modules will fol- low the ‘Boss’...
-
Page 41: Swing
Swing The CR can add swing on both 8th and 16th notes. To enable swing, enter vertical view and press the swing button. The first press will turn the button green indicating 8th note swing, pressing again turns the button red for 16th note swing. Pressing the button again disables swing and the led is off. Swing amount is set by the swing knob. -
Page 42: Looping
LOOPING The CR can build loops at both Preset and Group levels. Each group can have its own loop consisting of any of the 8 presets. A loop of any of the 8 groups can be made as well. Preset Loops To create a loop of presets inside a group of any of the presets: 1. -
Page 43: Programming Triggers And Gates
Programming triggers and gates As described in Advanced Tutorial 3, Triggers and Gates only differ in their duration. Triggers are short pulses. Gates are longer, sustained pulses. Triggers are great for triggering short sounds like drum sounds; however, Gates are needed for playing the sustained notes of a synth sound, for example using the Z4000 envelope generator with the Sustain knob set high. -
Page 44: Trigger Buttons
Trigger buttons In Vertical view, each trigger channel has a dedicated button for triggering single pulses, fills or ma- nually recording steps. With fill and recording off, pressing one of the trigger buttons outputs a single short trigger of that channel. -
Page 45: Updating Firmware
Startup functions Updating the CR Firmware From time-to-time, Tiptop releases firmware updates to some of its modules including the CR. The- se firmware updates include changes to the hardware that fix bugs as well as add new features or improve current features. Firmware updates are applied to the CR via a USB flash drive (memory stick) connected to the USB port on the module back. -
Page 46: Mode D
Mode D About Mode D Mode D is based on suggestions from Richard Devine (Mode D for Devine) to make the pattern playback more experimental. The change to the Fills makes for randomized splatters of fills rather than a steady pulse of them. Additional input was provded by Joeseph Fraioli. Additional Features •... - Page 47 Saving and Loading using a USB Drive Firmware version 023 adds the ability to save the internal sequence date to an external USB drive. The drive needs to be in the same format (MS DOS FAT32) as what is used for updating the fir- mware.
-
Page 48: Specifications
Specifications Width - 36HP Depth - 29.4mm inclusive of USB and cables +12v - 160mA -12v - 0mA +5v - 0mA Trigger Out - +5 volts Clock Out - +12 volts with no load, approx +5V with load. Reset Out - +12 volts with no load, approx +5V with load. Clock In max - +12 volts Clock In min - +4V Reset In max - +12 volts...
Need help?
Do you have a question about the CIRCADIAN RHYTHMS and is the answer not in the manual?
Questions and answers