Advertisement
Advertisement
Table of Contents

Subscribe to Our Youtube Channel
Summary of Contents for Kathmandu Cycle Computer
- Page 1 Wired Cycle Computer Instruction Manual...
-
Page 3: Table Of Contents
Contents: 1. Supply 9. Reset 2. Assembly / Instructions 10. Battery Replacement 3. Keys & Functions 11. Care & Maintenance 4. Modes 5. LCD Display 6. Basic Operations 7 . Wheel Size 8. General Settings... -
Page 4: Supply
SUPPLY A. Main Unit B. Bracket C. Bracket Sleeve D. Wheel Magnet E. Cable Ties F. Wired Speed Transmitter MAGNET Page 2... - Page 5 ASSEMBLY / INSTALLATION: Transmitter 1. Using the cable ties, loosely mount the speed transmitter to the fork blade. Ensure that this is on the same side of the bike as the handlebar bracket. 2. Screw the magnet loosely onto the wheel spoke, ensure it is on the same side as the transmitter.
- Page 6 ASSEMBLY / INSTALLATION: Wheel Magnet / Angle 3. Adjust the position of the magnet and sensor, the magnet must pass through FORK the sensor zone, the maximum clearance SENSOR distance between them is 5mm. If the magnet and sensor are not close enough the computer will not pick up a reading.
- Page 7 ASSEMBLY / INSTALLATION: Main Unit 1. Place unit on bracket. 2. Slide down until the “click” sound appears. Page 5...
-
Page 8: Keys & Functions
KEYS & FUNCTIONS Page 6... - Page 9 Page 7...
-
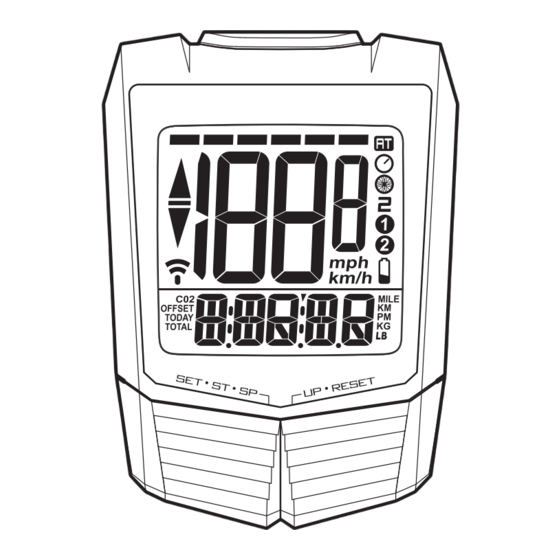
Page 10: Lcd Display
LCD DISPLAY Mode Indicator Marks which mode you are currently on. Pace Arrow The arrows indicate if your current speed is above, below or neutral to your average speed. Speed Window Displays current speed and is always visible in any mode. Low Battery Indicates the batteries are low. - Page 11 LCD DISPLAY Auto / Manual Visible when the Auto-mode is on. Wheel Measurement Visible when setting tire size. Sub-Modes Visible when user is viewing sub-measurements Data Window Displays a wide range of Bike 1 / Bike 2 functions and data that are Indicates which bike mode you are measured by the speed and on and can be selected in settings.
-
Page 12: Basic Operations
BASIC OPERATIONS: Getting Started Getting Started When the computer is turned on whenever the battery is re-installed, the following start up settings will automatically begin. Wheel Size km/h or mph Clock See pages 18-19 (GENERAL SETTINGS) for setting sequences. Follow the icons on top. Once the setting is done the standby screen will be visible. - Page 13 LCD Display Start/Stopping Measurements When Auto-mode is on, the computer detects the wheel spinning and starts measurement automatically in sync with the bicycle. Start/Stopping measurement with the SET/START/STOP key will be disabled. When Auto-mode is off, the computer starts/stops the measurement manually with the SET/START/STOP key.
- Page 14 BASIC OPERATIONS: Power-Saving Power-Saving When the computer is inactive for 10 minutes, it will enter the power-saving mode, where only the clock will be visible. When the computer is inactive for 2 weeks or more it will enter sleep mode, where all visible information will be disabled.
- Page 15 WHEEL SIZE: Measuring the Circumference Front Axle (radius) mm x 6.28=WS Measure Ground Roll forward once Wheel Circumference Page 13...
-
Page 16: General Settings
GENERAL SETTING Clock Bike 1 or 2 Hold adjust enter setting press mode next variable press adjust press adjust enter enter any mode press mode next variable press mode press mode toggle 12/24 toggle 1 or 2 Mode press reset + digit press adjust... - Page 17 GENERAL SETTING Km/h or mph Wheel Size AT ON / OFF press adjust press adjust press adjust press adjust enter enter enter enter press mode press mode press mode press mode toggle unit confirm next variable next variable press adjust press reset press...
-
Page 18: Reset
RESET INDIVIDUAL RESET: Hold the RESET key for 2 seconds will reset the data for a specific mode. Hold the RESET key for 2 seconds * CO2 and ODO will not reset. Reset individual data Page 16... -
Page 19: Battery Replacement
BATTERY REPLACEMENT Warning: Keep batteries away from children. If swallowed, contact a doctor immediately. Warning: Batteries contain chemical substances. They should be disposed of properly according to local regulations. Battery Type: CR2032 Lithium Battery Life: The battery is estimated to last 1 year depending on frequency and use of certain features. -
Page 20: Care & Maintenance
- Store your cycle computer in a dry place when not in use. - Avoid allowing the cycle computer to come into direct contact with hair liquids, colognes, sun block, creams and other toiletries which can cause deterioration of the plastic parts.
Need help?
Do you have a question about the Cycle Computer and is the answer not in the manual?
Questions and answers