Table of Contents
Advertisement
Available languages
Available languages
Quick Links
VSX-520
Discover the benefits of registering your product online at
http://www.pioneer.co.uk
Découvrez les nombreux avantages offerts en enregistrant votre produit en ligne
http://www.pioneer.fr
maintenant sur
Зарегистрируйте Baшe изделие на
http://www.pioneer.eu). Oзнакомьтесь с преимуществами регистрации в Интернет
Operating Instructions
Mode d'emploi
Инструкции по эксплуатации
-S/-K
(or http://www.pioneer.eu).
(ou http://www.pioneer.eu).
http://www.pioneer-rus.ru
(или
Advertisement
Chapters
Table of Contents

Related Manuals for Pioneer VSX-520-S


Summary of Contents for Pioneer VSX-520-S
- Page 1 Discover the benefits of registering your product online at http://www.pioneer.co.uk (or http://www.pioneer.eu). Découvrez les nombreux avantages offerts en enregistrant votre produit en ligne http://www.pioneer.fr maintenant sur (ou http://www.pioneer.eu). http://www.pioneer-rus.ru Зарегистрируйте Baшe изделие на (или http://www.pioneer.eu). Oзнакомьтесь с преимуществами регистрации в Интернет Operating Instructions Mode d’emploi Инструкции по эксплуатации...
- Page 2 IMPORTANT CAUTION RISK OF ELECTRIC SHOCK DO NOT OPEN CAUTION: The lightning flash with arrowhead symbol, The exclamation point within an equilateral within an equilateral triangle, is intended to TO PREVENT THE RISK OF ELECTRIC triangle is intended to alert the user to the alert the user to the presence of uninsulated SHOCK, DO NOT REMOVE COVER (OR presence of important operating and...
- Page 3 Information for users on collection and disposal of old equipment and used batteries Symbol for These symbols on the products, packaging, and/or accompanying documents mean equipment that used electrical and electronic products and batteries should not be mixed with general household waste. For proper treatment, recovery and recycling of old products and used batteries, please take them to applicable collection points in accordance with your national legislation.
-
Page 4: Table Of Contents
Thank you for buying this Pioneer product. Please read through these operating instructions so you will know how to operate your model properly. After you have finished reading the instructions, put them away in a safe place for future reference. - Page 5 08 Making recordings Making an audio or a video recording ..47 09 Other connections Bluetooth® ADAPTER for Wireless Enjoyment of Music....48 Wireless music play .
-
Page 6: Flow Of Settings On The Receiver
Flow of settings on the receiver The unit is a full-fledged AV receiver equipped The colors of the steps indicate the following: with an abundance of functions and terminals. Required setting item It can be used easily after following the procedure below to make the connections and settings. -
Page 7: Before You Start
Before you start Chapter 1: Before you start • Batteries with the same shape may have different voltages. Do not use different Checking what’s in the box batteries together. Please check that you’ve received the following • When disposing of used batteries, please supplied accessories: comply with governmental regulations or •... -
Page 8: Ventilation
Before you start Ventilation When installing this unit, make sure to leave space around the unit for ventilation to improve heat dispersal (at least 40 cm at the top). If not enough space is provided between the unit and walls or other equipment, heat will build up inside, interfering with performance and/or causing malfunctions. -
Page 9: Controls And Displays
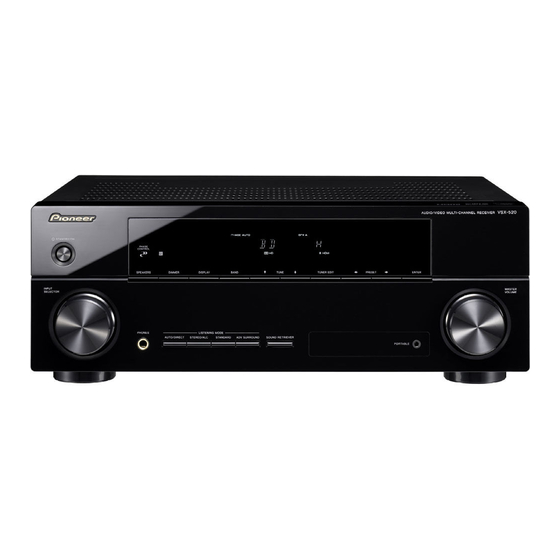
Controls and displays Chapter 2: Controls and displays Front panel VSX-520 AUDIO/ VIDEO MULTI- CHANNEL RECEIVER PHASE CONTROL STANDBY/ON SPEAKERS DIMMER DISPLAY BAND TUNE TUNER EDIT PRESET ENTER INPUT MASTER SELECTOR VOLUME PHONES LISTENING MODE AUTO/DIRECT STEREO/ALC STANDARD ADV SURROUND SOUND RETRIEVER MCACC SETUP MIC ... -
Page 10: Operating Range Of Remote Control
Controls and displays TUNER EDIT Operating range of remote control Use with TUNE /, PRESET / and The remote control may not work properly if: ENTER to memorize and name stations for • There are obstacles between the remote recall (page 43, 44). control and the receiver’s remote sensor. -
Page 11: Display
Controls and displays Display PHASE PRESET information or input signal indicator Lights when the Phase Control is switched on (page 33). Shows the preset number of the tuner or the input signal type, etc. AUTO 10 Character display Lights when the Auto Surround feature is switched on (see Auto playback on page 30). - Page 12 Controls and displays Lights when a source with Dolby Digital Plus encoded audio signals is detected. Lights when a source with Dolby TrueHD encoded audio signals is detected. Lights to indicate Dolby Digital EX decoding. 2PLll(x) Lights to indicate 2 Pro Logic II / 2 Pro Logic IIx decoding.
-
Page 13: Remote Control
As for operating other devices, the remote min – 60 min – 90 min – Off). You can check control codes for the Pioneer products are the remaining sleep time at any time by preset. The settings cannot be changed. - Page 14 Controls and displays STEREO/A.L.C. Press TUNER first to access: Switches between stereo playback, Auto TUNER EDIT level control stereo mode (page 32) and Memorizes/names stations for recall Front Stage Surround Advance modes (page 43, 44). (page 32). PTY SEARCH STANDARD Use to search for RDS program types Press for Standard decoding and to switch (page 45).
- Page 15 Dims or brightens the display. The brightness can be controlled in four steps. 12 SOURCE Turns on or off the power of the Pioneer DVD/ DVR units when BD, DVD, DVR or CD is selected using the MULTI CONTROL buttons.
-
Page 16: Connecting Your Equipment
Connecting your equipment Chapter 3: Connecting your equipment Placing the speakers By connecting the left and right front speakers (L/R), the center speaker (C), the left and right surround speakers (SL/SR), and the subwoofer (SW), a 5.1 ch surround system can be enjoyed. Further, by using an external amplifier, you can connect the left and right surround back speakers (SBL/SBR) and the left and right front height speaker (FHL/FHR) to boost your system up to a 7.1 ch surround system. -
Page 17: Hints On The Speaker Placement
Connecting your equipment Hints on the speaker placement • Try not to place the surround speakers farther away from the listening position Where you put your speakers in the room has a than the front and center speakers. Doing big effect on the quality of the sound. The so can weaken the surround sound effect. -
Page 18: Connecting The Speakers
Connecting your equipment Bare wire connections Connecting the speakers Front speaker terminals: The receiver will work with just two stereo Twist exposed wire strands together. speakers (the front speakers in the diagram) Loosen terminal and insert exposed wire. but using at least three speakers is recommended, and a complete setup is best Tighten terminal. -
Page 19: Connect The Surround Back Or Front Height Speakers
Connecting your equipment CAUTION Making cable connections • These speaker terminals carry Make sure not to bend the cables over the top HAZARDOUS LIVE voltage. To prevent of this unit (as shown in the illustration). If this the risk of electric shock when connecting happens, the magnetic field produced by the or disconnecting the speaker cables, transformers in this unit may cause a... -
Page 20: Hdmi Cables
Connecting your equipment HDMI cables • Input of multi-channel linear PCM digital audio signals (192 kHz or less) for up to 8 Both video and sound signals can be transmitted channels simultaneously with one cable. If connecting the player and the TV via this receiver, for both •... -
Page 21: Digital Audio Cables
Connecting your equipment Digital audio cables About video outputs Commercially available coaxial digital audio cables or optical cables should be used to connection connect digital components to this receiver. This receiver is not loaded with a video converter. When you use component video cables or HDMI cables for connecting to the input device, the same cables should be used for connecting to the TV. -
Page 22: Connecting A Tv And Playback Components
Connecting your equipment Connecting a TV and playback components Connecting using HDMI Connecting your component with no HDMI terminal If you have an HDMI or DVI (with HDCP) equipped component (Blu-ray disc player, This diagram shows connections of a TV and etc.), you can connect it to this receiver using a DVD player (or other playback component) commercially available HDMI cable. -
Page 23: Connecting A Satellite Receiver Or Other Digital Set-Top Box
Connecting your equipment Connecting a satellite receiver Connecting an HDD/DVD or other digital set-top box recorder, VCR and other video sources Satellite and cable receivers, and terrestrial digital TV tuners are all examples of so-called This receiver has audio/video inputs and ‘set-top boxes’. -
Page 24: Using The Component Video Jacks
Connecting your equipment Important Using the component video jacks • If you connect any source component to Component video should deliver superior the receiver using a component video picture quality when compared to composite input, you must also have your TV video. -
Page 25: Connecting Antennas
Connecting your equipment Using external antennas Connecting antennas To improve FM reception Connect the AM loop antenna and the FM wire Use a PAL connector (not supplied) to antenna as shown below. To improve reception connect an external FM antenna. and sound quality, connect external antennas (see Using external antennas below). -
Page 26: Plugging In The Receiver
Check the power cord once in a while. If you find it damaged, ask your nearest Pioneer authorized independent service company for a replacement. • Do not use any power cord other than the one supplied with this unit. -
Page 27: Basic Setup
Basic Setup Chapter 4: Basic Setup Switch on the receiver. Automatically setting up for Connect the microphone to the MCACC surround sound (MCACC) SETUP MIC jack on the front panel. Make sure there are no obstacles between the The Auto Multi-Channel Acoustic Calibration speakers and the microphone. -
Page 28: Other Problems When Using The Auto Mcacc Setup
Basic Setup If the noise level is too high, NOISY! blinks in Again, try to be as quiet as possible while this the display for five seconds. To exit and check is happening. It may take 1 to 3 minutes. the noise levels again, press SETUP (see the The Auto MCACC Setup has finished! notes about ambient noise below) or press... -
Page 29: Listening To Your System
Listening to your system Chapter 5: Listening to your system Press AUTO/DIRECT to select ‘AUTO Important SURROUND’ and start playback of the source. • The listening modes and many features If you’re playing a Dolby Digital or DTS described in this section may not be available depending on the current source, surround sound DVD disc, you should hear surround sound. -
Page 30: Auto Playback
Listening to your system • While listening to a source, press STANDARD. Auto playback If the source is Dolby Digital, DTS, or Dolby The simplest, most direct listening option is the Surround encoded, the proper decoding Auto Surround feature. With this, the receiver format will automatically be selected and automatically detects what kind of source shows in the display. -
Page 31: Using The Advanced Surround Effects
Listening to your system With multichannel sources, you can select • DOLBY DIGITAL EX – Creates surround from: back channel sound for 5.1 channel sources and provides pure decoding for • DOLBY PLIIz HEIGHT – Up to 7.1 channel 6.1 channel sources (like Dolby Digital sound Surround EX) •... -
Page 32: Listening In Stereo
Listening to your system • EXT.STEREO – Gives multichannel sound to a stereo source, using all of your Using Front Stage Surround speakers. Advance The Front Stage Surround Advance function allows you to create natural surround sound Listening in stereo effects using just the front speakers and the When you select STEREO you will hear the subwoofer. -
Page 33: Using Stream Direct
Listening to your system Using Stream Direct Better sound using Phase Control Use the Stream Direct modes when you want to hear the truest possible reproduction of a This receiver’s Phase Control feature uses source. All unnecessary signal processing is phase correction measures to make sure your bypassed. -
Page 34: Listening With Acoustic Calibration Eq
Listening to your system Phase Control technology provides coherent sound reproduction through the use of phase Using surround back channel matching for an optimal sound image at your processing listening position. The default setting is on and You can have the receiver automatically use 6.1 we recommend leaving Phase Control or 7.1 decoding for 6.1 encoded sources (for switched on for all sound sources. -
Page 35: Setting The Up Mix Function
Listening to your system While holding down the PRESET on • SB AUTO – Matrix decoding processing for the front panel, and hold the STANDBY/ generating the surround back component from the surround component is switched ON for about two seconds. automatically. - Page 36 Listening to your system Setting What it does Option(s) Switches on/off the effect of Acoustic Calibration EQ. (Acoustic Calibration S.DELAY Some monitors have a slight delay when showing video, so 0.0 to 9.0 (frames) (Sound Delay) the soundtrack will be slightly out of sync with the picture. 1 second = 25 frames By adding a bit of delay, you can adjust the sound to match (PAL)
- Page 37 Listening to your system Setting What it does Option(s) HDMI Specifies the routing of the HDMI audio signal out of this receiver (amp) or through to a TV. When THRU is selected, (HDMI Audio) THRU no sound is output from this receiver. A.DLY This feature automatically corrects the audio-to-video delay between components connected with an HDMI cable.
-
Page 38: Choosing The Input Signal
Listening to your system Choosing the input signal Using the headphone On this receiver, it is possible to switch the • Insert the headphone into the PHONES input signals for the different inputs as jack. described below. The sound is heard from the headphone and no •... -
Page 39: The System Setup Menu
The System Setup menu Chapter 6: The System Setup menu These settings are designed to fine-tune your system, but if you’re satisfied with the settings Using the System Setup menu made in Automatically setting up for surround The following section shows you how to make sound (MCACC) on page 27, it isn’t necessary detailed settings to specify how you’re using to make all of these settings. -
Page 40: Speaker Setting
The System Setup menu Speaker setting • Surround (S) – Select LARGE if your surround speakers reproduce bass Use this setting to specify your speaker frequencies effectively. Select SMALL to configuration (size, number of speakers). It is a send bass frequencies to the other good idea to make sure that the settings made speakers or subwoofer. -
Page 41: Crossover Network
The System Setup menu Crossover network When the surround back speakers are connected: • Default setting: 100Hz L C R SR SBR SBL SL SW This setting decides the cutoff between bass sounds playing back from the speakers When the front height speakers are connected: selected as LARGE, or the subwoofer, and bass L... -
Page 42: The Input Assign Menu
The System Setup menu • For the assignment of the digital signal inputs, see Choosing the input signal on The Input Assign menu page 38. You only need to make settings in the Input Assign menu if you didn’t hook up your equipment according to the default settings for The Pre Out Setting the component video inputs. -
Page 43: Using The Tuner
Using the tuner Chapter 7: Using the tuner High speed tuning Press and hold TUNE / for high speed Listening to the radio tuning. Release the button at the The following steps show you how to tune in to frequency you want. FM and AM radio broadcasts using the automatic (search) and manual (step) tuning Improving FM stereo sound... -
Page 44: Listening To Station Presets
Using the tuner Tune to a station you want to memorize. See Listening to the radio on page 43 for more on this. • To erase a station name, follow steps 1 and 2, and press ENTER while the display is Press TUNER EDIT. -
Page 45: An Introduction To Rds
Using the tuner AUDIO TUNER EDIT MASTER PARAMETER VOLUME TOOLS MENU An introduction to RDS MENU RECEIVER SLEEP SOURCE CONTROL Radio Data System (RDS) is a system used by ENTER RECEIVER DTV/TV INPUT SELECT most FM radio stations to provide listeners with INPUT HOME various kinds of information—the name of the... -
Page 46: Displaying Rds Information
Using the tuner Displaying RDS information Use the DISP button to display the different types of RDS information available. • Press DISP for RDS information. Each press changes the display as follows: • Listening mode • Master volume • Radio Text (RT) – Messages sent by the radio station. -
Page 47: Making Recordings
Making recordings Chapter 8: Making recordings Select the source you want to record. Use the MULTI CONTROL buttons (or INPUT Making an audio or a video SELECTOR). recording Select the input signal (if necessary). You can make an audio or a video recording Press the button then press RECEIVER... -
Page 48: Other Connections
Note 1 • It must be necessary that the Bluetooth wireless technology enabled device supports A2DP profiles. • Pioneer does not guarantee proper connection and operation of this unit with all Bluetooth wireless technology enabled devices. 2 • It must be necessary that the Bluetooth wireless technology enabled device supports AVRCP profiles. -
Page 49: Connecting Optional Bluetooth
Other connections Connecting Optional Bluetooth Bluetooth wireless technology device to enable Bluetooth communications. For more ADAPTER details, see also the operating instructions of • Before making or changing connections, your Bluetooth wireless technology device. switch off the power. Press TOP MENU. Press ENTER to enter PAIRING. -
Page 50: Listening To Music Contents Of Bluetooth
® The Bluetooth word mark and logos are registered trademarks owned by Bluetooth SIG, Inc. and any use of such marks by Pioneer Corporation is under license. Other trademarks and trade names are those of their respective owners. Note 1 PIN code may in some case be referred to as PASSKEY. -
Page 51: Additional Information
If the trouble cannot be rectified even after exercising the checks listed below, ask your nearest Pioneer authorized service center or your dealer to carry out repair work. • If the unit does not operate normally due to external effects such as static electricity disconnect the power plug from the outlet and insert again to return to normal operating conditions. - Page 52 Additional information Problem Remedy Broadcast stations cannot • Connect an outdoor antenna (refer to page 25). be selected automatically. No sound from surround or • Connect the speakers properly (refer to page 18). center speakers. • Refer to Speaker setting on page 40 to check the speaker settings. •...
- Page 53 Additional information Problem Remedy The Bluetooth wireless • Check that no object that emits electromagnetic waves in the 2.4 GHz technology device cannot band (microwave oven, wireless LAN device or Bluetooth wireless be connected or operated. technology apparatus) is near the unit. If such an object is near the unit, Sound from the Bluetooth set the unit far from it.
-
Page 54: Hdmi
Additional information HDMI Symptom Remedy No picture or sound. • If the problem still persists when connecting your HDMI component directly to your monitor, please consult the component or monitor manual or contact the manufacturer for support. No picture. • Video signals that are input from the analog video terminal will not output from the HDMI terminal. -
Page 55: Important Information Regarding The Hdmi Connection
Additional information Important information regarding Resetting the main unit the HDMI connection There are cases where you may not be able to Use this procedure to reset all the receiver’s route HDMI signals through this receiver (this settings to the factory default. Use the front depends on the HDMI equipped component panel controls to do this. -
Page 56: Specifications
HDMI terminal ....Type A (19-pin) Copyright © 2010 Pioneer Corporation. HDMI output type ....5 V, 100 mA All rights reserved. - Page 57 Additional information...
- Page 58 IMPORTANT ATTENTION DANGER D´ELECTROCUTION NE PAS OUVRIR ATTENTION : Ce symbole de l’éclair, placé dans un Ce point d’exclamation, placé dans un triangle équilatéral, a pour but d’attirer POUR ÉVITER TOUT RISQUE triangle équilatéral, a pour but d’attirer l’attention de l’utilisateur sur la présence, à D’ÉLECTROCUTION, NE PAS ENLEVER LE l’attention de l’utilisateur sur la présence, COUVERCLE (NI LE PANNEAU ARRIÈRE).
- Page 59 Information à destination des utilisateurs sur la collecte et l’élimination des équipements et batteries usagés Ces symboles qui figurent sur les produits, les emballages et/ou les documents Marquage pour les d’accompagnement signifient que les équipements électriques et électroniques et équipements batteries usagés ne doivent pas être jetés avec les déchets ménagers et font l’objet d’une collecte sélective.
- Page 60 Nous vous remercions pour cet achat d’un produit Pioneer. Nous vous demandons de lire soigneusement ce mode d’emploi ; vous serez ainsi à même de faire fonctionner l’appareil correctement. Après avoir bien lu le mode d’emploi, le ranger dans un endroit sûr pour pouvoir s’y référer ultérieurement.
- Page 61 07 Utilisation du tuner Pour écouter la radio....43 Amélioration du son stéréo FM ..43 Mémorisation de stations préréglées .
-
Page 62: Organigramme Des Réglages Sur Le Récepteur
Organigramme des réglages sur le récepteur Cet appareil est un récepteur AV à part entière Les couleurs des étapes ont la signification suivante : présentant un grand nombre de fonctions et de Point de réglage nécessaire prises. Il peut être utilisé facilement lorsque les raccordements et les réglages mentionnés ci- dessous ont été... -
Page 63: Mise En Place Des Piles
Chapitre 1 : Avant de commencer • Insérez les piles en respectant les indications de polarité situées à l’intérieur Vérification des accessoires du boîtier. livrés avec l’appareil • Des piles de même forme peuvent avoir Veuillez vérifier que les accessoires suivants des voltages différents. -
Page 64: Ventilation
Ventilation En installant cet appareil, veuillez vous assurer de bien laisser un espace de ventilation suffisant autour afin de permettre une meilleur dispersion de la chaleur (au moins 40 cm sur le dessus). Si l’espace entre l’appareil et le mur ou un autre appareil est insuffisant, la chaleur s’accumulera à... -
Page 65: Commandes Et Affichages
Chapitre 2 : Commandes et affichages Panneau frontal VSX-520 AUDIO/ VIDEO MULTI- CHANNEL RECEIVER PHASE CONTROL STANDBY/ON SPEAKERS DIMMER DISPLAY BAND TUNE TUNER EDIT PRESET ENTER INPUT MASTER VOLUME SELECTOR PHONES LISTENING MODE AUTO/DIRECT STEREO/ALC STANDARD ADV SURROUND SOUND RETRIEVER MCACC SETUP MIC ... -
Page 66: Portée De La Télécommande
PRESET / Portée de la télécommande Ces touches permettent de sélectionner La télécommande ne fonctionnera pas des stations de radio préréglées (page 43). correctement : Cadran MASTER VOLUME • Si des obstacles se trouvent entre la télécommande et le capteur de Voir la section PHONES télécommande du récepteur. -
Page 67: Affichage
Affichage PHASE Voyant des informations préréglées ou du S’allume lorsque la touche Phase Control est signal d’entrée sélectionnée (page 33). Indique le nombre de canaux préréglé du syntoniseur ou le type de signal d’entrée, etc. AUTO S’allume lorsque l’option Auto Surround est 10 Afficheur alphanumérique sélectionnée (voir la section Lecture en mode Affiche diverses informations sur le système. - Page 68 12 Voyants Dolby Digital 16 DIR. S’allume lorsque le mode DIRECT ou PURE DIRECT est sélectionné (page 33). S’allume lorsqu’un signal Dolby Digital encodé est détecté. S’allume lorsqu’une source comportant des signaux audio Dolby Digital Plus encodés est détectée. S’allume lorsqu’une source comportant des signaux audio Dolby TrueHD encodés est détectée.
-
Page 69: Télécommande
Cette touche permet d’allumer le récepteur et Télécommande de le mettre en veille. Les codes de la télécommande sont préréglés pour les produits Pioneer si vous souhaitez RECEIVER commander d’autres appareils. Les réglages Cette touche permet d’utiliser à nouveau la ne peuvent pas être modifiés. - Page 70 STANDARD Appuyez d’abord sur TUNER pour accéder au Appuyez sur ces touches pour accéder au menu : décodage Standard et naviguer entre les TUNER EDIT options 2 Pro Logic II (page 30). Permet de mémoriser/nommer des ADV SURR stations de radio à rappeler (page 43, 44). Permet de naviguer entre les divers modes PTY SEARCH surround (page 31).
- Page 71 12 SOURCE Cette touche permet de mettre sous tension ou hors tension un composant DVD/DVR Pioneer, après avoir sélectionné BD, DVD, DVR ou CD à l’aide des touches MULTI CONTROL. Remarque 1 La configuration Pre Out peut être affichée ou non, selon la source d’entrée que vous avez sélectionnée.
-
Page 72: Raccordement De Votre Équipement
Chapitre 3 : Raccordement de votre équipement Installation des enceintes Un système surround de type 5.1 canaux peut être obtenu en connectant les enceintes avant gauche et droite (L/R), l’enceinte centrale (C), les enceintes surround gauche et droite (SL/SR) et le subwoofer (SW). -
Page 73: Conseils D'installation Des Enceintes
Conseils d’installation des enceintes • Si les enceintes surround ne peuvent pas être placées directement à côté de la L’emplacement des enceintes dans la pièce position d’écoute dans un système à d’écoute a une grande influence sur la qualité 7.1 canaux, l’effet surround pourra être du son obtenu. -
Page 74: Raccordement Des Enceintes
Branchement des fils nus Raccordement des enceintes Bornes des enceintes avant : Le récepteur fonctionnera avec seulement Torsadez ensemble les brins de fil deux enceintes stéréo (les enceintes avant sur dénudés. le schéma), mais il est recommandé d’en Libérez la borne de l’enceinte et insérez-y utiliser au moins trois ;... -
Page 75: Connectez Les Enceintes Surround Arrière Ou Surround Avant-Haut
• Vous pouvez également raccorder ATTENTION l’amplificateur supplémentaire aux sorties • Les bornes des haut-parleurs sont sous Pre Out de canal surround arrière pour ajouter une seule enceinte. Dans ce cas, une tension HAZARDOUS LIVE. Pour connectez l’amplificateur à la borne éviter tout risque de décharge électrique gauche (L (Single)) uniquement. -
Page 76: Câbles Hdmi
Câbles HDMI • Entrée des signaux audio numériques aux formats suivants : Les signaux vidéo et audio peuvent être transmis simultanément via un seul câble. Dans le cas où – Dolby Digital, Dolby Digital Plus, DTS, le lecteur et le téléviseur sont connectés via cet Son à... -
Page 77: Câbles Audio Numériques
Câbles audio numériques À propos du raccordement des Les câbles audio numériques coaxiaux ou les câbles optiques disponibles dans le commerce sorties vidéo doivent être utilisés pour raccorder les Ce récepteur ne comporte pas de appareils numériques au récepteur. convertisseur vidéo. Les câbles vidéo en composantes ou les câbles HDMI que vous utilisez pour le raccordement à... -
Page 78: Vidéo
Raccordement d’un téléviseur et de périphériques de lecture Connexion au moyen de l’interface Raccordement d’un équipement HDMI dépourvu de borne HDMI Si vous avez un composant équipé d’une prise Ce schéma montre les connexions d’un HDMI ou DVI (avec HDCP) (Lecteur de disque téléviseur et d’un lecteur DVD (ou autre Blu-ray, etc.), vous pouvez le raccorder à... -
Page 79: Raccordement D'un Récepteur Satellite Ou D'un Boîtier Décodeur Numérique
Raccordement d’un récepteur Raccordement d’un satellite ou d’un boîtier enregistreur HDD/DVD, décodeur numérique magnétoscope et autres sources vidéo Les récepteurs satellites et par câble, ainsi que les syntoniseurs de téléviseur numérique Ce récepteur est muni d’entrées et de sorties terrestre sont tous des exemples de ce que l’on audio/vidéo adaptées au raccordement appelle boîtiers décodeurs. -
Page 80: Utilisation Des Prises Femelles Vidéo En Composantes
Important Utilisation des prises femelles • Si vous avez raccordé un composant vidéo en composantes source au récepteur au moyen d’une Les prises femelles vidéo en composantes offrent entrée vidéo en composantes, votre généralement une qualité d’image supérieure téléviseur doit également être raccordé à la aux prises vidéo composites. -
Page 81: Raccordement Des Antennes
Utilisation des antennes externes Raccordement des antennes Pour améliorer la réception FM Raccordez l’antenne cadre AM et l’antenne Utilisez un connecteur de type PAL (non fourni) filaire FM comme indiqué ci-dessous. Pour pour raccorder une antenne FM externe. améliorer la réception et la qualité du son, raccordez les antennes externes (consultez Utilisation des antennes externes ci-dessous). -
Page 82: Branchement Du Récepteur
électrique. Vérifiez l’état du cordon de temps à autre. Si le cordon est endommagé, demandez-en le remplacement auprès du service après- vente agréé Pioneer le plus proche. • N’utilisez aucun autre cordon d’alimentation que celui fourni avec cet appareil. -
Page 83: Configuration De Base
Chapitre 4 : Configuration de base Mettez l’appareil sous tension. Configuration automatique du Connectez le microphone à la prise son surround (MCACC) MCACC SETUP MIC sur le panneau avant. Assurez-vous qu’il n’y a pas d’obstacles entre Le système de calibrage acoustique les enceintes et le microphone. -
Page 84: Autres Problèmes Lors De L'utilisation De La Configuration Mcacc Automatique
Si le niveau sonore est trop élevé, NOISY! Si, à l’étape 5, vous n’effectuez aucune action clignote à l’écran pendant cinq secondes. Pour sur l’affichage pendant 10 secondes, et si vous n’appuyez pas sur la touche ENTER à l’étape 6, quitter et vérifier de nouveau les niveaux de bruit, appuyez sur SETUP (voir les remarques la configuration MCACC automatique se lance... -
Page 85: Écoute De Sources À L'aide De Votre Système
Chapitre 5 : Écoute de sources à l’aide de votre système Appuyez sur AUTO/DIRECT pour Important sélectionner AUTO SURROUND, puis lancez la lecture de la source. • Les modes d’écoute et de nombreuses Si vous lisez un DVD Dolby Digital ou DTS en fonctions décrites dans la présente section peuvent ne pas être disponibles en son surround, vous devez entendre un son... -
Page 86: Lecture En Mode Auto
• Lors de l’écoute d’une source, appuyez sur la touche STANDARD. Lecture en mode Auto Si la source présente un encodage Dolby La fonction Auto Surround correspond à Digital, DTS ou Dolby Surround, le format de l’option d’écoute en mode direct la plus décodage adéquat sera automatiquement simple. -
Page 87: Utilisation Des Effets Surround Avancés
• DOLBY PLIIx MOVIE – Voir ci-dessus • Décodage brut – Lecture sans effets DOLBY PLII, DOLBY PLIIz HEIGHT ou (disponible uniquement lorsque vous NEO:6. utilisez deux enceintes surround arrière) • DOLBY PLIIx MUSIC – Voir ci-dessus Les options suivantes sont disponibles avec les sources multicanaux : •... -
Page 88: Écoute En Mode Stéréo
• UNPLUGGED – Convient à la reproduction de sources musicales acoustiques. Utilisation de la fonction Front • EXT.STEREO – Permet de recréer un son Stage Surround Advance multicanaux à partir d’une source stéréo, La fonction Front Stage Surround Advance en utilisant toutes vos enceintes. vous permet de créer des effets sonores naturels de type surround en utilisant seulement les enceintes avant et le caisson de... -
Page 89: Utilisation Des Modes Stream Direct
• Appuyez sur la touche S.RETRIEVER pour activer/désactiver la fonction Sound Utilisation des modes Stream Retriever. Direct Les modes Stream Direct permettent de reproduire une source de la manière la plus Un meilleur son grâce à la fidèle possible. Toutes les fonctions de fonction Phase Control traitement de signal non nécessaires sont contournées. -
Page 90: Écoute Avec La Fonction Acoustic Calibration
La technologie Phase Control garantit une reproduction cohérente du son, grâce à Utilisation du traitement de l’utilisation de la correspondance de phase canal surround arrière qui permet d’obtenir une image sonore Vous pouvez indiquer au récepteur d’utiliser optimale à la position d’écoute. La fonction automatiquement le décodage 6.1 ou 7.1 pour Phase Control est activée par défaut et nous les sources 6.1 encodées (par exemple, Dolby... -
Page 91: Réglage De La Fonction Up Mix
Tout en maintenant enfoncé PRESET • SB AUTO – La fonction de décodage matriciel (Matrix) pour générer sur le panneau avant, maintenez STANDBY/ON enfoncé pendant environ l’équipement surround arrière à partir de l’équipement surround est activée deux secondes. automatiquement. - Page 92 Paramètre Fonction Option(s) Sélectionne/Désélectionne l’effet de Acoustic Calibration (Égalisation du calibrage acoustique) S.DELAY Certains moniteurs peuvent présenter un léger retard lors 0,0 à 9,0 (images) de la retransmission vidéo, de sorte que la bande sonore (Sound Delay) 1 seconde = 25 images est légèrement désynchronisée par rapport à...
- Page 93 Paramètre Fonction Option(s) A.DLY Cette fonction corrige automatiquement le retard entre le son et l’image entre les composants raccordés avec un (Auto Delay) câble HDMI. Le délai d’attente audio est paramétré en fonction de l’état opérationnel de l’écran raccordé avec un câble HDMI.
-
Page 94: Choix Du Signal D'entrée
Choix du signal d’entrée Utilisation du casque d’écoute Ce récepteur permet de commuter les signaux • Insérez le casque d’écoute dans la prise d’entrée pour les différentes entrées, comme PHONES. décrit ci-dessous. Le son est émis par le casque d’écoute et non •... -
Page 95: Menu De Configuration Du Système
Chapitre 6 : Menu de configuration du système Utilisation du menu de Réglage manuel des enceintes configuration du système Ces réglages permettent d’optimiser la performance du son surround. Les réglages ne La section suivante décrit de façon détaillée seront faits qu’une seule fois (sauf si vous comment effectuer les réglages adaptés à... -
Page 96: Réglage Des Enceintes
• SP DISTN – Définit la distance entre la • Front Height (FH) – Sélectionnez LARGE position d’écoute et vos enceintes (voir la si vos enceintes surround avant-haut section Distance des enceintes à la reproduisent de façon fidèle les fréquences page 41). -
Page 97: Fréquence De Coupure
Réglez le niveau de chaque canal à l’aide dirigées vers le subwoofer). Si vous n’avez des touches /. pas raccordé de subwoofer, sélectionnez NO (les fréquences graves seront émises Si vous avez sélectionné T. TONE M, utilisez / pour passer d’une enceinte à l’autre. par les autres enceintes). -
Page 98: Menu D'affectation D'entrée
• Pour plus d’informations sur l’attribution des signaux d’entrée numériques, voir la Menu d’affectation d’entrée section Choix du signal d’entrée à la Il vous suffit d’effectuer des réglages dans le page 38. menu Input Assign si vous n’avez pas raccordé votre équipement selon les réglages par défaut pour les entrées vidéo en composantes. -
Page 99: Utilisation Du Tuner
Chapitre 7 : Utilisation du tuner Réglage rapide Appuyez sur la touche TUNE / et Pour écouter la radio maintenez-la enfoncée pour lancer le Les étapes suivantes décrivent la façon de réglage rapide. Relâchez la touche à la régler les bandes FM et AM à l’aide de la fréquence souhaitée. -
Page 100: Pour Écouter Les Stations Préréglées
Appuyez sur la touche TUNER EDIT. • Le nom est mémorisé lorsque vous L’écran affiche PRESET, puis un MEM appuyez sur ENTER. clignotant et une station préréglée. Appuyez sur la touche PRESET / Astuce pour sélectionner la station préréglée que •... -
Page 101: Recherche De Programmes Rds
Recherche de programmes RDS Vous pouvez rechercher les types de programmes suivants : Vous pouvez rechercher un type de programme répertorié ci-dessus. NEWS – Informations FINANCE – Rapports de AFFAIRS – Analyse de bourse, commerce, ventes, Appuyez sur TUNER puis sur BAND pour l’actualité... -
Page 102: Enregistrement
Chapitre 8 : Enregistrement Sélectionnez la source que vous désirez enregistrer. Enregistrer un contenu audio ou Utilisez les touches MULTI CONTROL (ou vidéo INPUT SELECTOR). Vous pouvez enregistrer un contenu audio ou Sélectionnez le signal d’entrée (si vidéo à partir du syntoniseur intégré ou d’une nécessaire). -
Page 103: Autres Raccordements
1 • Il peut s’avérer nécessaire que le périphérique sans fil Bluetooth prenne en charge les profils A2DP. • Pioneer ne garantit pas que cet appareil se connecte et fonctionne correctement avec tous les périphériques dotés de la technologie sans fil Bluetooth. -
Page 104: Raccordement De L'adaptateur Bluetooth Optionnel
Raccordement de l’ADAPTATEUR afin de permettre les communications Bluetooth. Pour plus d’informations, Bluetooth optionnel consultez aussi le mode d’emploi de votre • Mettez cet appareil hors tension, ainsi que périphérique Bluetooth. tous les autres équipements/ périphériques, avant d’effectuer ou de Appuyez sur la touche TOP MENU. -
Page 105: Écoute De Musique Avec Votre Système À Partir D'un Équipement Sans Fil Bluetooth
® La marque et les logos Bluetooth sont des marques déposées appartenant à Bluetooth SIG, Inc. et Pioneer Corporation utilise ces marques sous licence. Les autres marques commerciales et noms commerciaux appartiennent à leurs propriétaires respectifs. Remarque 1 Dans certains cas, le code PIN est appelé PASSKEY. -
Page 106: Informations Complémentaires
électriques raccordés au récepteur. Si le problème ne peut pas être résolu grâce à la liste de contrôles ci-dessous, consultez le service après-vente Pioneer agréé le plus proche de chez vous ou votre revendeur pour effectuer la réparation. - Page 107 Problème éventuel Réparation possible Bruit considérable lors de • Raccordez l’antenne (page 25) et réglez sa position de façon à obtenir la radiodiffusion. une bonne réception. • Éloignez tous les câbles détachés des bornes d’antenne et des fils électriques. • Déroulez le fil de l’antenne filaire FM, placez-le de façon à obtenir une bonne réception et fixez-le sur un mur (ou raccordez-le à...
- Page 108 Problème éventuel Réparation possible Lors de la lecture d’un • Réglez le niveau du volume numérique du lecteur à fond, ou en position logiciel avec le système neutre. DTS, aucun son n’est émis • Assurez-vous que les réglages du lecteur sont corrects et/ou que la ou seul du bruit est émis.
-
Page 109: Hdmi
HDMI Symptôme Réparation possible Pas d’image ni de son. • Si le problème persiste lorsque vous connectez directement votre composant HDMI à votre moniteur, reportez-vous au manuel du composant ou du moniteur ou prenez contact avec le service après-vente du fabricant. Pas d’image. -
Page 110: Information Importante Concernant La Connexion Hdmi
Information importante concernant Réinitialisation de l’unité la connexion HDMI Dans certains cas, il ne sera peut-être pas principale possible d’acheminer les signaux HDMI via ce Respectez cette procédure pour rétablir les récepteur (ceci dépend du composant HDMI réglages d’usine du récepteur. Utilisez les que vous connectez - contrôlez les commandes du panneau frontal pour ce faire. -
Page 111: Spécifications
..420 mm (L) x 158 mm (H) x 347,7 mm (P) Publication de Pioneer Corporation. Poids (sans emballage)....8,9 kg ©... - Page 112 CAUTION RISK OF ELECTRIC SHOCK DO NOT OPEN D3-4-2-1-1_A1_Ru D3-4-2-1-3_A1_Ru D3-4-2-1-7b*_A1_Ru D3-4-2-1-4*_A1_Ru D3-4-2-1-7a_A1_Ru K041_A1_Ru D3-4-2-1-7c*_A1_Ru...
- Page 113 Информация для пользователей по сбору и утилизации бывшего в эксплуатации оборудования и отработавших элементов питания Данные обозначения утверждены только для Европейского Союза. Для стран, которые не входят в состав Европейского Союза: K058a_A1_Ru D3-4-2-2-1a_A1_Ru STANDBY/ON D3-4-2-2-2a*_A1_Ru...
- Page 114 Благодарим вас за покупку этого изделия марки Pioneer. Полностью прочтите настоящие инструкции по эксплуатации, чтобы знать, как правильно обращаться с этой моделью. Прочитав инструкции, сохраните их в надежном месте для использования в будущем. Содержание Порядок выполнения настроек на Использование внешних антенн ..25 Подключение...
- Page 115 Channel level (Уровень канала) ..41 Speaker distance (Расстояние до громкоговорителей) ..42 Меню назначения входов....42 Настройка...
-
Page 116: Порядок Выполнения Настроек На Ресивере
Порядок выполнения настроек на ресивере Аппарат является полноценным аудио-видео Цвета шагов означают следующее: ресивером, оборудованным множеством Требуемый параметр настройки функций и терминалов. Он может легко использоваться после выполнения процедуры подключений и настроек ниже. Настройка, выполняемая при необходимости Перед началом работы •... -
Page 117: Перед Началом Работы
Глава 1: Перед началом работы • Устанавливайте батарейки так, чтобы их положительные и отрицательные полюса Проверка комплекта поставки располагались в соответствии с Проверьте наличие перечисленных ниже обозначениями внутри отсека для батарей. принадлежностей: • Батарейки одинаковой формы могут • Установочный микрофон обеспечивать... -
Page 118: Вентиляция
Вентиляция При установке устройства обеспечьте пространство для вентиляции и предотвращения перегрева (не менее 40 см сверху). Если между устройством и стенами или другим оборудованием предусмотрено недостаточно пространства, внутри устройства повысится температура, что отрицательно повлияет на его функционирование и/или станет причиной неисправности. 40 см... -
Page 119: Органы Управления И Индикаторы
Глава 2: Органы управления и индикаторы Передняя панель VSX-520 AUDIO/ VIDEO MULTI- CHANNEL RECEIVER PHASE CONTROL STANDBY/ON SPEAKERS DIMMER DISPLAY BAND TUNE TUNER EDIT PRESET ENTER INPUT MASTER SELECTOR VOLUME PHONES LISTENING MODE AUTO/DIRECT STEREO/ALC STANDARD ADV SURROUND SOUND RETRIEVER MCACC SETUP MIC DIMMER ... -
Page 120: Дальность Действия Пульта Дистанционного Управления
Дальность действия пульта TUNER EDIT Используйте вместе с TUNE /, дистанционного управления PRESET / и ENTER для Эффективность работы пульта дистанционного запоминания и присваивания названия управления может снижаться в следующих радиостанциям для последующего их случаях: вызова (стр. 43, 44). • при наличии препятствий между пультом дистанционного... -
Page 121: Дисплей
Дисплей Индикатор информации PRESET или PHASE входного сигнала Загорается, когда включен фазовый переключатель (стр. 33). Отображает предварительно заданный номер тюнера или тип входного сигнала и т. п. AUTO Загорается при включенной функции 10 Символьный дисплей автоматического объемного звучания (см. Отображает различную информацию о Автоматическое... - Page 122 Загорается при обнаружении источника аудиосигнала в формате Dolby TrueHD. Загорается при включенном декодировании Dolby Digital EX. 2PLll(x) Загорается при включенном декодировании 2 Pro Logic II / 2 Pro Logic IIx. Погаснет при декодировании 2 Pro Logic IIz (подробнее см. раздел Прослушивание материала с использованием...
-
Page 123: Пульт Дистанционного Управления
Пульт дистанционного управления Для работы других устройств коды RECEIVER дистанционного управления для устройств Используется для включения ресивера или его Pioneer являются предварительно заданными. переключения в режим ожидания. Эти настройки изменить нельзя. RECEIVER Переключает пульт ДУ на управление ресивером (используется для выбора белых... - Page 124 STEREO/A.L.C. RETURN Переключение между режимами Подтвердите и выйдите из текущего экрана воспроизведения стерео, стерео режимом меню. Auto level control - автоматического MENU управления уровнями (стр. 32) и Front Stage Отображение меню TOOLS (Сервис) Surround Advance - фронтального плеера Blu-ray. объемного звучания (стр. 32). Сначала...
- Page 125 Уменьшает или увеличивает яркость дисплея. Имеется четыре уровня изменения яркости. 12 SOURCE Включает и выключает питание устройств Pioneer DVD/DVR, когда выбран BD, DVD, DVR или CD с помощью кнопок MULTI CONTROL. 13 Kнопки TV CONTROL Данные кнопки можно использовать только с...
-
Page 126: Подключение Оборудования
Глава 3: Подключение оборудования Размещение громкоговорителей Подключив левый и правый передние громкоговорители (L/R), центральный громкоговоритель (C), левый и правый громкоговорители объемного звучания (SL/SR) и низкочастотный громкоговоритель (SW), можно прослушивать 5.1-канальную систему объемного звучания. Кроме того, с помощью внешнего усилителя можно подключить левый и правый громкоговорители объемного... -
Page 127: Советы По Расположению Громкоговорителей
Советы по расположению функцию Up Mix (см. Настройка функции Up Mix на стр. 35). громкоговорителей • Старайтесь не размещать громкоговорители Pасположение громкоговорителей в комнате объемного звучания дальше от слушателя, имеет большое влияние на качество звука. чем передние и центральные. В противном Следующие... -
Page 128: Подключение Громкоговорителей
Подключение проводов Подключение Зажимы передних громкоговорителей: громкоговорителей Скрутите оголенные жилы провода. Ресивер может работать с двумя стерео Ослабьте зажим контакта и вставьте громкоговорителями (передние оголенный провод. громкоговорители на рисунке), тем не менее, Зажмите контакт. рекомендуется использовать по крайней мере три, а полный комплект обеспечивает наилучшее... -
Page 129: Подключение Задних Громкоговорителей Объемного Звучания Или Передних Верхних Громкоговорителей
Задние громкоговорители ОСТОРОЖНО объемного звучания или Усилитель заднего передние верхние канала объемного • На контактах громкоговорителей имеется громкоговорители звучания или переднего ОПАСНОЕ ДЛЯ ЖИЗНИ напряжение. SBL/FHL SBR/FHR верхнего канала Во избежание опасности поражения электрическим током при подключении или отключении кабелей громкоговорителей... -
Page 130: Кабели Hdmi
Кабели HDMI • Передача сигнала x.v.Color Одновременно по одному кабелю могут • Прием многоканальный линейных передаваться как видео-, так и звуковые сигналы. цифровых аудиосигналов PCM (192 кГц При подключении через этот ресивер или менее) для макс. 8 каналов проигрывателя и телевизора, используйте для •... -
Page 131: Цифровые Аудиокабели
Цифровые аудиокабели Подключение видеовыходов Для подключения к данному ресиверу цифровых компонентов следует использовать Данный ресивер не оборудован имеющиеся в продаже коаксиальные цифровые видеопреобразователем. Если для аудиокабели или оптические кабели. подключения к входному устройству используются видеокабели или кабели HDMI, такие же кабели должны использоваться для подключения... -
Page 132: Подключение Телевизора И Компонентов Воспроизведения
Подключение телевизора и компонентов воспроизведения Подключение с помощью HDMI Подключение компонента без разъема HDMI При наличии компонента с интерфейсом HDMI или DVI (с HDCP) (проигрывателя Blu-ray На данном рисунке показаны подключения дисков, др.), его можно подключить к данному телевизора и проигрывателя DVD (или другого ресиверу... -
Page 133: Подключение Спутникового Ресивера Или Другой Цифровой Приставки
Подключение спутникового Подключение HDD/DVD ресивера или другой цифровой рекордера, видеомагнитофона и приставки других источников видеосигнала Спутниковые и кабельные ресиверы, а также Данный ресивер имеет аудио и видео входы и цифровые радио ресиверы являются выходы, пригодные для подключения примерами так называемых «приставок». аналоговых... -
Page 134: Использование Разъемов Компонентного Видео
Внимание Использование разъемов • Если любой компонент-источник компонентного видео подключен к ресиверу через вход По сравнению с композитным видео компонентного видео, телевизор также компонентное видео обеспечивает значительно следует подключить к ресиверу при более высокое качество изображения. Еще помощи гнезд COMPONENT VIDEO большими... -
Page 135: Подключение Антенн
Использование внешних антенн Подключение антенн Улучшение качества приема FM Подключите рамочную антенну АМ и Для подключения внешней FM-антенны проволочную антенну FM, как показано ниже. используйте PAL-соединитель (приобретается Для улучшения приема и качества звука отдельно). подключите внешние антенны (см. ниже раздел Использование... -
Page 136: Подключение Ресивера К Электророзетке
или поражения электрическим током. Периодически проверяйте кабель питания. Если кабель питания поврежден, обратитесь за сменным кабелем в ближайший уполномоченный независимый сервис-центр Pioneer. • Используйте только кабель питания, входящий в комплект поставки данного устройства. • Используйте прилагаемый кабель питания только по его прямому назначению, как... -
Page 137: Основная Настройка
Глава 4: Основная настройка Включите ресивер. Автоматическая настройка Подключите микрофон в гнездо объемного звучания (MCACC) MCACC SETUP MIC на передней панели. Проверьте, нет ли препятствий между Автоматическая настройка многоканальной громкоговорителями и микрофоном. акустической калибровки (MCACC) определяет акустические характеристики MASTER VOLUME помещения, предназначенного... -
Page 138: Другие Проблемы При Использовании Автоматической Настройки Mcacc
Если уровень шума слишком высокий, на Ресивер выдает больше испытательных дисплее в течение пяти секунд будет мигать тоновых сигналов для определения надпись NOISY!. Чтобы выйти и проверить оптимальных настроек ресивера для настройки уровни шума снова, нажмите SETUP (см. громкоговорителей, уровня каналов, примечания... -
Page 139: Прослушивание Системы
Глава 5: Прослушивание системы Нажмите AUTO/DIRECT для выбора Внимание пункта «AUTO SURROUND» и начните воспроизведение источника. • Режимы звучания и многие функции, Если воспроизводится диск DVD с объемным описанные в этом разделе, могут быть звучанием в формате Dolby Digital или DTS, недоступны... -
Page 140: Автоматическое Воспроизведение
BD MENU AUTO/ STEREO/ STANDARD ADV SURR Автоматическое DIRECT A.L.C. воспроизведение • Во время прослушивания источника Cамым простым и наиболее непосредственным нажмите кнопку STANDARD (СТАНДАРТ). вариантом прослушивания является функция Если источником является закодированный Auto Surround (Автоматическое объемное сигнал Dolby Digital, DTS или Dolby Surround, звучание). -
Page 141: Использование Эффектов Дополнительного Объемного Звучания
• DOLBY PLIIz HEIGHT – до 7.1-канального Для многоканальных источников, если подключен(ы) задний(е) громкоговоритель(и) звучания объемного звучания и выбран параметр SB ON • NEO:6 CINEMA – см. вышe (Задний канал объемного звучания ВКЛ.), • NEO:6 MUSIC – см. вышe можно выбрать (в зависимости от формата): •... -
Page 142: Прослушивание В Стереофоническом
• ENT.SHOW – предназначен для • F.S.S.ADVANCE – подробнее см. раздел прослушивания музыкальных программ. Использование функции фронтального расширенного объемного звучания нижe. • ADVANCED GAME – подходит для видеоигр. Использование функции • SPORTS – подходит для спортивных программ. фронтального расширенного • CLASSICAL – создает звуковой эффект объемного... -
Page 143: Использование Функции Stream Direct (Прямое Воспроизведение)
ADAPTER TUNER Использование функции Stream PHASE S.RETRIEVER SIGNAL SEL Direct (Прямое воспроизведение) Используйте режим Stream Direct (Прямое • Нажмите кнопку S.RETRIEVER для воспроизведение), если необходимо включения или выключения функции воспроизведение источника, максимально восстановления звучания. приближенное к оригиналу. Все излишние цепи обработки входного сигнала отключены. Улучшение... -
Page 144: Прослушивание С Использованием Эквалайзера Акустической Калибровки
Технология корректировки фазы обеспечивает когерентность воспроизведения звука, Использование обработки благодаря согласованию фазы для заднего тылового канала обеспечения оптимального звукового поля в точке прослушивания. По умолчанию функция Можно настроить автоматическое использование включена, и при выходе из меню Phase Control ресивером декодирования 6.1 или 7.1 для (Управление... -
Page 145: Настройка Функции Up Mix
Удерживая нажатой кнопку PRESET • SB AUTO – обработка с дешифровкой матрицы для генерирования компонента на передней панели, нажмите кнопку STANDBY/ON и держите ее нажатой в заднего тылового канала из компонента объемного звучания включается течение примерно двух секунд. автоматически. - Page 146 Настройка Назначение Параметр(ы) Включение/выключение эффекта функции Acoustic Calibration EQ. (Эквалайзер акустической калибровки) S.DELAY Некоторые мониторы воспроизводят видео с небольшой 0,0 дo 9,0 (кадров) задержкой, поэтому звук и изображение не будут (Задержка звука) 1 секунда = 25 кадров совпадать в точности. Добавляя небольшое запаздывание, (PAL) можно...
- Page 147 Настройка Назначение Параметр(ы) A.DLY Эта функция автоматически корректирует задержку аудио/ видео между компонентами, соединенными кабелем (Автоматическая HDMI. Время задержки аудио устанавливается в задержка) зависимости от рабочего статуса дисплея, подключенного через кабель HDMI. Время задержки видео автоматически настраивается в соответствии со временем задержки аудио.
-
Page 148: Выбор Входного Сигнала
Выбор входного сигнала Использование наушников На данном ресивере можно переключать • Вставьте разъем наушников в гнездо входные сигналы для различных входов, как PHONES. это описано ниже. Звук идет из наушников и не идет из громкоговорителей, подключенных к данному • Нажмите кнопку SIGNAL SEL (ВЫБОР ресиверу. -
Page 149: Меню System Setup (Настройка Системы)
Глава 6: Меню System Setup (Настройка системы) имеющейся акустической системы на новую или подключения новых громкоговорителей). Использование меню System Эти настройки предназначены для точной Setup (Настройка системы) регулировки системы, но если вас устраивают характеристики системы, достигнутые в В следующем разделе описываются подробные результате... -
Page 150: Speaker Setting
Нажмите кнопку RETURN (ВОЗВРАТ) громкоговорители объемного звучания не подключены, выберите пункт NO (сигналы после необходимой регулировки этих каналов будут направляться на параметров для каждой настройки. остальные громкоговорители). • Front Height (Передний верхний) Speaker setting (FH) – выберите LARGE, если передние (Настройка... -
Page 151: Crossover Network
низкочастотный громкоговоритель должен • T. TONE M (РУЧНАЯ РЕГУЛИРОВКА воспроизводить звук непрерывно или если УРОВНЯ КАНАЛА) – переместите нужно более глубокое басовое звучание тестовый звуковой сигнал вручную от (при этом низкие частоты, которые обычно одного громкоговорителя к другому и поступают от передних и центрального отрегулируйте... -
Page 152: Speaker Distance
Speaker distance Выберите тип компонента, подключенного к этому входу. (Расстояние до громкоговорителей) • Использовать кнопки / и ENTER для Для обеспечения хорошей глубины звучания и выбора BD, DVD, TV, DVR или OFF. пространственного ощущения системы следует • Если компонентный вход предназначен для указать... -
Page 153: Использование Тюнера
Глава 7: Использование тюнера Повышение качества стереозвука в Прослушивание радиопередач диапазоне FM Если при настройке на FM-радиостанцию В приведенных ниже пунктах описывается индикаторы TUNE или ST не горят из-за процедура настройки на радиостанцию слабого сигнала, нажмите кнопку BAND для диапазона FM и AM с использованием выбора... -
Page 154: Прослушивание Запрограммированных Радиостанций
Нажмите кнопку TUNER EDIT. • Название сохраняется при нажатии кнопки На дисплее появится надпись PRESET, затем ENTER. мигающая надпись MEM и запрограммированное значение для Совет радиостанции. Нажимайте кнопки PRESET / для • Чтобы стереть название станции, выбора нужной запрограммированной выполните пункты 1 и 2, а затем нажмите радиостанции. -
Page 155: Поиск Программ Rds
Поиск программ RDS Можно вести поиск программ следующих типов: Можно осуществить поиск типов программ, перечисленных выше. NEWS – новости FINANCE – биржевые AFFAIRS – текущие сводки, коммерческая, Нажмите TUNER, а затем нажмите события торговая информация и т.д. BAND для выбора диапазона FM. INFO –... -
Page 156: Отображение Информации Rds
Отображение информации RDS Используйте кнопку DISP для отображения разных типов информации RDS. • Нажмите кнопку DISP для получения информации RDS. При каждом нажатии кнопки дисплей изменяется следующим образом: • Режим звучания • Регулирование громкости • Радиотекст (RT) – сообщения, передаваемые радиостанцией. Например, радиостанция, передающая... -
Page 157: Выполнение Записи На Внешний Источник
Глава 8: Выполнение записи на внешний источник Выберите источник, который требуется использовать для записи. Выполнение аудио- или Используйте кнопки MULTI CONTROL (или видеозаписи INPUT SELECTOR). Аудио- или видеозапись можно выполнить Выберите входной сигнал (если это либо с помощью встроенного тюнера, либо с необходимо). -
Page 158: Другие Подключения
1 • Возможно, потребуется, чтобы устройство, в котором используется беспроводная технология Bluetooth, поддерживало профили A2DP. • Компания Pioneer не гарантирует правильное подключение и работу этого устройства со всеми устройствами, в которых используется беспроводная технология Bluetooth. 2 • Возможно, потребуется, чтобы устройство, в котором используется беспроводная технология Bluetooth, поддерживало... -
Page 159: Спаривание Адаптера Bluetooth И
Подключение дополнительного подробные инструкции вы можете также найти в руководстве по эксплуатации вашего АДАПТЕРА Bluetooth устройства с беспроводным интерфейсом • Перед выполнением или изменением схем Bluetooth. подсоединения, отключите питание. Нажмите TOP MENU. Нажмите ENTER для входа в PAIRING. SUBWOOFER PRE OUT CD-R/TAPE DVR/VCR Выберите... -
Page 160: Bluetooth
(слово и логотипы) является зарегистрированным товарным знаком и интерфейсом Bluetooth выберите принадлежит компании Bluetooth SIG, Inc.; АДАПТЕР Bluetooth и введите PIN-код, использование корпорацией Pioneer этих выбранный в шаге 4. товарных знаков разрешено соответствующей лицензией. Прочие товарные знаки и торговые Прослушивание музыкального... -
Page 161: Дополнительная Информация
используемые компоненты и электроприборы. Если неполадку не удастся устранить даже после выполнения указанных ниже действий, обратитесь в ближайший сервисный центр, уполномоченный компанией Pioneer, или к своему дилеру для выполнения ремонта. • В случае некорректной работы устройства, вызванной внешними воздействиями, например... - Page 162 Неполадка Устранение Радиостанции не • Подсоедините наружную антенну (см. стр. 25). выбираются автоматически. Отсутствует звук из • Правильно подключите громкоговорители (см. раздел стр. 18). центральных • См. раздел Speaker setting (Настройка громкоговорителей) на стр. 40 громкоговорителей или для проверки настройки громкоговорителей. громкоговорителей...
- Page 163 Неполадка Устранение Не работает пульт • Замените элементы питания (см. раздел стр. 10). дистанционного • Пульт следует использовать на расстоянии не более 7 м и под углом не управления. более 30 от датчика дистанционного управления на передней панели (см. раздел стр. 7). •...
-
Page 164: Hdmi
HDMI Неполадка Устранение Изображение или звук • Если при непосредственном подключении компонента HDMI к монитору отсутствует. проблема сохранится, обратитесь к инструкции по эксплуатации компонента или монитора или к изготовителю. Изображение отсутствует. • Видеосигналы, которые вводятся с разъема аналогового видеосигнала, будут выводиться с разъема HDMI. Сигналы, которые вводятся с разъема HDMI, будут... -
Page 165: Важные Сведения О Подключении
Важные сведения о подключении HDMI Сброс параметров ресивера Иногда невозможно пропустить HDMI сигнал (перезагрузка) через этот ресивер (это зависит от Выполните следующую процедуру для сброса подключенного HDMI компонента, обратитесь всех настроек ресивера до значений по к изготовителю за сведениями о совместимости умолчанию, установленных... -
Page 166: Спецификации
В режиме ожидания....0,45 Вт Издано Pioneer Corporation. Размеры © Pioneer Corporation, 2010..420 мм (Ш) x 158 мм (В) x 347,7 мм (Г) Все права защищены. - Page 168 Примечание: В соответствии со статьей 5 Закона Российской Федерации “О защите прав потребителя” и Указанием Правительства Российской Федерации № 720 от 16 июня 1997 года корпорация Pioneer Europe NV устанавливает условие на следующую продолжительность срока службы официально поставляемых на Российский рынок товаров.
Need help?
Do you have a question about the VSX-520-S and is the answer not in the manual?
Questions and answers