Table of Contents
Advertisement
Quick Links
Advertisement
Table of Contents

Related Manuals for Nantian Electronics PR9 ES

Summary of Contents for Nantian Electronics PR9 ES
-
Page 1: Service Manual
PR9 ES Service Manual Ver 1.1 Nantian Electronics Information Corp.,LTD. -
Page 2: Table Of Contents
Catalogue PRODUCT OVERVIEW ..............1 1.1. INTRODUCTION ............... 1 1.2. GENERAL MACHINE CHARACTERISTICS ......1 1.3. SCANNER TECHNICAL DATA ..........3 1.4. DOCUMENTS HANDLED ........... 4 1.4.1 PAPER HANDLE INSTITUTION ..........4 1.4.2 CAPACITY OF COPY ............... 4 1.4.3 DOCUMENT HANDLED ............4 1.4.4 DOCUMNETS SPECIFICATION AND SHEET THICKNESS DOCUMENTS SPECIFICATION ............ - Page 3 2.3.2 PRINT TEST CONTENTS ..........16 CONNECTION TO THE SYSTEM ........18 2.4.1 RS 232C SERIAL INTERFACE (STANDARD) ....... 18 2.4.2 OPTIONAL SERIAL INTERFACE + USB INTERFACE CARD ... 18 2.4.3 OPTIONAL PARALLEL INTERFACE CARD ......19 INFORMATION FOR THE OPERATOR ......21 OPERATING PROCEDURES..........
- Page 4 4.6.1 CLEANING ..............84 4.6.2 CLEANING THE CASE ............84 4.6.3 CLEANING THE PAPER PATHS ......... 84 LUBRICATION ..............84 MECHANICAL ADJUSTMENTS........... 85 DOCUMENT FEED BELT ADJUSTMENT ......85 PRINT BAR ADJUSTMENT ..........85 DISTANCE ADJUSTMENT BETWEEN THE PRINT BAR AND PRINTHEAD NEEDLES ...............
- Page 5 6.3.20 TRANSMISSION SHAFT(SCANNER) DISASSEMBLY/REASSEMBLY............. 99 6.3.21 LOWER CIS (SCANNER) DISASSEMBLY/REASSEMBLY ..100 APPENDIX ................101 PR9's FIRMWARE UPDATING OPERATION ....101 PR9 COMMUNICATION CABLE CONNECTION TABLE ..106 7.2.1 PR-9T9 COMMUNICATION CABLE TABLE ...... 106 7.2.2 THE PARALLEL COMMUNICATION CABLE TABLE OF PR9 CONNECT TO THE HOST .............
-
Page 6: Product Overview
PR9 Service Manual PRODUCT OVERVIEW 1.1. INTRODUCTION PR9 is a specialized advanced banking printer. It can handle ordinary stationary (single and multicopy forms) and passbook for deposit/withdrawal transactions. Very versatile, this printer can also be used in Public Administration front-office environments and in post offices. - Page 7 PR9 Service Manual INTERFACE Standard RS 232C serial, optional USB, with the possibility of installing the following interface cards: RS 232C serial - Centronics parallel - Centronics parallel + 2 - LAN For Scanner model, the interface is RS 232C serial + USB(on scanner board), the 2 (on main board) is factory option DIMENSIONS...
-
Page 8: Scanner Technical Data
PR9 Service Manual 1.3. SCANNER TECHNICAL DATA TYPE OF SCANNER Contact TECHNOLOGY RESOLUTION 600dpi ILLUMINATION Set of LEDs TYPE OF ILLUMINATION IMAGE ACQUISITION - White / black - 16 shades of gray - 256 shades of gray - RGB(color) SCANNING WIDTH 216mm SCANNING FORMAT (W) 80~210 mm... -
Page 9: Documents Handled
PR9 Service Manual 1.4. DOCUMENTS HANDLED 1.4.1 PAPER HANDLE INSTITUTION Advanced capacity of paper handling: Automatic paper feeding. Adjust the printing thickness automatically. Automatic alignment. Automatic paper edge detection. 1.4.2 CAPACITY OF COPY Number of copies (carb.) 1+5 (original medium weight: 40g/ [mm]~60g/ [mm], carbon paper weight: 20g /[mm]~40g /[mm]), multicopy carbon paper weight: 380g/mm. -
Page 10: Accessories
PR9 Service Manual 1.5. ACCESSORIES This section describes the accessories available for the PR9 printer. BLACK NYLON SNUG CART RIBBON CARTRIDGE Ribbon cartridge specific for the PR9's printhead, with width of 7mm, length of 18m and a life-span of more than 5 million characters The cartridge is installed in the machine by opening the printer cover, with automatic printhead positioning if the printer is powered on or manual positioning if powered off, and lifting the print assembly by using the appropriate green lever. -
Page 11: Locating The Printer's Major Components
PR9 Service Manual 1.6. LOCATING THE PRINTER'S MAJOR COMPONENTS Page 6 of 102... - Page 12 PR9 Service Manual Fig. 1-3 Major Components of PR9 Note: The max. open angle of top cover is 90°, for a better view the open angle is 180°in the figure above Page 7 of 102...
-
Page 13: Locating The Printer's Major Internal Components
PR9 Service Manual 1.7. LOCATING THE PRINTER'S MAJOR INTERNAL COMPONENTS Fig. 1-4 PR9's Major Internal Components Page 8 of 102... -
Page 14: General Block Diagram
PR9 Service Manual 1.8. GENERAL BLOCK DIAGRAM 1.9. OPERATING COMMANDS PR9 operating commands are the following: power switch upper mechanical assembly green lifting lever LCD operating panel 1.9.1 POWER SWITCH The printer is equipped with a two-pole power switch. The switch on/off command is provided by means of a rod that crosses the printer longitudinally. -
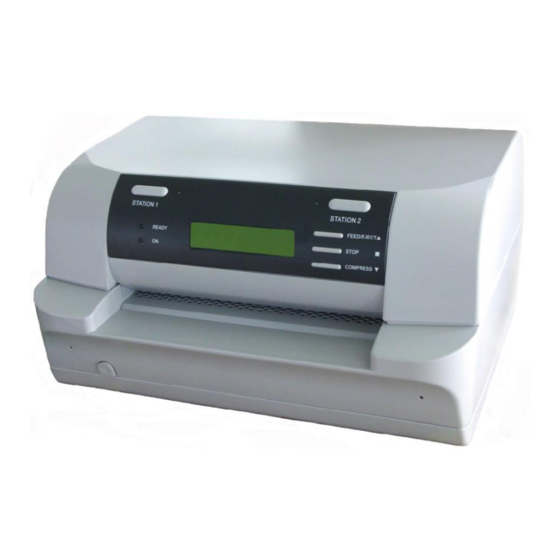
Page 15: Lcd Operating Panel
PR9 Service Manual Fig. 1-5 Note: The max. open angle of top cover is 90 °, for a better view the open angle is 180 ° in the figure above 1.9.3 LCD OPERATING PANEL The HMI (Human-machine interface) of the PR9 is mainly consisted of the operating panel (it has 5 keys, 4 LEDS and 160*32 LCD). -
Page 16: Led Indicators
PR9 Service Manual 1.10.2 LED Indicators Led indication in on-line BLINK LED1(0N) POWER ON POWER OFF LED2(READY) RECEIVING DATA LED3(STATI0N 1) ASSIGNED USER 1 LED4(STATI0N 2) ASSIGNED USER 2 1.10.3 TERMS DEFINITION ON-LINE: The statue when power on the printer in normal condition (Top cover is closed and no key is pressed). -
Page 17: Lcd
PR9 Service Manual printer resetting, insert A4 siheet, tine printer will print menu configuration there is fanfold Menu move FEED/EJECT Invalid paper printer, backward pressing the key, the previous item paper will feed the within same next page group. automatically cycle to the last Pressing item from the first... -
Page 18: Installation
PR9 Service Manual INSTALLATION 2.1 GENERAL INSTALLATION PRECAUTIONS To ensure optimal printer functionality and to avoid making service calls for problems that are not directly caused by the product itself, bear in mind the information provided in the following sections. 2.1.1 ELECTRICAL POWER SUPPLY Make sure that the electrical wall outlet to which the printer is connected has a valid ground and that it is able to supply the power needed by the machine. -
Page 19: Unpacking And Installing The Machine
PR9 Service Manual 2.2 UNPACKING AND INSTALLING THE MACHINE 2.2.1 UNPACKING THE MACHINE Checking the box contents The following items should be contained in the packaging: PR9 printer Power cord Operator Manual Ribbon cartridge CD-ROM with a PDF format of the User's Manual and additional information Fig. -
Page 20: Installing The Machine
PR9 Service Manual Fig. 2-2 Removing the Transportation Retainers 2.2.2 INSTALLING THE MACHINE Position the machine for operation, making sure that it complies with the information provided in section 2.1. Make sure that the voltage rating indicated on the electrical data plate corresponds to the local mains. -
Page 21: Print Test Contents
PR9 Service Manual According the LCD's prompting, insert an A4 sheet into the front feed slot until triggering the paper alignment photosensor. The machine will automatically feed the sheet and start printing the test. The sheet is automatically expelled at the end of the test. To repeat the test simply inserts a new of paper. - Page 22 PR9 Service Manual PR9/K10-P VER2.09 FPGA. 2.4 CCG. GB18030 CG. 001 PRINTER ID: 00000AEE616201 ||||||i 00000AEE616201 Hill Hill Hill Hill llllll Ulli NEEDLES TEST : CURRENT USER: MACROI MACROI* MACR02 MACR03 CONFIGURE INTERFACE: DUAL INTERFACE DUAL INTERFACE DUAL INTERFACE RSl EMULATION: OLIVETTI OLIVETTI OLIVETTI...
-
Page 23: Connection To The System
PR9 Service Manual 2.4 CONNECTION TO THE SYSTEM In its basic configuration, the printer is equipped with an on-board standard RS232C interface, the optional interface(s) can be on-board USB and a slot for the installation in field of an optional interface card that connects to the specific connector on the main board. -
Page 24: Optional Parallel Interface Card
PR9 Service Manual 2.4.3 OPTIONAL PARALLEL INTERFACE CARD The optional parallel interface card hosts a 36-pin Centronics parallel interface. It is installed in the specific slot alongside the first serial interface on the rear of the printer. It is suggested to use an interface cable up to 1.5 meters long. The ECP data exchange protocol is used. - Page 25 PR9 Service Manual Proceed as follows to install this optional card: - Power off the printer. - Using a screwdriver, break off the slot cover of the optional serial interface on the rear of the printer. - Insert the interface card in the slot and slide it along the guideways until it plugs into the related connector on the main board.
-
Page 26: Information For The Operator
PR9 Service Manual Fig. 2-6 Installing the parallel interface card In a printer dual-port configuration consisting of the standard serial interface + parallel interface, in an empty buffer and out of paper condition the printer polls the two ports to see which one will be assigned. When a signal is received by any one of the two interfaces, the printer switches to the receiving interface and maintains this condition until the end of the print job. -
Page 27: Operating Procedures
PR9 Service Manual Make it clear to the operator that observing these simple precautions ensures good printer operation in time. If failures should arise, however, the operator should promptly call the field engineering service. 2.6 OPERATING PROCEDURES 2.6.1 INSERTING A DOCUMENT WITH AUTOMATIC ALIGNMENT The front shelf on the case helps to insert the document in the printer. -
Page 28: Expulsion Of Processed Documents
PR9 Service Manual 2.6.3 EXPULSION OF PROCESSED DOCUMENTS The processed documents can be expelled from the printer, according to the application program, in the following ways: Returning back to where the documents were manually inserted (paper feed slot) From the printer's rear slot, starting from the front feed slot If the documents that are expelled from the front feed slot: The documents are less than 100mm long, they will be released from the feed rollers... - Page 29 PR9 Service Manual Push the ribbon guide downwards, make it withdraw from print head. Take out the used ribbon casket Fig. 2-9 Remove Ribbon Cartridge Insert the cartridge into the feed gears, hooking it on the two sides and making sure to insert pin into the related hole of the ribbon feed knob.
-
Page 30: Paper Jams
PR9 Service Manual Fig. 2-11 Hooking the Ribbon Guide Turn the carriage knob counterclockwise until the ribbon is taut and then remove tab. Using the specific lever, completely lower the upper part of the mechanical assembly containing the print head and ribbon cartridge. Close the printer cover. - Page 31 PR9 Service Manual Multi copy forms where the sheets are poorly glued together. The areas where jams are more likely to occur are: front document feed slot inside the printer rear document output slot 2.6..5.1 PAPER JAMS AT THE FRONT DOCUMENT FEED SLOT To remove a jammed document from the front feed slot, carefully pull the document from the printer to avoid ripping it.
- Page 32 PR9 Service Manual Fig. 2-14 Removing a Document from Inside the Printer If pieces of paper are jammed in inaccessible areas inside the machine, proceed as follows to remove them: Open the cover and power on the printer while pressing the button.
-
Page 33: Off-Line Operation, Setup And Adjustment
PR9 Service Manual OFF-LINE OPERATION, SETUP AND ADJUSTMENT 3.1 Overview of off-line operation When pressing down keys simultaneously, printer will enter the off-line mode. Under this mode, the following operations offered (Operating according the LCD displaying): Basic function test Hardware and software's parameters setup Inquire and printing ASCII Character sets printing , Chinese characters set printing. - Page 34 PR9 Service Manual FW version, special version tag, Info inquiry Version extended emulation, version of FPGA, etc. characters generators, optional HW configuration interface, and other options. ID number > Menu setup ^ Content: Modify the parameters of the printer configuration, including each emulation, different macro and different language.
-
Page 35: Operating Process
PR9 Service Manual 3.3 OPERATING PROCESS During the Menu Mode the key’s definition is as following: [FEED/EJECT ] upwards; it may cycle to the previous item from the first one. downwards; it may cycle to the following item from the last one. [COMPRESS [STOP accept the selected item or value. - Page 36 PR9 Service Manual The operator can select the language condition of printer when entering the module "LANGUAGE", and you can select "CHINESE " or "ENGLISH" The content the LCD displays on the first line is the current level, and these on the second line is the next level.
- Page 37 PR9 Service Manual parameter and it will enter the next item, the LCD will show: If pressing key, the modified parameter will do not be saved and it will return to the upper item, the LCD will show: Page 32 of 102...
- Page 38 PR9 Service Manual 3.3.1.2 Flow Chat Page 33 of 102...
-
Page 39: Menu Print
PR9 Service Manual 3.3.1.3 EXAMPLES For example, we will modify 15CPI of OLIVETTI emulation. After module selected, it will enter the OLIVETTI module, LCD shows: Pressing key, until the LCD shows: Pressing key, the LCD will shows: Pressing key, until the LCD shows: Pressing key, until the LCD shows: After pressing... - Page 40 PR9 Service Manual After the paper inserted, the printer will feed the paper automatically, LCD shows: After printing finished, the paper will be ejected automatically, LCD shows: MENU FRETTING FINISH, PRESS STAT2 And now, if you insert A4 sheet again, it will print menu again; if pressing key, it will exit the Menu printing and enter the sort selection of off-line operation, LCD shows: Now you can select other operations you want.
- Page 41 PR9 Service Manual PR9/K10-P VER2.09 FPGA. 2.4 CCG. GB18030 CG. 001 PRINTER ID: 00000AEE616201 ||||||i 00000AEE616201 Hill Hill Hill Hill llllll Ulli NEEDLES TEST : 1111 1112 2 2 2 2 12 3 4 5 6 7 8 9 0 1 3 4 5 6 7 8 9 0 1 2 3 4 CURRENT USER: MACROI...
-
Page 42: Printing Test
PR9 Service Manual 3.3.3 PRINTING TEST After entering printing test, LCD shows: Start to PRINTING TEST item selection. 3.3.3.1 Printing PR9 Brief User's Guide After entering printing test classification, LCD shows: Pressing key to accept, LCD shows: After inserting the paper, it will feed the paper automatically, and begin printing, LCD shows: After finishing printing, the paper will be ejected automatically, LCD shows: And now, if you insert paper again, the printer will print document again;... - Page 43 PR9 Service Manual Page 38 of 102...
- Page 44 PR9 Service Manual 3.3.3.2. CHARACTER SET PRINTING After entering printing test classification, LCD shows: Pressing key until the LCD shows: key or Pressing key to accept, LCD shows: After inserting the paper, it will feed the paper automatically and begin printing, after finishing printing, the paper will be ejected automatically, LCD shows: And now, if you insert paper again, the printer will print it again;...
- Page 45 PR9 Service Manual ASCII CHARACTER SET Page 40 of 102...
- Page 46 PR9 Service Manual 3.3.3.3. Dr. Grauert PRINTING After entering printing test classification, LCD shows: Pressing k ey or k ey until the LCD shows: Pressing key to accept, LCD shows: After inserting the paper, it will feed the paper automatically and begin printing, after finishing printing, the paper will be ejected automatically, LCD shows: And now, if you insert paper again, the printer will print it again;...
- Page 47 PR9 Service Manual Eilzustellung Norddeutsche Farbenwerke KG Herrn Dr. Grauert Große Elbstraße 64 2000 Hamburg 4 Org. Ill 5/37 4 34 22.04.75 17.04.75 Volkmann Vordruckgestaltung für den allgemeinen Schrift- verkehr, für das Bestell- und Rechnungswesen Eilt Sehr geehrter Herr Dr. Grauert, Sie können das Schreiben der Briefe, Bestellungen, Rechnungen usw.
-
Page 48: Adjustment: Only For Professional Engineer
PR9 Service Manual 3.3.4 ADJUSTMENT: ONLY FOR PROFESSIONAL ENGINEER Entering the off-line operation and selecting adjustment, LCD will show: Start to adjustment items selection. 3.3.4.1. RESET PHOTOSENSORS VALUE AND PRINT After entering adjustment, LCD shows: Pressing key to accept, LCD shows: After the paper inserted, and pressing key to accept, the printer will feed the paper automatically and begin to setup the photosensor. - Page 49 PR9 Service Manual 3.3.4.2. LEFT MARGIN SETUP: NOTE: Press key means to reduce the current value (moving leftwards), Press key means to increase the current value (moving rightwards) The value of adjustment is within a range. That is, there is a maximum value to increase and a minimum value to reduce.
- Page 50 PR9 Service Manual 3.3.4.3. TOP MARGIN SETUP: Press key means reduce based on current value (moving upwards) .Press key means increase based on the current value (moving downwards; The value of adjustment is within a range. That is, there is a maximum value to increase and a minimum value to reduce.
- Page 51 PR9 Service Manual Press key or key until the LCD shows: Press key to accept, LCD shows: After inserting the paper, it will feed the paper automatically and the run-in printing start, LCD shows: (nnn means the times of cover open when run-in printing; mm means the times of run-in printing finished) You just can skip run-in printing by pressing key or turning off the printer.
- Page 52 PR9 Service Manual 3.3.4.5. BIDIRECTION ALIGNMENT ADJUSTMENT: You can select different CPI and quality for adjusting in the bidirection alignment print. Classification : RESULT OF ALL SPEED 10CPI DRAFT 10CPI DRAFT 12CPI 17.1CPI DRAFT 17.1CPI 10CPI 12CPI 10CPI NOTICE : Before adjusting bidirection, you'd better select the "RESULT OF ALL APEED", print all the result of all modes and check it, then do the adjustment according your requirement.
- Page 53 PR9 Service Manual NOTICE: Press means reduce based on current value (move leftwards^. Press key means increase based on the current value (move rightwards) The adjustment is limited during a range. That is, there is a maximum value to the increase and a minimum to the reduce The sample of "RESULT OF ALL SPEED"...
- Page 54 PR9 Service Manual Press key, it will exit the photosensor values printing and enter the Classifieds election of adjustment, LCD shows: Now you can select other operations you want. The sample of PRINT PHOTOSENSOR VALUE: 3.3.4.7. INQUIRE PHOTOSENSOR VALUES: NOTICE: The inquiry of the photosensor can be classified into "FOTO VALUE-SET"...
-
Page 55: Debug/Test
PR9 Service Manual Press key (means move downwards) or key (means upwards) to check various values .If you want to exit, pressing key , The LCD shows : Now you can select other operations you want. 3.3.4.8. RESUME HARDWARE PARAMETER: This adjustment mainly used to resume the default value of the following hardware parameters: Left margin... - Page 56 PR9 Service Manual NOTICE: HEX printing can classified into "Data bacl<up'\ "Printing bacl<up data" and "Directly Dump" "Data backup": The printer can be used for normal operation while all the codes received will be preserved in RAM. "Printing backup data": After the normal transaction having been treated ,if you need print all saved data in Hex format, entering off-line mode again, and selecting "Printing backup data of HEX printing, put A4 sheet into the printer, all the previously transacted data will be printed in Hex format(NOTE: the first...
- Page 57 PR9 Service Manual Press key to accept, LCD shows: After inserting the paper, the printer will print all the receiving data in HEX format, at the same time, LCD show: If the sheet is not long enough, it will be ejected automatically. If printing finished, the sheet was did not ejected automatically, you have to press to eject the sheet, LCD shows: Then, the printer id still in the "Directly DUMP"...
-
Page 58: Inquiry Information
PR9 Service Manual 3.3.6 INQUIRY INFORMATION Entering the off-line operation, LCD shows: Then you can start to inquiry. 3.3.6.1. INSTRUCTION FW VERSION: version, special emulation, (such as: IBM9068, SHINKO, HITACHI etc), special version ID and FPGA version. HARDWARE CONFIGURE: Chinese character set, horizontal magnetic stripe, USB card, parallel card, SPROCKET, SCANCER etc. -
Page 59: Pr9 Menu Parameters
PR9 Service Manual 3.4 PR9 MENU PARAMETERS MODULE PARAMETER OPTION EXPLAIN NOTE CONFIGU RESUME Select resume This option DEFAULT default value or not, mainly If select "YES", jump used VALUE to "SAVE resume the PARAMETERS", the default parameters will be value when menu resumed the default... - Page 60 PR9 Service Manual MODULE PARAMETER OPTION EXPLAIN NOTE CONFIGU Select the stop bits of STOP BITS - RS1. DSR-RS1 SERIAL1 handle the DSR signal or not OLIVETTI Select CX emulation EMULATION (CX present and it has been selected) LQ1600K IBM9068 STROBE FAILING EDGE Select the trig mode...
- Page 61 PR9 Service Manual MODULE PARAMETER OPTION EXPLAIN NOTE CONFIGU UNDIRECTION Select printing DIRECTION BIDIRECTION direction for graphics IGNORE Ignore cover open or This COVER OPEN parameter effect English version(alw ays "NO") NEEDLE Select needle compensation or not COMPENSATI when the needle is broken HIGH SPEED...
- Page 62 PR9 Service Manual MODULE PARAMETER OPTION EXPLAIN NOTE PNS #2000K CONFIGU SINGLE The selection will PNS4002K SHEET influence ejection of PR2E 205MM "205MM": If the 220MM paper width exceeds 205MM, OxOC is treated as FORM FEED command; otherwise OxOC is treated as ejecting paper "220MM": If the...
- Page 63 PR9 Service Manual MODULE PARAMETER OPTION EXPLAIN NOTE CONFIGU PNS #2004K Printhead moves out 145mm of paper with vertical 205mm movement or not "NO": the print head never moves out of paper edge; "145MM"/"205MM" : print head moves out of the paper if the paper width is less than 145MM or 205MM;...
- Page 64 PR9 Service Manual MODULE PARAMETER OPTION EXPLAIN NOTE OLIVETTI HIGH SPEED Selecting high speed CONFIGU A4 SHEET printing mode: PRINTING FAN FOLD "NO": Forbid auto PAPER high speed printing. "A4 SHEET": print mode is forced as draft when the paper is A4 sheet. "FAN FOLD PAPER": the print mode is forced as draft when...
- Page 65 PR9 Service Manual MODULE PARAMETER OPTION EXPLAIN NOTE OLIVETTI MARG. Adjusting top margin CONFIGU in unit of 1/60 inch (1/60") (about 0.4mm) CHARACTER IBM/PC Selecting the OLIVETTI character set as IBM/PC or OLIVETTI. Selecting the IBM CHARACTER character set as PC or ISO.
- Page 66 PR9 Service Manual MODULE PARAMETER OPTION EXPLAIN NOTE CPOLUNIX Selecting the code CHARACTER ISO 8859/15 page of the ISO ISO 8859/1 character set. ISO 8859/2 ISO 8859/5 ISO 8859/6 ISO 8859/7 ISO 8859/8 ISO 8859/9 OLIVETTI OLI. ST15CND Selecting the code CONFIGU CHARACTER ST15CIBC...
- Page 67 PR9 Service Manual MODULE PARAMETER OPTION EXPLAIN NOTE COMPRESS 16.6 Setting the CPI which 17.1 command "ESC >" sets. "16.6": 16.6CPI "17.1": 17.1CPI Whether the following SELECTION PNS items is valid. PNS #2020K Relative "NO": Normal with passbook printer mode« PNS7010K "YES": Journal of PR2E...
- Page 68 PR9 Service Manual MODULE PARAMETER OPTION EXPLAIN NOTE PNS #2023K Selecting the special Relative function of the with command "ESC ! sp nnn" PNS7014K "NO": same as of PR2E PR2, the space setting of the full corner characters is same as half corner characters.
- Page 69 PR9 Service Manual MODULE PARAMETER OPTION EXPLAIN NOTE OPTION DISPLACEMEN STANDARD Selecting the position It is used for displacement PR9/K HOR. magnetic record. V1.07 later MSRW. version. POSITION Selecting the adjust It is used for ADJUST value for the position PR9/K of magnetic record V1.07...
- Page 70 PR9 Service Manual MODULE PARAMETER OPTION EXPLAIN NOTE COMPRESS 101/LINE (85%) Select the proportion CONFIGU PROPORTION 108/LINE(80%) of automatically on 115/LINE(75%) the condensation 123/LINE(70%) mode 133/LINE(65%) 144/LINE(60%) 157/LINE(55%) 170/LINE(50%) FOLD Select the left margin LEFT for the columns fan fold paper in n/10 MARC.(1/10") inch PAPER EMPTY...
- Page 71 PR9 Service Manual MODULE PARAMETER OPTION EXPLAIN NOTE DRAFT CHARACTER Select default CONFIGU character quality DEFINITIONS LF+CR "No": LF=LF "YES": LF=LF+CR CR+LF "No": CR=CR "YES": CR=CR+LF Aadjust left margin in LEFT MARC. unit of 1/60 inch (1/60") MARG. Adjust top margin in (1/6") unit of 1/6 inch MARG...
- Page 72 PR9 Service Manual MODULE PARAMETER OPTION EXPLAIN NOTE Select PNS or not, if CONFIGU SELECTION select YES for PNS, you can select the following items PNS #2060K Process of Relative command ESC % 9 with n1 n2: PNS7020K "NO": when n2=0 set of PR2E line spacing to zero "YES": when n2=0...
- Page 73 PR9 Service Manual MODULE PARAMETER OPTION EXPLAIN NOTE ASCII This CONFIGU CHARACTER MINCHO parameter ROMAN only effect 0PTI0N1 on Chinese 0PTI0N2 Version LATIN HIGH SPEED Selecting high speed PRINTING A4 SHEET printing mode: FAN FOLD "NO": Forbid auto PAPER high speed printing. "A4 SHEET": print mode is forced...
- Page 74 PR9 Service Manual MODULE PARAMETER OPTION EXPLAIN NOTE LEFT MARG. Adjusting left margin CONFIGU in unit of 1/60 inch. (1/60") Adjusting top margin MARG. in unit of 1/60 inch. (1/60") Selecting CHARACTER character set as PC or ISO. Page 69 of 102...
- Page 75 PR9 Service Manual MODULE PARAMETER OPTION EXPLAIN NOTE Selecting the code 437(INT) CONFIGU CHARACTER page of the PC 210 (GR) character set. 220 (E) 850(LATIN 1) (GREEK) 852 (LATIN 855(CYRILLIC) 857(LATIN 5) 858(LATIN EURO) 860(P) 862 (IL) 863(CAN. FR.) 864(ARABIC) 865(NORDIC) 866(CYRILLIC) DK/N...
- Page 76 PR9 Service Manual MODULE PARAMETER OPTION EXPLAIN NOTE ZERO S1_ASH Determines the CONFIGU printout of '0' (0x30) "YES": '0' will be printed with a slash on it LINE LENGTH Setting the line length in unit of character of 10CPI. INSERET DIRECT Selecting the insert IVIODE...
- Page 77 PR9 Service Manual MODULE PARAMETER OPTION EXPLAIN NOTE AUTO Determine whether CONFIGU COMPRESSIO automatically condense current line printing, when current line length in fact is exceed the allowed line length. LINE LENGTH Determine whether proportion COMPRESS automatically line condensation is upon to the current line length or it is fixed by menu...
- Page 78 PR9 Service Manual MODULE PARAMETER OPTION EXPLAIN NOTE ASCII This CONFIGU CHARACTER MINCHO parameter ROMAN only effect 0PTI0N2 on Chinese Version HIGH SPEED Determine whether A4 SHEET always Draft PRINTING FAN FOLD quality to print upon PAPER to the paper width. Select default LPI select Chinese...
- Page 79 PR9 Service Manual MODULE PARAMETER OPTION EXPLAIN NOTE select PC character CONFIGU 437(INT) CHARACTER 210 (GR) 220 (E) 850(LATIN 1) (GREEK) 852 (LATIN 855(CYRILLIC) 857(LATIN 5) 858(LATIN EURO) 860(P) 862 (IL) 863(CAN. FR.) 864(ARABIC) 865(NORDIC) 866(CYRILLIC) DK/N 1252(PC-WIN LATIN 1) 1250(PC-WIN LATIN2) CHINA...
- Page 80 PR9 Service Manual MODULE PARAMETER OPTION EXPLAIN NOTE Left margin adjust in LEFT CONFIGU n/60inch MARG.(1/60") MARG. Top margin adjust in (1/6") n/6inch MARG Top margin adjust in n/60inch MICRO-ADJUS TMENT. (1/60") ZERO SLASH Determines (zeros) are crossed out with "/"s (slash) when they are printed LINE LENGTH Select...
- Page 81 PR9 Service Manual MODULE PARAMETER OPTION EXPLAIN NOTE PNS#2100K Determine whether to CONFIGU reset automatically line condensation when Form Feed command executed "NO": do reset "YES": not reset PNS#2101K Determine whether to ignore all the code 0x20 in the end of a line "NO": ignore 0x20 "YES": not ignore...
- Page 82 PR9 Service Manual MODULE PARAMETER OPTION EXPLAIN NOTE LEFT MARG Adjust left margin in (1/60") unit 1/60 inch (about 0.4mm) negative value Adjust top margin in decrease MARG unit of 1/60 inch ,and (1/60") (about 0.4mm) positive value increase top IBM9006 CONFIGU Adjust the BOF...
- Page 83 PR9 Service Manual MODULE PARAMETER OPTION EXPLAIN NOTE IBM9006 FEED The adjustment when The item is CONFIGU ADJUST(1mm/ the form feed lOinch, valid 10") 0.5mm/inch now. EFFICIENCY UNIDIRECTIO Set command to set IGNORE UNIDIRECTION is valid or not LF+CR "No": LF=LF "YES": LF=LF+CR CR+LF...
- Page 84 PR9 Service Manual MODULE PARAMETER OPTION EXPLAIN NOTE BEEP ON Determines if the BEEP BEEP OFF alarm sounds when WARNING an end of document is detected. Whether the following SELECTION PNS items is valid. PNS#2120K "NO": Normal bottom margin limit. "YES": Special bottom margin limit.
-
Page 85: Failure Diagnose And Preventive Maintenance
PR9 Service Manual FAILURE DIAGNOSE AND PREVENTIVE MAINTENANCE 4.1 MAINTENANCE The following describes maintenance method for field engineers. 4.1.1 FAULT DETECTION ANALYSIS The user who detected product malfunction can give information regarding the operating mode the printer was in when the malfunction occurred and the related error indications that were provided. -
Page 86: Solving The Problem
PR9 Service Manual 4.1.5 SOLVING THE PROBLEM Repair the machine so that it correctly resumes to operating as normal. 4.2 FAULT CLASSIFICATION To make the search easier, the faults have been classified as follows: 4.3 Power-on faults 4.4 Document printout faults 4.5 Document handling faults Each fault classification lists the more probable failures and their possible causes. -
Page 87: Document Printout Faults
PR9 Service Manual 4.4 DOCUMENT PRINTOUT FAULTS Page 82 of 102... -
Page 88: Document Handling Faults
PR9 Service Manual 4.5 DOCUMENT HANDLING FAULTS Page 83 of 102... -
Page 89: Preventive Maintenance
PR9 Service Manual 4.6 PREVENTIVE MAINTENANCE 4.6.1 CLEANING For a correct printer operation, it is suggested that the internal components of the machine be cleaned periodically and whenever the machine is serviced. 4.6.2 CLEANING THE CASE Power off the machine, unplug it from the electrical outlet and then clean its case using a damp cloth;... -
Page 90: Mechanical Adjustments
PR9 Service Manual MECHANICAL ADJUSTMENTS The mechanical adjustments have been divided into: MACHINE CONDITION: Describes the condition that the printer must be in in order to be able to perform a successful adjustment. OBJECTIVE ADJUSTMENT: Indicates the points, values and tolerances to be observed to ensure good kinematic operation. -
Page 91: Distance Adjustment Between The Print Bar And Printhead Needles
PR9 Service Manual 5.3 DISTANCE ADJUSTMENT BETWEEN THE PRINT BAR AND PRINTHEAD NEEDLES MACHINE CONDITION: Power off the machine and lift the front part of the mechanical assembly. OBJECTIVE ADJUSTMENT: A distance of 0.27/0.32 mm must be measured between the head of printhead needle and the printhead pressure wheel. ADJUSTMENT METHOD: Adjust the screw (1), adjust the distance between the head of printhead needle and the printhead pressure wheel, and tighten screw (1) again. -
Page 92: Carriage Movment Belt Adjustment
PR9 Service Manual 5.4 CARRIAGE MOVMENT BELT ADJUSTMENT MACHINE CONDITION: Unimportant. OBJECTIVE ADJUSTMENT: make sure the belt moved smoothly. ADJUSTMENT METHOD: Adjust the screw (1). Fig. 5-6 Page 87 of 102... -
Page 93: Disassembly/Reassembly The Printer
PR9 Service Manual DISASSEMBLY/REASSEMBLY THE PRINTER DISASSEMBLY/REASSEMBLY INTRODUCE Disassembly/reassembly procedure: Described the sequence of the disassembly. Notes: recall adjustments that need to be made after reassembly, precautions or warnings to be observed. ATTENTIONS OF DISASSEMBLY/REASSEMBLY To ensure maximum safety, before starting any disassembly operation power off the printer and unplug its power cord from the electrical outlet. -
Page 94: Disassembly/Reassembly The Console Of Liquid Crystal Display
PR9 Service Manual Fig. 6-1 6.3.2 DISASSEMBLY/REASSEMBLY the console of liquid crystal Display (LCD) Open the printer's top cover. Unplugging the console cable from its connector (1) in the left rear side of the frame. Release the console connector (2) from the top cover by unplugging it gently and then remove the console of liquid crystal display from the top cover by press it lightly. -
Page 95: Photosensor Box Disassembly/Reassembly
PR9 Service Manual 6.3.3 PHOTOSENSOR BOX DISASSEMBLY/REASSEMBLY Open the printer's top cover Raise the upper part of the mechanical assembly by using the specific green lever (1). Push the snap features (2) aside and untie the photosensor box (4) Lift the photosensor box about 30 degree. Pull the photosensor box out of slot (3) INSTRUCTION: The photosensor box contains optical fiber, the front pressure rollers, the upper part of the paper feed roller. -
Page 96: Upper Part Of The Mechanical Assembly
PR9 Service Manual 6.3.5 UPPER PART OF THE MECHANICAL ASSEMBLY DISASSEMBLY/REASSEMBLY Remove the printer case (6.3.1) Loosen 2 screws in the left side and right side and unhooking the securing metal plates of the mechanical assembly rubber stops. Lift the front part of the mechanical assembly off the base of the printer, partly rotating it until you are able to reach the connectors on the main board. -
Page 97: Printhead Disassembly/Reassembly
PR9 Service Manual 6.3.6 PRINTHEAD DISASSEMBLY/REASSEMBLY Open the printer cover and lift the mechanical assembly. Remove the ribbon cartridge. Unscrew the two screws (1) that secure the printhead. Release the two fasteners(2) from the printhead cable support, down the printhead cable support out and insert it into the back of the printhead. Partly slide off the printhead from the carriage and unplug the two cables from the connectors on the printhead. -
Page 98: Paper Feed Motor Disassembly/Reassembly
PR9 Service Manual 6.3.9 PAPER FEED MOTOR DISASSEMBLY/REASSEMBLY Remove the printer case (6.3.1) Remove the mechanical assembly (6.3.4). Loosen the two nuts that secure the motor and then release the document feed belt. Remove the paper feed motor Note: After reassembly, adjust the tension of the document feed belt. Fixation screw Fig. -
Page 99: Printhead Movement Motor Disassembly/Reassembly
PR9 Service Manual 6.3.10 PRINTHEAD MOVEMENT MOTOR DISASSEMBLY/REASSEMBLY Remove the upper part of the mechanical assembly (6.3.5). Loosen the screw (1) that secures the return pulley support and then release the carriage movement belt from the motor Unscrew the two special securing screws (2) and then remove the printhead movement motor being careful to avoid damaging the ribbon feed gears. -
Page 100: Printhead Reset Photosensor Disassembly/ Reassembly
PR9 Service Manual 6.3.12 PRINTHEAD RESET PHOTOSENSOR DISASSEMBLY/ REASSEMBLY Remove the printer case (6.3.1) Loosen screws and unhooking the securing plates of the mechanical assembly rubber stops. Lift the front part of the mechanical assembly, partly rotating it until you are able to reach the connectors on the main board. -
Page 101: Power Supply Assy Disassembly/Reassembly
PR9 Service Manual 6.3.15 POWER SUPPLY ASSY DISASSEMBLY/REASSEMBLY Remove the mechanical assembly (6.3.4) Unplug the power supply cable (1) from the main board. Unscrews the four screws that secure the power supply and also remove the ground wires. Loosen the two screws that secure the switch. Extract the power supply assy. -
Page 102: Print Bar Disassembly/Reassembly
PR9 Service Manual 6.3.17 PRINT BAR DISASSEMBLY/REASSEMBLY Remove the printer case (6.3.1) Lift the front part of the mechanical assembly off the base of the printer, partly rotating it until you are able to reach the connectors on the main board. Unplug all the cables with the exception of the print head cables. -
Page 103: Disassembly/Reassembly
PR9 Service Manual 6.3.18 ROLLER SUPPORT TRAY(SCANNER) DISASSEMBLY/REASSEMBLY Remove the printer case (6.3.1); Remove the mechanical assembly (6.3.4); Remove the upper part of the mechanical assembly (6.3.5); Remove the six screws and then extract the tray(1). Fig. 6-10 6.3.19 UPPER CIS (SCANNER) DISASSEMBLY/REASSEMBLY Remove the printer case (6.3.1);... -
Page 104: Transmission Shaft(Scanner) Disassembly/Reassembly
PR9 Service Manual 6.3.20 TRANSMISSION SHAFT(SCANNER) DISASSEMBLY/REASSEMBLY Remove the printer case (6.3.1); Remove the mechanical assembly (6.3.4); Remove the service motor (6.3.11); Remove E-clip(1) ,the driving gear_SC(2), sintering bearing(3); Remove two screws(4) on the top of the mechanical assembly and then extract the transmission shaft(scanner) (5). -
Page 105: Lower Cis (Scanner) Disassembly/Reassembly
PR9 Service Manual 6.3.21 LOWER CIS (SCANNER) DISASSEMBLY/REASSEMBLY Remove the printer case (6.3.1); Remove the mechanical assembly (6.3.4); Remove the service motor (6.3.11); Remove the transmission shaft(scanner) (6.3.20); Remove two screws on the top of the mechanical assembly and then lift the lower CIS(1). -
Page 106: Appendix
PR9 Service Manual APPENDIX 7.1 PR9's FIRMWARE UPDATING OPERATION 7.1.1 Document description This document FW update method is applicable to the PR9-ES firmware update PR9 Administration Tool. As shown below: 7.1.2 Firmware download Firmware download may through the serial/parallel and USB interface. Two kinds of FW download operation corresponding two kinds of PR9’s panels: 7.1.3 Panel of 3 buttons without LCD The steps as following:... - Page 107 PR9 Service Manual 5. On the page "Update FW" of PR9 Update Tool, open the firmware file and click "Start" button to start updating. 6. After the updating is finished successfully, PR9 will restart automatically. (Simple: Open the printer coverà press and hold the [STATION1+LOCAL] keysàpower on the printerà...
- Page 108 PR9 Service Manual 7.1.4 Panel of 5 buttons with LCD The steps as following: 1. Press the ■STOP key and power on the printer, release ■STOP key till the PR9’s LCD displays “RELEASE STOP KEY”. After release STOP key, the PR9’s LCD displays “PROGRAM UPDATE”.
- Page 109 PR9 Service Manual Flow chart as below: Page 104 of 102...
- Page 110 PR9 Service Manual The interface as following: Page 105 of 102...
-
Page 111: Pr9 Communication Cable Connection Table
PR9 Service Manual 7.2 PR9 COMMUNICATION CABLE CONNECTION TABLE 9 PINS-— 9PINS<PR-9T9> 25PINS-—25PINS<PR-PRINT> 7.2.1 PR-9T9 COMMUNICATION CABLE TABLE Application Area: Host with standard 9 pins of RS232 serial port and PR9 communication cable. HOST: 9 PINS (DB-9S) PRINTER: 9 PINS (DB-9S) Page 106 of 102... -
Page 112: The Parallel Communication Cable Table Of Pr9
PR9 Service Manual 7.2.2 THE PARALLEL COMMUNICATION CABLE TABLE OF PR9 CONNECT TO THE HOST Application Area: host with standard Centronics IEEE parallel interface and PR9 communication cable. HOST 25 PINS 36 PINS Page 107 of 102...
Need help?
Do you have a question about the PR9 ES and is the answer not in the manual?
Questions and answers