
Related Manuals for UFO ATSFI-02


Summary of Contents for UFO ATSFI-02
- Page 1 UFO 16" PORTAT‹F ‹YON‹ZERL‹ FERAHLATICI VANT‹LATÖR ATSFI-02 KULLANIM KILAVUZU UFO 16'' STAND FAN WITH IONIZER ATSFI-02 USER MANUAL www.ufotr.com...
- Page 3 UFO 16" PORTAT‹F ‹YON‹ZERL‹ FERAHLATICI VANT‹LATÖR ATSFI-02 KULLANIM KILAVUZU www.ufotr.com...
- Page 4 Bu kullan›m k›lavuzu UFO 16'' Portatif ‹yonizerli Ferahlat›c› Vantilatör ATSFI-02 modelimiz için haz›rlanm›flt›r. Yüksek kaliteli ve verimli orijinal bir UFO ürünü alm›fl bulunuyorsunuz. UFO 16'' Portatif ‹yonizerli Ferahlat›c› Vantilatör ATSFI-02 sahip oldu¤u iyonizer özelli¤i ile sizi ferahlatarak sa¤l›¤›n›z ve rahat›n›za büyük katk› sa¤layacakt›r.
-
Page 5: Table Of Contents
5. Cihaz›n Kullan›lmas› - Kontrol Paneli ile Çal›flt›rma..............5 6. Cihaz›n Kullan›lmas› - Uzaktan Kumanda ile Çal›flt›rma......... 6 7. Güvenlik Talimatlar›......................7 8. Temizlik ve Bak›m......................8 9. Ufo Yetkili Servisleri - Teknik Servis................9 10. Garanti ile ‹lgili Olarak Müflterinin Dikkat Etmesi Gereken Hususlar......10... -
Page 6: Yon, Negatif ‹Yon Ve Negatif ‹Yonun Yararlar
‹yon Nedir? ‹yonlar bir elektron kazanan ya da kaybeden atom veya moleküllerdir. Nötral bir molekül veya atomdan bir elektron ayr›ld›¤› zaman iyon oluflur. Bir elektron kaybeden moleküller pozitif iyonlar ve bir elektron kazanan moleküller negatif iyonlar olarak bilinir. Negatif ‹yonlar Havay› Nas›l Temizler? Negatif iyonlar negatif bir flarja sahip iken havadaki hemen hemen tüm partiküller pozitif bir flarja sahiptir. -
Page 7: Cihaz›N Kurulum Tablosu Ve Teknik Özellikleri
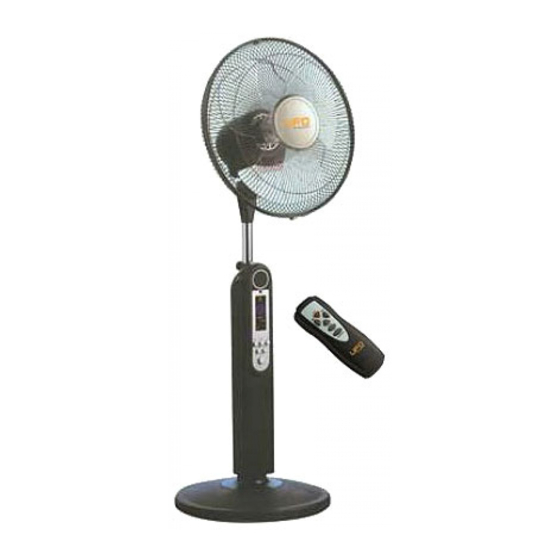
Cihaz›n Kurulum Tablosu ve Teknik Özellikleri Hata yapmamak için tüm parçalar› kullanmadan önce lütfen monte ediniz. 1. Ön Kafes Somunu 2. Ön Kafes 3. Pervane Sabitleme Somunu 4. Pervane 5. Pervane Çemberi 6. Arka Kafes Ba¤lant› Somunu 7. Arka Kafes 8. -
Page 8: Vantilatörün Montaj
Vantilatörün Montaj› Tüm parçalar› ambalaj›ndan ç›kar›n›z. Portatif Vantilatör Gövdesinin Montaj› 1. Gövde borusu, taban ve taban tespit vidalar›n› ç›kar›n. 2. Gövde borusunu tabana yerlefltirin ve sabitleyin. 3. Gövde ve taban› birbirine monte etmek için taban tespit vidalar›n› kullan›n. Arka Kafesin Montaj› 1. -
Page 9: Cihaz›N Kullan›Lmas› - Kontrol Paneli Ile Çal›Flt›Rma
Cihaz›n Kullan›lmas› / Kontrol Paneli ile Çal›flt›rma Cihaz›n›z› kontrol paneli veya uzaktan kumanda ile kumanda edebilirsiniz. A. Kontrol Paneli ile Çal›flt›rma 1. SWING (SALINIM & SAVURMA) > Soldan sa¤a do¤ru sal›n›m› bafllatmak için SWING butonuna Yukar› ve afla¤›ya sal›n›m bas›n. >... -
Page 10: Cihaz›N Kullan›Lmas› - Uzaktan Kumanda Ile Çal›Flt›Rma
Cihaz›n Kullan›lmas› / Uzaktan Kumanda ile Çal›flt›rma B. Uzaktan Kumanda ile Çal›flt›rma Cihaz› çal›flt›rmak için kumandada bulunan ON/SPEED butonuna bas›n. OFF (KAPAMA) Vantilatör çal›fl›rken kapatarak beklemeye (standby) al›r. SWING (SALINIM & SAVURMA) > Soldan sa¤a do¤ru sal›n›m› bafllatmak için SWING butonuna bas›n. >... -
Page 11: Güvenlik Talimatlar
Güvenlik Talimatlar› > Vantilatör çal›flt›r›lmadan önce, vantilatör ve güç kablosu üzerinde bir hasar olup olmad›¤› mutlaka kontrol edilmelidir. E¤er hasar varsa cihaz›n›z› çal›flt›rmayarak teknik servise baflvurulmal›d›r. > Vantilatörü veya herhangi bir parças›n› aç›k alev, piflirme veya di¤er ›s›tma cihazlar›n›n yan›na koymay›n›z. >... -
Page 12: Temizlik Ve Bak›M
Temizlik ve Bak›m 1. Herhangi bir temizlik ifllemine bafllamadan önce vantilatörünüzün çal›flmad›¤›na ve prizden çekili oldu¤una emin olunuz. 2. Temizli¤e bafllamadan önce kafes ve pervaneyi gövdeden ay›r›n ve kuruduktan sonra tekrar monte edin. 3. Sert temizleme malzemeleri kullanmay›n›z. Nemli bir bez ile siliniz ve kullanmadan önce çok iyi kurulay›n›z. -
Page 13: Ufo Yetkili Servisleri - Teknik Servis
› n d a b i l g i a l a b i l e c e ¤ i n i z i n t e r n e t a d r e s i m i z : w w w . u f o t r . c o m Ayr›ca internet adresimizde bulunan UFO Forum'a üye olabilir ve yaz›l› olarak istek ve sorular›n›z›... -
Page 14: Garanti Ile ‹Lgili Olarak Müflterinin Dikkat Etmesi Gereken Hususlar
8. Garanti süresinde anlaflmazl›k do¤du¤u takdirde fatura tarihi esas al›naca¤›ndan, kullan›c›n›n Garanti Belgesiyle birlikte faturay› veya okunakl› bir fotokopisini muhafaza etmesi gereklidir. 9. Garanti belgesi üzerinde ve UFO markal› vantilatörün orijinal seri numaras›nda tahrifat yap›lm›fl olmas› hallerinde garanti hükmünden düfler. ‹braz edilen Garanti Belgesi'nin ar›zal› ürüne ait olmas› flartt›r. - Page 15 UFO 16'' STAND FAN WITH IONIZER ATSFI-02 USER MANUAL www.ufotr.com...
- Page 16 Ionizer ATSFI-02 will contribute to your health and comfort via its ionizer specification. We would like to express our thanks to you for choosing UFO and reliance on UFO products. For a sustainable pleasure with your appliance, please read this manual thoroughly.
-
Page 17: Table Of Contents
3. Installing Chart and Technical Specifications.............3 4. Assembly of the Fan........................4 5. Operating the Fan - Through Control Panel................5 6. Operating the Fan - Through Remote Control............6 7. Safety Precautions........................7 8. Cleaning and Maintenance......................8 9. UFO Authorized Services - Technical Services................9 10. Warranty Terms..........................10... -
Page 18: Ion, Negative Ion And Benefits Of Negative Ion
What is ion? An atom or group of atoms that bears an electric charge is called ion. Positively charged ions are called positive ions and negatively charged ions are called positive ions. How do negative ions purify the air? Most all particles in the air have a positive charge or are positively ionized, while negative ions have a negative charge. -
Page 19: Installing Chart And Technical Specifications
Installing Chart and Technical Specifications To avoid failure, please assemble all the parts completely before using. 1. Front Guard Nut 2. Front Guard 3. Blade Nut 4. Blade 5. Blade Ring 6. Rear Guard Mounting Nut 7. Rear Guard 8. Motor Shaft 9. -
Page 20: Assembly Of The Fan
Assembly of the Fan I. Assembling the Stand Fan Body to the Base 1. Take out the stand pole, stand round base and base nut. 2. Match and fix the stand pole to stand round base. 3. Use the base nut to screw the body and round base together tightly. II. -
Page 21: Operating The Fan - Through Control Panel
Operating Instructions / Operating Through Control Panel The fan can be controlled by both control panel switch and remote control provided. 1. OSCILLATION & PITCHING Press the SWING button to start normal oscillation from > left to right. Press second time to start oscillation from up to down. >... -
Page 22: Operating The Fan - Through Remote Control
Operating Instructions / Operating Through Remote Control B. Operating Through Remote Control Please press the ON/SPEED button to start operating the fan. Switches off the fan and stands it by. OSCILLATION & PITCHING Up and down osc. Press the SWING button to start normal oscillation from >... -
Page 23: Safety Precautions
Safety Precautions > Make sure the fan and the power cord is not damaged before operating your fan. In case of a damage consult to your authorized technical service. > Do not place the fan or any part close to flammable materials and heating appliances. Do not install your fan onto wall or ceiling. -
Page 24: Cleaning And Maintenance
Cleaning and Maintenance 1. Please disconnect the power cord plug from the electric outlet and make sure that your fan is not operating before cleaning it. 2. Dissemble the fan guard and blade from the fan body before cleaning and assemble back after drying up. -
Page 25: Ufo Authorized Services - Technical Services
You may consult to our web-site on our products and the updated technical services in your neighborhood and their contact details: www.ufotr.com You may also be a member of UFO Forum in our web-site and express and share your wishes, concerns and problems with other customers. Your all demands and problems will be finalized and met as soon as possible. -
Page 26: Warranty Terms
9. The warranty will be voided if the certificate or the original serial number of UFO fan has been falsificated. - Page 27 Notlar / Notes...
- Page 28 SUN Pazarlama Elk. Makina San. Tic. Ltd. fiti Perpa Ticaret Merkezi A Blok Kat: 11 No: 1594 fiiflli / ‹STANBUL / TÜRK‹YE Tel: +90 212 210 07 72 www.ufotr.com info@ufotr.com...
Need help?
Do you have a question about the ATSFI-02 and is the answer not in the manual?
Questions and answers