Advertisement
E X PE R I M E NT M A N UA L
Franckh-Kosmos Verlags-GmbH & Co. KG, Pfizerstr. 5-7, 70184 Stuttgart, Germany | +49 (0) 711 2191-0 | www.kosmos.de
Thames & Kosmos, 301 Friendship St., Providence, RI, 02903, USA | 1-800-587-2872 | www.thamesandkosmos.com
Thames & Kosmos UK Ltd, Goudhurst, Kent, TN17 2QZ , United Kingdom | 01580 212000 | www.thamesandkosmos.co.uk
Advertisement
Table of Contents

Summary of Contents for Thames GECKOBOT
- Page 1 Franckh-Kosmos Verlags-GmbH & Co. KG, Pfizerstr. 5-7, 70184 Stuttgart, Germany | +49 (0) 711 2191-0 | www.kosmos.de Thames & Kosmos, 301 Friendship St., Providence, RI, 02903, USA | 1-800-587-2872 | www.thamesandkosmos.com Thames & Kosmos UK Ltd, Goudhurst, Kent, TN17 2QZ , United Kingdom | 01580 212000 | www.thamesandkosmos.co.uk...
-
Page 2: Safety Information
Avoid deforming the batteries. With all of the experiments that use batteries, have an adult For any toy that is used with a window, like the geckobot model, check the experiment or model before use to make sure it is there is the potential risk that a child opens the window and falls assembled properly. -
Page 3: Table Of Contents
Safety Information ............Inside front cover Table of Contents ..................... 1 Kit Contents ....................... 2 MODELS Geckobot ........................3 How to operate the geckobot ................14 Industrial robot arm ..................16 Suction tow truck ....................18 Suction gun ......................20 Inch worm ......................22 Smartphone holder .................... -
Page 4: Kit Contents
7-hole wide rounded rod Pump (dark green) 7404-W10-C2G1 7409-W85-C1G 9-hole rod Motor box 7407-W10-C1G 7409-W85-A Square frame Geckobot eye stickers 7026-W10-T2G R20#7409-US Axle, 35 mm 7413-W10-O1D You will also need: NOTE! Cutting the tube to length 2 x AAA batteries (1.5-volt, type AAA/LR03), scissors, ruler or You must cut the 200-cm tube into these lengths. -
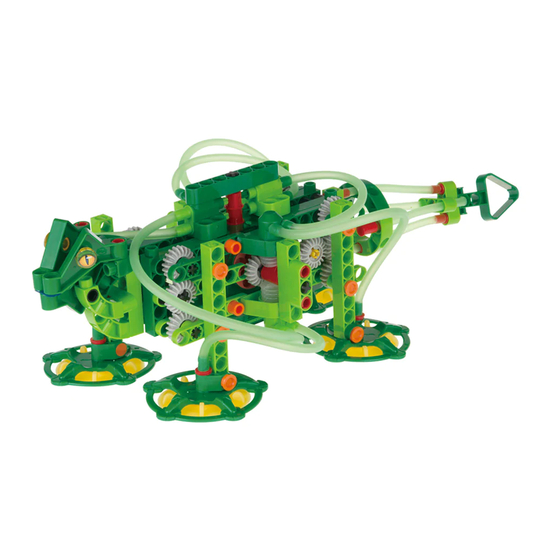
Page 5: Geckobot
Geckobot GECKOBOT 10 x 10 x 10 x 4 x 12 x 4 x 6 x Body units: Steps through Repeat steps 1 through 8 twice to build two 18 x copies of this body unit. Side view Actual size... - Page 6 GECKOBOT Actual size 7 cm Legs: Steps through Repeat steps 9 through 15 twice to attach two legs to each body unit. Assemble two feet. TIP! When one of the suction cups is stuck to a surface and you want to release it, pull one of the small yellow tabs on the suction cup, rather than trying to pull the whole model.
- Page 7 Geckobot Top view Side view Top view Note the orientation of the feet. One is in front and the other is in back.
- Page 8 The battery compartment cover Zero point should be facing the tail of the geckobot. The power switch is closer to the head. How to install and remove the batteries: Install the batteries by removing the cover,...
- Page 9 Geckobot Top view TIP! At this point, you should make sure that the geckobot’s legs can rotate through a complete rotation. Make sure that the axles that attach the legs to the body are not sticking out too far and blocking the rotation of the legs.
- Page 10 The legs and cams have to be aligned or else the geckobot will not walk or stick to the surfaces. To adjust the legs, remove the small gear, turn the Note the orientation legs into place, and replace the of the feet.
- Page 11 Dual valve When the pressure relief button is not pressed in, the valve is closed. When the geckobot lifts its foot, the button must be pushed in to release the pressure at the suction Side view Note the direction cup.
- Page 12 GECKOBOT Head: Steps through Side view Choose a pair of eye stickers.
- Page 13 Geckobot Tail: Steps through You must cut the tube into segments of the indicated lengths. Use a ruler or measuring tape and scissors. Attach the head. 9-cm tube 9-cm tube 9-cm tube 9-cm tube 20-cm tube Top view Run the tube through the joint pin.
- Page 14 Attach the tail. Connecting the tubes: Steps through When the tubes are inserted, the geckobot’s suction cup feet will start to stick to the table. You can put the model on a piece of paper or fabric to keep it from sticking.
- Page 15 Geckobot 15-cm tube 20-cm tube 15-cm tube 20-cm tube...
-
Page 16: How To Operate The Geckobot
If you need to, adjust the front feet by removing the small gear as described in step 3. Be careful with the model! Handle your geckobot Head model delicately. Pick it up by the body — not the... - Page 17 Then adjust the top small cam shaft to the correct position, as shown here and described on page 9. Test the geckobot by turning it on and letting it walk on a flat tabletop first. A. If the model walks smoothly on the table, well done! Now, test its ability to climb on a smooth vertical surface as described below.
-
Page 18: Industrial Robot Arm
INDUSTRIAL ROBOT ARM 10 x 9 x 10 x 2 x 3 x Flip over Flip over Flip over... - Page 19 Industrial Robot Arm 20-cm tube WHAT’S HAPPENING Position the suction cup over a sheet of thin plastic. Turn the power on with the switch. The motor turns the mechanical linkage that forms the arm of the model. The arm drops downward and the suction cup engages the sheet of plastic.
-
Page 20: Suction Tow Truck
SUCTION TOW TRUCK Car: Steps through 9 x 4 x 4 x 4 x 1 x 9-cm tube Tow Truck: Steps through... - Page 21 Suction Tow Truck 20-cm tube WHAT’S HAPPENING Done! Back the tow truck up and extend its arm to attach its suction cup to the car’s suction cup, squeezing the air out. The low air pressure in between the two suction cups keeps the models attached together until you release the pressure by pressing the button on the suction release valve.
-
Page 22: Suction Gun
SUCTION GUN Side view 10 x 9 x 5 x 6 x 2 x 20-cm tube... - Page 23 Suction Gun Side view Side view Done! WHAT’S HAPPENING 27-cm Side view tube Turn on the power. The arm consists of a linkage that expands and contracts as the motor turns. Aim the gun at a flat sheet of plastic and try to pick it up with the suction cup.
-
Page 24: Inch Worm
INCH WORM 10 x 10 x 9-cm tubes How to replace the batteries WHAT’S HAPPENING Turn on the motor and the inch worm inches along the table. The linkage turns the rotating motion from the motor into the back-and-forth motion of the inch worm’s body, Done! which pulls the model forward. -
Page 25: Smartphone Holder
SMARTPHONE HOLDER 10 x 15-cm tube Stick a smartphone onto the suction cup. Done! WHAT’S HAPPENING One suction cup is used to attach your smartphone to the holder. The other three suction cups secure the holder to the table. -
Page 26: Ellipsograph
ELLIPSOGRAPH 10 x WHAT’S HAPPENING Insert 15-cm You can use the ellipsograph to marker tube Pull here here. draw a perfect ellipse on a piece of Done! paper. The arm motion is constrained along two perpendicular tracks, causing the tip of the arm where the marker is attached to always follow an elliptical path. - Page 27 Distributed in North America by Thames & Kosmos, LLC. Providence, RI 02903 Phone: 800-587-2872; Web: www.thamesandkosmos.com Distributed in United Kingdom by Thames & Kosmos UK, LP. Goudhurst, Kent TN17 2QZ Phone: 01580 212000; Web: www.thamesandkosmos.co.uk We reserve the right to make technical changes.
Need help?
Do you have a question about the GECKOBOT and is the answer not in the manual?
Questions and answers