
Summary of Contents for FloatPac RainPac
- Page 1 UNDER HOUSE AND DECKING FLEXIBLE RAINWATER HARVESTING BLADDER TANKS INSTALLATION GUIDE MANUFACTURED BY FLOATPAC PTY LTD P a g e 1 | 15...
-
Page 2: Legal Disclaimer
SOME GENERAL RULES REGARDING RAINPAC · DO NOT use hot water to clean your RainPac · DO NOT use high pressure water cleaners on any part of the RainPac · DO NOT use any other cleaning agent or solvent to clean your RainPac at any stage;... - Page 3 NOTE: There is no reference to the breather setup in this installation guide as nothing needs to be done to the existing system already on the tank. Please contact FloatPac on 1300 306 000 or +61 (0) 3 9548 4700 if any of the above parts are missing. Please note that this is designed as a starter kit and you may require additional fittings, depending on your site and install requirements.
-
Page 4: Maintenance
– this will help keep the water supply fresh and help to increase the life of the material, thus increasing the lifespan of the bladder. Any repairs etc. need to be reported to FloatPac within seven days of any damage being noticed. Small puncture holes can be easily repaired onsite, although any larger damage will need to be assessed by FloatPac at our manufacturing plant in Springvale, Victoria. - Page 5 1. Make sure the corresponding bladder and clearance requirement listed above suits the selected area; 2. The area should be relatively close to the downpipe/s from where the RainPac will fill. Additionally, as all fittings are situated at one end, this end should be the closest to the downpipe/s(where possible);...
-
Page 6: Installation
Make sure that once the bladder is laid out flat, the 100mm (4”) Hansen inlet is facing towards the ground. The 2” (50mm) vent fitting in the centre of the RainPac is the only fitting that should be facing towards the sky. - Page 7 INLET SETUP SEE DRAWING ON THE NEXT PAGE FOR SCHEMATIC DRAWING NOTE: BEFORE COMPLETING INSTALLATION AND GLUING ALL PVC TOGETHER, COMPLETE A DRY RUN TO ENSURE EVERYTHING FITS BEFORE CEMENTING BEGINS. TRENCH SIZE REQUIRED: 200MM WIDE X 700MM LONG X 500MM DEEP FITTINGS REQUIRED FROM FITTING KIT: ·...
- Page 8 INLET SETUP P a g e 8 | 15...
- Page 9 OUTLET SETUP SEE DRAWING ON THE NEXT PAGE FOR SCHEMATIC DRAWING NOTE: BEFORE COMPLETING INSTALLATION, COMPLETE A DRY RUN TO ENSURE EVERYTHING FITS BEFORE CEMENTING BEGINS. FITTINGS REQUIRED FROM FITTING KIT: · 1 X 32MM THREADED BALL VALVE · 1 X 32MM BLACK POND HOSE WITH M BSP ENDS PLEASE NOTE THE M BSP FITTINGS HAVE ALREADY BEEN FITTED TO THE 32MM FLEXIBLE BLACK POND HOSE.
- Page 10 OUTLET SETUP P a g e 10 | 15...
- Page 11 · 90MM PIPE TO SUIT IMPORTANT!!! THE SET HEIGHT OF THE OVERFLOW MUST SUIT THE LISTED HEIGHTS BELOW FOR THE WIDTH OF THE RAINPAC BEING INSTALLED. THE OVERFLOW CAN BE INSTALLED LOWER THAN THE HEIGHT IF REQUIREED. IT MUST NEVER BE INSTALLED ABOVE THE HEIGHT LISTED.
- Page 12 OVERFLOW SETUP – HORIZONTAL DOWNPIPE P a g e 12 | 15...
- Page 13 OVERFLOW SETUP – VERTICAL DOWNPIPE P a g e 13 | 15...
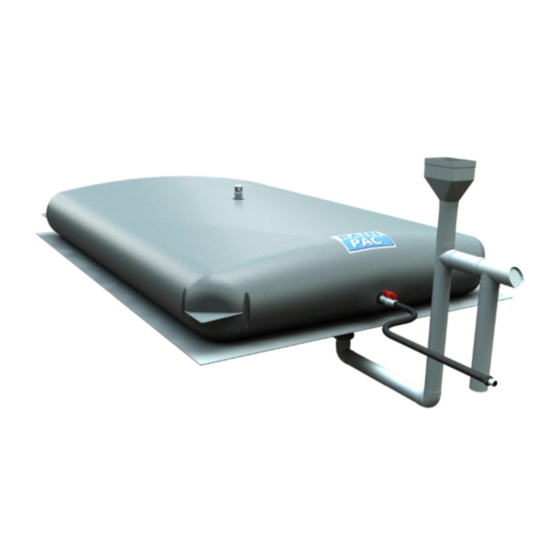
- Page 14 RENDERINGS OVERFLOW SETUP – HORIZONTAL DOWNPIPE OVERFLOW SETUP – VERTICAL DOWNPIPE P a g e 14 | 15...
-
Page 15: Contact Details
CONTACT DETAILS RainPac is a trademark of FloatPac Pty Ltd Postal: PO BOX 372, Springvale, Victoria, Australia 3171 Physical: 11 Awun Court, Springvale, Victoria, Australia, 3171 Phone: 1300 306 000 | + 61 (0) 3 9548 4700 sales@rainpac.com.au www.rainpac.com.au P a g e... - Page 16 FloatPac Pty Ltd to accomplish said repair. In no event shall FloatPac Pty Ltd be liable for the cost of labour expended by any person or entity other than FloatPac Pty Ltd or its agent on any defective workmanship with respect to the installation of the product.
Need help?
Do you have a question about the RainPac and is the answer not in the manual?
Questions and answers