Table of Contents
Advertisement
Quick Links
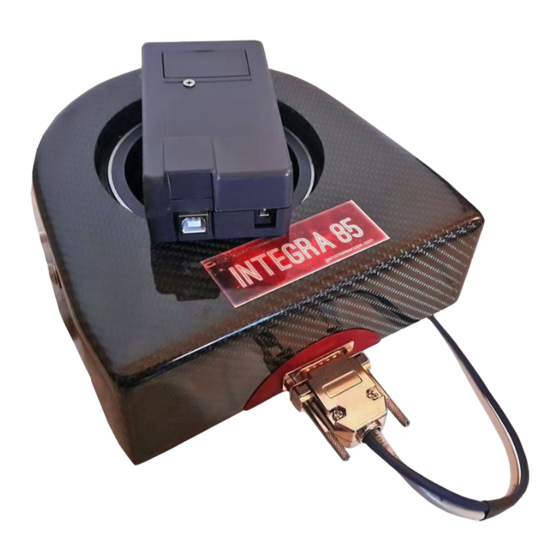
GEMINI INTEGRA 85 USER'S MANUAL ver1.5
The Integra 85 is an ASCOM microfocuser integrated with a camera rotator that saves
you backfocus and weight. It works under MaximDL, TheSkyX, PHD2 , FocusMax and
many more.
Phisical dimensions
Maximun inner diameter: 85mm
Ouside dimensions: see the drawing at the end of this
manual.
Backfocus: 69 +/- 5mm (with telescope and CCD
adapters added), Travel: 10 mm
Weight: 2,3 kg
Mounting interface: M5 coaxial push-pull screws at
3x120 degree, on R64 mm circle
Loading capacity
8kg @ 50mm from focuser end, 5kg @ 100mm from
focuser end
At these loads the measured flexture is within the focus depth of an F5 system.
Rotator – 3,5 Nm unbalanced torque.
Focusing/Rotating Precision
Focuser: 0,053 micron resolution at full motor step (188 600 steps/full travel)
Rotator: 21 arcsec per full motor step (171,66 step/degree)
Power and Controller
The dedicated electronics is supplied with factory calibration (focuser), USB and Bluetooth
connection, 0,8m cable. The rotator can be calibrated with the aid of any plate solving
software. Temperature sond and end-of-travel sensor is integrated.
Alternatively you can use Integra85 with the Lunatico electronics, but the integrated
temperature sond and the auto calibration feature will not be functional.
Lunatico Armadillo or Platypus
ObjectPath=/Shops/Store.Lunatico/Categories/Seletek
For both controller options, a 12 VDC (minimum 2A) power supply is needed (not supplied)
with a 5,5/2,1mm center positive DC plug.
Gemini Integra85 Manual rev02/2017
http://tienda.lunatico.es/epages/Store.sf/en_GB/?
p1
geminitelescope.com
Advertisement
Table of Contents

Summary of Contents for Gemini Telescope Design integra 85
- Page 1 GEMINI INTEGRA 85 USER'S MANUAL ver1.5 The Integra 85 is an ASCOM microfocuser integrated with a camera rotator that saves you backfocus and weight. It works under MaximDL, TheSkyX, PHD2 , FocusMax and many more. Phisical dimensions Maximun inner diameter: 85mm Ouside dimensions: see the drawing at the end of this manual.
-
Page 2: Installation
M68x1 CCD side adapter, plus your custom ordered parts. Installation In short, before using the Integra 85 on your scope 1) make sure you have the adapter for the telescope and the camera 2) you have the power supply (12VDC 2A) and the USB cable... - Page 3 Lift the hood off Locate the 3pc M5 mounting bolts (The larger copper bolt is for collimation) Collimating bolt Mounting bolt M5 Before placing the Integra85 on the telescope side adapter, make sure that all three collimating bolts slightly protrude from the plane of the focuser body! The focuser should ALWAYS rest on these three points only, NOT on the whole surface of the adapter!!!! Gemini Integra85 Manual rev02/2017 geminitelescope.com...
- Page 4 A protrusion of 0,2-1mm is necessary here!!! Place the Integra85 on the adapter, paying attention to orient the mounting bolts to meet the holes on the adapter. Using an open wrench of 8mm, drive the mounting bolts in. Do not tighten any of them until all are in place.
- Page 5 Now you can collimate the focuser with the collimating bolts. Finally, you have to lock the collimating bolts with the lateral M4 grub screws. Control the tightness of the M5 mounting bolts (8mm key). The hood can now be mounted and fixed with the 3pc M4 bolts. The DB15 connector must be placed and fixed in its recess.
-
Page 6: Connecting Cables - Gemini
Connecting Cables – Gemini Connect the 0,8m cable from the Gemini controller to the Integra85 D15 connector. (at right) Do NOT operate the controller without motors connected! Connect the controller to a 12VDC (minimum 2A) power supply (not included). Plug size 5,5/2,1mm, center positive. - Page 7 Your Integra85 comes calibrated to the controller. The focuser will be in the mid position. At first connection to the ASCOM driver the focuser will be automatically re-calibrated. This takes about 2 min. The Integra85 is ready for use now. The exact value of focuser backlash depends on the loading.
-
Page 8: Using The Bluetooth Connection - Gemini
Warning: the controller will lose its position (step counts are set to zero) if it is powered off. Disconnecting the ascom driver properly saves the position for the successive use. Naturally, the physical position will not change in any case. Using the Bluetooth Connection –... -
Page 9: Installing Drivers And Software - Lunatico
Installing Drivers and Software - Lunatico You need to have the latest ASCOM platform installed before proceeding. Install the Seletek drivers and software from the CD or the latest from: http://www.lunatico.es/site/ourproducts/seletek-armadillo-platypus/technical- information/firmware-and-software.html Configuring the Software - Lunatico Now you can connect the driver to the PC and power up the driver (12VDC, 2A, 5.5/2,1mm DC power plug, center positive). - Page 10 2) exit setup and check if moving OUT really moves the focuser out, 3) if not, reopen the configuration window and click “Reverse button's motion”, 4) take the focuser to the outermost position, where it stalls, return a few steps, reopen the configuration window and click “Set outermost”, exit setup, 5) take the focuser to the innermost position, where it stalls, return a few steps, reopen the configuration window and click “Set innermost”, exit setup.
-
Page 11: Attaching The Camera
Attaching the Camera You will need an adapter for your camera. The adapter can be ordered with your Integra 85 or prepared according to the drawing supplied at the end of this manual. Note that the backfocus of the Integra85 with a 5mm telescope adapter and a 5mm CCD adapter plate is 69 +/- 5mm. - Page 12 You must do the setup of the rotator similarly, clicking the Options at the Rotator setup. You can see an autofocus session result at right. It is important to configure Maxim autofocus options correctly (system F No.,central obstruction, focuser step size 0,05micron) to get a good result.
-
Page 13: Auto Focusing With Other Programs
Example: an F7 system has 141 microns focus depth, which equals 2820 motor steps of the Integra 85. The suggested value for autofocus step size is 1400-1500 steps. This works well in SGP for example. - Page 14 If you wish to prepare your own camera side adapter, these are the dimensions to respect. The adapter will attach to the Integra 85 with a maximum of 6pc M4x10 screws that must be countersunk. The adapter plate has a maximum thickness of 5mm. Put M4 washers as spacers between the Integra85 and the adapter.
- Page 15 An extra adapter plate like at top right is available for EUR 30 with a custom central hole or thread. www.geminitelescope.com Innovation and Service since 1996 Gemini Integra85 Manual rev02/2017 geminitelescope.com...
Need help?
Do you have a question about the integra 85 and is the answer not in the manual?
Questions and answers