Bosch BSGL4000GB Instructions For Use Manual
Hide thumbs
Also See for BSGL4000GB:
- Instructions for use manual (20 pages) ,
- Features and specifications (13 pages) ,
- Instructions for use manual (20 pages)
Table of Contents
Advertisement
Advertisement
Table of Contents

Related Manuals for Bosch BSGL4000GB


Summary of Contents for Bosch BSGL4000GB
- Page 1 BSGL4000GB Instructions for use...
-
Page 2: Table Of Contents
Intended use ............... .3 Safety information . -
Page 3: Intended Use
Congratulations on your purchase of a Bosch BSGL4 Safety information vacuum cleaner. This instruction manual describes various BSGL4 models, This vacuum cleaner complies with the which means that some of the equipment features and recognised rules of technology and the functions described may not be available on your model. -
Page 4: Disposal Information
For safety reasons, only authorised after-sales service personnel are permitted to carry out repairs and fit replacement parts to the vacuum cleaner. Protect the vacuum cleaner from the weather, moisture and sources of heat. Do not pour flammable substances or substances containing alcohol onto the filters (dust bag, motor protection filter, exhaust filter, etc.). -
Page 5: Your Vacuum Cleaner
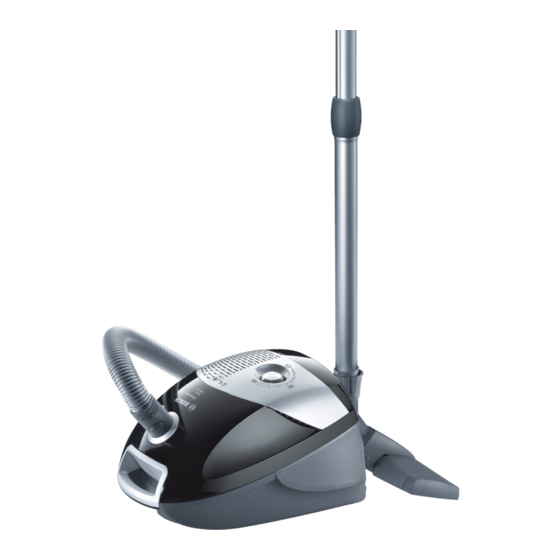
Your vacuum cleaner 1 Adjustable floor tool 10 On/off button with electronic suction regulator 2 Telescopic tube with adjusting sleeve 11 Motor protection filter, washable 3 Hose handle 12 Storage aid (on underside of unit) 4 Flexible hose 13 Dust bag 5 Upholstery nozzle 14 Dust bag compartment lid 6 Crevice nozzle... -
Page 6: Setting Up
Setting up Before using for the first time Push the handle onto the flexible hose until it engages. CLICK! Push the crevice nozzle and upholstery nozzle into the accessories holder as illustrated. CLICK! Push the flexible tube adapter into the air intake opening in the vacuum cleaner lid until it engages... - Page 7 Setting up Connect together the handle and telescopic tube. Insert the telescopic tube into the floor tool adapter. Release the telescopic tube by moving the sliding switch in the direction of the arrow and adjust the tube to the required length. Holding the power cord by the plug, pull out the required length and plug the plug into the mains socket.
- Page 8 Setting up Switching on/off Your appliance is fitted with a pop-out control button. To switch on the appliance, press the control button in the direction of the arrow down to the stop and release. This will release and extend the controller.
-
Page 9: Vacuuming
Vacuuming Adjusting the floor tool: Rugs and carpets => hard floors => Caution! Floor tools are subject to a certain amount of wear, depending on the type of hard floors you have (e.g. rough, rustic tiles). Therefore, you must check the underside of the floor tool at regular intervals. - Page 10 Vacuuming After use, push the crevice nozzle and upholstery nozzle back into the accessories holder as indicated. CLICK! You can use the parking aid on the back of the vacuum cleaner if you wish to stop vacuuming for a short time. Once you have switched off the vacuum cleaner, slide the catch on the floor tool into the recess on the rear of the appliance.
-
Page 11: When The Work Is Done
When the work is done Unplug the vacuum cleaner. Tug the power cord briefly and let go. The cable then rewinds automatically. To store/ transport the vacuum cleaner, use the storage aid on the underside of the vacuum cleaner. Stand the vacuum cleaner up on its end. Slide the catch on the floor tool into the groove on the underside of the appliance. -
Page 12: Changing The Dust Bag And Filters
Changing the dust bag and filters Replacing the dust bag If the dust bag change indicator is completely yellow when the floor tool is lifted from the floor and the highest suction power is selected, the dust bag must be changed, even if it is not yet full. In this case it is essential to change the dust bag due to the type of material it contains. - Page 13 Changing the dust bag and filters Seal the dust bag by pulling the sealing strip and remove the bag. Slide the new dust bag into the holder to the stop. Caution: the lid will only close if a dust bag has been inserted. Cleaning the motor protection filter The motor protection filter should be cleaned regularly by knocking out the dirt or rinsing it out.
- Page 14 Changing the dust bag and filters Clean the motor protection filter by tapping it. If it is very dirty, the motor protection filter should be rinsed out. The filter must then be left to dry for at least 24 hours. After cleaning, slide the motor protection filter into the vacuum cleaner and close the dust bag compartment lid.
-
Page 15: Care
Care Always switch off the vacuum cleaner and disconnect the power cord from the mains before cleaning the appliance. The vacuum cleaner and plastic accessories can be cleaned with a commercial plastic cleaner. Do not use a scourer, glass-cleaning agent or multipurpose cleaning product. Never immerse the vacuum cleaner in water. -
Page 16: Replacement Parts And Accessories
For best performance: Gplus (BBZ41GPLUS) Contents: 4 self sealing hygiene bags 1 micro-hygiene filter http://www.dust-bag-bosch.com Textile dust bag (permanent dust bag) BBZ10TFG Reusable bag with Velcro fastener. HEPA filter BBZ153HFB Additional filter for cleaner exhaust air. Recommended for allergy suffer- ers. - Page 17 Replacement parts and accessories ® TURBO-UNIVERSAL brush for floors BBZ102TBB All-in-one brushing and vacuuming of shallow-pile rugs and carpets and all hard floor coverings. Especially suitable for picking up pet hair. The brush roller is driven by the air flow through the vacuum cleaner. No separate electrical connection is needed.
- Page 19 Conditions of guarantee For this appliance the guarantee conditions as set out by our representatives in the country of sale apply. Details regarding same may be obtained from the dealer from whom the appliance was purchased. For claims under guarantee the sales receipt must be produced.
- Page 20 02/ 2013 GA 5100 003 187 A...
Need help?
Do you have a question about the BSGL4000GB and is the answer not in the manual?
Questions and answers