Table of Contents
Advertisement
Advertisement
Table of Contents

Summary of Contents for Moderno Kids MKHP011
- Page 1 88 LB 12 Volt RC Ride-On Car...
- Page 2 DO NOT RETURN THIS PRODUCT TO THE STORE! Please read the following important information. For Moderno Kids Customer Care, product operation information, or for problem resolution, call toll-free: 55 585 0088 10 a.m. to 6 p.m. Eastern Standard Time MON - FRI...
- Page 3 WARNING! To reduce the risk of injury, adult supervision is required. Never use in roadways, near motor vehicles, on or near steep inclines or steps, swimming pools or other bodies of water. Always wear shoes and a helmet. Never allow more than 1 riders. TO PREVENT FIRE AND ELECTRIC SHOCK: Only use battery and charger provided and specified by manufacturer.
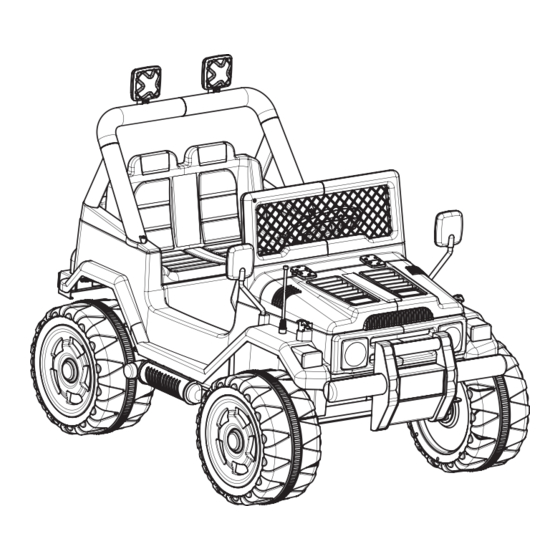
- Page 4 Windshield Front bumper support Rear top bar Wheel-gearbox adapter Rear bar support Tail light lens Wheel center cap Rearview mirror Steering frame Rear top bar light M5 Locknut*1 Battery charger M10 Locknut*4 M8 Locknut*1 5mm×50mm Rear axle Steering fixing bolt×1 Parental Remote...
- Page 5 IMPORTANT! Before first time use, charge Assembly of your new car is simple, provided the battery for at least 8-12 hours. you carefully follow the detailed diagram and refer to component part numbers to ensure they are fitted in the Never charge the battery longer correct order as shown above.
- Page 6 4mm×16mm Flat self-tapping screws×8 4mm×10mm Flat self-tapping screws×4...
- Page 8 5mm×50mm Steering fixing bolt×1 M5 Locknut*1 M8 Locknut×2...
- Page 10 Figure 9 Figure 10 4mm×16mm Flat self-tapping screws×4...
- Page 11 Figure 11 Figure 12...
- Page 12 Figure 13 4mm×16mm Flat self-tapping screws×4 Figure 14 4mm×14mm Circular self-tapping screws×2...
-
Page 13: Specifications
Figure 15 Specifications The battery 12V 10AH ( 2 x 6V 10AH ) The motor 12V ( 2 x 30W ) The charger 12V 1000MA ( Smart Charger ) Maximum load 88LB Charging time Charging time 8-12 hours (Automatically Controlled) Applicable age 3 Years + The car speed... - Page 14 ON/OFF Your ride-on car is equipped with switch located on dashboard. F o r w a r d Battery Status S t o p B a c k Manual Volume control HIGH SPEED LOW SPEED...
- Page 15 Instructions FORWARD STOP SPEED DISPLAY LED RIGHT BACKWARD SPEED - SPEED + LEFT POWER How to pair the parental remote control? 1. First confirm that ride-on car power switch has been turned OFF. Open remote controller battery cover, and install two AAA alkaline type batteries (do not use lithium type batteries as they can damage remote controller).
-
Page 16: Trouble Shooting Guide
Battery safety information Disposal Of Battery Disposal Of Battery Your sealed lead-acid battery must be recycled or disposed of in an enviromentally friendly way, in compliance with local laws and regulations Charging tips 1.Charging of battery should always be performed by an adult. 2.Never completely discharge battery as this will decrease battery life. -
Page 17: Safety Warnings
Safety warnings 1.Battery should only be charged by an adult. 2.Children should always be supervised when riding. 3.Product should only be assembled by an adult. 4.Car should not be ridden at night, near or around swimming pools, steep slopes or near any public roads. 5.Always ensure that product is stationary before switching from forward to reverse.
Need help?
Do you have a question about the MKHP011 and is the answer not in the manual?
Questions and answers
Jeep runs for a minute then stopps
A Moderno MKHP011 Jeep could run for a minute and then stop due to a low or damaged battery, poor battery connection, or a problem with the charger. Ensure the battery is fully charged, check for wear or damage to the battery, charger, and connectors, and confirm all connections are secure. Also, avoid using the battery if damaged and replace only with manufacturer’s parts.
This answer is automatically generated