Table of Contents
Advertisement
Advertisement
Table of Contents

Subscribe to Our Youtube Channel
Related Manuals for Mud-Skipper 210

Summary of Contents for Mud-Skipper 210
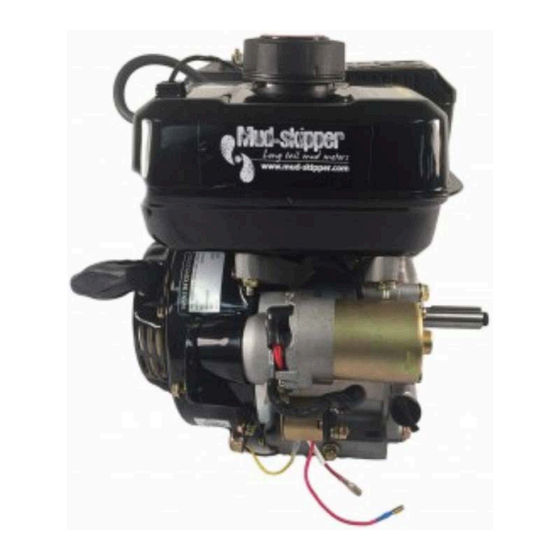
- Page 1 Gasoline Engine 7 & 16 hp with Electric Start www.mud-skipper.com (844) MUD-SKIP ...
-
Page 2: Table Of Contents
PRE SEASON CHECK LIST TROUBLESHOOTING INSTALLING A KILL SWITCH STARTER WIRING ENGINE BASE DIMENSIONS LT210 7hp ENGINE BASE DIMENSIONS LT420 16hp ENGINE PTO DIMENSIONS LT420 16hp ENGINE PTO DIMENSIONS LT210 7hp SPARE PARTS & SPECIFICATIONS INSTALLING A MUD-SKIPPER OUTBOARD KIT Page 1... - Page 3 Thank you for purchasing the Mud-Skipper Gasoline engine. This OPERATION MANUAL tells you how to operate and service your gasoline engine. Please read it before using the engine to ensure proper handling and operating. Follow the instructions carefully to keep your engine in the best running condition.
-
Page 4: Fuel And Engine Oil
FUEL AND ENGINE OIL Use clean, fresh, unleaded ETHANOL FREE gasoline. wherever possible. ·Do not mix oil into the gasoline Page 3... - Page 5 Engine Oil ·Use the engine oil grade depending on ambient temperature using the table below Note: Recommended engine oil: SAE 5W-40 mineral oil use only Do not add commercial additives to the oil. Do not mix gasoline into the oil Before starting, be sure to conduct an oil check.
-
Page 6: Pre-Operation Inspection
PRE-OPERATION INSPECTION Fuel Inspection ·Is there fresh gasoline in the tank? ·Is old gasoline being used? If so, remove it and replace with fresh gasoline ·Is the fuel tank cap closed correctly? WARNING: Air-cleaner Inspection Foam filters should be washed in detergent, dried and lightly impregnated with oil. -
Page 7: Starting And Stopping The Engine
STARTING AND STOPPING THE ENGINE Starting the Engine OPEN the fuel cock Turn the engine switch to "ON" position Completely CLOSE the choke valve Move throttle lever a little to OPEN THESE ENGINES START BY CHOKING THE CARBURETOR, REGARDLESS OF WHETHER THE ENGINE IS HOT OR COLD. Page 6... - Page 8 Due to EPA regulations, there is no fuel/air mix adjustment on these engines as the carburetor is preset. Recoil start: Hold the starter handle and pull it slightly until the compression position is reached, and then pull it swiftly from this position; Slowly return the starter handle to its original position after the engine starts.
-
Page 9: Inspection And Maintenance
INSPECTION AND MAINTENANCE Daily and Regular Inspection Daily and regular inspections are important to assure safe, proper and long-term operation of the engine. Refer to this inspection table when conducting inspections and maintenance. Regular Inspection Table: Page 8... - Page 10 CLEANING THE AIR FILTER Page 9...
-
Page 11: Cleaning The Spark Plug
Cleaning the spark plug Remove the carbon attached to the electrode Polish the electrode with emery paper or wire brush Adjust the electrode gap Clean the fuel filter Remove the filter from fuel tank neck Clean it in solvent Clean the fuel cock deposit cup Remove the cup from fuel cock Clean the cup Replace the cup - use a new 2-ring... -
Page 12: Storage Of Engine
STORAGE OF ENGINE Should the engine be stored for a long period, please do as follows: Drain off the fuel in tank and oil in crankcase Remove the spark plug, add about 2-3 cc. Engine oil into the cylinder, and reinstall the spark plug. - Page 13 Is there fresh fuel in the tank? Is the fuel tank tap open? Is the kill switch open? Is the battery charged? Is the HT Lead firmly fixed to the spark plug? Is the gas tank cap vent hole plugged up? Is there sufficient oil in the engine? Is the Oil Sensor still connected? Check Your Fuel...
- Page 14 night. You should see a bright blue spark. If there is a yellow or weak spark, change the spark plug. Check the HT lead, (This is the thicker lead that fits onto the spark plug.) Dam- age can occur to this, causing a short and grounding out the power to the plug. look for cracks and perished rubber Check the Ignition Coil Using an ohmmeter, check the resistance between the side terminals of the coil.
-
Page 15: Cleaning The Carburetor Fuel Jet
CLEANING THE CARBURETOR FUEL JET Place a tray underneath the engine if you intend to do this job on the boat, but we recommend removing the engine and doing this work in a workshop. These parts are small and easily lost. To gain access to the Fuel Jet, undo the retainer screw at the base of the carburetor bowl and pull off the bowl. -
Page 16: Pre Season Check List
PRE SEASON CHECK LIST Drain the sump and replace the oil at the beginning of every season, or every 25 hours use. Air Filter Remove the air filter. If foam, wash in detergent with warm water, and dry. Then rub in a small amount of light oil, say a teaspoon full. This aids the filter to trap dust particles. -
Page 17: Troubleshooting
TROUBLESHOOTING Smoking Engine Black smoke Black smoke is an indicator of too much gas being burnt. Blue or white smoke problem Smoking engines indicates burning oil, probably caused by: Over filling the crankcase with oil Incorrect oil grades Defective or obstructed crankcase breather Crankcase air leak Blown head gasket Worn cylinder and/or rings... - Page 18 Problems with Carburetor Unbolt the carburetor bowl and thoroughly clean in fresh gasoline or carburetor cleaner. (Remember to reinstall the thin rubber gasket correctly) Check the float for free movement Check all ports and vents for blockages, particularly the bolt that hold the bowl on.
-
Page 19: Installing A Kill Switch
INSTALLING A KILL SWITCH Locate the Kill switch on a suitable position on the steering handle or somewhere on the boat near the operator’s position, and run a twin flex wire to the engine. Follow the diagram for wiring the actual switch from the enclosed Kill Switch instructions. Connect one wire to the same bolt you used as the ‘ground’... -
Page 20: Starter Wiring
STARTER WIRING Wire 1 To Terminal 10 (Positive lead from battery also to Terminal 10) Wire 2 (Yellow) To Wire 7 (Black) Wire 3 (Short Black) To Wire 6 (Black Leading From Under Engine) Wire 4 (Thick Black) To Wire 9 (Long Red) Wire 5 (Short Brown) To Wire 8 (Short Red) To Include A Kill Switch: Note- longer leads for kill switch, to mount switch at preferred location, are not included. -
Page 21: Engine Base Dimensions Lt210 7Hp
ENGINE BASE DIMENSIONS LT210 7hp Page 20... -
Page 22: Engine Base Dimensions Lt420 16Hp
ENGINE BASE DIMENSIONS LT420 16hp Page 21... -
Page 23: Engine Pto Dimensions Lt420 16Hp
ENGINE PTO DIMENSIONS LT420 16hp Page 22... -
Page 24: Engine Pto Dimensions Lt210 7Hp
ENGINE PTO DIMENSIONS LT210 7hp Page 23... -
Page 25: Spare Parts & Specifications
SPARE PARTS & SPECIFICATIONS Page 24... -
Page 26: Installing A Mud-Skipper Outboard Kit
INSTALLING A MUD-SKIPPER OUTBOARD KIT Before installing the PTO coupler, remove the bolt in the end of the shaft. This has been left in place for customers who wish to use the engine for other applications where an attachment needs to be bolted onto the shaft. - Page 27 Page 26...
Need help?
Do you have a question about the 210 and is the answer not in the manual?
Questions and answers