Table of Contents
Advertisement
Advertisement
Table of Contents

Related Manuals for Gerhardt Vapodest 10s


Summary of Contents for Gerhardt Vapodest 10s
- Page 1 Vapodest 10s Instruction Manual Please read this manual carefully before you start operating the system! Please observe the safety instructions of this manual, marked with order to avoid any dangers resulting from improper handling! VAP 10 05. Nov. 2008_GB...
-
Page 2: Table Of Contents
Contents 1 Safety................ 3 1.1. Application as directed ................3 1.2. Safety instructions ................3 1.3. Work bench / Authorized user .............. 3 2 Technical description ..........4 2.1. Warranty conditions ................4 2.2. Technical data ..................4 3 Description of the system ........5 3.1. -
Page 3: Safety
- all instructions of this manual - the regulations in place in the country the instrument is used All other usage is not recommended! C. Gerhardt GmbH & Co. KG is not liable for any damages caused due to non recommended usage - any modifications are not allowed for safety reasons... -
Page 4: Technical Description
The distillation unit Vapodest 10 is manufactured following the high quality gui- delines of EN ISO 9001:2000. On the basis of the C. Gerhardt conditions of war- ranty our products are guaranteed for 1 year, as long as the apparatus is used in accordance with the instructions mentioned in this manual. -
Page 5: Description Of The System
3 Description of the system 3.1. Check for transport damage Check for transport damage Before assembling the Vapodest 10 please check if the content of the box is complete and intact! In case of any damage, please notify your carrier (post, rail, road) as well as your supplier! The exact contents of the delivery can be checked by the following list. 3.2. Parts list 1 x Distillation system Vapodest 10, complete 1 x W ater inlet tubing 10/17mm with connections of 1/2 inch and 3/4 inch, 2m Order-No.: 22802 3 x PVC-tubing 8/12, 2 m, order no.: 22604 1 x PVC-tubing 4/7, order no.: 22601... -
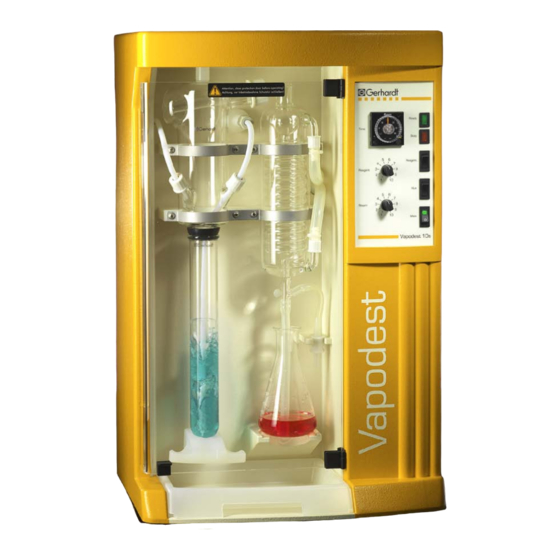
Page 6: Front View
3 Description of the system 3.3. Front view Fig. 3.3: Front view Vapodest 10 Structural components and parts 1 Quick clamping device with wedge 12 Distillation condenser, Order No.: 7673 2 Digestion tube, Order No.: 6100 13 Screw cap GL 14 with plastic screw connection, 3 PTFE-Inlet tubing, steam, Art.-Nr.: 11815 Order No.: 16601 4 Holder for steam inlet tubing... -
Page 7: Rear View
3 Description of the system 3.4. Rear view Fig. 3.4: Rear view Vapodest 10 Structural components and parts 1 Inlet for NaOH 6 Excess pressure - steam outlet Connection PVC-tubing 8/12, Order-No.: 22604 7 Type plate 2 Level detector: 8 Cooling water inlet with sieve: Connector for diode plug, 3-pin or level detector Connection thread 3/4 Zoll for water inlet tubing for set of storage tanks KAN 20... -
Page 8: Assembly And Setting Into Operation
4 Assembly and setting into operation 4.1. General Please observe the local water and waste regulations and those of your public water supply company!! Please note that the length of the inlet and outlet tubing is restricted to 2 metres. The appliance should be located on a fixed laboratory bench, close to the cold water connection and a drain. -
Page 9: Mains Connection
4 Assembly and setting into operation Use of the set of tanks KAN 20 (optional): - Connect the diode plugs of the level detectors to the distribution box and con- nect to the socket level detector (see fig. 3.4, pos. 4). - Blank off the remaining diode sockets of the distribution box with the dummy diode plugs enclosed. Usage of other set of tanks without level sensor control - Put the diode dummy plug on the connection of level sensor control (see ill. 3.4., pos.4). 4.3. Mains connection Please check the nominal voltage on the type plate before connecting to the mains. Should the nominal voltage deviate more than +/- 10%, then you have to contact your service engineer. -
Page 10: Operation
5 Operation Safety instructions Attention when handling acids and alkalies! Please observe your national safety regulations! Use gloves when removing the glass digestion tube as this will be very hot, and there is danger of burning! Take care when handling glass parts and follow the national safety regulations concerning the handling of glass parts! 5.1. -
Page 11: Priming The Tubes
5 Operation 5.3. Priming the tubes Please make sure that the tubes are fully primed. This must be performed before for the initial start, after longer working inter-missions (holidays etc.) and each time after the inlet and outlet tubes have been removed. 1. Switch the distillation system on. 2. Check the chemical tanks. 3. -
Page 12: Distilling A Sample
5 Operation 1 0. After the system is ready (green LED) press the key "Run" to start the distilla- tion. 1 1. Remove the digestion tube after the distillation is finished. Use gloves when removing the glass digestion tube as this will be very hot, and there is danger of burning! 1 2. Remove the Erlenmeyer flask. The distillation system Vapodest 10 is now ready for the distillation of samples. 5.5. -
Page 13: Errors
6 Errors 6.1. Distillation does not start or is interrupted Error description Cause of failure and correction Vapodest is not ready for operation (green display is out) - No cooling water Check cooling water inlet - Turn on the tap - Cooling water pressure too low <... -
Page 14: Results Too Low Or No Results
6 Errors 6.3. Results too low or no results Error description Cause of failure and correction Distillation has not been complete or distillation time No quantitative carry over of the ammonia content, the has been too short. amount of the distillate should be 100ml. Ammonia escapes at leaks. -
Page 15: Maintenance
7 Maintenance In case of replacements of parts make sure that only original C. Gerhardt products are used! 7.1. Spare parts and accessories Distillation condenser 7673 Plastic screw connection for distillation condenser 16609 Ventilation valve 6474 Distribution head, glass 7472... -
Page 16: Cleaning The Glass Parts
Make sure to handle error messages as described in chapter "6. Errors". In case of breakdown or failure of your Vapodest 10, please contact your local dealer or: C. Gerhardt GmbH & Co. KG Cäsariusstr. 97 53639 Königswinter E-Mail: service@gerhardt.de www.gerhardt.de... -
Page 17: Disposal
13th, 2005 without charges and will dispose of them according to the regulations, or Gerhardt will come to an agreement with the last user of the unit. For all instru- ments delivered prior to August 13th, 2005 the last user will be held responsible for the proper disposal. - Page 18 apodest...
- Page 19 apodest...
- Page 20 apodest...
Need help?
Do you have a question about the Vapodest 10s and is the answer not in the manual?
Questions and answers