Table of Contents
Advertisement
Quick Links
PIPE MACHINE
Model No. 7991
Be sure to hand this operation manual to the user.
·
To ensure safe and efficient use of this machine, read this
·
operation manual very carefully before use.
Be sure to keep this operation manual where the operator can
·
refer to it whenever necessary.
Wheeler-REX
OPERATION MANUAL
Be sure to read this
Operation Manual before
using the machine
- Note -
Advertisement
Table of Contents

Related Manuals for wheeler 7991


Summary of Contents for wheeler 7991
- Page 1 PIPE MACHINE Model No. 7991 Wheeler-REX OPERATION MANUAL Be sure to read this Operation Manual before using the machine - Note - Be sure to hand this operation manual to the user. · To ensure safe and efficient use of this machine, read this ·...
-
Page 2: Table Of Contents
• • • • • • • • • • • Instructions for using the No.7991 • • • • • • • Names of Parts, Standard Specifications, Standard Accessories ..7 Operating Instructions 1. Transporting the Machine 2. -
Page 3: Safety Precaution
Safety Precautions WARNING 1) Ensure you use the correct voltage. • Be sure to use the voltage indicated on the name plate of the main unit or in the operation manual. If the voltage is different from the voltage indicated overheating, smoke or fire may occur. 2) Check the switch is OFF, before inserting the plug into the power supply socket. -
Page 4: Safety Precautions
Store carefully when the machine is not in use. • Store in a dry place away from children and locked with a key. For overhaul and repair of the machine, ask an appointed Wheeler-Rex agent. • Our products comply with corresponding safety standards. Do not remodel. - Page 5 Instructions for using the No.7991 • Threading work WARNING Take care when handling blades and other sharp objects. ·To prevent accidents and injury, take special care when handling blades and other sharp objects such as the dies, reamer, pipe cutter and carbide cutter, etc.
- Page 6 Instructions for using the No. 7991 • Chamfering work WARNING To prevent injury, do not touch the reamer blade direcly with your hands as it is extremely sharp. • Threading Oil CAUTION Wear goggles · Touching the eyes with oil may cause inflammation.
- Page 7 Instructions for using the No. 7991 • Using threading oil for stainless steel pipes WARNING Do not burn off the oil. · This oil contains chlorine compounds and generates toxic gas when burnt. · In the case of an emergency in which someone has inhaled such toxic gases, carry the affected person out into the fresh air and seek medical attention.
- Page 8 · The Wheeler-REX No.7991 was developed to provide users with a machine that is safe and that they can use with confidence. The most versatile model in its class, it has a sturdy design that enables it to handle the toughest of jobs, as well as new, enhanced safety features.
-
Page 9: Transporting The Machine
If the rear scroll end is low, oil will drain out of the rear of the pipe, etc., soiling the floor and wasting oil. Fig. 3 Fill the tank with the Wheeler-Rex threading oil. · (Fig. 4.Attaching and Removing the Die Head... -
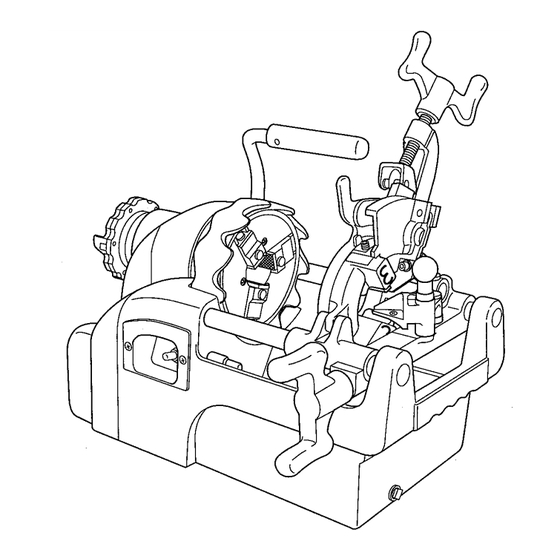
Page 10: Operating The Die Head
Getting Ready 5.0perating the Die Head •Names of Parts Notch B (for 1 "(25A)) (silver) Auto Open lever Guide set lever Die head post Fig. Eccentric positioning pins (black) (silver) •setting the Thread Cutting Size 1 /2" ( 15A) 3/4" (20A) 1"... - Page 11 Getting Ready •Attaching the Dies (1) Use the removal procedure in reverse to attach dies to the die head. Insert the dies into their corresponding die groove on the die head and push them in until they click into place on the notch. Push up the guide set lever.
-
Page 12: Inserting And Removing Pipes
Getting Ready Rear ush the chuck carrying han d le over Note: When operating the unit, make sure the handle is in the lowered (Fig. 12) position ("Operating position" in Fig. 2 on Pg. 7). 6.lnserting and Removing Pipes AwARNING During operation and immediately after the switch has been set to the OFF position, when the machine is still rotating, do NOT attempt to insert or remove pipes. -
Page 13: Pre-Operational Inspection
Getting Ready AwARNING Before cutting or threading pipes, be sure to check the following. If anything is out of the ordinary, consult the Troubleshooting table and take the appropriate action as noted in the table. Failure to check and resolve problems may result in accident or injury. 8.Pre-Operational Inspection (1) Set the switch to the ON position and step on foot switch. -
Page 14: Cutting Pipes
Getting Ready 9.Cutting Pipes (1) As the die head and reamer will not be used when cutting pipes, lift them out of the way. (2) Determine the position at which the pipe is to be cut, then fasten the pipe securely. -
Page 15: Chamfering
Getting Ready 1 O.Chamfering After cutting the pipe with the pipe cutter, be sure to use the reamer to chamfer the inside of the pipe before cutting threads. (1) As the die head and cutters will not be used when chamfering, lift them out of the way. -
Page 16: Cutting Threads
Getting Ready 1 2.Cutting Threads Lift the cutter and reamer and set the die head to the proper size. Also look over the unit to make sure it is safe to begin threading. Note: Make sure the handle is in the lowered position (''Operating position" in Fig. -
Page 17: Replacing The Carbon Brushes
& Daily Inspection Care AcAUTION Before inspecting or performing maintenance on the unit, always set the switch to the OFF position and remove the plug from the outlet. · If the unit is left plugged in, it may begin operating unexpectedly, resulting in injury. If you discover any problems during inspection or maintenance, look up the symptoms in the "Troubleshooting"... -
Page 18: Repairs 1
The chuck jaw insert on the end of the chuck should be kept clean. Use a wire brush or the like to clean away any grime that clogs it. When the chuck jaw insert needs replacing, contact your distributor or Wheeler-Rex. Note: When replacing the chuck and chuck jaw insert, be sure to replace them with Wheeler-Rex original parts only. - Page 19 Before requesting repairs and services CAUTION If any problems are not dealt with below, do not attempt to overhaul or repair the unit by yourself. If repairs are performed by untrained or unskilled personnel, optimum performance cannot be attained, and accidents and injuries may occur.
Need help?
Do you have a question about the 7991 and is the answer not in the manual?
Questions and answers