
Summary of Contents for Evil Mad Scientist axidraw
- Page 1 Personal Writing and Drawing Machine User Guide AxiDraw Version 2.0 Guide Revision: 2.1, June 30 2016...
-
Page 2: Hey There Early Adopter
0. This guide is a work in progress! Welcome to AxiDraw! You’re one of the first to get one of our new personal writing and drawing machines. This guide is here to help you get started. There is a lot here–covering how you set up and use the machine, and pointing you about where to go from here. -
Page 3: Table Of Contents
2.1 What comes with the machine ........6 2.2 AxiDraw Anatomy ............6 2.2 Handling the AxiDraw ..........8 3: Overview: Getting Started with AxiDraw ....8 4: Software for AxiDraw ..........9 4.1 Installing software ............9 4.2 Inkscape and the extensions ........9 4.3 Aside: Alternative software and APIs ...... - Page 4 11: Maintenance and troubleshooting ......37 11.1 The hex wrenches ............37 11.2 Lubrication ..............37 11.3 Belt tension ..............37 11.4 Loss of position ............37 11.5 Service, repair, and parts support ......38 12. AxiDraw Tips and Tricks ...........38...
-
Page 5: Introducing The Axidraw
1.1 Credits and History: While new to most of the world, the AxiDraw project has been active since 2014, when it was first created by Dr. Lindsay Robert Wilson of IJ Instruments Ltd. in the UK. Early AxiDraw units had a different design. It was a smaller format pen plotter with a chassis made from machined Delrin plastic. -
Page 6: Checking Out Your Axidraw
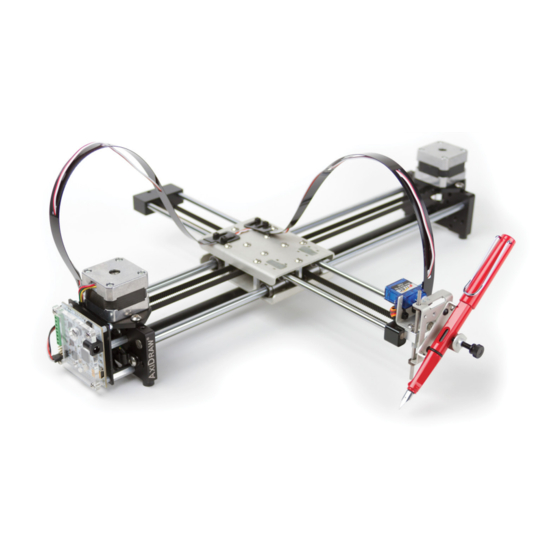
5. Power supply 4. Hex drivers 2.1 What comes with the machine Here are the parts that come 1. The AxiDraw itself (Ready to use) with the AxiDraw: 2. Clip Easel and binder clips (4) 3. USB cable 4. Hex drivers, including 5/64”, 3/32”, and 1/8”... - Page 7 §2.2, AxiDraw anatomy, continued: Top View Carriage (Y-axis part) Y Tail Block Y Shafts Timing belt X Shafts Wire conduit Pen holder Detail: Left Base Stepper motor “EBB” Control board Power Jack Base Block (left) Pause Button (aka “PRG” button)
-
Page 8: Handling The Axidraw
Vertical shafts 2.2 Handling the AxiDraw 1). Lifting: Lift AxiDraw by the base blocks, or by the stepper motors or X shafts if necessary. Do not lift by the cables, cable guides, or pen holder. 2). Heat: Please note that the two stepper motors may get warm. This is normal, but it is helpful to be aware of it. -
Page 9: 4: Software For Axidraw
4.2 Inkscape and the extensions Once you have installed the software, launch Inkscape. The AxiDraw software may be found in the Extensions > AxiDraw submenu of Inkscape. All machine control is performed from within the “AxiDraw Control” panel. (A second extension, Hatch Fill, is provided as well, to help with filling in shapes.) -
Page 10: 5: The Home Corner
Home Corner AxiDraw Logo When a plot finishes, the AxiDraw will return to its Home Corner automatically, leaving it ready for the next plot. Slide the carriage to the Home Corner by hand. You can move it diagonally by holding the Y Tie Block, which is the black block just behind the pen holder. -
Page 11: 6: Workholding
A simple board with clips, the Clip Easel, is included with the AxiDraw for holding smaller workpieces – principally different shapes and sizes of paper – that are not large enough to be held down by the AxiDraw itself. This is a great way to mount paper when getting started with the AxiDraw. -
Page 12: Moving Beyond The Clip Easel
If your AxiDraw is used as a single-purpose machine (that is, if you use the same pen and paper size consistently), you will likely prefer to make a workholding solution tailored for your specific application. -
Page 13: 7: Connecting Power And Usb
In the next section, when setting the pen heights, it is necessary to plug in the AxiDraw. When it is time to do so, connect the power and USB cables to the AxiDraw as shown. Connect the USB cable to any available USB port on your computer. -
Page 14: 8: Pens And Getting Ready For Printing
8: Pens and Getting Ready for Printing In this section we will discuss different types of pens, configuring the pen to be vertical or at an angle, the pen-up and pen-down positions, setting the pen height, and how to set the paper position relative to the pen. -
Page 15: Inserting A Pen
8.3 Inserting a pen You can insert a pen – or other writing instrument that you are using – into the pen clip and tighten it in place with the thumbscrew. (If you are setting up for the first time, you may find the thumbscrew removed for shipping.) Take care to only apply gentle force with the thumbscrew: You only need to immobilize the pen, so stop turning once you encounter moderate resistance. -
Page 16: Pen Up And Pen Down Positions
In this step we will check the pen-up and pen-down positions. First, connect power and USB (See “7: Connecting Power and USB” on page 13). Then, within Inkscape, open up AxiDraw Control. You can find it in the menu bar at: Extensions > AxiDraw > AxiDraw Control Click on the Setup tab: Select the “Toggle pen between UP, DOWN”... - Page 17 You can physically adjust the position of the pen with the thumbscrew, and/or change the positions from the Setup tab of AxiDraw Control. Toggle also to the pen-down position. With the pen down, the pen should rest on the paper by its weight.
-
Page 18: Positioning Your Paper
Plotting on large surfaces (where the AxiDraw sits directly on the surface): Position the AxiDraw such that the pen tip is at the upper left corner of the area that you intend to plot upon. The software will treat the corner of the page in your Inkscape doc- ument as Home Corner for the purpose of plotting. - Page 19 Position the paper with its upper-left corner directly underneath the tip of the pen. Square the paper up so that its top edge is parallel to the X-Shafts of the AxiDraw. As we discussed earlier (page 12), documents that are taller than wide are usual- ly turned “sideways”, as in B above.
-
Page 20: Summary
9: Plotting with the AxiDraw 9.1 Making your first plot In this section we will walk through the steps to make your first plot on the AxiDraw. Finish installing the AxiDraw software (§4) before beginning here. In addition to what comes with the AxiDraw, you will need pen and paper. - Page 21 §9.1, Making your first plot, continued If you have not done so already, get the AxiDraw set up to print: 1) Slide the pen holder to the Home Corner. (See §5) • The Home Corner is the upper-left corner, by the USB port.
- Page 22 §9.1, Making your first plot, continued You are now set up to print. Last thing: Check the area around the AxiDraw, and make sure that the carriage has room to move, both in front of and behind the base. Finally, switch to the Plot (first) tab of AxiDraw Control, and click Apply to begin.
-
Page 23: Pausing, Resuming, And Canceling Plots
To pause while plotting, press the pause button, which is the raised button located on the left hand side of the AxiDraw. (See “Detail: Left Base” on page 7.) The AxiDraw will stop plotting and raise the pen immediately after finishing the current line segment. -
Page 24: Plotting With Multiple Layers And Colors
9.3 Plotting with multiple layers and colors By default, AxiDraw Control will plot your entire drawing. However, if you have a docu- ment with multiple layers, you can use the Layers tab of AxiDraw Control to plot a single layer, or some set of layers. - Page 25 §9.3, Plotting with multiple layers and colors, continued Open the Layers window in Inkscape (shown at right) by selecting from the menu: Layer > Layers... You can edit the layer names within the Layers window, and you can use the various commands in the Layers menu to move objects between layers.
-
Page 26: Basic Speed Control
9.4 Basic speed control The Timing tab of AxiDraw control lets you set the basic movement speeds for the Axi- Draw. The two numbers at the top under the “Movement speeds” heading set the speeds used for the horizontal (XY) carriage motion. -
Page 27: Pen Lift Speeds
These additional delays are set in milliseconds, and can be posi- tive or negative in value. (You can use a negative delay value to force the AxiDraw to start its next movement even before the vertical motion is complete.) -
Page 28: Advanced Options
9.6 Advanced options The Options tab of AxiDraw Control has several advanced settings that do not normally need to be changed, but that you may wish to know about. Auto-rotate page when printing (Default: on) When checked, documents taller than wide (those in portrait orientation) will automat- ically be rotated sideways. -
Page 29: Axidraw Manual Controls
“O”) while writing text. 9.7 AxiDraw Manual Controls The Manual tab of AxiDraw Control allows you to manually execute select, basic com- mands and utilities. Select the operation to perform with the Command drop-down list, and then click the “Apply”... - Page 30 An important note is that no limit checking is performed when manually commanding a move from the Manual tab. Take care not to run the AxiDraw into its physical limits. If you are unsure, you can always disable the motors and move the carriage Home by hand.
-
Page 31: Plotting Away From Home
9.8 Plotting away from home Occasionally, it is the case that the subject that one is writing – for example a name, ini- tials, return address, or signature – is both small compared to a page of paper and needs to be positioned precisely. -
Page 32: 10: Designing For Axidraw
10: Designing for AxiDraw 10.1 General considerations The AxiDraw is a pen potter, which is fundamentally a single function device. Its sole func- tion is to guide a pen (or other implement mounted in the pen holder) along the set of vector lines, curves, and paths that you ask it to follow. -
Page 33: Visualizing Paths In Your Document
And, in the Stroke Style tab, select a consistent width, say 0.020 inches or 0.5 mm. This procedure generally provides a good preview of how the AxiDraw will view your page. It is only a preview however; it shows the outlines around objects even if they are not (for example with text) converted to paths yet. - Page 34 § 10.3 Working with standard fonts, continued To convert your editable text into paths that can be plotted, select them and choose from the menu Path > Object to Path. You may wish to save a separate copy of your document before converting to paths, in case you wish to edit the text again later.
-
Page 35: Single Stroke Fonts & Hershey Text
10.4 Single stroke fonts & Hershey Text The ideal type of font to use with a plotter is an engraving font or single stroke font. Standard fonts used on computers (truetype, postscript, opentype, etc.) are outline fonts. In these, the font file describes a filled vector shape. That is to say, the visible part of a character in an outline font is the area enclosed by the shape. -
Page 36: Filling
10.5 Filling The AxiDraw software includes a second Inkscape extension, which handles the task of filling in areas with paths, such that they can be filled in with pen strokes on your page. You can find it in the menu at Extensions > AxiDraw > Hatch Fill Hatch Fill will fill any selected objects with a series of back and forth lines, with adjust- able spacing and angle. -
Page 37: 11: Maintenance And Troubleshooting
Teflon/acetal composite) will not slide freely if oiled. 11.3 Belt tension The AxiDraw uses a single timing belt, looped in an “X” around the two motors and the Y carriage. This belt may gradually stretch a small amount, and can be retensioned where it is anchored, if necessary. -
Page 38: Service, Repair, And Parts Support
11.5 Service, repair, and parts support The AxiDraw is designed to be serviceable, and we are here to help. Nothing should re- quire regular replacement. However, most parts of the machine can be unscrewed and replaced if necessary. Please contact technical support directly if you need assistance with troubleshooting or repairing a mechanical issue. - Page 39 AxiDraw in other orientations (when gravity is not readily available to pull the pen to the surface). Do not add a rubber band unless it is actually needed; it will reduce the lifespan of the pen-lift servo motor.
Need help?
Do you have a question about the axidraw and is the answer not in the manual?
Questions and answers