Table of Contents

Subscribe to Our Youtube Channel
Related Manuals for Miele DA 3660


Summary of Contents for Miele DA 3660
- Page 1 Operating and Installation Instructions Ventilation Hood To prevent accidents and damage to the appliance, you must read these instructions before installing the appliance and using it for the first time. en-US M.-Nr. 10 625 750...
-
Page 2: Table Of Contents
Contents IMPORTANT SAFETY INSTRUCTIONS .............. 4 Caring for the environment ................ 13 Description of functions .................. 14 Con@ctivity 2.0 function..................15 Guide to the appliance .................. 16 Operation (Automatic mode) ................ 18 Cooking with Con@ctivity 2.0 (Automatic mode) ..........18 Temporarily exiting Automatic mode .............. - Page 3 Contents MieleCare ......................35 Installation...................... 36 Installation parts ....................36 Appliance dimensions ................... 38 Distance between cooktop and ventilation hood (S)..........41 Installation recommendations ................42 Before installation....................42 Installation Instructions ..................44 Electrical connection .................. 45 Air venting ...................... 46 Condensate trap....................
-
Page 4: Important Safety Instructions
IMPORTANT SAFETY INSTRUCTIONS READ AND SAVE THESE INSTRUCTIONS This appliance complies with current safety requirements. Improper use of the appliance can lead to personal injury and material damage. Read all instructions before installing or using the appliance for the first time. Only use the appliance for its intended purpose. Keep these operating instructions in a safe place and pass them on to any future user. -
Page 5: Technical Safety
Installation, repair and maintenance work should be performed by a Miele authorized service technician in accordance with national and local safety regulations and the provided installation instructions. Contact Miele’s Technical Service Department for examination, repair or adjustment. - Page 6 Tampering with electrical connections or components and mechanical parts is highly dangerous to the user and can cause operation faults. Defective components should be replaced by Miele original parts only. Only with these parts can the manufacturer guarantee the safety of the appliance.
-
Page 7: Proper Use
IMPORTANT SAFETY INSTRUCTIONS If the power cord is damaged, it must only be replaced by a qualified service technician. During installation, maintenance, and repair work, the ventilation hood must be disconnected from the electrical supply. It is only completely isolated from the electricity supply if one of the following applies: –... - Page 8 IMPORTANT SAFETY INSTRUCTIONS – a) SMOTHER FLAMES with a close fitting lid, cookie sheet, or metal tray then turn off the burner. BE CAREFUL TO PREVENT BURNS. If the flames do not go out immediately, EVACUATE AND CALL THE FIRE DEPARTMENT. –...
- Page 9 IMPORTANT SAFETY INSTRUCTIONS Fat and debris deposits impair the proper functioning of the ventilation hood. To ensure that cooking vapors are properly cleaned, never use the ventilation hood without the grease filters in place. There is a risk of fire if cleaning is not completed according to the instructions in this manual.
- Page 10 IMPORTANT SAFETY INSTRUCTIONS Proper installation WARNING: TO REDUCE THE RISK OF FIRE, ELECTRIC SHOCK, OR INJURY TO PERSONS, OBSERVE THE FOLLOWING: – a) Installation work and electrical wiring must be done by qualified person(s) in accordance with all applicable codes and standards, including fire-rated construction.
- Page 11 – Do not throw old batteries away with your general household waste. Please dispose of them in a designated battery collection and recycling system. Accessories Use only genuine original Miele parts. If parts or accessories from other manufacturers are used, the warranty will become void.
-
Page 12: Fcc Declaration Of Conformity
IMPORTANT SAFETY INSTRUCTIONS FCC Declaration of Conformity These devices comply with FCC Rules Part 15. This equipment has been tested and found to be in compliance with the limits for a Class B digital device, pursuant to Part 15 of the FCC Rules of Operation and is subject to the following conditions: These devices may not cause harmful interference. -
Page 13: Caring For The Environment
Caring for the environment Disposal of the packing Disposal of your old appliance material Do not dispose of this appliance with your household waste. The cardboard box and packing materials protect the appliance during Old appliances may contain materials shipping. They have been designed to that can be recycled. -
Page 14: Description Of Functions
Description of functions The following functions are available on Recirculation mode your ventilation hood, depending on the Recirculation mode hoods require a model: recirculation kit and OdorFree Charcoal Filters (available as optional Vented mode accessories), see "Technical Data" for more information. The air is drawn in and cleaned by the grease filters and directed outside. -
Page 15: Con@Ctivity 2.0 Function
Miele cooktop. and the canopy extends. – During cooking, the hood automatically selects the fan level based on the number of burners in operation and their power levels. -
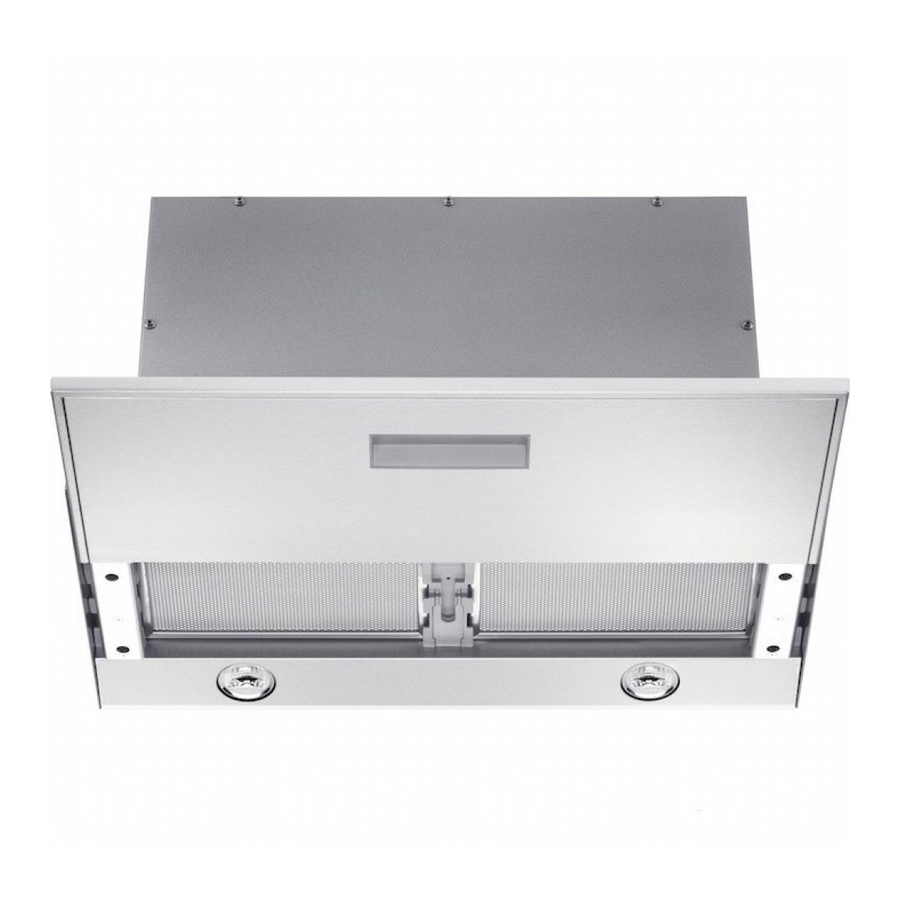
Page 16: Guide To The Appliance
Guide to the appliance... - Page 17 Guide to the appliance a Retractable canopy b Control panel c Grease filters d Overhead cooktop LED lighting e Vent connection The exhaust collar can also be fitted at the back. f Slots for the charcoal filters g Slots for the grease filters h Charcoal filter Optional accessory for recirculation mode i Overhead lighting button...
-
Page 18: Operation (Automatic Mode)
Operation (Automatic mode) When Con@ctivity 2.0 is active, the Reaction time hood always operates in Automatic Changing the power setting on the mode (see "Activating Con@ctivity cooktop does not lead to an immediate 2.0"). increase or decrease in cooking vapors. See "Cooking without Con@ctivity 2.0"... - Page 19 Operation (Automatic mode) Cooking process Deactivation If, for example, you switch on a Turn off all burners. burner at the highest power setting to Over the next few minutes, the heat cookware in preparation for ventilation hood fan setting will searing and then reduce the power decrease one level at a time until the level after approx.
-
Page 20: Temporarily Exiting Automatic Mode
Operation (Automatic mode) Temporarily exiting Automatic Resuming Automatic mode mode The ventilation hood resumes Automatic mode: To temporarily exit the Automatic mode when cooking: If the ventilation hood has not been used for a period of approx. 5 Manually select a different fan level, minutes after the manual selection of a fan level, or ... -
Page 21: Operation (Manual Mode)
Operation (Manual mode) Cooking without Con@ctivity Extending the deflector plate, 2.0 (Manual mode) switching the fan on Press the "" button on the remote The hood can be operated manually if: control. – The Con@ctivity 2.0 function is not activated. -
Page 22: Selecting The Power Level
Operation (Manual mode) Selecting the power level Selecting the delayed shut down time Power levels 1 to 3 can be used for light to heavy cooking vapors and odors. It is advisable to run the fan for a few minutes after cooking has finished to For strong vapors and odors that are neutralize any lingering vapors and temporarily produced when cooking,... -
Page 23: Switching The Overhead Lighting On/Off
Operation (Manual mode) The next time you switch on the Power management ventilation hood, the canopy will extend The ventilation hood features a power again correctly. management system for saving energy. It is used for switching off the lighting, Switching the overhead reducing the fan power level and lighting on/off retracting the canopy automatically... - Page 24 Operation (Manual mode) Turning power management On/Off Confirm the setting by pressing the delayed shut down button 5 15. You can deactivate the power management. All the indicator lights will go out. This can result in increased electricity If the new setting is not confirmed consumption.
-
Page 25: Operation (Automatic And Manual Modes)
Operation (Automatic and Manual modes) Filter saturation indicator The number of hours the hood has been in operation is stored in appliance memory. The filter saturation indicators show when the filters need to be cleaned or Remove the grease filters. changed by lighting up the grease filter symbol ... -
Page 26: Activating/Changing The Charcoal Filter Saturation Timer
Operation (Automatic and Manual modes) Activating/changing the charcoal If the new setting is not confirmed filter saturation timer within 4 minutes, the hood reverts to the previous setting. The filter saturation timer for the charcoal filter requires one-time activation and must be set to match your cooking habits. -
Page 27: Checking The Elapsed Operating Time
Operation (Automatic and Manual modes) Checking the elapsed operating time Before the set operating time interval has been reached, you can check what percentage of the time has elapsed. Press the On/Off button to switch the fan on. ... -
Page 28: Energy-Saving Tips
Energy-saving tips This hood operates in a very efficient – Make sure that you switch the and energy-saving manner. The ventilation hood off after use. following will help you to save even If cooking vapors and odors still more energy when using it: need to be removed from the kitchen air after cooking, use the –... -
Page 29: Cleaning And Care
Stainless steel surfaces can also be cleaned using a non-abrasive Before cleaning or servicing the stainless steel cleaner, available from hood, disconnect it from the power Miele. supply, see "IMPORTANT SAFETY INSTRUCTIONS". To prevent the surfaces from quickly becoming dirty again, we recommend... -
Page 30: Grease Filters
Cleaning and care Cleaning intervals Grease filters Over longer periods of time, fat buildup The reusable metal grease filters in the on the grease filter hardens and makes appliance remove the solid particles cleaning more difficult. Therefore, we contained in kitchen vapors (fat, dust, recommend cleaning the grease filters etc.), thereby preventing the ventilation once every 3-4 weeks. - Page 31 Select a program with a wash to the filter surfaces if used regularly. temperature between 120°F (50°C) Do not use any of the following: and 150°F (65°C). In a Miele – Lime removers dishwasher use the "Normal" program. – Abrasive powders or abrasive liquids –...
-
Page 32: Odorfree Charcoal Filter
These are designed to absorb cooking odors. Charcoal filters are available from your Miele dealer or from Miele. See "Technical data" for the type and Insert the charcoal filters in the slots. reference number. -
Page 33: Resetting The Filter Saturation Indicator For The Charcoal Filter
Cleaning and care When to change the OdorFree Charcoal Filter Always replace the OdorFree Charcoal Filters whenever they no longer absorb kitchen odors effectively. The charcoal filters should be replaced at least once every 6 months. The charcoal filter saturation indicator ... -
Page 34: Remote Control
Cleaning and care Remote control Cleaning the remote control Only clean the surface with a damp cloth. Do not use too much water to avoid moisture penetrating the casing. Changing the battery Use only the type of battery listed. Do not use rechargeable batteries. -
Page 35: Service And Warranty
Miele This service is available in USA only. dealer or Miele Technical Service. The telephone number for Miele is listed MieleCare, our Extended Service at the back of these instructions. Contract program, gives you the... -
Page 36: Installation
Installation Installation parts... - Page 37 Installation a 2 covers for the brackets. b 2 brackets to support the appliance 4 screws M4 x 16 mm (5/8") for in the wall unit. securing the ventilation hood to the c 1 cover for the charcoal filter slots. brackets and for securing the spacer strip.
-
Page 38: Appliance Dimensions
Installation Appliance dimensions... - Page 39 Installation...
- Page 40 Installation a Extraction, recirculation with conversion kit DUU 150. b The wall unit housing needs to be 1 1/2" (38 mm) shorter than the wall unit door. c Installation is also possible in a 23 5/8" (600 mm) wide unit. In the process, the following must be observed: –...
-
Page 41: Distance Between Cooktop And Ventilation Hood (S)
Please also observe the information contained in the "IMPORTANT SAFETY INSTRUCTIONS" section. Minimum distance S Cooking appliance Miele Non-Miele appliance appliance Electric Cooktops 24" (610 mm) Electric Barbeques and Fryers 26"... -
Page 42: Installation Recommendations
Installation Installation recommendations Before installation – To achieve optimal vapor extraction, Before installing the appliance, make sure that the hood covers the read all of the information contained cooktop. The hood should be in this chapter and also in the positioned centrally over the cooktop, "IMPORTANT SAFETY not to the side or rear. - Page 43 Installation Repositioning the ducting The blower can be rotated to allow the ducting to be fitted at the back of the hood. This may be necessary if the hood is being fitted in a reduced height wall unit, for example. Repositioning is carried out before installing the hood.
-
Page 44: Installation Instructions
Installation Installation Instructions Please refer to the accompanying installation sheet for instructions on how to install the appliance. Leave these instructions with the appliance for the consumer/user. Information is subject to change. Please refer to our website to obtain the most current product specification, technical &... -
Page 45: Electrical Connection
CSA C22.1-12, please consult a licensed electrician Canadian Electrical Code, Part I. or call Miele’s Technical Service Department. WARNING: THIS APPLIANCE MUST BE GROUNDED... -
Page 46: Air Venting
Air venting – Make sure that all connections are WARNING: Danger of toxic fumes. secure and airtight. Gas cooking appliances release carbon monoxide that can be Remember that any constriction of harmful or fatal if inhaled. the airflow will reduce extraction To reduce the risk of fire and to performance and increase operating properly exhaust air, the exhaust... -
Page 47: Condensate Trap
Air venting Condensate trap Reducing Collar (optional accessory) If you would like to reduce the In addition to insulating the exhaust environmental impact of your ventilation duct, we recommend installing a system by limiting the CFM output the condensate trap to collect and Reducing Collar can be installed. -
Page 48: Activating Con@Ctivity 2.0
Activating Con@ctivity 2.0 Activating the ventilation hood Installation of the Con@ctivity 2.0 stick Signing on/off is carried out with the canopy retracted. In order for you to be able to use the Con@ctivity 2.0 function, the cooktop must be equipped with a Con@ctivity 2.0 stick. -
Page 49: Activating The Cooktop
Activating Con@ctivity 2.0 Activating the cooktop Activation failed While the ventilation hood is If a wireless connection cannot be searching for a wireless connection, established despite activation of the start activation on the cooktop. Con@ctivity function on the More information can be found in the ventilation hood and cooktop, the operating instructions for the... -
Page 50: Signing The Remote Control On/Off
Signing the remote control on/off If the connection has been lost between Signing on and off must be done at the the remote control and the ventilation same time on the ventilation hood and hood, the remote control and the the remote control. - Page 51 Signing the remote control on/off flashes. The remote control has now option control 515 on the been signed off. The LED will go out ventilation hood and on the remote after a short while. control. Confirm the signing off procedure by ...
-
Page 52: Technical Data
Power cord length 2.5 ft (0.75 m) Weight 41.8 lbs (19 kg) Special accessories for recirculation mode: Conversion kit DUU 150 or DUU 151 and Miele charcoal filter set DKF 19. Contains two charcoal filters. Contains FCC ID: 2ACUWEI8800 IC: 5669C-EI8800 This device complies with Part 15 of the FCC Rules and with Industry Canada licence-exempt RSS standard(s). - Page 55 Technical Service. U.S.A. Canada Miele, Inc. Importer Miele Limited National Headquarters 9 Independence Way Headquarters and Miele Centre Princeton, NJ 08540 161 Four Valley Drive Phone: 800-843-7231 Vaughan, ON L4K 4V8 609-419-4298 Fax: www.miele.ca www.mieleusa.com...
- Page 56 DA 3690 en-US M.-Nr. 10 625 750 / 00...
Need help?
Do you have a question about the DA 3660 and is the answer not in the manual?
Questions and answers