Table of Contents
Advertisement
Pubn No: 30000H0K
Installation, Operating and Maintenance Instructions
SETAFLASH SERIES 3
CLOSED CUP
FLASH POINT TESTER
Model 30000-0
(Software Version 2.00 and above)
London Street, Chertsey, Surrey, KT16 8AP
Telephone: +44 (0) 1932 564391 Facsimile: +44 (0) 1932 568363
Email: info@stanhope-seta.co.uk Web: www.stanhope-seta.co.uk
Issue K
10 Jun 2007
Advertisement
Table of Contents

Summary of Contents for Stanhope-Seta 30000-0
- Page 1 SETAFLASH SERIES 3 CLOSED CUP FLASH POINT TESTER Model 30000-0 (Software Version 2.00 and above) London Street, Chertsey, Surrey, KT16 8AP Telephone: +44 (0) 1932 564391 Facsimile: +44 (0) 1932 568363 Email: info@stanhope-seta.co.uk Web: www.stanhope-seta.co.uk Issue K 10 Jun 2007...
-
Page 2: Safety Notices
© 2007 by Stanhope-Seta, all rights reserved. The copyright in this work is vested in Stanhope-Seta. Reproduction in whole or part is strictly prohibited, except with the written consent of Stanhope-Seta, and then only on the condition that this notice is included in any such reproduction. -
Page 3: Preliminary Material
30000-0 Setaflash Series 3 Closed Cup Flash Point Tester PURPOSE OF THIS MANUAL This manual has been prepared to assist in the preparation, use and care of the 30000-0 Setaflash Closed- Cup flash point tester. This manual is not intended to replace the appropriate Test Methods, which should be consulted to ensure full compliance with the requirements. -
Page 4: Table Of Contents
QUALITY ASSURANCE ....................... 6 1.3. REGULATORY CONFORMANCE....................6 DESCRIPTION......................7 2.1. SERIES 3 FLASH POINT TESTERS .................... 7 2.2. OVERVIEW – MODEL 30000-0 ....................7 2.3. SAFETY FEATURES ........................8 2.3.1. OVER-TEMPERATURE CUT-OUT AND RESET BUTTON ............. 8 2.3.2. TEMPERATURE WARNING LED..................... 8 INSTALLATION - GENERAL ................... -
Page 5: List Of Figures
SETA SOLIDS DISPENSER 13747-0 ..........41 APPENDIX C: SETA COOLING BLOCK 13880-0 .............43 LIST OF FIGURES Figure 1 30000-0 Setaflash Series 3 Closed Cup Flash Point Tester ............3 Figure 2 Main Component Parts ......................... 7 Figure 3 Gas Canister and Related Components ..................10 Figure 4 Flash Detector Probe Replacement .................... -
Page 6: Conformity
Pubn No: 30000H0K CONFORMITY 1.1. APPLICATIONS The Setaflash 30000-0 is a Closed Cup Flash Point Tester that conforms to the following:- ASTM D1655; ASTM D3278; ASTM D3828; BS 3900 Part A13; BS 6664 Parts 3 & 4; BS EN456; CHIPS Regulations;... -
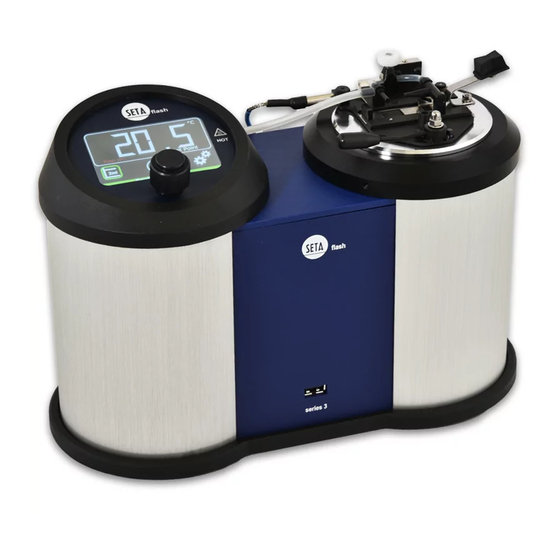
Page 7: Description
There are four Closed Cup variants of the Setaflash Series 3 Tester; Model 30000-0; Model 33000-0 (Series 3 ‘Plus’), is similar to the model 30000-0, with the addition of a ramp function to automatically increment the temperature for repeated tests until a flash is observed, or the end of the search range is reached;... -
Page 8: Safety Features
Pubn No: 30000H0K The aluminium sample cup is integral with a block containing the heating elements. Temperature control is achieved by a digital heater controller. A precision platinum resistance thermometer measures the temperature of the cup, providing data for the display and the heater controller. An LED indicator is provided on the top of the case, adjacent to the sample cup, to warn the operator when the temperature of the sample cup exceeds 55°C. -
Page 9: Installation - General
1) Retain all packaging for future storage or transport of the instrument. 2) Check the contents against the Packing List. The major items are: a) 30000-0 Series 3 Closed cup Flash Point Tester b) 2ml syringe c) Gas canister and igniter d) Silicone rubber tubing for gas canister to gas jet connection e) Silicone Sample Well ‘O’... -
Page 10: Supply Operation (With Optional 30005-0 Psu)
Pubn No: 30000H0K 4) Ensure that the fuse rating suits the power supply. a) The fuse is fitted in a fuse holder below the on/off switch on the rear of the unit. b) An antisurge (T) 2A HBC fuse is fitted. c) To access the fuse, prise the fuse holder open with a screwdriver blade. -
Page 11: Gas Canister Charging
Pubn No: 30000H0K 3.4.2. GAS CANISTER CHARGING Disconnect Slide the ON/OFF gas valve to Slide Down the OFF (down) position [1] and disconnect the silicone tubing from the brass insert [2]. Lift the gas canister from its holder and turn it upside down so that the transparent section is uppermost. -
Page 12: Operation
Pubn No: 30000H0K OPERATION WARNING: BEFORE OPERATION, REFER TO THE SAFETY NOTICES ON PAGE 2. 4.1. SAMPLE PREPARATION WARNING: KEEP CONTAINERS CLOSED WHEN NOT IN USE. DO NOT MAKE A TRANSFER UNLESS THE SAMPLE TEMPERATURE IS AT LEAST 10°C BELOW THE EXPECTED FLASH POINT. -
Page 13: Setting The Test Flame Size
Pubn No: 30000H0K 4.2.2. SETTING THE TEST FLAME SIZE Switch the gas supply ON. Slide Up WARNING: IF THE GAS CANISTER HAS JUST BEEN RECHARGED, THE SIZE OF THE PILOT AND TEST FLAMES WILL BE CONSIDERABLY LARGER THAN THE LAST TIME THEY WERE LIT Light the Pilot and Test Jets. -
Page 14: Switching The Power On
Pubn No: 30000H0K 4.2.3. SWITCHING THE POWER ON Switch the instrument ON at the ON/OFF Power Switch on the rear of the instrument Switch ON The display will show the Version N.NN software version ….. N.NN = software version ….. then change to show the current status. -
Page 15: Setting Test Parameters
Pubn No: 30000H0K 4.3. SETTING TEST PARAMETERS 4.3.1. SETTING THE TIMER Press and hold down the Set Press & Hold Down Timer Button The display will start to count XX.X down for a few seconds ….. 59 seconds ….. then a warning beep will SET TEST TIME sound and the display will AUTO... -
Page 16: Setting The Temperature
Pubn No: 30000H0K 4.3.2. SETTING THE TEMPERATURE Press hold down the Set Press & Hold Down Temperature Button ….. ….. until a warning beep is heard and the display changes to show SET TEMPERATURE XX.X “Set Temperature” ….. XX.X = sample cup temperature ….. -
Page 17: Running A Test
Pubn No: 30000H0K 4.4. RUNNING A TEST When the Sample Cup has stabilised at the set temperature a warning beep will sound ….. ….. and the display will show XX.X C AUTO Yml XX.X TT mins Ready Ready “Ready”. Load the Syringe with sample and inject the sample into the Sample Cup through the Filler Orifice. - Page 18 Pubn No: 30000H0K Slide Up Switch the gas supply ON. Light the Pilot and Test Jets. Check the Test Jet flame is 4mm diameter. A 4mm circle is Rotate engraved on the shutter plate as a guide. Adjust if necessary by turning the Pinch Valve.
-
Page 19: Results
Pubn No: 30000H0K Open and close the Shutter over 2.5 Seconds a period of 2.5 seconds 4.5. RESULTS Note: ‘Halo’ Effect: Note: ‘Popping’: A "popping" sound may be heard A blue halo or enlarged flame when the flame is dipped into the sometimes occurs when the vapour space. -
Page 20: No Flash
Pubn No: 30000H0K 4.5.2. NO FLASH If a flash is NOT detected ….. ….. the second line of the XX.X TT mins XX.X C AUTO Yml XX.X display will not show “FLASH”. RAMPING Record the temperature and result. 4.6. END OF TEST Slide Down Switch the gas supply OFF and wait until the test and pilot... - Page 21 Pubn No: 30000H0K Unlock and open the Lid, remove used sample, and clean the Sample Cup. Switch the instrument OFF at the ON/OFF Power Switch on the rear of the instrument Switch OFF Issue K 10 Jun 2007...
-
Page 22: Calibration
Pubn No: 30000H0K CALIBRATION 5.1. DESCRIPTION The Calibration Mode is only accessible from power up. The Setaflash Series 3 Flash Point Testers are calibrated for temperature using a single point method. The procedure is carried out via the panel controls and requires a reference thermometer and some thermo-conductive paste. - Page 23 Pubn No: 30000H0K ….. switch the Setaflash Series 3 ON at the ON/OFF Power Switch on the rear of the instrument. Switch ON The display will show the Version N.NN software version ….. N.NN = software version ….. then change to show the Calibrate Mode Please wait …...
- Page 24 Pubn No: 30000H0K When the countdown reaches 0 a warning beep will sound ….. ….. and the display will change Thermometer T? > to request the temperature as 55.0°C shown on the thermometer. Wait until the temperature shown on the thermometer is stable. This may take a few more minutes.
-
Page 25: Calibration Check
Pubn No: 30000H0K Switch the instrument OFF at the ON/OFF Power Switch on the Switch OFF rear of the instrument. The calibration is stored. 5.4. CALIBRATION CHECK Press hold down the Set Temperature and Set Timer Buttons and ….. Press & Hold Down ….. - Page 26 Pubn No: 30000H0K Release the Set Temperature and Set Timer Buttons. Release °C °C The Sample Cup will start to heat up to 55°C as measured by the Setaflash Series 3 Flash Point Tester. When the instrument measures the Sample Cup temperature as Calibrate Mode 55°C the display will countdown Please wait 300...
- Page 27 Pubn No: 30000H0K Wait until the temperature shown °C on the thermometer is stable. 54.9 This may take a few more minutes. If the thermometer shows 54.9 to °C 55.1 55.1°C the calibration is correct. Otherwise repeat the calibration procedure. Switch the instrument OFF at the ON/OFF Power Switch on the Switch OFF...
-
Page 28: Verification
Certified Reference Materials (CRM) mandatory. More regular tests will utilise Secondary Working Standards (SWS). Note: Stanhope-Seta recommends using Setaflash Certified Flash Point Material, part number Seta 99878-3. 2) Secondary Working Standards may be generated by the company carrying out the tests. The procedure for making SWS is included in the standard method of test. -
Page 29: Maintenance
Pubn No: 30000H0K MAINTENANCE CAUTION: DO NOT LUBRICATE THE DIPPING MECHANISM. CAUTION: DO NOT LUBRICATE THE SHUTTER. CAUTION: TAKE CARE WHEN CLEANING THE LID OR SHUTTER NOT TO DAMAGE THE TIP OF THE FLASH DETECTOR PROBE. 1) After each test: a) Wipe the Sample Cup clean. -
Page 30: Fault Finding
Pubn No: 30000H0K FAULT FINDING FAULT POSSIBLE CAUSE USER REMEDY Erroneous temperature display or other Random program error Try switching off unit for 5 seconds and visible operating fault switching back on again No illumination on panel display when No power to the Tester Check that the power supply is available power is switched on and switched on... -
Page 31: Repair
Pubn No: 30000H0K REPAIR 1) If the instrument is to be returned to our factory for repair, ensure that it is adequately packed for the intended method of transport. Inadequate packing may cause returned instruments to be damaged in transit, resulting in additional cost and time to rectify. Please contact our Repairs Administration for any help or advice you may need. -
Page 32: Replacing The Gas Canister And Tubing
Pubn No: 30000H0K ‘O’ Ring Seal Figure 5 Sample Well 'O' Ring Seal Replacement 9.3. REPLACING THE GAS CANISTER AND TUBING 1) Check that the on/off gas valve is in the off (down) position. 2) Pull the silicone rubber tubing from the brass fitting on the top of the gas canister and the lid shutter assembly. -
Page 33: Replacing The Lid/Shutter Assembly
Pubn No: 30000H0K 9.4. REPLACING THE LID/SHUTTER ASSEMBLY 1) Disconnect the silicone rubber tubing that connects the gas canister to the lid/shutter assembly at the lid/shutter assembly. 2) Remove the flash detector; a) Disconnect the flash detector probe lead from the socket on the back of the instrument. b) Loosen the flash detector retaining nut and clip. -
Page 34: Specification
Pubn No: 30000H0K 10. SPECIFICATION Flash point temperature range: Ambient to 300°C 0°C to 300°C using optional Seta Coolant Module Sample size: 2ml for flash points up to 100°C 4ml for flash points above 100°C 2ml for FAME products at all temperatures. Test time: 1 minute for flash points up to 100°C 2 minutes for flash points above 100°C 1 minute for FAME products at all temperatures... -
Page 35: Accessories
Pubn No: 30000H0K 11. ACCESSORIES Part No. Description 13747-0 13666-0 BUTANE REFILL CONTAINER, pack of 10. 13746-0 SETAFLASH DRAUGHT SCREEN 13747-0 SOLID SAMPLE DISPENSER 13751-0 REFERENCE THERMOMETER, 0-110°C, with NAMAS calibration certificate. 13755-0 REFERENCE THERMOMETER, 100-300°C, with UKAS calibration certificate. 13770-311 SYRINGE, 4ml, for tests in the range of 100-300°C. -
Page 36: Spares
Pubn No: 30000H0K 12. SPARES 12.1. SPARES AVAILABLE Part No. Description 13666-0 BUTANE REFILL CONTAINER, pack of 10 13730-005 SILICONE RUBBER TUBING, 4 metres 13740-004 SAMPLE WELL ‘O’ RING SEAL, VITON, for kerosene based applications, pack of 5 13470-009 SYRINGE, 2ml 13740-425 FLASH DETECTOR ASSEMBLY 13770-004... -
Page 37: Frequently Asked Questions
8) How can I accelerate cooling of the cup between tests? See the Accessories list for cooling blocks 9) Which model should I use for Jet A1 and Aviation Fuels? Models 30000-0, 33000-0, or 33200-2 10) Which model should I use for corrosive samples? Model 32000-0 11) Which closed cup model should I use for tests at close to ambient temperature? Model 33200-2 because it has a peltier cell cooling system built in. -
Page 38: Figure 8 30000-0 Wiring Schematic Diagram
Pubn No: 30000H0K Figure 8 30000-0 Wiring Schematic Diagram Issue K 10 Jun 2007... -
Page 39: Appendix A: Seta Coolant Module 13870-0
Pubn No: 30000H0K APPENDIX A: SETA COOLANT MODULE 13870-0 The coolant module is used to reduce the temperature of the sample cup to below ambient temperature for samples with low flash points, before starting a test. To use the coolant module, proceed as follows (refer to the illustrations): WARNING: ALWAYS WEAR SAFETY GLASSES AND GLOVES WHEN HANDLING DRY ICE (SOLID... - Page 40 Pubn No: 30000H0K Page Intentionally Left Blank Issue K 10 Jun 2007...
-
Page 41: Appendix B: Seta Solids Dispenser 13747-0
Pubn No: 30000H0K APPENDIX B: SETA SOLIDS DISPENSER 13747-0 1) Fit the knurled base into the Setaflash cup. 2) Generously load the sample into the dispenser. 3) Level off the sample. 4) Fit the dispenser into the knurled base. 5) Whilst holding the knob, rotate the knurled base. Issue K 10 Jun 2007... - Page 42 Pubn No: 30000H0K 6) Remove the dispenser and base. This dispenses a 2ml sample. 7) To dispense a 4ml sample, remove the spacer ring as shown and carry out steps (1) to (6) above. Issue K 10 Jun 2007...
-
Page 43: Appendix C: Seta Cooling Block 13880-0
Pubn No: 30000H0K APPENDIX C: SETA COOLING BLOCK 13880-0 The cooling block is used to accelerate cooling of the sample cup between tests, when the cup has been heated to above ambient temperature. To use the cooling block, carry out the following steps :- 1) Store the block in a refrigerator or in cold water. - Page 44 Pubn No: 30000H0K Page Intentionally Left Blank Issue K 10 Jun 2007...
Need help?
Do you have a question about the 30000-0 and is the answer not in the manual?
Questions and answers