Table of Contents
Advertisement
Quick Links
Advertisement
Table of Contents

Summary of Contents for Cocktail Audio X50
- Page 1 Rev1.0 English...
-
Page 2: Table Of Contents
2-4-1. HDD installation ……………………………………………………………………………..…………… 12 2-4-2. HDD Format …………………………………………………………….………………………..…………. 12 2-5. X50 purchased with an internal storage installed …………….…..………….……………..……. 12 2-6. HDD Installation for non-RAID system or RAID system ............ 12 2-6-1. How to connect for non-RAID system ................. 13 2-6-2. - Page 3 4-1-6-2. How to check backup progress and result ..........22 4-1-6-3. How to stop backup ..................... 22 4-1-7. Restore …………………………………………………………………………………………….…..………..18 4-1-8. MusicDB Integrity Check ..................... 23 4-2. CD Ripping ……………………………………………………………………………………………………………. 23 4-2-1. Bit Rate and Quality …………………………………………………………………………………….. 23 4-2-2. Audio Format (Audio Rip Format) ……………………..………………………….…………….. 24 4-2-3.
- Page 4 6-1. When the X50 is connected to network (Internet)…………….………….….……….……………. 46 6-1-1. Ripping All ……………………………………………………………………………….…….…...…………… 47 6-1-2. Ripping Track ………………………………………………………………………….….…...………………. 48 6-2. In the case that X50 is NOT connected to network (Internet) ……..…..….…….….…..…… 49 6-2-1. Ripping All ……………………………………………………………………………………..….….…..…….. 50 6-2-2. Ripping Track ………………………………………………………………………….….……….….…..…… 51 6-3.
- Page 5 9. Audio CD direct play ………………………………………….……………….……………..………...….…...….…….. 58 9-1. If the X50 is connected to a network (Internet)………………….……………..………...….….…. 58 9-2. If the X50 is NOT connected to network (Internet) ……………………..….………..……..… 60 9-3. In case that you have installed the FreeDB data onto the hard disk of the X50 ……………………………………………………………………………….….…..…...…..…….
- Page 6 13-1-4-3. The recorded file name structure…………………………..…..….…….…….….. 69 13-1-4-4. How to edit the recorded file …………………………………...……...…….……. 70 13-1-5. Reservation Recording …………………………………………………………..….…….………… 70 13-1-5-1. How to set reservation recording …………………………….…..……….……… 70 13-1-5-2. How does the reservation recording start ………………….……..…………. 71 14. FM Radio …………………………..…………………………………………..……………………………...…..……….…... 72 14-1.
-
Page 7: Important Safety Instructions
18-15. Seek function on the Playing Screen ……………..…………………..……..….…………...….….. 85 18-16. How to rip(convert) the edited file into other formats(MP3, FLAC, OGG, etc) and load onto the MusicDB ........86 19. Specification ……………………………………………………………………….………..………...…………….……..87 20. Troubleshooting …………………………………………………………….………………………..………….…….….. 88 Important safety instructions For your own safety, please read the following important safety instructions carefully before attempting to connect this unit to the main power supply. - Page 8 exposure less than a minute. The higher decibel ranges are offered for those that may be experiencing some hearing loss. Over time your hearing ‘comfort level’ adapts to higher volumes of sound, so after prolonged listening, what sounds ‘normal’ can actually be loud and harmful to your hearing.
-
Page 9: Product Overview
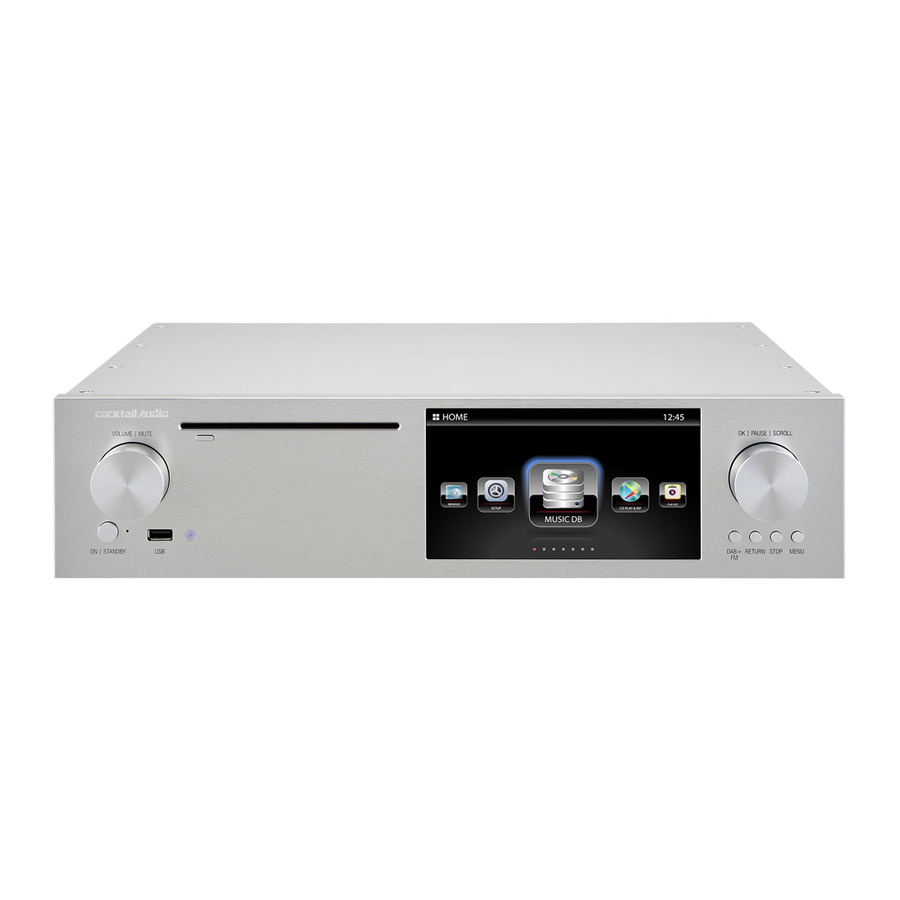
1. Product overview 1-1. Front View ① Volume/Mute Knob ⑨ OK/PAUSE/SCROLL knob ② Power/Standby button ⑩ DAB+/FM button ③ Power/Standby Indicator ⑪ RETURN button ④ USB Host port ⑫ STOP button ⑤ Remote control receiver ⑬ MENU button ⑥ CE Eject button ⑦... -
Page 10: View Of Remote Control And Key Function
1-3. View of Remote Controller and each key’s function POWER: Power ON/OFF i-SERVICE: Go to i-Service screen DAB: Go to DAB+ screen HOME: Go to home screen SEARCH: To pop up search menu Alphanumeric: Enter number & alphabet/ Seek at Playing Screen mode ... -
Page 11: Prepare
2. Prepare 2-1. Check the contents of X50 package ⑥ FM Radio Antenna ① X50 unit ⑦ DAB Antenna ② Remote controller + AAA batteries x 2EA ⑥ Screw to install storage ③ Power cord ④ Manual ⑤ FreeDB Data CD <NOTICE>... -
Page 12: X50 Purchased Without Storage
2-4. X50 purchased without storage. You need a 3.5” or 2.5” SATA hard disk or SSD, and install it into the X50 like below picture and format it. For formatting of the installed storage into X50, please refer to the 4-7-7. Format Storage (Page 40) 2-4-1. -
Page 13: How To Connect For Non-Raid System
Storage #2 Storage #1 2-6-1 How to connect for non-RAID system <NOTICE> non-RAID system is default: All X50 units will be shipped with non-RAID system 1) How to connect each cable -. Cable to Storage #1 to Connector #3 -. Cable to Storage #2 to Connector #2 -. -
Page 14: How To Connect For Raid System
After switch setting, you need to activate RAID according to the below procedures ① Set RAID mode as you want ② Make X50 Power Switch at rear ON ③ Power X50 ON with RAID Switch pressed. ④ Keep RAID Switch pressed until... -
Page 15: Explanation For Each Mode Of Raid
RAID Switch Blinking LED 2-6-2-3 Explanation for each mode of RAID 1) BIG mode: -. Need to install two storages to work properly -. Two HDDs will be concatenated and presented as a single disk -. For example, if install 500GB HDD and 250GB HDD, it will recognize as 750GB single disk. 2) RAID-1 mode(Mirror): -. -
Page 16: Turn On And Start
3-2. Turn ON for normal use Switch the unit on at the rear of the X50. The power LED will be ON with green color. Power it on using the remote control or the power button on the front of the X50. The power LED color will be changed to blue and start booting –... -
Page 17: Setup
4. SETUP Go into SETUP menu with remote controller. You can select each item with the arrow key and confirm it with the OK button. 4-1. Music DB Select the Display Mode and confirm with the OK button. 4-1-1. Display Mode You may set one of ten(10) options, see below. -
Page 18: Track Numbering
‘Rename, Delete, Copy to DB, or CD ripping’ etc. If there are errors in the Music DB, the X50 may not play the files properly or may not rip CDs properly. The Music DB Recovery function will help to clear these problems. -
Page 19: How To Run Music Db Recovery Function
4-1-5-3. To create ‘Recovery MM-DD hh-mm’ folder automatically on HDD (or USB) During Music DB Recovery run, the X50 creates a ‘Recovery MM-DD hh-mm’ folder automatically on the internal HDD (or USB). The checked files or album folders will be stored (moved) there. -
Page 20: Importing Files From The 'Recovery' Folder To The Music Db Again
4-1-6. Backup 4-1-6-1 How to do Backup X50 offers two backup methods. One is 'Background backup', the other is 'Interactive backup'. ※ Background backup: You can do other works like playing even in backup processing. ※ Interactive backup: You can't do anything in backup processing. - Page 21 ※You need an external USB hard disk drive which has a bigger capacity than the Music DB. ① Go to SETUP > MusicDB > Backup ② Confirm 'Backup' with OK key ③ Dialog window will show up like left picture. "Do you want to backup by Background Mode? ④...
-
Page 22: How To Check Backup Progress And Result
4-1-6-2 How to check backup progress and result ※ While backup in progress ① Go to SETUP > MusicDB > Backup ② Place the cursor on the 'backup' ③ Press MENU key ④ You can choose 'State of Progress' or 'Backup Result' ※... -
Page 23: Restore
4-1-7. Restore You can restore the backup data in the Music DB of the X50. ① Connect the backup device to the USB host port of the X50. ② Go to the Music DB of SETUP and select Restore, and confirm it with the OK button. -
Page 24: Audio Format (Audio Rip Format)
【 TIP ① 】 The time required to rip a CD to MP3 format based on each quality level option is shown below. Option of quality level Normal playing time Required time to convert to MP3 Excellent X 1.5 (150%) The time required to Best X 1.08 (108%) -
Page 25: Freedb Install
4-2-4. FreeDB Install You can install the FreeDB data to the storage of the X50 as a FreeDB data (DVD) is supplied by the manufacturer. Once you install the FreeDB data to the X50 the inserted CD information (metadata like title, album name, artist, etc) will be displayed on the X50 screen without network connection. -
Page 26: Audio
[ Cover & List ] [ Music info ] [ List Only ] 4-3-2. USB/HDMI Audio Out When USB DAC or HDMI audio device is connected to X50 USB Audio Out, the connected devices will be listed here. You may select it here. -
Page 27: Dsd Native
4-3-3. DSD Native in ON mode, X50 will send out DSD native signal when playing DSD file. in OFF mode, X50 will convert DSD signal to PCM by software. ※ Default: ON 4-3-4. Digital Out Volume ※ Variable: You can control volume for Digital Out with ※... -
Page 28: Dsd Via I²S Out
In OFF mode, X50 will convert DSD signal to PCM by hardware 4-3-8. Gapless Play The X50 supports gapless playback function for MP3 files, WAV, FLAC and DSD files only. ※ Default: ON 【 TIP 】 LAME-encoded MP3 files only supported ※... -
Page 29: Network
4-4. Network ※ Make sure your Ethernet cable or a USB WiFi dongle is connected. Select Network and press the OK button. ① Select Network and confirm with the OK button. ② Select Wired Setup or Wireless Setup and confirm it with OK button. -
Page 30: Wireless Setup
4-4-2. Wireless Setup. The X50 offers two kinds of method for wireless network connection 4-4-2-1 Open SSID ① Select ‘Wireless Setup’ and confirm with OK key. ② Select ‘Scan Ap List’. All AP available will be listed up. ③ Select proper AP and confirm with OK key. -
Page 31: Wifi Repeater Roaming Function
※ Default: OFF <NOTICE> In case that Wake ON LAN is set as ON, X50 Power LED on the front will stay as Blue even though you power it off by remote control or front power button. 4-5. Network Service Select Network Service and confirm with the OK key. -
Page 32: Samba Server
4-5-1 Samba Server If you would like to see the folders on the X50 hard disk through your network connected PC you can set up the following: ① Select Samba Server and confirm with the OK key. Set Samba Server as ON, see below ※... - Page 33 1) How to add ‘shared folder’ ① Go to Browser and click 'NET' when network is enabled ② Click 'Add share' and the below screen shows up ③ Click the Server (Workgroup\Server), then you may get workgroup and server as below. ※...
-
Page 34: Web Server
4-5-3 Web Server With the Web Server function of the X50, you can enjoy the following functions: Add album cover art to all albums stored (ripped) in the X50 Music DB through Internet. Edit ID3-tag information of each song ... -
Page 35: How To Start Webinterface
4-5-3-2. How to start WebInterface The X50 WebInterface is available in two formats; one for PC (tablet PC also), the other is for smart phones. ① You can get the IP address of your X50 from SETUP. (SETUP / Network / Network Info) ②... -
Page 36: Upnp Server
<NOTICE> Please click the items marked with quadrangle. Then, you may see various functions 4-5-4 UPnP Server If you have a device (like a PC) which supports UPnP client protocol, you can play music stored in the X50 Music DB through the UPnP device. Default setting for UPnP Server is ON, see below. -
Page 37: Ftp Server
OFF if needed ※Default: ON 4-6. Internet Service X50 integrated Online Music Services into its software. So, you can play Qobuz, TIDAL, Deezer with X50 directly if you subscribe for those service and put their user name and password here properly. -
Page 38: System
【 TIP 】 For detailed explanation of Auto Play function, refer to 18-13 Auto Play (Page 85) 4-7-3. Resume Play When you boot up the X50, it will automatically resume playing the music in the Music DB, Browser or i-Radio from where it was last stopped. -
Page 39: Play In Browser
4-7-6. HDD Sleep You can make X50 HDD go to sleep mode by this setting. There are five (5) options like OFF, 10 Min, 20 Min, 30 Min and 1 Hour. During the selected time, if no access to HDD, the HDD goes into sleep mode. -
Page 40: Format Storage
USB storage, you can try this function to remove some error in file system of storages. Select File System Fix and confirm with the OK key. 【 Caution 】 We recommend you NOT to run this function if the file system of the X50 hard disk has no problems. -
Page 41: Alarm
Alarm is set as ‘after 2 days from now’. 4-7-11. Auto Shutdown The X50 will be powered off automatically at the assigned time and date. ① Go to SETUP and select System. ② Select Auto Shutdown and confirm with the OK key... -
Page 42: Scroll Speed
④ You can set the time on the X50 ⑤ Once the time is set move cursor onto the OK icon and confirm with the OK key. ※ NOTE: Use the arrow key (UP/Down) to change the values. Use the arrow key (left/right) to move the cursor. -
Page 43: User Front
① Select Time Set (Internet) and confirm it with the OK button. All the time options will be displayed as below. 【 TIP 】 Make sure that the X50 is connected to network (internet) before you try time setting by... -
Page 44: Time Set (Manually)
② Input your time manually and select OK to confirm it with OK button. 4-9. Firmware You can check the current firmware version of your X50 and install the updated new firmware. Select Firmware and confirm with the OK key. 4-9-1. Current Version You can check the current firmware version as shown below. -
Page 45: Update Automatically (Automatic Firmware Update By Network)
Select OK and confirm with the OK button. The X50 will reboot automatically to update the X50. 4-9-3. Update automatically (Automatic Firmware Update by network) The X50 will automatically update the firmware through the network. If you don’t wish this done automatically you can change the setting to OFF, see left. -
Page 46: Check Now For New Firmware
CD metadata server provided by the company with which we contracted for that service. 6. CD Loading (Ripping) All music that you load (rip) onto the X50 will be stored in hidden folder (the name of the folder is .DB), that cannot be seen. -
Page 47: Ripping All
④ Select one of five (6) options (WAV, ALAC, AIFF, MP3, OGG, FLAC) and press OK button. Then, the below screen is displayed. The X50 retrieves each information (title, artist, etc) from the CD metadata server ⑥ Move the cursor onto the CD icon like below. -
Page 48: Ripping Track
⑩ Select one album art for your CD and confirm it with the OK key. ⑪ The selected art will be downloaded. ⑫ You will be prompted OK/Other/Cancel. ⑬ Select OK to confirm. The confirmed art will be placed onto the CD icon. -
Page 49: In The Case That X50 Is Not Connected To Network (Internet)
From here, next procedures are same as the ‘Ripping All’ 【 TIP ③ 】 When a CD is inserted into the optical drive, the X50 loads (rips) the CD to a WAV format first, even if the MP3 option was chosen. The X50 then converts the WAV file into MP3 format afterwards in the background. -
Page 50: Ripping All
⑩ After entering the info, select OK and confirm it by pressing the OK button. ※ NOTE : You can edit tag information for loaded CDs in Music DB of the X50 easily through WebInterface. -
Page 51: Ripping Track
※ NOTE: If you wish to check the information and the status of the conversion process for the whole of the Music DB of the X50, go to the home screen. Place the cursor on the Music DB icon and Press the INFO key. -
Page 52: How To Use The Music Db(Database)
You can see the loaded music format is still WAV not MP3. To rip CD within short time, once X50 will rip CD into WAV format first, and then, as background job, it will convert WAV format into the format you selected. Converting lead-time will be almost same as actual playing time. - Page 53 【 TIP ② 】Pressing the INFO key will change the screen as follows; [ Playing Screen ] [ INFO Screen ] [ Title List Screen ] 【 TIP ③ 】 On the album list screen, press the MENU button on the remote control, to show other categories such as artist/track list, artist/album list, genre/track list, genre/album list or titles, see below 【...
-
Page 54: Search Function
7-3. How to manage Music DB The X50 allows you to manage the Music DB. You can delete or rename albums, artists and genre. You can export music from other storage devices (USB memory sticks or other hard disks) to Music DB folder. -
Page 55: Cover Art
④ Select Delete or Rename and confirm with the OK button. ⑤ Select OK and confirm with the OK button. 【 TIP ⑥ 】 You can also run this function for the artist list and the genre list by using the same procedure. 7-3-2. -
Page 56: How To Export Music From The Music Db To Other Storage Devices
③ You can edit Album name(60 Jahre Bravo Hits - 01) to target one(60 Jahre Bravo Hits) including other items. ※ If you press OK key when the cursor is in album name, the 'Album Help" screen will show up. You can select target album here ④... -
Page 57: Creating .M3U And .Pls Files When Exporting
7-3-5. Creating .M3U and .PLS files when exporting When you run 'Export Song' function, X50 will create .M3U file and .PLS file also in the target folder. For playlist icon on the home screen, you can export it to outside like USB... -
Page 58: History Function
7-3-6. History function You can list a maximum of 10 recently played songs from the Music DB using this function. ① Go into the Music DB ② Press the MENU key ③ Select ‘History’ and confirm with the OK key, as shown in the screen shot on the left. -
Page 59: Editing The Tag Information Of The Music In The Music Db
③ Using the remote control or USB keyboard you can edit the information. ④ Select OK and confirm with the OK button. 【 TIP 】 You can edit loaded CDs in the Music DB of the X50 easily using the WebInterface. Please refer to the X50 – WebInterface User Guide. -
Page 60: If The X50 Is Not Connected To Network (Internet)
9-3. In the case that you have installed the FreeDB data onto the storage of the X50 If you installed the FreeDB data onto the storage of the X50, it will work just like the X50 is connected to a network (Internet). The X50 displays the CD information from the FreeDB data installed on the storage. -
Page 61: Playlist
【 TIP 】 If you wish, you can import the music on the CD to the Music DB of X50. Press the MENU button on the remote control when on the music list and select Import to DB and confirm with the OK button. -
Page 62: How To Add Songs To A Playlist Whilst Playing Music
④ Enter a playlist name and select OK. Confirm the selection with the OK button. The album list is then displayed in the Music DB, as shown below. 【 TIP ② 】 You can add music to a playlist by track or by album. ⑤... -
Page 63: Shortcut To Add Song(S) In Musicdb To Existing Playlist
[ Playing Screen ] ① Press the PLAYLIST key whilst in ‘Playing Screen’ mode as shown above. ② Select the playlist you would like to add the song to. ③ Confirm with the OK key and the song will be stored in the selected playlist. 11-1-3. -
Page 64: How To Change Song Position In A Playlist
11-1-5. How to change song position in a Playlist ① In a Playlist, select a song or songs with RIGHT arrow key. ② Move the cursor with UP/DOWN arrow key to the place where you want to move the selected song/songs. -
Page 65: The Music Streaming Function
Server/Client, you can enjoy various Music Streaming functions with the X50. 12-1. UPnP Server/Client and Samba Server/Client function You can use the X50 together with various kinds of devices that support UPnP Server/Client or Samba Server/Client. If the devices are connected to the X50 through the same network, you can... -
Page 66: Multiple X50'S On The Same Network
Place the X50 with the storage (music server) in your living room. A second X50 (without storage) is placed in room #1 or room #2. You can then play files from the X50 (music server) on the X50s without storage, see schematic below. -
Page 67: Shareplay Function
13-1. Internet Radio 13-1-1. How to play the Internet Radio. You can enjoy many internet radio stations. The X50 Internet radio is based on the Airable server. It provides many stations by genre, by country, etc. 【 TIP 】 When the i-Service icon is highlighted the X50 is successfully connected to the network. -
Page 68: How To Add Your Favorite Stations Into My Favorites
※ NOTE 1: We recommend NOT to record continuously for over three (3) hours. ※ NOTE 2: Space required for recording in MP3 format: 1 hour(54MB)/2 hours(108MB)/3 hours(162MB) ※ NOTE 3: X50 will record i-Radio by the formats like MP3, AAC or ASF according to the station’s streaming format. -
Page 69: How To Record
[ Playing ] 13-1-4-2. Where is the recorded file stored ? The X50 creates a [IRadio Recording] folder on the hard disk automatically when recording has started. All recorded files are stored in the IRadio Recording folder, see below. 13-1-4-3. The recorded file name structure The station will show the music title, see below, the recorded file name will be the music title. -
Page 70: How To Edit The Recorded File
13-1-4-4. How to edit the recorded file You can edit the recorded file easily with the file management function. Place the cursor on the recorded file and press the MENU button to run the following functions: [ TAG Edit ] [ Import to DB ] [ Copy File ] [ Move file ]... -
Page 71: How Does The Reservation Recording Start
3 M ) X50 will start booting up automatically at 3:57PM (3 minutes before set time 4:00PM) X50 will start playing the station at 3:59PM (1 minute before set time 4:00PM). Volume is set as ‘Mute’ automatically. -
Page 72: Fm Radio
※ NOTE: Make sure to install the FM Radio antenna properly first. ① Select FM Radio icon to start FM Radio ② X50 will seek all stations available ③ Select one station and confirm it with OK key. ④ It will start playing as below. -
Page 73: How To Record Fm Radio
15-1. How to play DAB+ ① Select DAB icon to start ② X50 will seek all stations available like below screen <NOTICE> DAB signal is affected very much and easily by neighboring obstacle like wall. So, you need to remove surrounding obstacle to receive DAB signal better. -
Page 74: How To Record Dab
PCM, PLS, M3U, etc. ① Insert the data CD into the X50. ② Select the Browser icon and confirm with the OK button. You will see the data CD. Select the music you would like and play using the OK button. -
Page 75: File Management
17-2. File Management function 17-2-1. Accessing information on the HDD, USB, folder or file. Place the cursor on each drive and press the INFO key. The information is displayed as shown below. To check the information folder, place the cursor on the folder and press the INFO key. To check the information on a file, place the cursor on the file and press the INFO key. -
Page 76: Tag Edit
17-2-2. TAG Edit This function is only valid for files not for folders or disks. Place the cursor on the file you would like to edit and press the MENU key. Select Edit Tag and the edit screen is displayed, see below. 17-2-3. -
Page 77: Copy Files
17-2-4. Copy Files You can copy files or folders by following the procedure below: ① Place the cursor on the file or folder you would like to copy ② Press the MENU key and select Copy Files. The screen below is then displayed. From here, refer to 7-3-4. -
Page 78: Pls Or M3U Files With Internet Radio Stations
If you wish to play an individual internet radio station using the X50, you will need to create a PLS or M3U file and put the file(PLS or M3U) onto the storage or USB host of the X50. Once you have created the file you can play the station through the X50 Browser, see example below. -
Page 79: Create Folder
③ Set 'Playing Section' as mentioned on the 7-3-8. Set ‘Playing Section’ to play it repeatedly (Page 58) ④ Press MENU key to show up POPUP ⑤ Select 'Cut to Wave file' and confirm it with OK key ⑥ Progress message ⑦... -
Page 80: Extra Function
③ After setting, you may save and exit using any key 18-2. External Screen If you want to use an external screen like TV, monitor, etc as a bigger screen for X50, please connect external screen to X50 HDMI Out. -
Page 81: Listing By Text Or Album Cover Art
18-4. Listing by Text or Album cover art You can list up all information (like album, title, genre, artist, etc) on the screen of X50 by text or album cover art. You can select one of text mode and album cover art mode easily using TEXT/ART button of remote control. -
Page 82: Resume Play
⑤ Select Delete and confirm with the OK button. 18-7. Resume Play When you boot up the X50, it will automatically resume playing the music in the Music DB, Browser or i-Radio from where it was last stopped. Select Resume Play and confirm with the OK key. -
Page 83: Changing The Play Mode
⑤ Repeat All: Play all music in an album or in a folder in sequence and repeatedly 18-10. Alarm set You can set six (6) alarm settings on the X50. ① Go to Alarm at SETUP, and confirm it with the OK key. The following screen will appear. -
Page 84: Auto Shutdown
① Press the SLEEP button on any screen (except setup), the popup Sleep Off/Sleep 10Min/Sleep 20Min/Sleep 30Min/Sleep 1Hour/Sleep 2Hour/Sleep 3Hour is displayed. ② The X50 will be set as per the last popup NOTE: Sleep icon will show up after setting. ※ NOTE: ※... -
Page 85: Auto Play
18-13. Auto Play When the power is ON, Auto Play function allows the X50 to boot up and start playing automatically the song in the Auto Play folder in the Playlist on the home screen. ① Navigate to the Playlist to Auto Play. -
Page 86: How To Rip(Convert) The Edited File Into Other
18-16. How to rip (convert) the edited file into other formats (MP3, FLAC or Ogg) and load onto the Music DB ※ NOTE: Before trying to convert the recorded file you should edit the recorded file first. ① Place the cursor on the edited file, and press the RIP button on the remote control. -
Page 87: Specification
19.Specification Model name Remarks CPU: Dual Core ARM Cortex A9 running at 1.0GHz Host CPU & Main Memory: DDR-1066 1GByte Memory NAND Flash 8GByte CD Player Type Front Loading Supported CD, CD-DA, CD-R, CD-RW, DVD-R/RW media Display 7.0" TFT LCD(1,024 x 600pixels)(* able to connect to ext. screen via HDMI out) Interface Key &... -
Page 88: Troubleshooting
2-2. Check for interference from other IR sources 2-3. Reduce the distance between the remote control and the X50. 3. The X50 does not display the network-shared folder on your PC 3-1. Check the network connection status between the X50 and your PC 3-2. - Page 89 6. The disc is skipping 6-1. Check for scratches or dirt. 6-2. Make sure that the X50 is on a firm surface and not subject to vibrations. 7. There is a hum coming from the speaker. Make sure that all cable connections are secure.
Need help?
Do you have a question about the X50 and is the answer not in the manual?
Questions and answers