Table of Contents
Advertisement
Quick Links
Advertisement
Table of Contents

Summary of Contents for 3D Robotics pixhawk
- Page 1 AUTOPILOT QUICK START GUIDE...
-
Page 2: Getting Started
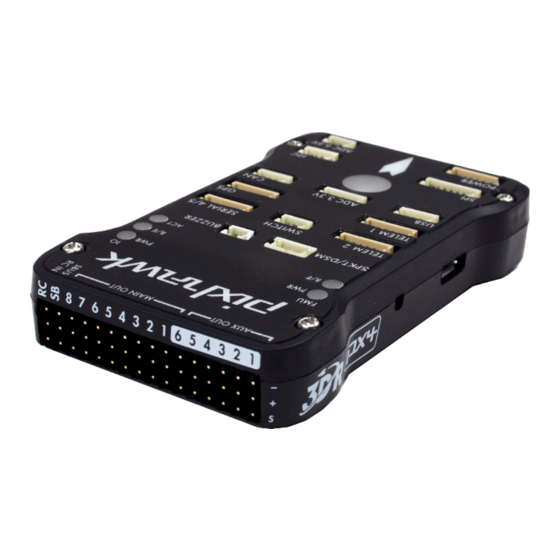
Pixhawk. MOUNT Use the provided foam to mount Pixhawk as close as possible to your vehicle’s center of gravity. Make sure to orient the board with the arrow pointing forward. Attach the foam squares to the corners of the board. - Page 3 (Optional) The I C splitter expands the I C port to allow up to four additional peripherals to connect to Pixhawk. Use the 4-wire cable to connect the I C splitter and add a compass module, external LED, digital airspeed sensor, or other...
- Page 4 LOAD SD CARD INTO PIXHAWK If the SD card is not preloaded into Pixhawk, insert the micro-SD card into the slot at the bottom end of the board. CONNECT RADIO CONTROL FOR PPM RC RECEIVERS AND FUTABA S.BUS RECEIVERS Connect the ground (-), power (+), and signal (S) wires to the RC pins using the provided 3-wire servo cable.
-
Page 5: Connect Outputs
Pin 4 = Steering LOAD FIRMWARE APM firmware is the brains of your autopilot operation and must be installed before using Pixhawk. To load firmware onto Pixhawk, install a mission planner application on your ground station computer. Choose either Mission Planner (Windows) or APM Planner for (Windows, OS X, and Linux). - Page 6 When the installation is complete, open the application, and connect Pixhawk to your computer using the micro-USB cable. Your computer will automatically install the correct drivers. Do not select Connect at this time; Pixhawk can only load firmware while unconnected to Mavlink.
- Page 7 Pixhawk needs your attention: BEEP BEEP beep BEEP beep... BEEP BEEP BEEP CALIBRATE With Pixhawk connected to your computer, select the communication option from the drop-down menu for FMU, set the rate to 115200, and select the Connect icon. Select...
-
Page 8: Calibrate Compass
SELECT FRAME TYPE (COPTERS ONLY) For copter, select your frame orientation. CALIBRATE COMPASS Select the options to enable the compass; to allow automatic declination calculation; and to specify Pixhawk. Select Live Calibration to launch the wizard, and follow the prompts. - Page 9 Select Accel Calibration, check the box for AC 3.0+, select Calibrate, and follow the prompts to calibrate Pixhawk’s accelerometer. Make sure to wait a couple of seconds before and after changing the positions of the vehicle. RC CALIBRATION left stick...
-
Page 10: Led Meanings
LED MEANINGS Flashing red and blue: initializing. Please wait. Double flashing yellow: error. System refuses to arm. Flashing blue: disarmed, searching for GPS. Autonomous, loiter, and return-to-launch modes require GPS lock. Flashing green: disarmed, GPS lock acquired. Ready to arm. Quick double tone when disarming from the armed state. - Page 11 PORTS Spektrum DSM receiver Telemetry (radio telemetry) Telemetry (on-screen display) SPI (serial peripheral interface) bus Power module Safety switch button Buzzer 9 Serial 10 GPS module 11 CAN (controller area network) bus 12 I C splitter or compass module 13 Analog to digital converter 6.6 V 14 Analog to digital converter 3.3 V 15 LED indicator 1 Input/output reset button...
-
Page 12: Important Note
IMPORTANT NOTE Please note that these instructions describe basic setup for Pixhawk and do not represent the complete set of configuration procedures required to build a copter, plane, or rover. For more information on ESC calibration, battery monitoring, failsafes, mode descriptions, and more, visit ardupilot.com. - Page 13 SAFETY Operating a powered vehicle of any kind can be a lot of fun, but it carries certain inherent risks. Regulations governing the use of powered vehicles, including aircraft, vary from locale to locale, even within the same country or district. It is your responsibility to ensure that you understand and comply with all local laws and regulations. Safety basics: • Never operate the vehicle or software in a way that could be dangerous to you, other people, or property.
- Page 14 JURISDICTIONS DO NOT ALLOW THE EXCLUSION OF IMPLIED WARRANTIES, SO SUCH EXCLUSION MAY NOT APPLY TO YOU. EXCEPT TO THE EXTENT REQUIRED BY APPLICABLE LAW, IN NO EVENT WILL 3D ROBOTICS BE LIABLE TO YOU ON ANY LEGAL THEORY FOR ANY SPECIAL, INCIDENTAL, CONSEQUENTIAL, PUNITIVE OR EXEMPLARY DAMAGES ARISING OUT OF THE USE OF THE HARDWARE.
Need help?
Do you have a question about the pixhawk and is the answer not in the manual?
Questions and answers