Table of Contents
Advertisement
Available languages
Available languages
Advertisement
Table of Contents

Related Manuals for Steren COM-818


Summary of Contents for Steren COM-818
- Page 2 Repetidor y punto de acceso WI-FI de pared. Por favor, revíselo completamente para estar seguro de cómo utilizar apropiadamente el producto. Para apoyo, compras y todo lo nuevo que tiene Steren, visite nuestro sitio web: www.steren.com La información que se muestra en este manual sirve únicamente como referencia sobre el producto.
- Page 3 IMPORTANTE • No use ni almacene este equipo en lugares donde existan goteras o salpicaduras de agua. Puede causar un mal funcionamiento o choque eléctrico. • No coloque objetos pesados sobre el equipo, ni sobre sus accesorios. • No exponga el equipo a temperaturas extremas. •...
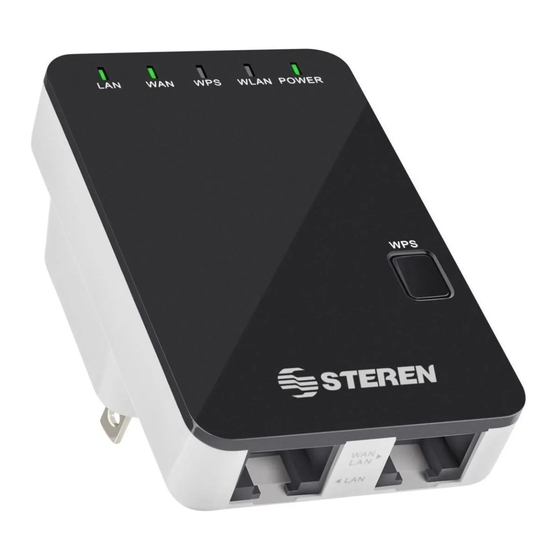
- Page 4 CONTROLES Botón sistema protección de red inalámbrica 2. Entrada red LAN WLAN POWER 3. Entrada red WAN 4. Botón de Reset LEDs indicadores 5. Red LAN activada 6. Red WAN activada 7. Sistema de protección de RESET RESET red inalámbrica activado 8.
- Page 5 • Consulte a su proveedor de ADSL o cable módem para una correcta instalación del módem. • Conecte el ADSL o cable módem al ruteador COM-818 en la entrada LAN y conecte el ruteador en la toma de corriente eléctrica.
- Page 6 2. Dé clic derecho sobre el ícono para abrir Conectarse a una Red. 3. En la lista que aparece, elija la red inalámbrica “COM-818” y después dé clic en Conectar. 4. Si es requerida, introduzca la clave de seguridad de red o contraseña y después dé...
- Page 7 3. Abra el navegador web y escriba http://192.168.10.253 en el cuadro de dirección del navegador. Este número es la dirección IP por defecto para este dispositivo. A continuación aparecerá la pantalla de inicio de sesión. - Introduzca el nombre de usuario y la contraseña, dé...
- Page 8 Agregar inalámbricamente computadoras al Ruteador con el botón WPS 1. Inicie sesión en la computadora. 2. Presione durante 2 o 3 segundos el botón WPS en el Ruteador. 3. Presione el botón WPS de su adaptador inalámbrico durante 2-3 segundos. Dé clic en Finalizar para completar la confi...
- Page 9 Cómo confi gurar la dirección IP en su computadora o laptop 1. Inicie la computadora. 2. Dé clic en Inicio > Panel de Control > Centro de redes y recursos compartidos elija Conexión de área local. Seleccione Propiedades y en esa ventana elija Protocolo de Internet versión 4 (TCP/IPv4), después dé...
- Page 10 ASISTENTE Después de iniciar sesión, dé clic en el menú Asistente para una confi guración rápida de su ruteador. Elija el Modo de Operación que requiera: Ruteador. Modo estándar del Ruteador inalámbrico: Este ruteador se conecta a internet mediante un puerto WAN, por lo que otros dispositivos pueden conectarse al ruteador inalámbricamente o conectarse al puerto LAN del ruteador por medio de un cable.
- Page 11 Modo ruteador Establezca el parámetro inalámbrico. Es recomendable cambiar el nombre del SSID, elija el Modo Seguro e introduzca una clave (key). Si está seleccionado IP Dinámica, el ruteador obtiene la dirección IP automáticamente del servidor DHCP o del ISP. No necesitará confi gurarlo y podrá continuar con la confi...
- Page 12 Modo AP - Establezca el parámetro inalámbrico. Es recomendable que cambie el nombre del SSID, elija el Modo Seguro e introduzca una clave (key). SSID: nombre de la red. Canal: se recomienda elegir “Automático”. Modo de seguridad: Confi gure la seguridad inalámbrica y el cifrado para prevenir accesos no autorizados.
- Page 13 Modo Repetidor Seleccione el SSID de la red de destino y dé clic en Seleccionar. El SSID de la red de destino aparecerá automáticamente, ingrese la contraseña y después dé clic en Guardar y reiniciar.
- Page 14 ISP inálambrico Elija el SSID del punto de acceso al que quiere acceder y dé clic en Seleccionar. El SSID de la red de destino aparecerá automáticamente; elija una contraseña y dé clic en Guardar y reiniciar.
- Page 15 CONFIGURACIÓN INALÁMBRICA BÁSICA Dé clic en el menú WiFi para que confi gure su red inalámbrica de manera básica. Eliges el nombre de la red, el tipo de encriptación y la clave. Dé clic en Aplicar para guardar los cambios o Cancelar para regresar al menu principal.
- Page 16 AJUSTES LAN Dé clic en Ajustes LAN. Se abrirá la siguiente pantalla: - Dirección IP: Introduzca la dirección IP de su router, la notación preestablecida de fábrica es: 192.168.10.253. - Sub red: Código de dirección que determina el tamaño de la red. Normalmente usa 255.255.255.0 como máscara de subred.
- Page 17 AJUSTES BÁSICOS WAN - Dé clic en Ajustes básicos WAN. Se abrirá la siguiente pantalla: Si su proveedor de Internet le brinda servicio DHCP, elija “DHCP cliente” ruteador obtendrá automáticamente los parámetros IP de su proveedor de Internet. - El siguiente ejemplo es para la confi...
- Page 18 Si su proveedor de Internet le proporciona una dirección IP estática o fi ja, Máscara de subred, Puerta de enlace y confi guración de DNS, seleccione IP estática. Introduzca la Dirección IP / Máscara de subred / Puerta de enlace predeterminada / Tamaño MTU / DNS primario y secundario en notación decimal con puntos proporcionada por su proveedor de Internet.
- Page 19 ADMINISTRACIÓN Cambiar la contraseña del administrador La contraseña predeterminada del COM-818 es “admin” y se muestra en el indicador de entrada cuando se accede desde el navegador web. Usted deberá cambiar la contraseña para evitar riesgos de seguridad, esto es muy importante cuando tenga la función inalámbrica habilitada.
- Page 20 Zona horaria A través de esta opción puede ajustar y guardar la zona horaria y actualizar la hora. Confi guración del administrador del ruteador Dé clic en “Reinicio Respaldo, localizados en la interfaz del administrador web. Con esto puede guardar toda la confi guración del ruteador en un archivo, por lo que se pueden hacer varios copiados de confi...
- Page 21 Actualización del Firmware El software del sistema usado por este ruteador es conocido como fi rmware, y como con otras aplicaciones del sistema, cuando usted remplaza la aplicación vieja por una nueva, su computadora tendrá nuevas funciones. También puede usar la función de actualización de este fi...
- Page 22 Para confi gurar su ruteador de manera más específi ca dé clic en el botón Avanzar. La siguiente pantalla se abrirá:...
- Page 23 Ajustes avanzados Permite confi gurar los protocolos de red a través de VPN. Para mas información consulte a un especialista. IP estática A través de este menú puede confi gurar la dirección IP de la red y la dirección MAC. Dé...
- Page 24 Tabla de clientes DHCP Esta pantalla muestra la dirección IP de los equipos actualmente conectados. INALÁMBRICO Ajustes básicos Usted puede confi gurar un mínimo número de ajustes inalámbricos para comunicación, como Nombre de Red (SSID) y el Canal. El Punto de Acceso se puede confi...
- Page 25 - SSID: Identifi cador de servicios principal. Nombre de la red inalámbrica. - Emitir SSID: Seleccione “Habilitar” para permitir que el dispositivo SSID sea accesible para los clientes inalámbricos. - Canal: Este campo determina qué frecuencia de operación se usará. El canal por defecto es Auto, por lo que el AP elegirá...
- Page 26 Ajustes inalámbricos avanzados Estos ajustes son sólo para usuarios más avanzados técnicamente, quienes tienen un conocimiento sufi ciente acerca del LAN inalámbrico. Estos ajustes no deben ser cambiados hasta que usted conozca qué efecto va tener el cambio en su AP. Puede modifi...
- Page 27 Control de acceso Aquí puede confi gurar el control de acceso inalámbrico basado en la dirección MAC. El modo de control de acceso te da 3 opciones: Deshabilitar, Permitir enlistados, Denegar enlistados. Horario Aquí puede Activar la programación inalámbrica, programe el día y el tiempo que desea activar y desactivar la red inalámbrica en el ruteador.
- Page 28 Confi guración WDS Es una función que permite la interconexión inalámbrica entre ruteadores o puntos de acceso. De esta manera podremos usar el ruteador como repetidor de otra señal o para interconectar 2 redes. Confi guración WiFi protegido Usted puede establecer una conexión inalámbrica entre el adaptador inalámbrico y el ruteador usando el método PIN.
- Page 29 FIREWALL Filtro de puertos Active la fi ltración de puerto, introduzca el Rango de puertos que desea controlar. Haga clic en el botón “Aplicar”. Observará el Rango de puerto que aparece en la tabla de fi ltro actual. Filtro de IP El fi...
- Page 30 Filtro de MAC Consiste en que sólo se conecten a la red del ruteador las direcciones MAC que usted quiera. Active fi ltración MAC, introduzca la dirección MAC que desea controlar. Haga clic en el botón “Aplicar”. Observará la dirección MAC que confi...
- Page 31 Redirección de puertos Algunas aplicaciones requieren que ciertos puertos estén abiertos para poder comunicarse con sus servidores. Desde esta pantalla podrá abrir el Rango de puertos necesarios. Confi guración DMZ DMZ abre todos los puertos de una computadora / dispositivo hacia Internet. Debe ser utilizado únicamente para un propósito en especial, ya que no contará...
- Page 32 AVANZADO DNS dinámico En caso de que cuente con un servicio de DDNS, confi gure su cuenta en esta página. Calidad de servicio - QoS se encarga de priorizar el ancho de banda disponible en función de las necesidades del usuario y basándose en una serie de criterios que clasifi...
- Page 33 ESTADO Muestra la información del ruteador.
- Page 34 ESPECIFICACIONES • Alimentación: 127 V~ 60 Hz. 3 W máx. • Estándar: IEEE 802.11b/g/n; IEEE 802.3 y 802.3u • Puerto RJ45: 2. 1 WAN 10/100 Mbps y LAN 10/100 Mbps con auto negociación de datos. • Velocidad máxima de transferencia de datos: 300 Mbps de forma inalámbrica •...
- Page 35 1.- Para hacer efectiva la garantía, presente esta póliza y el producto, en donde fue adquirido o en Electrónica Steren S.A. de C.V. 2.- Electrónica Steren S.A de C.V. se compromete a reparar el producto en caso de estar defectuoso sin ningún cargo al consumidor. Los gastos de transportación serán cubiertos por el proveedor.
- Page 37 COM-818 Thank You on purchasing your new Steren product. This manual includes all the feature operations and troubleshooting necessary to install and operate your new Steren´s WI-FI wall mount access point and repeater. Please review this manual thoroughly to ensure proper installation and operation of this product.
- Page 38 IMPORTANT • Do not use or store this equipment in places where there are dripping or splashing of water. It may cause electric shock or malfunction. • Not place heavy objects on the device or its accessories. • Do not expose the equipment to extreme temperatures. •...
- Page 39 CONTROLS 1.Wireless Protection System WLAN POWER button. 2. LAN network input. 3. WAN network input. 4. Reset button. Led indicators 5. LAN network enabled. RESET RESET 6. WAN network enabled. 7.Wireless Protection System activated. 8. Wireless. 9. On.
- Page 40 • You’ll need broadband Internet access (ADSL, modem line cable in your home or offi ce). • Ask your ADSL or cable modem provider the proper installation of the modem. • Connect the ADSL or cable modem to the COM-818 router on the LAN input and plug the router into the electrical outlet.
- Page 41 WLAN light turns on. 2. On your computer or other device with Internet access, go to the wireless settings and connect to the “COM-818” network. It is likely that you have to disconnect from your current network. If your computer requests a network PIN code or “set up”, click on “Connect without...
- Page 42 3. Open the web browser and type http://192.168.10.253 in the browser’s address box. This number is the IP default address for the router. Login screen will then appear. - Enter the user name and password, click OK to start the session.
- Page 43 Add wireless computers with WPS button 1. Start the computer. 2. Press the WPS button on the Router for 2-3 seconds. 3. Press the WPS button on the wireless adapter for 2-3 seconds. Click Finish to complete WPS confi guration. (Please check the instruction manual of your wireless adapter).
- Page 44 How to confi gure the IP address on your computer or laptop 1. Start the computer. 2. Click Start > Control Panel > View network Status and Tasks > Manage Network; then right-click on Local Area Network > Properties. When the Local Area Connection Properties window appears, select “Internet Protocol Version 4 (TCP/IPv4)”...
- Page 45 WIZARD After you log in successfully, confi gure your router on the Wizard quick menu. Choose the operating mode you need, and then click Next. Router. Standard wireless router mode: This router connects to Internet by WAN port, and then other terminal devices can connect to this router by wireless connection or connect to this router’s LAN port with a cable.
-
Page 46: Router Mode
Router mode Set the wireless parameter. It is recommended to change the name of the SSID, choose Safe mode and enter a password (key). If dynamic IP is selected, the router obtains the IP address automatically DHCP server or ISP. You don’t need to confi gure it and you can continue with the wireless settings. If you selected PPPoE, enter the user name and password provided by your ISP. - Page 47 AP mode - Set the wireless parameter. It is recommended that you change the name of the SSID, choose Safe mode and enter a password (key). SSID: Network’s name Channel: “Automatic” is recommended Security mode: Confi gure wireless security and encryption to prevent unauthorized access.
-
Page 48: Repeater Mode
Repeater mode Select the SSID of the network of destination and click on select. The SSID of the network destination will appear automatically, type the password and then click on Save and reboot. - Page 49 Wireless ISP Select the SSID of the access point you want to access and click on select. The SSID of the network destination will appear automatically; choose a password and click Save and reboot.
-
Page 50: Wireless Basic Settings
WIRELESS BASIC SETTINGS Click on the Wi-Fi menu for basic setup of your wireless network. Choose the network name, the encryption type and the password. Click on “Apply” to save the changes or “Cancelar” to go to the main menu. - Page 51 LAN BASIC SETTING Click LAN Basic Setting. The following screen will appear: - IP address: Enter the IP address of your router, the factory preset is: 192.168.10.253. - Sub network: address code that determines the size of the network. Normally use 255.255.255.0 as the subnet mask.
- Page 52 WAN BASIC SETTING Click WAN Basic Setting. The following screen will appear: If your ISP provides DHCP service, choose “DHCP client” and the router will automatically obtain parameters from your ISP. - The following example is for setting up PPPoE. - Enter the PPPoE user name and password which was given by the Internet service provider.
- Page 53 If your ISP gives you a static or fi xed IP address, subnet mask, gateway and DNS settings, select static IP. Enter the IP address / Subnet mask / default gateway / MTU size / primary and secondary DNS in dotted-decimal notation provided by your Internet service provider.
-
Page 54: Change The Administrator Password
MANAGEMENT Change the administrator password COM-818 default password is “admin” and is displayed in the indicator when accessed from the web browser. You should change the password to avoid security risks, this is very important when you have the wireless function enabled. -
Page 55: Time Zone
Time zone Here you can adjust and save the time zone, and update the time. Router manager confi guration Click backup and reset, located in the web admin interface. With this you can save all the settings of the router into a fi le, so several copied can be the router confi... -
Page 56: Firmware Upgrade
Firmware upgrade The software of the system used by this router is known as fi rmware, and as with other applications of the system, when you replace the old application with a new one, your computer will have new features. You can also use this fi rmware update function to add functionality to your router, and even fi... - Page 57 For more specifi c setup, click on “Advance”. The following screen appears:...
- Page 58 NETWORK Advance Setting Confi gure the network protocols via VPN. For more information consult a specialist. Static IP In this menu you can confi gure the network IP address and MAC address. Click Apply to save the changes and then restart the router.
-
Page 59: Basic Settings
DHCP Client Table This displays the IP address for devices currently connected. WIRELESS Basic settings You can confi gure a minimum number of wireless settings for communication, such network name (SSID) and channel. The access point can be confi gured simply with minimum confi... -
Page 60: Wireless Security
- SSID: Main service identifi er. The name of the wireless network. - Broadcast SSID: Select “Enable” to enable that the device’s SSID is accessible to wireless clients. - Channel number: this fi eld determines which operating frequency will be used. The channel by default is Auto, so the AP will choose the best channel automatically. -
Page 61: Wireless Advanced Settings
Wireless Advanced Settings These settings are only for more technically advanced users who have suffi cient knowledge about wireless LAN. These settings should not be changed until you know what effect the change will hace on your AP. You can change: •... -
Page 62: Access Control
Access Control Setup the wireless access control based on the MAC address. The access control has 3 options: Disable, Allow listed and Deny listed. Schedule Enables the wireless schedule, program the day and the time you want to enable or disable the wireless network in the router. -
Page 63: Wds Settings
WDS settings Allows wireless interconnection between routers or access points. This way we can use the router as a repeater of another signal or to interconnect 2 networks. Wi-Fi Protected Setup You can establish a wireless connection between wireless adapter and the router using the PIN method. -
Page 64: Port Filtering
FIREWALL Port Filtering Enable port fi ltering, enter the Port range you want to control. Click on “Apply”. The port range will appear in the current fi lter table. IP fi ltering The IP fi ltering decides which IP addresses will be normally processed and wich are discarded. -
Page 65: Mac Filtering
MAC Filtering With this you can control the MAC addresses you want to connect to the router’s network. Enable MAC fi ltering, enter the MAC address you want to control. Click on “Apply”. You will notice the MAC address confi gured in the current fi... -
Page 66: Port Forwarding
Port Forwarding Some applications require certain ports to be openin order to communicate with their servers. Here you will be able to open the range of ports required. It opens all the ports of a computer/device to the Internet. It should be only used for a special purpose, because there will not be security able in this situation. -
Page 67: Dynamic Dns
ADVANCED Dynamic DNS If you have a DDNS service, set up your account on this page. Quality of Service prioritize available bandwith according to the user requirements and based on a number of criteria which classify traffi c. - You can enable or disable the QoS controls and you can select if the router upload speed will be automatically or manually. - Page 68 STATUS Displays the router’s status.
- Page 69 • Input: 127 V~ 60 Hz. 3 W max. • Standard: IEEE 802.11b/g/n; IEEE 802.3 and 802.3u • RJ45 port: 2. 1 WAN 10/100 Mbps and LAN 10/100 Mbps with data auto-negotiation • Maximum data transfer speed: 300 Mbps wirelessly •...
- Page 70 Part number: COM-818 Brand: Steren WARRANTY This Steren product is warranted under normal usage against defects in workmanship and materials to the original purchaser for one year from the date of purchase. CONDITIONS 1. This warranty card with all the required information, invoice, product box or package, and product, must be presented when warranty service is required.
Need help?
Do you have a question about the COM-818 and is the answer not in the manual?
Questions and answers