Table of Contents
Advertisement
Quick Links
Advertisement
Table of Contents

Summary of Contents for VIRDI 4000
- Page 1 VIRDI 4000 User’s Manual Version eng-1.00...
- Page 2 VIRDI 4000 User’s Manual Disclaimers Information in this document is provided in connection with UNION COMMUNITY products. No license, express or implied, by estoppels or otherwise, to any intellectual property rights is granted by this document. Except as provided in UNION COMMUNITY’s Terms and Conditions of Sale for such products, UNION...
- Page 3 About This Manual This is an introduction to operation of VIRDI 4000 series supplied by UNION COMMUNITY. This manual describes how to do user registration in local terminal, terminal settings, network settings, etc. The purpose of this manual is to provide...
-
Page 4: Glossary
VIRDI 4000 User’s Manual < Glossary> Admin, Administrator - As a user who can enter into the terminal menu mode, he can register/modify/delete terminal users and change the operating environment by changing settings. - If there is no administrator for a terminal, anyone can change the settings. In this regard, it is recommended to register at least one administrator. - Page 5 VIRDI 4000 User’s Manual Function keys [F1], [F2], [F3], [F4], [ENTER] are used, and they are used for direct authentication and each key represents each authentication mode.
-
Page 6: Table Of Contents
VIRDI 4000 User’s Manual Table of Contents < Glossary>....................... 4 Table of Contents ..................... 6 1. Before use......................8 1.1. Safety precautions ..................8 1.2. Terminal description ................... 9 1.3. Screen (during operation) description ............ 10 1.4. Voice information during operation ............11 1.5. - Page 7 VIRDI 4000 User’s Manual 3.7.1. Terminal lock settings ................. 44 3.7.2. Read card number................44 3.8. Device settings ..................45 3.8.1. Function key settings................45 3.8.2. Card reader settings ................46 3.8.3. Fingerprint sensor settings ..............46 3.8.4. Wiegand output settings ..............48 3.8.5.
-
Page 8: Before Use
VIRDI 4000 User’s Manual 1. Before use 1.1. Safety precautions Warning Handling with wet hands or allowing liquid to flow into it Do not place a fire source is prohibited. near the terminal. -> cause -> It may cause a fire. -
Page 9: Terminal Description
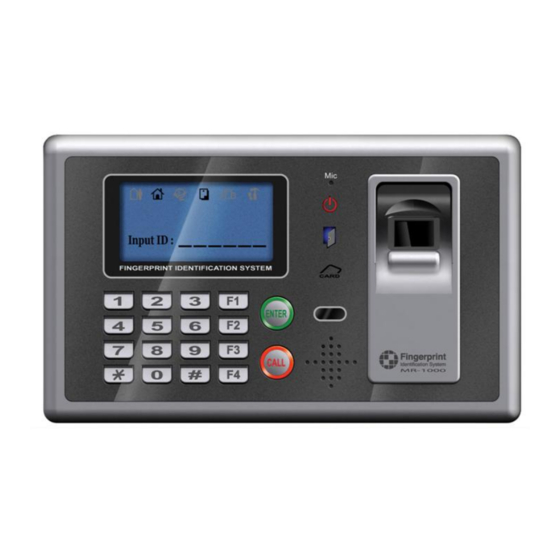
VIRDI 4000 User’s Manual 1.2. Terminal description ④ ⑤ ① ⑥ ⑦ ② ⑧ ③ ⑨ item description ① Display character message for all the operations [F1], [F2], [F1] : Start, [F2] : Leave, [F3], [F4] [F3] : Outside work, [F4] : Come back... -
Page 10: Screen (During Operation) Description
VIRDI 4000 User’s Manual 1.3. Screen (during operation) description == Connected to network server Disconnected to network server Access mode display in case of access control ( F1, F2, F3, F4 ) T&A mode display in case of time & attendance control( START, LEAVE, OUT, BACK,... -
Page 11: Voice Information During Operation
VIRDI 4000 User’s Manual 00:00 - Waiting for card to be input 00:00 - A registered user tried authentication at that time when access is not allowed. 00:00 - Waiting for a reply from the server for authentication 00:00 - Terminal is locked... -
Page 12: Correct Fingerprint Registration And Input Methods
VIRDI 4000 User’s Manual 1.7. Correct fingerprint registration and input methods Correct fingerprint registration methods Place your index finger on the window just as you do with a finger stamp. Finger tip touching is not an appropriate registration or input method. - Page 13 VIRDI 4000 User’s Manual Cautions about fingerprint condition Depending on the user’s fingerprint condition, some fingerprints may not be used or may cause an inconvenience. If the fingerprint is damaged or very unclear, then it cannot be recognized. Please use a password instead in this case.
-
Page 14: Introduction
VIRDI 4000 User’s Manual 2. Introduction 2.1. Features Access control system using LAN - Communication between the unit and authentication server is done through a UTP cable and TCP/IP protocol, so an existing LAN can be used as it is. - Page 15 VIRDI 4000 User’s Manual Various registration and authentication methods - There are a total of 11 registration and authentication methods (4 methods if the card reader is not installed), so you are required to select one method before registering users and an administrator.
-
Page 16: Configuration
VIRDI 4000 User’s Manual 2.2. Configuration 2.2.1. Network configuration Network Server (authentication server) Switch Hub 6410 Tx R x T x R x Tx R x T x R x Tx Rx Tx R x T x R x T x Rx... -
Page 17: Specifications
VIRDI 4000 User’s Manual 2.3. Specifications ITEM SPEC REMARK 32Bit RISC CPU 8M SDRAM 3,520 4M FLASH (Default) MEMORY fingerprints 8,160 8M FLASH (Option) fingerprints Fingerprint sensor Optical Authentication speed <1 sec. Scan Area / Resolution 12.9 * 15.2mm / 500 DPI FRR / FAR 0.1% / 0.001%... -
Page 18: Device Configuration Settings
VIRDI 4000 User’s Manual 3. Device configuration settings 3.1. Check items before device configuration settings 3.1.1. Entering menu The following screen appears when [*] is pressed for over 2 sec. 1. User Press [0] to view menus not shown in 2. -
Page 19: Saving Device Configuration Settings
VIRDI 4000 User’s Manual 3.1.3. Saving device configuration settings Press the [#] button in the main menu to save device configuration settings. The following screen appears: Save? Press [1] to save changes. If not, press [2]. [Y=1/N=2]:_ If there are no changes in device configuration settings, it goes out of this this setting mode without going through the above screen. -
Page 20: Menu Configuration
VIRDI 4000 User’s Manual 3.2. Menu configuration 1. User 1. Add 2. Delete 3. Modify 4. Add Admin 5. Delete All 2. Network 1) Terminal ID 2) Mode [NS/SN/NO] 3) Network Type [Static IP/DHCP] 4) IP Address 5) Subnet Mask... - Page 21 VIRDI 4000 User’s Manual 4. Terminal Info Terminal ID=0001 Version=10.41.00 Application=Access Language=ENG Mode=NS Network Type= Static(1) Mac-Address=000265201111 IP Address=192.168.0.3 Gateway=192.168.0.1 Subnet Mask=255.255.255.0 Server IP=192.168.0.2 Svr-Port==2201 Card Reader=None FP-Sensor=FOS02 1:1 Level=4 1:N Level=5 Max User=0 MAX FP=0 All User=0 All Admin=0...
-
Page 22: User Account
VIRDI 4000 User’s Manual 3.3. User account 3.3.1. User registration Press the [1] button in the main menu to select “1.User”, and the following screen appears: 1. Add Press [1] to register a new user. 2. Delete 3. Modify 4. Add Admin 5. - Page 23 VIRDI 4000 User’s Manual <Enable 1:N > The default is ‘0’. To enable 1:N authentication, ( N=0/Y=1 ) : 1 it should be set to ‘1’. In case that there are not many users or for the convenience of a specific user, a fingerprint only without ID can be used for authentication.
- Page 24 VIRDI 4000 User’s Manual Input the same password once more for <Confirm PW > confirmation. PW : _ _ _ _ _ _ _ _ If registration succeeds, a “ppiririck” buzzer sound rings. Then, it returns to the “1.Add” screen. If they are different, a “ppibig” buzzer sound indicating failure rings and the “1.Add”...
- Page 25 VIRDI 4000 User’s Manual ◆ [ENTER] User ID [ENTER] Place the card 1:1 Level [ENTER] Enable 1:N [ENTER] Input FP Input same FP ◆ Card registration (refer to “5. RF” registration) precedes fingerprint ⑤ registration (refer to “1. FP” registration).
- Page 26 VIRDI 4000 User’s Manual Place the card 1:1 Level [ENTER] Input FP Input same FP ◆ If a user feels difficult in inputting ID, a card can be used instead of ID input for authentication. Card registration (refer to “5. RF” registration) precedes fingerprint ⑤...
-
Page 27: Deleting User
VIRDI 4000 User’s Manual 3.3.2. Deleting User ◆ [ENTER] User ID [ENTER] ◆ In the main menu, press [1] to select “1.User” and the following screen appears. 1. Add To delete user, press [2]. 2. Delete 3. Modify 4. Add Admin 5. - Page 28 VIRDI 4000 User’s Manual As for users who registered only their fingerprints for access, they can modify 1:1 authentication level and add other fingerprints. 1. 1:1 Level To change the authentication level, press [1]. To 2. Add FP add a fingerprint to the corresponding ID, press [2].
- Page 29 VIRDI 4000 User’s Manual Input password. Password should be 1~8 < Input PW > characters in length. PW:_ _ _ _ _ _ _ _ Press [ENTER] after inputting the password. Input the same password once more for <Confirm PW>...
- Page 30 VIRDI 4000 User’s Manual 1. 1:1 Level Press [0] to see menus not shown in the LCD 2. Add FP window. 3. Change Card To cancel, press the [#] button. Press the [1] button to modify the 1:1 Level (refer to “3.3.3.1”).
-
Page 31: Administrator Registration
VIRDI 4000 User’s Manual 3.3.4. Administrator registration ◆ [ENTER] Admin ID [ENTER] ◆ In the main menu, press [1] to select “1.User” and the following screen appears: 1. Add For administrator registration, press [4]. 2. Delete 3. Modify 4. Add Admin 5. -
Page 32: Network Settings
VIRDI 4000 User’s Manual 3.4. Network settings In the main menu, press [2] to select “2.Network” to see the following screen. When this setting is done, press [ENTER] to move to the next setting. 3.4.1. Terminal ID settings ◆ [ENTER] [2] ◆... -
Page 33: Connection Method Settings
VIRDI 4000 User’s Manual Depending on number of terminals, number of users, or network conditions, each different mode can flexibly be used. But if there are more than 10 terminals connected to the server for simultaneous authentication or there are frequent network problems, it is recommended to use “SN”... -
Page 34: Gateway Settings
VIRDI 4000 User’s Manual If the subnet mask is ‘255.255.255.0’, enter as below: [2] [5] [5] [2] [5] [5] [2] [5] [5] [0] Press [ENTER] to move to the next setting. 3.4.6. Gateway settings <Gateway> Press [#] to delete an old value and enter the 192.168. -
Page 35: Option Settings
VIRDI 4000 User’s Manual 3.5. Option settings 3.5.1. Application mode settings In the main menu, press [3] to select “3. Option” and following screen appears: 1. Application To set the basic operation mode of a terminal, 2. Verify Option press [1]. -
Page 36: Option Settings For Authentication
VIRDI 4000 User’s Manual authentication of outside work is automatically changes to start time mode, which is very convenient for users in time & attendance mode. After setting <start time>, set <leave time> and <normal time> in the same manner. Note that each time must not overlap. - Page 37 VIRDI 4000 User’s Manual ◆ [ENTER] [2] ◆ <Show User ID> Default setting: ‘0’ (N=0/Y=1):0 If it is set to the default setting ‘0’, only the “Success” message is displayed. If it is set to ‘1’, user ID is displayed in the LCD window when authentication is successful as shown below: (Ex.) OK! <0001>...
- Page 38 VIRDI 4000 User’s Manual In cases that ID input or fingerprint authentication after placing a card – when card input replaces ID input – is unavoidably needed, it should be set to ‘0’. The followings are detailed settings about whether 1:N authentication is allowed or not.
-
Page 39: Doorlock Settings
VIRDI 4000 User’s Manual 3.5.3. Doorlock settings In the main menu, press [3] to select “3. Option” and the following screen appears: 1. Application Press [3] for door settings. 2. Verify Option 3. Set Doorlock 4. Sound Control 5. Time Setting 6. -
Page 40: Volume Settings
VIRDI 4000 User’s Manual ‘0’ setting is for no monitoring, ‘1’ setting is for dead bolt type or auto door and ‘2’ setting is for strike type. When this is set to ‘1’ or ‘2’, the door status through connected terminal is periodically transmitted to the server. -
Page 41: Current Time Settings
Default setting: ‘0’ (N=0/Y=1):1 An alarm sounds if the terminal case is damaged or opened. For this setting, VIRDI 4000 series have case open sensor installed. After the setting is completely done, press [ENTER] to move to the upper menu. -
Page 42: Other Setting
VIRDI 4000 User’s Manual old numbers with the [#] button before adding the new numbers. Press [ENTER] to check that the current time is updated and move to the upper menu. 3.5.6. Other setting In the main menu, press [3] to select “3.Option”. Press [6] to see the following screen: 1. -
Page 43: Terminal Information View
VIRDI 4000 User’s Manual 3.6. Terminal information view ◆ [ENTER] [4] ◆ In the main menu, press [4] to select “4.Terminal info” and the following screen appears where all the environmental settings are displayed: Terminal ID=0001 Press [0] to scroll up and down the screen. -
Page 44: Extra Functions
VIRDI 4000 User’s Manual All FP Number of fingerprints currently registered to a terminal 1:N User Number of users for 1:N authentication 1:N FP Number of fingerprints for 1:N authentication All Log Authentication records stored in a terminal 3.7. Extra functions In the main menu, press [5] to select “5.Ext function”... -
Page 45: Device Settings
VIRDI 4000 User’s Manual To exit from this setting, press [#] to move to the upper menu. 3.8. Device settings In the main menu, press [6] to select “6. Device”, and the following screen asking for a password appears: In the most of cases, There is no need for modifying the device settings after installation. -
Page 46: Card Reader Settings
VIRDI 4000 User’s Manual 3.8.2. Card reader settings ◆ [ENTER] ‘084265’ [ENTER] [2] ◆ Card Reader:0 Default setting: ‘0’ 0=Non 1=RF 2=SC 3=Wiegand 4=SC1 5=Ext This is to set the card reader mounted in a terminal. Refer to the followings for correct setting: - ‘0’: No card reader... - Page 47 VIRDI 4000 User’s Manual fingerprint input window and the fingerprint associated with ID ‘1234’ in a terminal. For your information, if a user’s 1:1 authentication level is set to ‘0’ – refer to 3.3.1.1. “1. FP” registration, 1:1 matching process for the user is performed according to the 1:1 authentication level (1:1 level of a terminal) assigned through ‘‘3.8.4.1.
-
Page 48: Wiegand Output Settings
VIRDI 4000 User’s Manual After the setting is completely done, press [ENTER] to move to the upper menu. 3.8.4. Wiegand output settings ◆ [ENTER] ‘084265’ [ENTER] [4] ◆ Wiegand Out:0 Default setting: ‘0’ 0=None 1=26bit 2=34bit Its default setting is ‘0’. If Wiegand output from the local terminal is needed for external access controller with Wiegand input, an administrator can set this setting as ‘1’... -
Page 49: Terminal Initialization
VIRDI 4000 User’s Manual <ID Length> Default setting: ‘4’ digits (2-8):4 This ID length can be 2~8 digits and should be the same as that of ID registered in the server program. If the ID registered in the server program is ‘000075’, input 6. -
Page 50: How To Use The Terminal
VIRDI 4000 User’s Manual ◆ [ENTER] ‘084265’ [ENTER] [1] ◆ <Init Config> To initialize configuration settings, press [1]. If [ Y=1 / N=2 ] : not, press [2]. All the configuration settings except for Mac (physical) address are initialized; users’ information and authentication records are not deleted. -
Page 51: Access Control Application
VIRDI 4000 User’s Manual 4.1. Access control application - Menu “3.Option” “1.Application” [0] for access control application 4.1.1. Authentication mode - Authentication mode display screen 00:00 Normal mode; authentication with [ENTER] 00:00 F1 mode; authentication with [F1] 00:00 F2 mode; authentication with [F2] 00:00 F3 mode;... - Page 52 VIRDI 4000 User’s Manual ▶ When auto sensing is running, input ‘0001’ if the user ID is ‘0001’ and then place your finger close to the fingerprint sensor. The light on the fingerprint input window turns on to detect the fingerprint and the authentication result is displayed on the LCD window.
-
Page 53: 1:N] Fingerprint Authentication
VIRDI 4000 User’s Manual 4.1.3. [1:N] fingerprint authentication This authentication is allowed only for users who are registered as 1:N authentication setting. ▶ If a user places his/her finger close to the fingerprint sensor when auto sensing is running, the light on the fingerprint input window turns on to detect the fingerprint and the authentication result is displayed on the LCD window. -
Page 54: Password Authentication
VIRDI 4000 User’s Manual 4.1.4. Password authentication ▶ If the user ID is “0001”, input “0001” and press the function key. The terminal waits for the user password to be inputted after a “ppiriririck” buzzer sound. Input the relevant password and press [ENTER]. The authentication result appears on the LCD. -
Page 55: Card Authentication
VIRDI 4000 User’s Manual 4.1.5. Card authentication ▶ In case of a user who is registered as [RF], [RF|FP] or [RF|PW], place the card close to the terminal in main screen. After a “ppig” buzzer sound, the authentication result appears on the LCD. -
Page 56: User Id Group Authentication
VIRDI 4000 User’s Manual 4.1.6. User ID group authentication User ID group authentication is performed just among users grouped with same first digit and/or above of user ID – at least one digit. This authentication can conveniently be used if there are too many users and the matching time for 1:N authentication takes too long. -
Page 57: Multiple Fingerprint Authentication
VIRDI 4000 User’s Manual 4.1.7. Multiple fingerprint authentication For a door where higher security is required, multiple fingerprints captured from more than two persons are assigned to a single ID for access to the specific door. The door opens only when all the registered fingerprints are successfully authenticated. -
Page 58: Time & Attendance Control
VIRDI 4000 User’s Manual 4.2. Time & Attendance control - Menu “3.Option” “1.Application” [1] T&A (Time Attendance) settings - If start and leave time for employees are fixed, set <start time>, <leave time> and <normal time> to reduce user input errors. -
Page 59: 1:N] Fingerprint Authentication
VIRDI 4000 User’s Manual 4.2.3. [1:N] fingerprint authentication - Same as 4.1.3. 4.2.4. Password authentication - Same as 4.1.4. 4.2.5. Card authentication - Same as 4.1.5. 4.2.6. User ID group authentication - Same as 4.1.6. 4.2.7. Expansion of working mode by multi-key function - If more than 5 working modes - start, leave, outside work (out), return (back) and normal - are required, it can be expanded up to 41 modes.
Need help?
Do you have a question about the 4000 and is the answer not in the manual?
Questions and answers