Table of Contents
Advertisement
Advertisement
Table of Contents

Related Manuals for LogiLink NS0045A

Summary of Contents for LogiLink NS0045A
- Page 1 NS0045A / NS0046A Gigabit NAS Server for 3.5" SATA HDD User Manual |...
- Page 2 In any case, liability for loss of data is limited to the effort that is necessary to restore from existing backup copies. Congratulations to the Purchase of NS0045A/NS0046A ! Please read the Manual and Safety Instructions before using the product for the first time.
- Page 3 Supports Windows, Mac OS, and Linux 2.3 Package Content 1 x Gigabit NAS (NS0045A or NS0046A) 1 x LAN Cable 1 x CD with Easy Installer Tool 1 x Power Adapter (NS0045A: 12V, 2A; NS0046A:12V, 4A) 1 x User Manual...
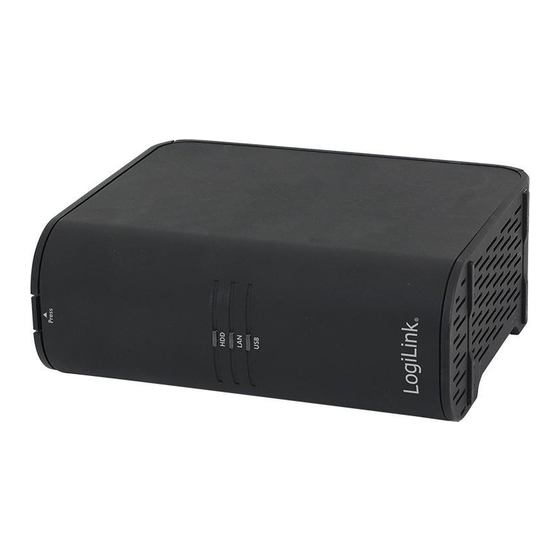
- Page 4 3.0 Overview: 3.1 Front View: NS0045A NS0046A One Bay Gigabit NAS Two Bays Gigabit NAS...
- Page 5 3.2 LED Definition NS0045A Label Color Function Blue Blue LED indicates power is on and hard drive status is good for System Status this slot. If there is no hard drive, the LED is OFF. HDD Status Blinking This LED will blink blue when the hard drive is being accessed.
- Page 6 3.3 Rear View: NS0045A: NS0046A: Rear View Identification DC IN, Power jack 12V Power Switch Gigabit LAN USB port : Support Flash Driver, external HDD, SD card Reader Reset Button: Press this button for at least 5 seconds to reset NAS to its default settings.
- Page 7 Set your PC’s IP settings to match the network subnet group of the NAS. Example: Logilink NAS default IP settings: 192.168.16.1 Configure your PC to these settings: 192.168.16.X (Whereas X represents a number from 1 to 254 other than 1).
- Page 8 Connect through the web browser -- available for Windows, Mac OS X, and Linux 5.1 NetTool Setting: The Logilink Gigabit NAS NS0045A or NS0046A provides user-friend NetTool Utility for quick NAS finder and setting. The NetTool utility is used to detect devices on the local network (same subnet) Insert the provided CD into your CD drive.
- Page 9 Funation button DescrIptIon Seach Device Click button, and then system will scan connected Logilink NAS. Device Click to access the login screen of the selected device. The web Management interface of the device displays through your default browser.
- Page 10 Please refer to Chapter 6.0 for Setup. 5.2 Browser Setting Open the browser (Firefox, Internet explorer, Chrome or Others Browser) 1. Please Input the default device name. For one bay NS0045A, please input \\NS0045A or http://NS0045A ; for NS0046A, 2 bays, please input \\NS0046A http://NS0046A.
- Page 11 4. The NAS device must be configured and initialized. After click “File Explorer”, Mount the NAS SAMBA share will appear as following figure. 5. Click “Setup Wizard”, Your default web browser opens to display the system Setup Wizard screen. 6. Click icon to begin the initialization process.
- Page 12 6.0 Quick Wizard The NAS Quick Wizard Interface allows you to configure your personal settings easily. Please key in user name: “admin” and password: “admin” to login NAS to setup. 6.1 Setup Wizard Click icon Link to following settings: 1) Device Settings Administrator can set device name, description and select language on this page.
- Page 13 Device Name Enter the name of the NAS. The server name can be 15 characters long at maximum, which supports alphabets, numbers, and hyphen (-). The server does not accept names with space, period (.). Description Enter the description of the NAS. The server description can be 50 characters long at maximum, which supports alphabets, numbers, and hyphen (-).
- Page 14 The Format process will erase all data from the hard drive. Make sure that the NAS is connected to a power source and is not powered down during this process to prevent damage to the system. NS0045A: Select the Disk, Create Disk Partition and Format the internal storage device as XFS or EXT3 format.
- Page 15 Click OK to confirm the Disk initialization process. Do not power down or disconnect the power adapter to prevent failure or damage to your system. The initialization Process starts and the following display is shown. The designated HDD LED blinking during the initialization process. The initialization completed screen displays, see the following figure.
- Page 16 Check the hard disk information. NS0046A:...
- Page 17 If you just want to use single mode hard disk separately, not to get into the RAID mode, please click the hard disk format button to format HDD. Then you can use it. When there are two Hard Disks inside the NAS, you could enable this function. You could select JBOD/RAID 0/RAID 1 different modes.
- Page 18 The initialization Process starts and the following display is shown. The designated HDD LED blinking during the rebuilding process. The time required to rebuild a system is dependent on the RAID type selected and the size of hard drives. The initialization completed screen displays see the following figure.
- Page 19 10. Check the hard disk information. 4) Administrator Settings Administrator can change the password on this page. Password Input range: 5~20 characters. The invalid characters are: " / \ [ ] : ; | = , + * ? < > ` '...
- Page 20 5) Network Settings Administrator can select protocol type on this page. Obtain the IP address settings automatically via DHCP If your network supports DHCP, the NAS will use DHCP protocol to retrieve the IP address and related information automatically. If NAS cannot obtain an IP at the boot time, the IP will be configured as the default IP -- 192.168.16.1.
- Page 21 6.2 Settings The User Interface includes access to Settings (DDNS, Protocol..), Storage, USB. Click icon Link to System menu. System menu displays functions under this category.
- Page 22 6.3 User Management Administrator can add new users in this setting page. “admin” is a default user and he has the highest control over this NAS. If a new user is created with password, administrator can click that user to edit it.
- Page 23 6.4 Download Station The NAS supports BT download. You can add download task to the NAS and let the server finish downloading independent of PC. Click icon Link to Bit Torrent Menu. Bit Torrent Menu displays functions under this category.
- Page 24 6.5 Online User Manual This feature provides NAS PDF Manual Download.
- Page 25 6.6 Support This function call Logilink Support E-mail message window.
- Page 26 7.0 Web Management 7.1 System menu System menu displays functions under this category. 1) System Information Firmware Version Show firmware version of the NAS.
- Page 27 Device Name Show the name of the NAS. Description Show the description of the NAS. MAC Address Ethernet MAC address. IP Address Show the NAS IP address. Protocol Show the protocol used to obtain the IP address (DHCP or Static IP). HTTP Server Port Assign a port for the NAS http port.
- Page 28 2) General Settings Device Name Enter the name of the NAS. The server name can be 15 characters long at maximum, which supports alphabets, numbers, and hyphen (-). The server does not accept names with space, period (.). Description Enter the description of the NAS. The server description can be 50 characters long at maximum, which supports alphabets, numbers, and hyphen (-).
- Page 29 3) Network Settings This section contains all LAN settings to configure the NAS to the network. Protocol DHCP If your network supports DHCP, the NAS will use DHCP protocol to retrieve the IP address and related information automatically. If NAS cannot obtain an IP at the boot time, the IP will be configured as the default IP -- 192.168.16.1.
- Page 30 4) DDNS If user wants to access NAS from Internet, he should register NAS to DDNS Service first and then public it to Internet. After a NAS s account and domain are registered to DDNS, user can access this NAS from Internet by using the domain name but not public IP. It is easier for users to remember a domain than a public IP.
- Page 31 Password Description Password registered in the selected DDNS service Value setting Based on DDNS service restriction Domain Description Domain registered in the selected DDNS service Value setting Based on DDNS service restriction...
- Page 32 5) Volume Information User can check Disk information in this page. If any new storage device is attached to NAS, disk information will change to the latest status after refresh button is used. Remove USB is to safely remove the external USB storage device. Internal Storage Device ...
- Page 33 6) Disk Management Single Mode Select the Disk, Create Disk Partition and Format the internal storage device as XFS or EXT3 format. Single MODE: if you just want to use single mode hard disk separately, not to get into the RAID mode, please click the hard disk format button to format HDD.
- Page 34 HDD S.M.A.R.T status Monitor the hard disk drives (HDD) status by HDD S.M.A.R.T. RAID Mode(Only for NS0046A) When there are two Hard Disks inside the NAS, you could enable this function. You could select JBOD/RAID 0/RAID 1 different modes. Create the Raid Mode and disk will be formatted.
- Page 35 7) Account Management Administrator can add new users in this setting page. “admin” is a default user and he has the highest control over this NAS. If a new user is created with password, administrator can click that user to edit it. User Management Administrator can manage (add, modify, and delete) user accounts of NAS.
- Page 36 Add user Press Add to create a user with name, password and description The following information is required to create a new user: User name Input range: 1~15 characters. The invalid characters are: " / \ [ ] : ; | = , + * ? < > ` ' ...
- Page 37 7.2 Application Application menu displays functions under this category. Samba Users can use Samba to download and upload files between NAS and client PCs. The supported OS of client PC is Windows 7, Windows Vista, Windows XP, Mac OS X, and Linux.
- Page 38 File Structure The root directory shared by Samba server contains: 1) admin: the private folder of the admin Photo: the private photo folder of the admin. Music: the private music folder of the admin. Video: the private video folder of the admin. 2) home: the private folder of NAS users will be created under this folder 3) public: the public folder shared by all users User Behavior...
- Page 39 Bonjour With Bonjour enabled, NAS will broadcast the HTTP and SMB services. Mac users can use “Finder” to discover the NAS samba share and use “Safari” to discover the NAS web page Bonjour Service: enable or disable the function ...
- Page 40 FTP Server Users can use FTP to download and upload files between NAS and client PCs across the Internet. User Behavior admin: admin user can manage all the data in the NAS. user: a normal user can only access his private folder and the public folder. Web configuration ...
- Page 41 BT Downloader The NAS supports BT download. You can add download task to the NAS and let the server finish downloading independent of PC. BitTorrent: enable or disable the function Status: display current server status (running/stopped) Job List: display current torrent status...
- Page 42 ID: The BT task number File Name: BT Downloaded file name Size: BT downloaded file size Progress: The status BT Task DL/UL speed: Download / Upload speed Operation: Start: Start the BT task Pause: Pause the BT task Info: The detail information of BT task Delete: Delete BT task...
- Page 43 1. Go to “Applications” > " BitTorrent”. 2. Select “Add Job” 3. Add a new BT task Click “Add Job” and upload a torrent file (*.torrent). You can download legal torrent files by searching on the Internet. Please download the torrent files to your local disk and then upload them to the NAS.
- Page 44 Preference User can set some BT parameters here to limit the connected peers or bandwidth Maximum peers overall: The total maximum number of connected peers. Default is 240. Maximum peers per torrent: The maximum number of connected peers per torrent. Default is 60.
- Page 45 Name: The downloaded BT file Location: The location of downloaded BT file, default is /public/BTDownload Percent: The completeness percentage of BT task Download speed: The download speed of BT task Upload speed: The upload speed of BT task ...
- Page 46 iTunes If you want to use this function, you should setup the iTunes client in the client computer. If the iTune server is running, iTune client will show this server in the Share item. iTunes server shares mp3 files in the public folder. The shared file list will be refreshed automatically every minute.
- Page 48 Media Server NAS can be a media server and user can use some UPNP media player, such as Nero Showtime 8 or PS3, XBOX3 to play video or audio media files on NAS. Media server shares multimedia files in the public folder. The shared file list will be refreshed automatically every minute.
- Page 49 7.3 Maintenance Maintenance menu displays functions under this category. Power Management Administrator can restart the device or shutdown the device in this power management page. Follow the steps below to restart or shut down the NAS. 1. Login the NAS. Go to “Maintenance” > “Power Management”. 2.
- Page 50 HDD suspend You can enable or disable the suspend functions of the NAS. Select the time duration the HDD will enter standby mode. Firmware Upgrade Whenever a new firmware released, we can upgrade the NAS firmware from here. The system update may take tens of seconds to several minutes to complete depending on the network connection status.
- Page 51 system update is completed. Note: User can not shutdown the NAS during Firmware Upgrade.
- Page 52 Save & Restore Config Here allow us to backup the setting we’ve set for future use. (Including the settings in LAN, System, and service settings) Save Config To back up the settings, including server name, the settings in LAN, System, and service settings etc., click “Save”...
- Page 53 System Item General Settings Language Device Name Description NTP Status NTP Server HTTP Port Network Settings Protocol IP Address Subnet Mask Default Gateway Primary DNS Secondary DNS Application Item Samba Server Workgroup Bonjour Server Server FTP Port Download Rate Upload Rate Server TCP Source Port Maximum peers overall...
- Page 54 Restore Config To restore the settings, click “Restore”, click “Browse” to select a previously saved setting config and click “Restore” again. Note: User can not shutdown the NAS during Restore.
- Page 55 Please make sure you have backed up all the system settings before resetting the NAS. Items which will be reset to default: System Item Default Value General Settings Language English Device Name NS0045A/NS0046A Description NS0045A/NS0046A Time Zone (GMT+08:00) Taipei NTP Status Enable NTP Server pool.ntp.org HTTP Port Network Settings...
- Page 56 Subnet Mask 255.255.255.0 Default Gateway 192.168.16.1 Primary DNS 168.95.192.1 Secondary DNS 168.95.1.1 Application Item Default Value Samba Server Enabled Workgroup WORKGROUP Bonjour Server Enabled Server Enabled FTP Port Anonymous Login Disable Client PC’s Languaga Unicode (UTF-8) Server Enabled TCP Source Port 51413 Maximum peers overall Maximum peers per torrent 60...
- Page 57 UPnP media server started/Stop CE Declaration: This device corresponds to EU directive 2004/108/EC: With the CE sign Logilink®, a registered trademark of the 2direct GmbH ensures, that the product is conformed to the basic standards and directives. These standards can be requested online on www.logilink.com.
Need help?
Do you have a question about the NS0045A and is the answer not in the manual?
Questions and answers