Table of Contents
Advertisement
Advertisement
Table of Contents

Summary of Contents for PROEL PLBR24
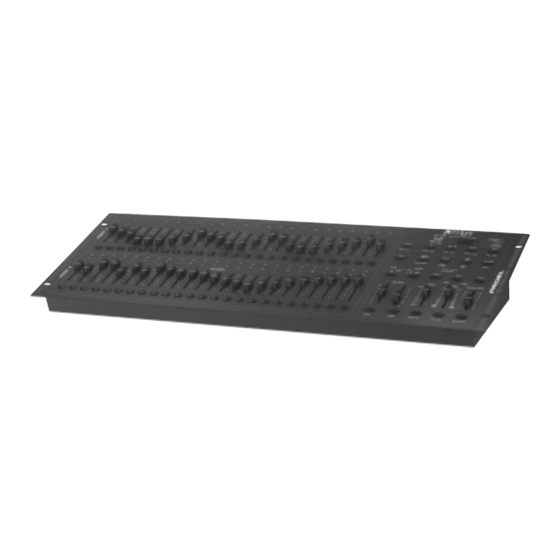
- Page 1 REGIA LIGHT 24/48 LIGHT MIXER 24/48 PLBR24...
- Page 2 Double Preset 1. Press Mode Select Button to enter A Double Preset Mode. 2. In this mode, Channel Sliders 1-24 and channel sliders 25-48 both control Channel 1-24 3. Master A controls channel Slider 1-24 while Master B controls Channel Sliders 25-48. 4.
-
Page 3: Table Of Contents
e Mode INDICE programs will run in sequential order starting in the order of program number. e Segment Display will read the running program number. Caratteristiche ……………………………………………………………………………………………………………………………… programs will be controlled by the same Speed Slider . ss the MODE SELECT BUTTON and select " CHNS SCENES". Istruzioni Generali ………………………………………………………………………………………………………………………... - Page 4 3. Use of Tap Sync in setting a standard beat is the same with speed control slider. aso di problemi di funzionamento di una certa entità, cessare immediatamente l’utilizzo e ri- ersi al proprio rivenditore per un controllo oppure contattare direttamente PROEL. La mano- Master Slider sione del prodotto prevede la decadenza immediata della garanzia.
-
Page 5: Presentazione
mplementation 1. PRESENTAZIONE ing receiving and sending MIDI data, all MIDI scenes and channels being run will automa- 1.1 Pannello Frontale y paused if there is no response within 10 minutes. ng receiving and sending file dump, the controller will automatically search for or send De- D of 55H(85), a file named DC2448 with an extension of "BIN(SPACE)". - Page 6 Up viene utilizzato per modificare una scena nella modalità E 3.3 Exit MIDI Setting HASE serve a invertire la direzione del chasing di una scena HASE sotto il controllo slider SPEED. Premere per selezionare le pagine delle scene da Pagina 1 a 4. Press and hold down the Record button.
-
Page 7: Pannello Posteriore
DI OPERATION 33. S Questo slider controlla la sensibilità dell’input Audio. LIDER UDIO EVEL 34. P Serve ad attivare a distanza macchine del fumo che abbiano input ULSANTE ACHINE etting MIDI IN DMX. 1. Tap the Flash button 1 three times while holding down the Re- cord button, the Segment Display reads "CHI"... -
Page 8: Guida Al Funzionamento
UIDA AL FUNZIONAMENTO 2.3.4 Running a Program With the Standard Beat izio Programmazione 1. Be sure the Audio is disengaged. Tap the Mode Select button to select CHNS SCENE mode. Attivazione di Record 2. Tap the Park button to select Mix Chase mode, the LED lights in- dicating this selection. -
Page 9: Programmazione Scene
Running a Program To Audio 2.1.3 Programmazione scene 1. Attivare Record. 2. Selezionare la modalità 1-48 Single premendo il pulsante Mode Se- 1. Use built-in microphone or plug the audio source into the RCA Au- lect. Questo garantirà il controllo di tutti i 48 canali durante la pro- dio jack. -
Page 10: Editing
MPIO: Programmazione di un chase a 16 passi con i canali 1-32 al completo in sequenza nel 2.3 Running nte Flash 25 della Pagina 1. Attivare R 2.3.1 Running Chase Programs ECORD Portare Master A e B nella posizione massima e lo slider F verso l’alto. -
Page 11: Cancellazione Di Un Programma
2.2.2 Cancellazione di un programma 4. Tap the Insert button to insert the step you've created before, all 1. Attivare R ECORD LEDs will flash, indicating the step is inserted. 2. Usare il pulsante P per selezionare la pagina del programma INSERT che si desidera cancellare. -
Page 12: Inserimento Di Un Passo O Di Più Passi
3. Premere il pulsante D quando viene raggiunto il passo che ELETE si desidera cancellare, tutti i LED lampeggeranno brevemente in- dicando la cancellazione del passo. 2.2.5 Delete a Step or Steps DELETE 1. Enter the Edit mode. 4. Continuare allo stesso modo con il passo 2 e 3 fino a quando tut- ti i passi indesiderati non saranno stati cancellati. -
Page 13: Modifica Di Un Passo O Di Più Passi
Erase a Program 5. Premere il pulsante F 35 mantenendo premuto il pulsante E , il LED della scena cor- LASH rispondente si accenderà. 1. Record enable. 6. Premere il pulsante S per scorrere fino al passo 4. 7. Premere il pulsante Insert per inserire la scena creata precedentemente. 2. -
Page 14: Funzionamento Di Un Programma In Audio
3. Portare il M B al massimo (completamente verso il bas- EXAMPLE: Program a 16 steps chase with channel 1-32 at full in sequence into Flash button 25 ASTER LIDER so). of Page 1. 1. Record enable. 2. Push Master A & B to maximum position and Fade slider to top. 3. -
Page 15: Funzionamento Di Un Programma Con Lo Slider Speed
Program Scenes 2.3.3 Funzionamento di un programma con lo slider Speed 1. Record Enable. 1. Assicurarsi che la modalità A sia disattivata, ovvero, che il LED UDIO sia spento. UDIO 2. Select the 1-48 Single mode by tapping the the Mode Select but- REC SPIN ton. -
Page 16: Cambiamento Della Modalità Speed Tra 5 Minuti E 10 Minuti
ambiamento della modalità SPEED tra 5 minuti e 10 minuti 2. OPERAION GUIDE 2.1 Begin Programming 1. Premere e mantenere premuto il pulsante R ECORD 2.1.1 Record Enable 2. Premere il pulsante 5 o 10 per 3 volte mantenendo premuto 1. -
Page 17: Impostazione Midi Out
3.2 Impostazione MIDI OUT ome Button This button is used to deactivate the Blind. 1. Premere il pulsante F 2 per 3 volte mantenendo premuto LASH il pulsante R , il display legge “CHO” indicando che l’im- ECORD p Sync Button Repeatedly tapping this button establish the chase speed. -
Page 18: Invio Del Dump Del File Midi
vio del dump del file MIDI in Mix mode. Premere il pulsante F 4 per 3 volte mantenendo premuto il LASH pulsante R , il display legge “OUT” indicando che questa 11. Up/Chase Rev Up is used to modify a scene in Edit mode. ECORD centralina sta inviando il dump del file MIDI. -
Page 19: Sommario Delle Funzioni Principali
4. SOMMARIO DELLE FUNZIONI PRINCIPALI VIEW ont View • Inversione della direzione della scena 1. Inversione della direzione di tutte le scene: Premere il pulsante ALL REV, tutte le scene do- vrebbero cambiare direzione. 2. Inversione della direzione del chasing di tutti i programmi con controllo della velocità. Pre- mere il pulsante Chase Rev. - Page 20 gle Mode GENERAL INSTRUCTIONS utti i programmi funzioneranno in ordine sequenziale partendo nell’ordine del numero del pro- ramma. Read the instruction in this manual carefully and thoroughly, as they give important Display leggerà il numero del programma avviato. information regarding safety during use and maintenance. Keep this manual with utti i programmi saranno controllati dallo stesso Slider Speed.
-
Page 21: Caratteristiche Tecniche
URES • Add e Kill - Il pulsante ADD/KILL cambia la modalità dei pulsanti Flash. Normalmente i pulsanti Flash so- k you for your purchase. This product features include: no in modalità Add, laddove premendo qualsiasi pulsante Flash non si neutralizzeranno altre scene, permettendo il funzionamento simultaneo di scene multiple. - Page 22 CONTENTS FEATURES ......................GENERAL INSTRUCTIONS .
Need help?
Do you have a question about the PLBR24 and is the answer not in the manual?
Questions and answers