Table of Contents
Advertisement
Quick Links
Advertisement
Table of Contents

Related Manuals for EVS Multicam LSM


Summary of Contents for EVS Multicam LSM
-
Page 1: Operation Manual
OPERATION MANUAL Version 12.05 - May 2014... - Page 3 (for manuals on hardware products) or at the following page on the EVS website: http://www.evs.com/contacts. User Manuals on EVS Website The latest version of the user manual, if any, and other user manuals on EVS products can be found on the EVS download center, on the following webpage: http://www.evs.com/downloadcenter.
-
Page 5: Table Of Contents
OPERATION MANUAL Multicam LSM 12.05 Table of Contents TABLE OF CONTENTS WHAT'S NEW? 1. OVERVIEW 2. WORKING INTERFACES 2.1. Overview 2.2. Remote Panel Controls 2.2.1. General Layout 2.2.2. LED Colors 2.2.3. Function Keys & Small Keys 2.2.4. Soft Keys and LCD Display 2.2.5. - Page 6 EVS Broadcast Equipment SA Issue 12.05.A - May 2014 4. CLIP MANAGEMENT 4.1. Introduction 4.1.1. Clip Structure 4.1.2. Clip Numbering Hierarchy 4.1.3. Clip Availability on Disks 4.2. Clip Functions on the Remote Panel 4.2.1. Remote Panel Interface 4.2.2. Remote Panel Functions 4.3.
- Page 7 OPERATION MANUAL Multicam LSM 12.05 5.6.5. Naming a Playlist or Playlist Element 5.6.6. Consolidating a Playlist 5.6.7. Generating a Continuous TC in a Playlist 5.7. Operations on Clips in Playlists 5.7.1. Adding Clips in a Playlist 5.7.2. Deleting and Moving Playlist Elements 5.7.3.
- Page 8 EVS Broadcast Equipment SA Issue 12.05.A - May 2014 7.2. Managing Keyword Files 7.3. Assigning Keywords 7.4. Clearing Keywords 7.5. Editing the Ranking of a Clip 7.6. Naming a Clip Using the Keywords 7.7. Searching the Database Using the Keywords 8. OPERATION ON XNET NETWORK 8.1.
- Page 9 OPERATION MANUAL Multicam LSM 12.05 9.5.1. Activating and Accessing the Hypermotion Mode 9.5.2. Controlling the Hypermotion Camera 9.5.3. Specific Camera Features 9.6. Video Delay 9.7. Sony, XtenDD35, Odetics & VDCP Protocols Table of Contents...
-
Page 11: What's New
OPERATION MANUAL Multicam LSM 12.05 What's New? In the Operation manual, the icon has been added on the left margin to highlight information on new and updated features in release 12.05. Cue Points on Clips • See section "Managing Cue Points" on page 72 •... -
Page 13: Overview
OPERATION MANUAL Multicam LSM 12.05 Overview The aim of this manual is to familiarize the operator with the Multicam software for EVS High Definition and Standard Definition servers, and its Remote Panel, so as to learn as quickly and efficiently as possible the basic operations. -
Page 14: Working Interfaces
EVS Broadcast Equipment SA Issue 12.05.A - May 2014 Working Interfaces 2.1. Overview Several User Interfaces The EVS server can be operated from several user interfaces that can work in a complementary manner: • VGA interface • Remote Panel interface •... - Page 15 OPERATION MANUAL Multicam LSM 12.05 VGA Interface When turning on the EVS mainframe, the first step is the PC boot sequence, then the Multicam Setup window is displayed: • If a default application has been previously selected, this application will start automatically after a few seconds if no key is hit.
-
Page 16: Remote Panel Controls
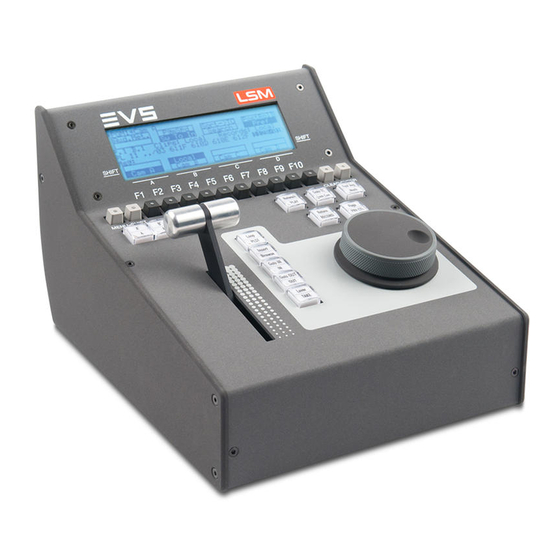
EVS Broadcast Equipment SA Issue 12.05.A - May 2014 2.2. Remote Panel Controls 2.2.1. General Layout The following diagram shows the Remote Panel along with a brief description of each area. Note The operational buttons have primary and secondary functions and are divided into upper and lower sections. - Page 17 OPERATION MANUAL Multicam LSM 12.05 Ref. Command Function F-keys & small Multi-purpose keys buttons Soft keys With LCD display, allows the operator to enter the Multicam MENU system Lever Initiates slow motion and playlist replay Jog dial Used to accurately cue disk recorder...
-
Page 18: Led Colors
NETWORK Enters the XNet menu (connects to other servers on the network). LAST CUE Re-cues EVS server to previous cue point GOTO TC Allows timecode entry, with «F» keys FAST JOG Used with jog dial for rapid, manual re-cue. This mode is automatically reset after PLAY/LIVE commands. -
Page 19: Function Keys & Small Keys
OPERATION MANUAL Multicam LSM 12.05 2.2.3. Function Keys & Small Keys Function Provides access to the secondary menu. Also used as CANCEL in some messages when confirmation is required. Note: SHIFT+MENU returns to Main menu Enables use of the secondary key functions. -
Page 20: Soft Keys And Lcd Display
EVS Broadcast Equipment SA Issue 12.05.A - May 2014 2.2.4. Soft Keys and LCD Display The soft keys have primary and secondary functions and are divided into upper and lower sections. The LCD display is divided into two menus. • To access the secondary functions in the operational menu (A’ to D’), press the SHIFT button. -
Page 21: Jog Dial
OPERATION MANUAL Multicam LSM 12.05 2.2.5. Jog Dial The jog dial allows the operator to pass into Search mode and thus to choose exactly the Short OUT or Short IN image. Move the jog dial clockwise to search forward and move it counter-clockwise to search backwards. -
Page 22: Keyboard Locking
EVS Broadcast Equipment SA Issue 12.05.A - May 2014 2.2.7. Keyboard Locking You can lock a remote keyboard at any time to protect it against accidental changes, for example to prevent interruption of a play operation on an unattended device. Only the locked device is affected, other remotes will stay fully operational. -
Page 23: Remote Panel Operations
Function Key F1 to F4 If desired, the Multicam system can be run using 1, 2, 3 or 4 EVS Remote Panels. Depending on the number of play channels available in the current configuration, 1-, 2-, 3- or 4- Remote modes will be available from the main menu. - Page 24 Enables or disables the on-screen display (Timecode, Clip ID…) on the output monitors. F6: Exit Exits the Multicam software and returns to the EVS Menu. F7: Clear all clips Clears all clips. All clips will be lost. A confirmation of this command is required.
-
Page 25: Function Of The Small Keys
OPERATION MANUAL Multicam LSM 12.05 2.3.2. Function of the Small Keys MENU This function allows the operator to gain access to the secondary menu. SHIFT+MENU on the Remote gains access to the main menu. Also used as an ESCAPE key to cancel some options and messages. - Page 26 EVS Broadcast Equipment SA Issue 12.05.A - May 2014 This is very useful to “consolidate” effects and edits, or adding live sound or music or voice to previously recorded material when only the video is looped back into the server. When playing back at 200% in loop mode, then replaying the looped sequence at 50%, you can obtain a “film effect”.
- Page 27 OPERATION MANUAL Multicam LSM 12.05 This function defines the IN point of a clip. The key will light differently depending on the following situations: • Green key The key lights green if an IN point exists but is not the image you see.
-
Page 28: Function Of The Operational Block 2 Keys
EVS Broadcast Equipment SA Issue 12.05.A - May 2014 Lever This function is used to perform slow motion from 0 to 100% and to playback material from 100 to + 100% or from 200 to + 200% when Secondary Lever range is selected. The lever has a continuous, linear range, except when Super Motion material is loaded on the primary channel. - Page 29 OPERATION MANUAL Multicam LSM 12.05 PLAY This function initiates a forward motion. It can also be used to start playback of playlists and clips (refer to PLST command). When PgmSpd/Var Max is OFF, the default playback speed when pressing the PLAY key is 100% for standard pictures, 33% for Super Motion pictures with a Triple Speed camera (SD), and 50% for Super Motion pictures with a Double Speed camera (HD),.
- Page 30 To exit the GOTO TC function at any time, press the MENU key. Last Cue This function re-cues the EVS server to previous cue point relative to the current timecode position. Each time the Last Cue button is pressed, the EVS server re-cues to the previous cue, etc.
-
Page 31: Rebooting The System From The Remote Panel
OPERATION MANUAL Multicam LSM 12.05 RECORD This key lights red when the system is recording. Pressing this key brings the system in E/E (“live”) mode, and starts the record if necessary (depending on the settings of the Setup menu). The E/E mode is actually playing pictures already recorded by the system, and has a delay of 3 frames compared to the live source, on all audio and video tracks. - Page 32 (record trains, clips, playlists) upon exit. Hit ALT+Q on the keyboard or press F6 from the main Menu, and confirm with ENTER or cancel with ESC. You will exit the Multicam software and go back to the EVS Menu. 2. Working Interfaces...
-
Page 33: Control Modes
OPERATION MANUAL Multicam LSM 12.05 Control Modes 3.1. Live, Search or Playback Mode Multicam can be set in three different basic modes, depending on commands used: Live (E2E) Mode This mode selected at start-up can also be selected by pushing the RECORD key. -
Page 34: 1Pgm+Prv Mode
EVS Broadcast Equipment SA Issue 12.05.A - May 2014 3.2. 1PGM+PRV Mode 3.2.1. 1PGM+PRV Mode Introduction Multicam has two modes for its basic operation, 1PRV+PGM and Multi PGM: • The 1PGM+PRV mode is more powerful as it allows interaction between all outputs. -
Page 35: 1Pgm+Prv Primary Menu Controls
OPERATION MANUAL Multicam LSM 12.05 3.2.2. 1PGM+PRV Primary Menu Controls Introduction The primary menu in 1PGM+PRV mode, illustrated below, gives access to the functions detailed in the following paragraphs: Rst Cam Local Sync Prv 2nd CTRL Cam A Cam B... -
Page 36: 1Pgm+Prv Secondary Menu Controls
This function allows the operator to swap the control of one or several play channels between the EVS Remote and a third-party controller. Both controllers receive permanently the status of the channel(s), but only one controller at a time is able to actually control a channel. - Page 37 OPERATION MANUAL Multicam LSM 12.05 Mix / Wipe L>R / Wipe R>L / Wipe U>D / Wipe D>U / Cut Aud.Met. PgmSpd Sort->TC PostRoll Mix. Sw to IN Search Pref These options determine the transition effect that will occur between the PGM and PRV pictures.
- Page 38 EVS Broadcast Equipment SA Issue 12.05.A - May 2014 Aud.Met. Aud.Met. PgmSpd Sort->TC PostRoll Mix. Sw to IN Search Pref This option enables/disables the display of audio meters for all channels using the OSD of the output monitors. Post-Roll Aud.Met. PgmSpd Sort->TC...
-
Page 39: Full Control And Lever Control
OPERATION MANUAL Multicam LSM 12.05 3.2.4. Full Control and Lever Control You control both PGM and PRV when the PRV CTL key is not active. Once you select PRV CTL, you gain control on the PRV channel with the jog dial and most keys, while the lever and the PLAY key control the PGM output. -
Page 40: Multi Pgm Primary Menu Controls
EVS Broadcast Equipment SA Issue 12.05.A - May 2014 How to Enter the Multi-PGM Mode To enter the Multi PGM mode, press B from the Main menu. This button is labeled '1 PGM', '2 PGM', or '3 PGM' according to your system configuration. The Remote Panel will then display the following screen: PGM1 CAM A ... - Page 41 This function allows the operator to swap the control of one or several play channels between the EVS Remote and a third-party controller. Both controllers receive permanently the status of the channel(s), but only one controller at a time is able to actually control a channel.
- Page 42 EVS Broadcast Equipment SA Issue 12.05.A - May 2014 How to Assign a Camera to a Channel In Multi PGM mode, to change the current camera on each PGM, proceed as follows: 1. In the primary menu, select the PGM to which you want to change the current camera.
-
Page 43: Multi Pgm Secondary Menu Controls
OPERATION MANUAL Multicam LSM 12.05 Practical Example 1. The operator builds a playlist with Fills and another playlist with Keys. 2. He sets the Playlist Load parameter to Conditional in the setup menu. 3. He enters the 2 PGM mode. 4. He selects the Fill playlist as current playlist, presses A to gain control on PGM1. -
Page 44: Synchronization Mode (Switch To In)
EVS Broadcast Equipment SA Issue 12.05.A - May 2014 3.4. Synchronization Mode (Switch To In) The Synchronization mode allows users to define how they jump from one camera to the other. The Synchronization mode is available in the secondary menu from the main LCD display, using the B soft key. -
Page 45: Controlled And Primary Channels
Introduction The 2nd CTRL function available on the Remote Panel in the main operational menu allows the operator to swap the control of one or several play channels between the EVS Remote and a third-party controller. Both controllers receive permanently the status of the channel(s), but only one controller at a time is able to actually control a channel: this is called the exclusive secondary control mode. - Page 46 EVS Broadcast Equipment SA Issue 12.05.A - May 2014 Interactions between IPDP and Multicam When a Remote Panel and an IPDirector share the control of some PGMs in exclusive secondary control mode, the following principles apply: • When a playlist/timeline is controlled by the Remote Panel on a PGM, the playlist/timeline remains the current one when IPDirector is given the control on the PGM.
-
Page 47: Clip Management
OPERATION MANUAL Multicam LSM 12.05 Clip Management 4.1. Introduction 4.1.1. Clip Structure Concepts A clip is defined by Short IN and Short OUT points. When referring to Short IN and Short OUT points, the operators usually use the terms IN point and OUT point. -
Page 48: Clip Numbering Hierarchy
EVS Broadcast Equipment SA Issue 12.05.A - May 2014 General Principles Protect IN & Protect OUT points of a clip cannot be replaced by new ones. Short IN & Short OUT points of a clip can be replaced by new ones. - Page 49 OPERATION MANUAL Multicam LSM 12.05 Clip Hierarchy Diagram The following diagram represents the hierarchy of the Multicam clip numbering system. As an example, clip number “112” is used: Clip LSM ID The clip numbering system is as follows: In the example, the digits have the following meaning in the numbering system: •...
-
Page 50: Clip Availability On Disks
EVS Broadcast Equipment SA Issue 12.05.A - May 2014 4.1.3. Clip Availability on Disks Various clip types can be distinguished depending on whether they are available on the disks or not. Depending on the clip availability on disks, you can perform specific actions on the given clip or not. -
Page 51: Remote Panel Functions
OPERATION MANUAL Multicam LSM 12.05 Secondary Menu Without Keyword File Defined If no keyword file is selected in the setup , the LCD display will be: 1keyword8901 2keyword8901 3keyword8901 111A Push Aux Clip Sort->TC PostRoll >Archive Search In this mode of the secondary menu, clips can still be directly recalled using the F1-F10 keys of the Remote Panel. - Page 52 The Archive function allows the operator to flag a clip to place it in the archive queue of the XFile defined in the Operational Setup menu (p.7.1 F3). The EVS Xfile is a 2U device with 2 removable hard drives, that can be connected to the XNet SDTI network. Clips can be archived to/restored from the removable media.
- Page 53 OPERATION MANUAL Multicam LSM 12.05 Ranking (***) Push Aux Clip Sort->TC PostRoll >Archive Name The Ranking function allows assigning a ranking to the current clip. Pressing several times this key will scroll through the different values: 0 (***, not highlighted).
-
Page 54: Clip Functions On The Vga
EVS Broadcast Equipment SA Issue 12.05.A - May 2014 PostRoll Push Aux Clip Sort->TC PostRoll >Archive Name This function enables/disables the post-roll mode. "1PGM+PRV Secondary Menu Controls" on page 24 for more explanations about this mode. Clip/Cam Push Aux Clip Sort->TC PostRoll >Archive... - Page 55 Title Bar The Title bar contains the status information: • Number and name of the EVS server currently selected for clips and for record trains (*). The name is blinking red if it is a network machine. • Total number of clips (i.e. protects, 1 camera angle counting for 1 clip in this count).
-
Page 56: Vga Functions - Clip Screen
EVS Broadcast Equipment SA Issue 12.05.A - May 2014 Clip Information Area The next area is the Clip Information Area which displays the clips of the selected page and bank(s). Two clip banks are displayed at a time. For each clip and camera angle, the following information is available:... - Page 57 OPERATION MANUAL Multicam LSM 12.05 Function Description Name This function is used to name a clip. Clip/Cam This function toggles between CLIP mode and CAM mode. • In CLIP mode, actions on a clip will use all available cameras for this clip.
- Page 58 EVS Broadcast Equipment SA Issue 12.05.A - May 2014 Connect Function (F9) This option calls the CONNECT window. This window allows the operator to connect to the clips and record trains of other machines on the network. The following functions can be used in the CONNECT window: •...
- Page 59 OPERATION MANUAL Multicam LSM 12.05 Clip Management Area Name Capture Field This is the only capture area of the screen. It is used to enter the name to assign to a clip/playlist, or to enter the ID of a clip to recall.
- Page 60 Allows the operator to flag a clip to place it in the archive queue of the XFile defined in the Operational Setup menu (p.7.1 F1) or in the Setup screen. (The EVS Xfile is a 2U device with 2 removable hard drives, that can be connected to the XNet SDTI network.
-
Page 61: Vga Interface - Vdr Panel
The control of a channel from the VDR Panel is concurrent to any other controller that might be assigned to that channel: EVS Remote Panel or external protocol. A command sent from the VDR Panel to a channel will overwrite whatever the channel was doing at that time. -
Page 62: Vga Functions - Vdr Panel
EVS Broadcast Equipment SA Issue 12.05.A - May 2014 The name of the channel currently assigned to each window is displayed on the top of each of them. To assign a new channel to this window, press ALT+H. A new window appears on the other side to allow the selection of a new channel. - Page 63 OPERATION MANUAL Multicam LSM 12.05 The following functions are available to play and browse the current element: Command Description ALT+P Play from / Pause on the current picture ALT+Y Play the current clip in endless loop mode. The play will start from...
-
Page 64: Operations On Clips
Each clip is created in all essences active in the running configuration. • If you change the running configuration, you may be required to clear partially or totally the clips on the EVS server. This ensures the content is always consistent on the EVS server. 4. Clip Management... - Page 65 OPERATION MANUAL Multicam LSM 12.05 • For all essences of a clip, the user sees a single clip, and a single position in the EVS page and bank storage system. • All essences of a given clip will be identical. This means, among others, that they will have the same IN and OUT points, ID, naming, keywords, ranking, auxiliary clip,...
- Page 66 EVS Broadcast Equipment SA Issue 12.05.A - May 2014 Push The availability of the Push function and the essence pushed depend on the configuration, and are explained in the table below. With some essence combinations, the user can specify in which codecs the clip should be pushed, by means of the Codec target setting (Multicam Configuration module, Operation page, Push section) of the source server.
-
Page 67: Creating And Saving Clips
OPERATION MANUAL Multicam LSM 12.05 4.4.2. Creating and Saving Clips Introduction A clip is created by defining and IN and OUT point on a record train, and saving the A/V material between IN and OUT as a clip, hence preventing it to be deleted by the loop recording. - Page 68 EVS Broadcast Equipment SA Issue 12.05.A - May 2014 Example To create a clip in location 213 (page 2, bank 1, location 3): 1. Press SHIFT+Page+F2 to select page 2. 2. Press SHIFT+F1 to select bank 1. 3. Press F3 to select location 3 on the selected page.
-
Page 69: Recalling And Playing Back Clips
If Recall Clip Toggle option is enabled in the Operational Setup menu (p.9.1 F6) or in the Multicam Configuration window (Operation tab, EVS controller section), pressing several times on the same F_ key will call successively all camera angles of that clip. - Page 70 • As long as the OUT point of a growing clip is not available on the EVS server, the LED corresponding to the growing clip location blinks green when it is called and red when it is loaded on the Remote Panel. The clip LED will no longer blink as soon as both IN and OUT points are available on the EVS server.
- Page 71 OPERATION MANUAL Multicam LSM 12.05 In the VGA Interface Introduction In the Clip window, use the keyboard keys to move through pages/banks, as well as select and recall clips. The main commands are detailed in the table below: Moving Around Pages and Banks In order to ...
- Page 72 EVS Broadcast Equipment SA Issue 12.05.A - May 2014 To recall a clip on another server than the one you are connected to, proceed as follows: 1. Enter the 3 or 4 digits of the ID, followed by a slash mark (/) and the network number of the machine (for example 111/03 or 111A/03).
-
Page 73: Deleting Clips
OPERATION MANUAL Multicam LSM 12.05 4.4.4. Deleting Clips Introduction You can delete any clip available on disks as well as growing clips, but: • Loaded clips cannot be deleted. • Clips that are on air cannot be deleted. • In network mode, clips included in a playlist or currently used by another operator cannot be deleted. - Page 74 5. A message is displayed on the video monitor to notify the operation completion. Warning The Clear All Clips command is different from the Clear Video Disks command available in the Maintenance menu of EVS software. • The Clear All Clips command deletes only the unprotected clips.
-
Page 75: Copying And Moving Clips
To copy or move a clip, proceed as follows. 1. Select the original clip. It can be a local, a remote, or a growing clip. 2. Select an empty location locally or on an EVS server connected to the network. The following Copy/Move menu is displayed: Copy Clip 113 to Clip 141... - Page 76 EVS Broadcast Equipment SA Issue 12.05.A - May 2014 3. Select the COPY or MOVE function by pressing the A or B key. The selected function will be highlighted on the Remote Panel and the message will be updated accordingly on the OSD.
- Page 77 OPERATION MANUAL Multicam LSM 12.05 In the VGA Interface Copying and moving clips is performed using the CUT, COPY and PASTE functions available in the Clip Management area. How to Copy a Clip To copy or move a clip, proceed as follows.
-
Page 78: Naming A Clip
EVS Broadcast Equipment SA Issue 12.05.A - May 2014 How to Copy a Clip in the VDR Panel Player To copy a clip from the VDR Panel Player, proceed as follows: 1. Load the original clip 2. Press ALT+S to save the current clip to another location. This creates a copy of the clip. -
Page 79: Restriping Clips
OPERATION MANUAL Multicam LSM 12.05 4.4.7. Restriping Clips Limitation of the Remote Panel Interface The function to restripe the timecode of a clip via the Remote Panel is restricted as follows and you should use the VGA interface to change these parameters: •... - Page 80 EVS Broadcast Equipment SA Issue 12.05.A - May 2014 In the VGA Interface To restripe the timecode of a clip, proceed as follows: 1. Move the cursor on the desired clip and press ENTER or click on it with the stylus to recall it.
-
Page 81: Searching For Clips By Timecode
OPERATION MANUAL Multicam LSM 12.05 4.4.8. Searching for Clips by Timecode Introduction Searching for clips by timecode is only available using the Remote Panel. Note The Reset function resets all default parameters, including the ones related to the material and the TC type to search on. -
Page 82: Shortening A Clip
EVS Broadcast Equipment SA Issue 12.05.A - May 2014 Displaying Results If matching clips are found, the Remote Panel will automatically be in Browse mode (the Browse key is red), allowing the operator to quickly view the frame of each clip corresponding to the requested timecode by rotating the jog dial. -
Page 83: 4.4.10. Canceling A Network Copy
OPERATION MANUAL Multicam LSM 12.05 4.4.10. Canceling a Network Copy In the Remote Panel Interface To cancel a remote copy, proceed as follows: 1. While the clip is copying, its light flashes green. 2. Pressing CLEAR+the corresponding F_ key to cancel the network copy. -
Page 84: 4.4.11. Changing The Primary Camera Of A Clip
EVS Broadcast Equipment SA Issue 12.05.A - May 2014 4.4.11. Changing the Primary Camera of a Clip You can change the primary camera of a clip in the VGA interface. To change the primary camera of a clip, proceed as follows: 1. - Page 85 OPERATION MANUAL Multicam LSM 12.05 Possible Actions on Cue Points Adding Cue Points To add a cue point, press the Mark key. • If Mark cue point is set to Playback, the cue point is added on the current clip.
- Page 86 EVS Broadcast Equipment SA Issue 12.05.A - May 2014 Freezing on a Specific Image To freeze on a specific image, proceed as follows: 1. Make sure the Freeze on cue points parameter is set to Yes in the Multicam Configuration module.
-
Page 87: Playlist Management
All playlists created are automatically stored on the banks dedicated to playlists and timelines on the server, i.e. the bank 10 of each page. Playlists on page 10 are not available from the EVS Remote Panel. These playlists are reserved for external protocols (Odetics, Louth VDCP, EVS AVSP). -
Page 88: Selecting Playlists Or Timelines
“7” refers to the playlist or timeline position (1 to 10) inside bank 10. Note The playlist bank of page 10 is not available from the EVS remote, since it is actually reserved for the EVS AVSP protocol (for Air Box and Air Edit). -
Page 89: Edit And Playout Modes
OPERATION MANUAL Multicam LSM 12.05 5.3. Playlist Functions on the Remote Panel 5.3.1. Edit and Playout Modes Introduction Two modes are available on the Remote Panel to access and manipulate the playlists: The Playlist Edit mode and the Playlist Playout mode: •... -
Page 90: Functions In Playlist Edit Mode
EVS Broadcast Equipment SA Issue 12.05.A - May 2014 Accessing the Playlist Playout Mode When you load a playlist pressing the PLST key on the Remote Panel, you need to press PLST a second time to enter the Playlist Playout mode. - Page 91 OPERATION MANUAL Multicam LSM 12.05 FX Dur The FX Dur function (C key) sets the duration of the transition effect. The default value that initially appears is determined by the value set in the Setup menu. The effect duration will affect the transition at the beginning of the selected clip. Use the lever to to adjust the value, then press ENTER to confirm.
-
Page 92: Functions In Playlist Playout Mode
EVS Broadcast Equipment SA Issue 12.05.A - May 2014 OtherAng The OtherAng (Other Angle) function (SHIFT+C key) allows the operator to replace the current playlist element by another playlist element showing a different angle of the recorded material. When the OtherAng option is selected, Multicam loads the local and network trains that include the TC IN of the playlist element to replace. -
Page 93: Playlist Functions On The Vga
OPERATION MANUAL Multicam LSM 12.05 Skip While the playlist is rolling, the next clip in the sequence is always displayed on the PRV screen. The Skip function allows the operator to discard clips before they go on-air. The clip that will be «skipped» is the one displayed on the PRV screen. This function does not remove the clip from the playlist, but it simply allows it to be skipped during playback. -
Page 94: Vga Playlist Bank Screen
EVS Broadcast Equipment SA Issue 12.05.A - May 2014 Display Depending on the Load Playlist Setting When the Load Playlist parameter is set to ‘Conditional’ in the Operational Setup menu on the Remote Panel (P3.3 F2), the information displayed on the VGA Playlist Screen will... -
Page 95: Editing Functions In Vga Playlist Screen
To use the following commands, you must be in Playlist Edit or Playlist Playout mode: • To enter the Playlist Edit mode, press the PLST key on the EVS Remote. The screen of the Remote Panel displays the information about the previous, current and next three clips of the playlist. -
Page 96: Playlist Management In Multi-Essence
See the Server Configuration manual for more information. When the EVS server runs a multi-essence configuration (Intra+LongGOP) or (Intra+Proxy), the playlists are managed in the same way as in a single essence configuration (Intra only or LongGOP only). -
Page 97: Setting And Loading Playlists
OPERATION MANUAL Multicam LSM 12.05 5.6. Operations on Playlists 5.6.1. Setting and Loading Playlists Introduction A distinction is made between setting and loading a playlist: • When you load a playlist, you actually load it on a given player channel either to edit it or to play it out. -
Page 98: Rolling A Playlist
EVS Broadcast Equipment SA Issue 12.05.A - May 2014 In the VGA Interface To set the current playlist, proceed as follows: 1. From the clip screen, press END to access the playlist bank. 2. Press DOWN ARROW to select the playlist that you want to define as the current playlist. -
Page 99: Deleting Playlists
OPERATION MANUAL Multicam LSM 12.05 5.6.3. Deleting Playlists Note Deleting a playlist deletes all the playlist elements from the playlist as well as the playlist definition in the database. In the Remote Panel Interface To delete a playlist, proceed as follows: 1. -
Page 100: Copying Playlists
Copy Options When you copy a distant playlist from the VGA, or a local/distant playlist from the Remote Panel to the local EVS server, you have different options: • The EDL copy copies only the playlist definition while the playlist elements remain at their original location. - Page 101 OPERATION MANUAL Multicam LSM 12.05 Available Copy Actions The basic principle is that only copies to the local EVS server are possible, whereas copies to a distant EVS server are not supported. The following table provides an overview on the copy actions available from the Remote Panel and from the VGA interface.
- Page 102 EVS Broadcast Equipment SA Issue 12.05.A - May 2014 5. Press COPY (A key) to select the copy option. The menu becomes: Copy Playlist 11/03 to Playlist 13 ? [Menu]: Cancel [Enter]: Confirm COPY PLST+CLP NEW PLST 6. Specify whether to copy the EDL with or without the clips: ◦...
- Page 103 OPERATION MANUAL Multicam LSM 12.05 In the VGA Interface How to Copy a Local Playlist To copy a local playlist, proceed as follows: 1. Press the END key to open the playlist bank. 2. Select the playlist to copy. 3. Press CTRL+C to copy the playlist.
-
Page 104: Naming A Playlist Or Playlist Element
EVS Broadcast Equipment SA Issue 12.05.A - May 2014 Merging Playlists From the VGA Interface, it is possible to merge two playlists by copying a playlist and pasting it to an existing playlist. The copied playlist will be added at the end of the destination playlist. -
Page 105: Consolidating A Playlist
OPERATION MANUAL Multicam LSM 12.05 How to Name a Playlist Element To name the current element in the loaded playlist from the VGA Playlist window, proceed as follows: Note This function is only available when the playlist is the current one in Playlist Edit mode (PLST EDIT) or Playlist Playout mode (PLST DIFF) on the Remote Panel. -
Page 106: Generating A Continuous Tc In A Playlist
EVS Broadcast Equipment SA Issue 12.05.A - May 2014 How to Loop Back a Playlist into the Server To consolidate a playlist using the internal Loop mode, proceed as follows: 1. Add the requested effects to the playlist. 2. Recue the playlist. -
Page 107: Operations On Clips In Playlists
OPERATION MANUAL Multicam LSM 12.05 How to Activate the Continuous Timecode Regeneration To activate the continuous timecode regeneration, proceed as follows: 1. In the Playlist page (F10), press TAB several times until the ON/OFF field after ‘Regeneration of TC’ is green highlighted. - Page 108 EVS Broadcast Equipment SA Issue 12.05.A - May 2014 How to Add Clips at the End of the Current Playlist You can create a playlist very quickly. The experienced operator can include a clip at the end of the playlist containing an action that happened seconds before the playlist is played on air.
- Page 109 OPERATION MANUAL Multicam LSM 12.05 How to Insert the Result of a Clip Search into a Playlist Working Principles • In Playlist Edit mode with a PRV channel, when PRV CTL is enabled, the operator has full control of the PRV channel while the playlist remains loaded on the PGM channel.
- Page 110 EVS Broadcast Equipment SA Issue 12.05.A - May 2014 5. Do one of the following: ◦ To insert only one clip at the end of the playlist, browse to the clip and press ENTERon the Remote Panel. ◦ To insert only one clip into the playlist at the last browsing position, browse to the clip and press SHIFT + INSERTon the Remote Panel.
-
Page 111: Deleting And Moving Playlist Elements
OPERATION MANUAL Multicam LSM 12.05 5.7.2. Deleting and Moving Playlist Elements Introduction Just as you can add clips into a playlist only with the Remote Panel, deleting clips from a playlist or moving clips within a playlist are also performed via the Remote Panel. -
Page 112: Browsing Within A Playlist
EVS Broadcast Equipment SA Issue 12.05.A - May 2014 5.7.3. Browsing Within a Playlist Introduction You can browse within a playlist in different ways in the Remote Panel: • Browse through the content of each clip in the playlist. • Browse quickly by jumping to the first field of each clip in the playlist. -
Page 113: Changing The Camera Angle Of A Playlist Element
OPERATION MANUAL Multicam LSM 12.05 5.7.4. Changing the Camera Angle of a Playlist Element From the Remote Panel, you can change the camera angle of a playlist element if the material is still available in a local or distant record train. -
Page 114: Trimming Clips Into A Playlist
EVS Broadcast Equipment SA Issue 12.05.A - May 2014 Multicam Behavior When adding a cut to a clip, Multicam will behave as follows: • The transition applied at the cut point is a cut (for both audio and video). • The speed of the cut elements is the same as the original element, even if it is “Unknown”. -
Page 115: Sorting The Playlist Elements By Tc In
OPERATION MANUAL Multicam LSM 12.05 How to Trim Clips in a Playlist To trim clips in a playlist, proceed as follows: 1. Browse to the desired element in the playlist. 2. Re-mark a new Short IN or Short OUT. If the clip duration is too short, clear the IN or OUT point by selecting CLEAR and then set the new IN or OUT point at the desired position. -
Page 116: Transition And Audio Operations
EVS Broadcast Equipment SA Issue 12.05.A - May 2014 5.8. Transition and Audio Operations 5.8.1. Overview on Transition Effects Introduction You can apply effects on the audio and video transitions of a clip in a playlist. For each transition, you define the effect type and duration. You can only apply transition effects using the Remote Panel. - Page 117 OPERATION MANUAL Multicam LSM 12.05 Playlist with 1:00 sec Effect Duration In an LSM playlist, the video and audio effects end at the OUT point of a clip, so the duration of clips is shortened by the length of the effect.
- Page 118 EVS Broadcast Equipment SA Issue 12.05.A - May 2014 Effect Type Description Fade to color (>) A fade in effect to a defined color is applied on the previous clip up to the transition in cut mode to the next clip (on which the effect is defined).
- Page 119 OPERATION MANUAL Multicam LSM 12.05 The following table shows which audio transition effect is applied depending on the defined video transition effect. V Fade Fade from Fade to Audio Effect to/from Mute Mute Mute Video Effect √ √ √ Wipe Left ->...
-
Page 120: Adding Transition Effects In A Playlist
EVS Broadcast Equipment SA Issue 12.05.A - May 2014 5.8.2. Adding Transition Effects in a Playlist Transition Effects Commands The functions related to transition effects are available from the main menu of the Playlist Edit mode, and the effects applied are also displayed on the Remote Panel display:... -
Page 121: Swapping Audio Tracks
OPERATION MANUAL Multicam LSM 12.05 The following effect types are available: Command Description Wipe > Fade to color < Fade from color Fade to/from color 4. To modify the default duration for the transition effect, press FX Dur (C) and move the... - Page 122 EVS Broadcast Equipment SA Issue 12.05.A - May 2014 Enabling the Audio Swap Mode To enable the Audio Swap mode, proceed as follows: 1. Enter the Setup menu. 2. Select the Swap audio tracks parameter value in the Operational Setup menu (p.3.2 F4).
- Page 123 OPERATION MANUAL Multicam LSM 12.05 The OSD screen indicates the following information: In eight tracks mode: In dual stereo mode: *PL11/03* LEFT 06:42:22 *PL11/03* LEFT 06:42:22 V Mix 02:25 Spd.Unk V Mix 02:25 Spd.Unk A Mix 02:25 A.Del. 00:00 A Mix 02:25 A.Del. 00:00...
- Page 124 EVS Broadcast Equipment SA Issue 12.05.A - May 2014 Display on the OSD: *PL11/03* LEFT 06:42:22 V Mix 02:25 Spd.Unk A Mix*02:25 A.Del. 00:00 IN-00:00:00 OUT+00:00:27 LOOP: 12:23:45:13 00:07:13 100 112B/04 ClipName 999/999 Swapping Audio Track in Manual Mode If the Manual mode is selected for the Swap audio tracks parameter value in the Operational Setup menu (p.3.2 F4), the swap operates in a similar way but asks the...
-
Page 125: Using The Split Audio Mode
OPERATION MANUAL Multicam LSM 12.05 Deleting Swap Points When you are on a swap point, press CLEAR+IN/OUT to delete the current swap point. All swap points for that timecode are deleted. When you are not on a swap point, press CLEAR+IN/OUT to bring up a confirmation message to delete all swap points for the current clip. - Page 126 EVS Broadcast Equipment SA Issue 12.05.A - May 2014 Default Transition Duration with Split Audio • The simplest type of split audio edit that can be performed on an LSM is to make the video and audio transitions at the beginning of the clip have different durations, such as a 12 Frame Video Mix with a 2 sec Audio cross fade.
- Page 127 OPERATION MANUAL Multicam LSM 12.05 OSD Display On the monitor display, additional information is also displayed when the split audio mode is active: The information displayed below the playback speed will display the audio delay/advance or video delay/advance in frames depending on the editing action applied, or ‘no split’ if no delay or advance is applied.
-
Page 128: Extending A Transition In Split Audio
EVS Broadcast Equipment SA Issue 12.05.A - May 2014 5.8.5. Extending a Transition in Split Audio Introduction Whenever you perform a video or audio split on the Remote Panel, the transition originally set is changed, which means extended on either or both sides of the transition boundaries. - Page 129 OPERATION MANUAL Multicam LSM 12.05 5. Playlist Management...
- Page 130 EVS Broadcast Equipment SA Issue 12.05.A - May 2014 Changing the Audio or Video Effect Duration Introduction When you change the video or audio effect duration, you extend or reduce the duration of the video or audio transition: • In case of Center on cut, the transition is extended/reduced on both sides. This creates an audio delay or advance depending on whether you reduce or extend the transition duration.
-
Page 131: Base Editing In Split Audio
OPERATION MANUAL Multicam LSM 12.05 How to Change the Audio Effect Duration To change the audio effect duration, proceed as follows: 1. Enter the Playlist Edit mode. 2. Browse to the desired clip in the playlist. 3. Press SHIFT+V Base (A). - Page 132 EVS Broadcast Equipment SA Issue 12.05.A - May 2014 Audio is extended from the end of the previous clip and the audio on the clip being edited is shortened. How to Insert an Audio Advance Inserting an audio advance consists of advancing the beginning of the audio transition compared to the video transition.
-
Page 133: A Base Editing In Split Audio
OPERATION MANUAL Multicam LSM 12.05 How to Add an Audio Split When you perform an audio split, you specify the TC for the beginning or the end of the audio transition. In this case, you can choose whether you perform an audio delay or advance. - Page 134 EVS Broadcast Equipment SA Issue 12.05.A - May 2014 How to Insert a Video Advance Inserting a video advance consists of advancing the beginning of the video transition compared to the audio transition. To insert a video advance, proceed as follows: 1.
- Page 135 OPERATION MANUAL Multicam LSM 12.05 Video from the previous clip is extended and video from the clip being edited is shortened. How to Add an Video Split When you perform a video split, you specify the TC for the beginning or end of the video transition.
-
Page 136: Using The Replace Function
EVS Broadcast Equipment SA Issue 12.05.A - May 2014 OUT Key Colors in Playlist Mode • When the Playlist is sitting on the Video and Audio OUT point of a Clip, the OUT key will light red. • When the Playlist is sitting on the Video OUT point of a Clip, the OUT key will light green. - Page 137 OPERATION MANUAL Multicam LSM 12.05 Accessing the Replace Function Press MENU in Playlist Edit mode to open the secondary menu with the Replace function. Select Replace in this menu to access the Replace function : Clr Unav OtherAng Replace MakeLoc...
- Page 138 EVS Broadcast Equipment SA Issue 12.05.A - May 2014 How to Perform a Replace First define the Replace function in the Replace Edit mode. Then execute the Replace function in the Replace Playback mode. To perform a Replace, proceed as follows: 1.
- Page 139 OPERATION MANUAL Multicam LSM 12.05 On the Remote Panel, a confirmation message pops up: Replace in/out by clip xxx ? MENU: Cancel – ENTER: OK 10. Press ENTER on the Remote Panel to validate the Replace: ◦ The material between the IN and OUT points is replaced with the newly created clip.
-
Page 140: Adding An Auxiliary Audio Clip
EVS Broadcast Equipment SA Issue 12.05.A - May 2014 5.8.9. Adding an Auxiliary Audio Clip Introduction This option allows adding a new stereo audio track (e.g. sport comments, music, jingles, ambient sound) to the original video clips. This is only available from the Remote Panel. -
Page 141: Timeline Management
OPERATION MANUAL Multicam LSM 12.05 Timeline Management 6.1. Introduction Description Note The timeline feature is a software option that requires the license code 112 being installed, and is therefore only available on XT3 and XT2+ chassis. For more information on the required license key, contact the Support or Sales team. -
Page 142: Timeline Mode
1. Select the position where the requested timeline is stored on the playlist bank 2. Press the PLST button. Output Assigment The first user of the EVS server gets its first two outputs assigned as follows: • Output 1: TL Recorder. It always displays the edit. -
Page 143: Functions In Timeline Mode
OPERATION MANUAL Multicam LSM 12.05 6.2.2. Functions in Timeline Mode Main Menu Functions The main menu appears as follows on the Remote Panel. The functions with an asterisk are only displayed when they can be used. Speed Fx Dur Effect... - Page 144 EVS Broadcast Equipment SA Issue 12.05.A - May 2014 Secondary Menu Functions The secondary menu appears as follows on the Remote Panel. The functions with an asterisk are only displayed when they can be used. Film FX Delete Match Add Cut...
-
Page 145: Display In Timeline Mode
A2 (Audio2). A timeline created in Multicam always includes two audio tracks. Timeline ID Timeline number and location on the EVS server. The timeline 13 is located on page 1, bank 10 (playlist bank), and position 3. Track selection (*) The asterisk shows the selected tracks, to which the editing actions will be applied. - Page 146 EVS Broadcast Equipment SA Issue 12.05.A - May 2014 Information Type Description TL remaining time Remaining time to the end of the timeline, that is to the last timeline element (black clip). Timeline TC General timecode for the timeline. It gives the nowline position in the timeline.
-
Page 147: Managing Timelines
OPERATION MANUAL Multicam LSM 12.05 6.3. Managing Timelines 6.3.1. Creating Timelines Introduction The timelines can be created in one of the following ways: • Using the Remote Panel, you can create a timeline from scratch, or from an existing playlist or timeline. - Page 148 EVS Broadcast Equipment SA Issue 12.05.A - May 2014 3. Press the B key (CopyToTL option) to copy the source playlist onto the selected position, and convert it at the same time into a timeline. 4. Press ENTER to confirm the copy.
-
Page 149: Copying Timelines
Remote Panel and from the VGA. Possible Copy Actions The basic principle is that only copies to the local EVS server are possible, whereas copies to a distant EVS server are not supported. The following table provides an overview on the copy actions available from the Remote Panel and from the VGA interface. -
Page 150: Editing Timelines
EVS Broadcast Equipment SA Issue 12.05.A - May 2014 6.4. Editing Timelines 6.4.1. Overview of Editing Features Editing Mode Two editing modes are available when you perform editing actions in a timeline: Insert mode or Overwrite mode. Insert Mode The Insert mode works as follows: •... - Page 151 OPERATION MANUAL Multicam LSM 12.05 Supported Editing Features In Multicam, the following editing features are available: Editing Feature Description Insert (3-point edit) Allows inserting a clip or a portion of a clip or record train (audio and/or video) onto any position in the timeline.
-
Page 152: Adding Clips To A Timeline
EVS Broadcast Equipment SA Issue 12.05.A - May 2014 6.4.2. Adding Clips to a Timeline Adding a clip to a timeline is the only editing action you can perform on any timeline on the Remote Panel, whether it has been created in IPEdit or from the Remote Panel. -
Page 153: Inserting Material Into A Timeline
OPERATION MANUAL Multicam LSM 12.05 Multicam Behavior When adding a cut to a clip, Multicam will behave as follows: • The transition applied at the cut point is a cut (for both audio and video). • The speed of the cut elements is the same as the original element, even if it is “Unknown”. - Page 154 EVS Broadcast Equipment SA Issue 12.05.A - May 2014 Three-Point Edit In a three-point edit, three marks must be defined on the recorder and on the player for Multicam to be able to perform the Insert action, as shown below: Recorder...
- Page 155 OPERATION MANUAL Multicam LSM 12.05 Example of Three-Point Edit 6. Timeline Management...
- Page 156 EVS Broadcast Equipment SA Issue 12.05.A - May 2014 Example of Four-Point Edit 6. Timeline Management...
- Page 157 OPERATION MANUAL Multicam LSM 12.05 How to Insert Material Into a Timeline Procedure To perform an Insert (3- or 4- point edit), proceed as follows: 1. Recall the requested timeline by selecting its page (SHIFT+Page+F_ key), bank (SHIFT+F10), and the timeline position (F_ key).
-
Page 158: Deleting Part Of A Timeline
EVS Broadcast Equipment SA Issue 12.05.A - May 2014 6.4.5. Deleting Part of a Timeline Introduction It is possible to delete: • a timeline element on which you define a Mark IN or Mark OUT • a portion of a timeline delimited by a Mark IN and Mark OUT points The Delete action can be performed in Insert or in Overwrite mode: •... -
Page 159: Extending A Timeline Element
OPERATION MANUAL Multicam LSM 12.05 6.4.6. Extending a Timeline Element Introduction The Extend feature in Multicam consists in extending the length of a timeline element by extending the IN or OUT points of a clip as explained below, as long as the material is available. - Page 160 EVS Broadcast Equipment SA Issue 12.05.A - May 2014 Extend From OUT This editing action shifts the IN point of the timeline element which includes the Mark OUT to the defined Mark IN. The following schema shows an example with only the video track selected.
- Page 161 OPERATION MANUAL Multicam LSM 12.05 5. Press the D key (Extend) to perform the Extend action. The LCD display and menu change to become the following one: Extend? [Menu]: Cancel [Enter] : Confirm From In From Out 6. Press the A (Extend From IN) or B key (Extend From OUT) to select the Extend action.
-
Page 162: Changing The Speed Of A Timeline Element
EVS Broadcast Equipment SA Issue 12.05.A - May 2014 6.4.7. Changing the Speed of a Timeline Element Description You can modify the playout speed of the timeline element loaded on your Remote Panel in Timeline mode. You have access to the normal speed range, and to the second lever range. - Page 163 OPERATION MANUAL Multicam LSM 12.05 How to Change the Speed of a Timeline Element To change the playout speed of an element of a timeline loaded in Timeline mode, proceed as follows: 1. Browse to the timeline element you want to increase the speed of.
-
Page 164: Adding Transition Effects In A Timeline
EVS Broadcast Equipment SA Issue 12.05.A - May 2014 4. Select the Overwrite or Insert mode by pressing D on the Remote Panel. By default, the Overwrite mode is active. 5. If you need to access the second lever range, press SHIFT+LEVER. - Page 165 OPERATION MANUAL Multicam LSM 12.05 3. Select the Effect command by pressing SHIFT+D on the Remote Panel. The LCD display of the timeline element changes to show the effect type and duration for each track, on the right of the LSMID and speed.
-
Page 166: Playing Out Timelines
EVS Broadcast Equipment SA Issue 12.05.A - May 2014 6.5. Playing Out Timelines Introduction You can play out: • Any local or remote timeline that has been created on the Remote Panel or in IPEdit. • A local timeline that is still being edited by a Remote Panel or in IPEdit. - Page 167 OPERATION MANUAL Multicam LSM 12.05 In the Remote Panel Interface The information displayed on the Remote Panel in the Timeline Playout mode is the same as in the Timeline Edit mode: TL13 <NAME> LEFT=00:00:00:00 V * 112B 01/04 00:00:25 11:15:15:11...
-
Page 168: Keyword Management
The keyword and ranking assignment, and the search functions, can be performed using the EVS Remote Panel or the VGA screen and PC keyboard. Note These functions are only available if license codes 124 (database search functions) and 125 (keyword assignment functions) are installed on the server. - Page 169 OPERATION MANUAL Multicam LSM 12.05 The operation of both On-Air and Off-Air Keyword screens is entirely similar. • The name of the current keyword file is displayed in the centre of the Title Bar, against a red background. • Many functions for clip management are similar to the Clip screen: ◦...
-
Page 170: Managing Keyword Files
EVS Broadcast Equipment SA Issue 12.05.A - May 2014 7.2. Managing Keyword Files The keyword file is a simple text file: ◦ With a name of maximum 8 characters. ◦ With a .KWD extension. ◦ Located in the Multicam\KWD directory of the server. - Page 171 The operator can select any file from all the .KWD files present in the Multicam\KWD directory. If the machine is connected to other systems on the EVS SDTI network, the network server will automatically distribute its current keyword file to all other users on the network.
- Page 172 EVS Broadcast Equipment SA Issue 12.05.A - May 2014 Editing the Keyword File in the VGA Interface The Keyword file can also be edited directly in the Multicam application using the Off-Air Keyword screen (F7) as illustrated hereunder. This screen is also used to assign keywords to a clip asdescribed in the next section.
-
Page 173: Assigning Keywords
OPERATION MANUAL Multicam LSM 12.05 To edit a keyword in the current file: 1. Move the cursor to the desired keyword location, using either the arrow keys or the stylus. 2. Type the new keyword. It will appear in the Name field at the bottom of the screen. - Page 174 EVS Broadcast Equipment SA Issue 12.05.A - May 2014 Assigning Keywords in List Mode To assign keywords to a clip in list mode, recall the clip, then press MENU to access the secondary clip menu on the Remote Panel. 1player_B101232action_ 6890123keyword8901 F1:action_1 F6:action_6...
- Page 175 OPERATION MANUAL Multicam LSM 12.05 PGM1 Cam A *PRV1* Cam B Push PgmSpd Sw To In Pref >Archive Name P.1 B.1 Clips: Local Records: Local PL 11: < > Msg: Local Sync Prv 2nd CTRL Cam A Cam B Cam C...
-
Page 176: Clearing Keywords
EVS Broadcast Equipment SA Issue 12.05.A - May 2014 7.4. Clearing Keywords In the VGA Interface Clearing a Keyword Using the Keyboard 1. Press the TAB key to move the arrow cursor to the lower area of the screen. 2. A red arrows will appear around one of the keywords or ranking values. -
Page 177: Naming A Clip Using The Keywords
OPERATION MANUAL Multicam LSM 12.05 7.6. Naming a Clip Using the Keywords In the VGA Interface 1. Move the cursor to the desired keyword. 2. Press ALT+N. 3. The keyword is added at the end of the current name if there is enough space left. - Page 178 EVS Broadcast Equipment SA Issue 12.05.A - May 2014 Search Based on Keywords Select the keywords that you want to use as search criteria the same way as you select them during assignment to a clip, in LIST or NUMERIC mode.
- Page 179 OPERATION MANUAL Multicam LSM 12.05 Search LOC / Search NET Once the search criteria are defined: • Use the Srch Loc command (press the C key) to search the local clips database. • Use the Srch Net command (press the D key) to search the entire network database.
- Page 180 EVS Broadcast Equipment SA Issue 12.05.A - May 2014 Return Command Use the Return command (press the A key) to exit the search function without performing any search. In the VGA Interface The Search Window Press F8 to access the search screen. The VGA search screen is made up of several...
- Page 181 OPERATION MANUAL Multicam LSM 12.05 Search Criteria Different criteria can be combined to search the database. They can be defined in the search criteria available at the bottom of the screen. When you access the search screen, the criteria that were last defined are still available on the screen.
-
Page 182: Search Options
EVS Broadcast Equipment SA Issue 12.05.A - May 2014 Criteria Description Keywords This restricts the search to the clips containing all keywords defined in this screen. • Move the cursor to the desired keyword to assign a keyword. • Press ENTER or click on the keyword using the stylus. - Page 183 OPERATION MANUAL Multicam LSM 12.05 • To clear all criteria at once: ◦ Press ALT+DEL or click on ALT+DEL:CLR ALL. ◦ All keywords, timecode, Date From and Date To fields assigned as search criteria are removed. ◦ The ranking is reset to the lowest level (“-“).
- Page 184 EVS Broadcast Equipment SA Issue 12.05.A - May 2014 For each clip, the following information is displayed: • Position in the list • Clip ID • Clip name • Timecode of Short IN and Short OUT points ◦ Timecodes from the LTC table are displayed in grey/black.
-
Page 185: Operation On Xnet Network
Operation on XNet Network 8.1. Overview The XNet Network is set up in the EVS application. For more information, on how to set up the XNet Network and connect to the XNet network, refer to the section ‘SDTI Network’ in the Configuration manual. -
Page 186: Local Mode
EVS Broadcast Equipment SA Issue 12.05.A - May 2014 The LCD display returns to the normal mode and the names of the remote systems are now displayed after the Page and Bank information as illustrated hereunder: PGM1 112B/04 *PRV1* CAM B... - Page 187 OPERATION MANUAL Multicam LSM 12.05 In the VGA Interface Once the desired mode and the remote system are selected on the Remote Panel, the names of the remote systems are displayed in the title bar of the Clip screen as illustrated hereunder.
-
Page 188: Recalling And Playing Back A Remote Clip
EVS Broadcast Equipment SA Issue 12.05.A - May 2014 8.3. Recalling and Playing Back a Remote Clip In the Remote Panel Interface To recall/play back a remote clip, proceed as follows: 1. Select the Clip mode in the Network menu. 2. Select the remote LSM from the list. The LCD display returns to the normal mode. -
Page 189: Naming A Remote Clip
OPERATION MANUAL Multicam LSM 12.05 8.4. Naming a Remote Clip Note This operation requires action on both the Remote Panel and the VGA interface. To name a remote clip, proceed as follows: 1. Select the Clip mode in the Network menu. -
Page 190: Inserting Remote Clips Into A Playlist
EVS Broadcast Equipment SA Issue 12.05.A - May 2014 8.6. Inserting Remote Clips into a Playlist In the Remote Panel Interface To insert remote clips into a playlist, proceed as follows: 1. Select the remote LSM via the Network menu. 2. Select a remote clip in the banks. The corresponding F_ key lights red. -
Page 191: Creating Local Clips With Remote Record Trains
OPERATION MANUAL Multicam LSM 12.05 8.8. Creating Local Clips with Remote Record Trains In the Remote Panel Interface To create local clips with remote record trains, proceed as follows: 1. Select the Record mode in the Network menu. 2. Select the remote LSM in the list. The LCD display returns to the normal mode 3. -
Page 192: Working With Mapped Network Cameras
EVS Broadcast Equipment SA Issue 12.05.A - May 2014 8.9. Working with Mapped Network Cameras If you have activated the Authorize cam mapping parameter (p.10.1 F1) and define mapped network cameras (p.10.1) in the Operational Setup menu of the Remote Panel, you can use other network cameras as if they were local cameras. -
Page 193: Advanced Control Modes
Rolling a clip while in the Loop mode, in Painting, and dissolving paint image on/off allow for a very powerful feature. Warning The Paint mode is not available on EVS servers: • working with 10-bit codecs. •... -
Page 194: Monitor Display
EVS Broadcast Equipment SA Issue 12.05.A - May 2014 9.1.2. Monitor Display The following functions are available on the monitor display in Paint mode. They are detailed in the next section. Displayed letter Function C (clear) Clear screen. Enable line mode («one-shot»). -
Page 195: Function Description
OPERATION MANUAL Multicam LSM 12.05 Displayed letter Function Play back the clip at slow motion speed. The speed of slow motion is predefined in the PGM Speed/Var max parameter in the Operational Setup menu (p.9.1 F3). Play back the current clip at normal speed. - Page 196 EVS Broadcast Equipment SA Issue 12.05.A - May 2014 Circle Drawing (O) To draw a circle, proceed as follows: 1. Select O on the Paint mode monitor display. 2. In the displayed menu, choose between the following options: • Set center (default): A pointer appears on the screen to let you set the center of the circle.
- Page 197 OPERATION MANUAL Multicam LSM 12.05 Color and Density (D) To set the drawing color and the line thickness, proceed as follows: 1. Select D on the Paint mode monitor display. 2. Select the desired color from the display. 3. Select the desired line thickness.
-
Page 198: Target Mode
You can operate these functions within the software package using the tablet and the stylus. Change the pointing device parameter in the Operational Setup menu (p.9.2 F2) to toggle between the tablet. Note The Target mode is not available on EVS servers working with 10-bit codecs. 9. Advanced Control Modes... -
Page 199: Monitor Display
OPERATION MANUAL Multicam LSM 12.05 9.2.2. Monitor Display The following functions are available on the monitor display in Target mode. They are detailed in the next section. 9. Advanced Control Modes... - Page 200 EVS Broadcast Equipment SA Issue 12.05.A - May 2014 Upper Display Line Displayed letter Function <K> Indicates a keyframe has been marked on the current field. Use left and right arrows to go to previous or next keyframe (if available). Erases currently displayed keyframe.
-
Page 201: Tracking Object Creation
OPERATION MANUAL Multicam LSM 12.05 9.2.3. Tracking Object Creation 1. Select the type of tracking object to use. 2. The character on the left of the “T” letter on the 1 line of the OSD shows the current object: Character Current object O (letter “o”) -
Page 202: Managing Keyframes
EVS Broadcast Equipment SA Issue 12.05.A - May 2014 4. Once the tracking object is positioned correctly, mark a keyframe: ◦ By pressing the button of the stylus, ◦ By clicking on the M sign on the monitoring screen. The K appears in the upper left corner indicating that a keyframe has been marked. -
Page 203: Managing The Zoom Option
OPERATION MANUAL Multicam LSM 12.05 Rules When Using Keyframes • The first / last keyframe can be at the IN / OUT points of the clip. • If, when a replay is viewed, the action is not accurately followed, stop the replay where the tracking object has drifted away from the target and use the pen to move the object to the correct point, marking an additional keyframe. -
Page 204: Offside Line Mode
The Epsio mode offers a more advanced offside line feature, as well as other live tools, when the EVS server is used in combination with the Epsio application. For more information, refer to the Epsio user manual. -
Page 205: Accessing The Offside Line Mode
OPERATION MANUAL Multicam LSM 12.05 9.3.2. Accessing the Offside Line Mode 1. To activate the Offside Line mode, set the following parameters in the Operational Setup menu on the Remote Panel: ◦ Set the Internal offside line parameter (p.12.3 F1) to Yes. -
Page 206: Commands Description
EVS Broadcast Equipment SA Issue 12.05.A - May 2014 9.3.3. Commands Description The following commands are available on the Remote Panel to control and manage the Offside Line option: Main Menu The offside line menu displays as follows while the Mark key is blinking:... -
Page 207: Marking An Offside Line
OPERATION MANUAL Multicam LSM 12.05 9.3.4. Marking an Offside Line To mark an offside line on a clip or on a record train, proceed as follows: 1. Load the clip or train on the PGM1. 2. Jog to the position where the offside line should be marked. -
Page 208: Editing An Offside Line
EVS Broadcast Equipment SA Issue 12.05.A - May 2014 9.3.5. Editing an Offside Line Once the offside line is created, you can again load the sequence and edit it. To edit an existing offside sequence, proceed as follows: 1. In the Offside Line mode, press Last Cue until you reach the cue corresponding to the requested offside sequence. -
Page 209: Split Screen Mode
OPERATION MANUAL Multicam LSM 12.05 9.4. Split Screen Mode 9.4.1. Introduction The Split Screen mode, which is a software option, allows a simple split screen effect on PGM 1. This mode operates very similarly to the 2PGM mode, except that the two outputs are now left and right parts of the screen (vertical split screen) or top and bottom part of the screen (horizontal split screen) or mixed together on the entire screen (Split Mix mode). - Page 210 EVS Broadcast Equipment SA Issue 12.05.A - May 2014 Screen Description Commands Description Command Description V SPLIT / H SPLIT Toggles between horizontal and vertical Split screen menus Swap To swap sources from both sides Sync To synchronize the selected PGM with the other one. Press this button and select the PGM to use as a reference.
-
Page 211: Using Horizontal Split
OPERATION MANUAL Multicam LSM 12.05 • Press the SHIFT+D to enter this mode. The menu will change, as shown above. • Press the <–Lf–> key, and move the command knob to centre the left side picture. • Press the <–Rg–> key and do the same operation for the right side picture. - Page 212 EVS Broadcast Equipment SA Issue 12.05.A - May 2014 Screen Description Commands Description Command Description V SPLIT / H SPLIT Toggles between horizontal and vertical Split screen menus Swap To swap sources from both sides Sync To synchronize the selected PGM with the other one. Press this button and select the PGM to use as a reference.
-
Page 213: Using Mixed Split
They record a buffer of images in an internal memory. This buffer can then be ingested into an EVS server via the standard SDI connection. In doing so, a hypermotion camera is considered as a standard camera by the server. -
Page 214: Controlling The Hypermotion Camera
When the EVS server works in hypermotion mode, it must run a Multicam LSM configuration. The aim of the hypermotion mode is to enable the use of a standard EVS Remote to control the hypermotion camera. Though most commands are identical for such cameras, the last part of this chapter lists some of the supported cameras model along with their specific features. - Page 215 OPERATION MANUAL Multicam LSM 12.05 PLAY This key corresponds to the 'Play' command on the hypermotion camera. Pressing this key initiates a replay from the first available frame on the current memory block. The corresponding CAM key flashes green to indicate the playback status.
- Page 216 EVS Broadcast Equipment SA Issue 12.05.A - May 2014 RECORD This key corresponds to the ‘ARM’ or ‘REC’ commands on hypermotion cameras. The different behaviors are possible, depending on various conditions: • In single-block memory, pressing this key deletes the material recorded on the camera and starts the recording process on the camera.
- Page 217 OPERATION MANUAL Multicam LSM 12.05 CAM Keys When you press a CAM key corresponding to a recorded block, this loads the last recorded frame of the selected block in play mode. When you press a CAM key corresponding to a block in REC, this loads the last recorded frame of the selected block in play mode, and the recording starts on the next empty block, if available.
- Page 218 EVS Broadcast Equipment SA Issue 12.05.A - May 2014 Last Cue Parameter The Last Cue parameter defines the Last Cue button function when the Cuesparameter is Off. Ramp UP SpeedBrk LSM Mode Block 1 Block 2 • The Last cue parameter can be set to Ramp Up (the default value): ◦...
- Page 219 Creating a Clip from a Hypermotion Camera When the camera is replaying its content into the EVS server, you can clip it automatically directly from the remote controlling the camera. Use the IN and OUT keys and the F_ keys to clip the record train corresponding to the hypermotion camera and to store it at a clip position.
- Page 220 EVS Broadcast Equipment SA Issue 12.05.A - May 2014 Managing Cue Points When the controller controls the camera, press Mark to define and set up to 255 cue points. You can add the cue points on the current block in record mode.
- Page 221 OPERATION MANUAL Multicam LSM 12.05 Color Code for Memory Block Status The memory blocks status are displayed using a common color code both directly on the corresponding CAM keys on the LSM Remote Panel, and on the OSD monitoring of the recorder corresponding to the hypermotion camera.
- Page 222 EVS Broadcast Equipment SA Issue 12.05.A - May 2014 Working with Multiple-Block Memory The general recording and playback process when controlling the camera using a multiple- block memory is the following: 1. Press the A to D CAM key corresponding to the memory block (1 to 4) on which you want to record the material.
- Page 223 OPERATION MANUAL Multicam LSM 12.05 3. Press TAKE to stop recording on the current block, and start recording on the next available one (block 2). At the same time, the playback starts on block 1. Block 1 Block 2 Block 3 Block 4 4.
- Page 224 EVS Broadcast Equipment SA Issue 12.05.A - May 2014 How to Use Speedbreak 1. Make sure the Speedbreak mode is active on the Remote Panel (See section "LCD Menu on the Remote Panel" on page 205). 2. Call a sequence back by pressing the CAM key of the requested block (for example).
-
Page 225: Specific Camera Features
OPERATION MANUAL Multicam LSM 12.05 9.5.3. Specific Camera Features Introduction The subsections below describe the differences and variations of several camera models against the standard features described previously in this chapter. The following sections are based on the manufacturer's camera name. The table below... - Page 226 EVS Broadcast Equipment SA Issue 12.05.A - May 2014 FOR-A VFC-7000 Camera Application Start At application start, the recording starts on the first memory block. Parameter Values The tables below list the parameter value, or value range that are specific to the camera.
- Page 227 OPERATION MANUAL Multicam LSM 12.05 Cue Points Management Note The cue points are only operational when all memory blocks have been recorded once. • When a new ARM/REC command is issued on a block, all its cue points are cleared.
- Page 228 EVS Broadcast Equipment SA Issue 12.05.A - May 2014 The operational parameters are defined in the Hypermotion mode of the Remote Panel, in the LCD secondary menu. Operational Parameter Value Range Default Value # Blocks 1 to 4 Pre-Roll from 00s00fr to 5s00fr...
- Page 229 OPERATION MANUAL Multicam LSM 12.05 • Cue points can be marked across several blocks but the recall is limited to the currently selected block. Example: ◦ While recording on memory block 1, mark cue points 1, 2, and 3 on memory block ◦...
- Page 230 EVS Broadcast Equipment SA Issue 12.05.A - May 2014 5. Press TAKE to stop the record on block 1 and start the record on the first empty block (block 2). Playback starts on block 1. Block 1 Block 2 Block 3 Block 4 6.
- Page 231 OPERATION MANUAL Multicam LSM 12.05 Parameter Values The tables below list the parameter value, or value range that are specific to the camera. The configuration parameters are defined in the Multicam Configuration window, Operation page, Hypermotion controller section. Configuration Parameter...
- Page 232 EVS Broadcast Equipment SA Issue 12.05.A - May 2014 Hi-Motion II Camera Camera Names The cameras manufactured by NAC/Ikegami are sold as Hi-Motion II cameras on the market. Application Start At application start, this camera is in ARM mode and the recording starts on the first memory block.
- Page 233 OPERATION MANUAL Multicam LSM 12.05 • CAM key: When the CAM key is pressed for the first time after selecting the number of blocks you want to work with, the block is loaded at the frame specified in the camera menu. When the CAM key is pressed subsequently, the block is loaded at the last frame it was last loaded on.
- Page 234 EVS Broadcast Equipment SA Issue 12.05.A - May 2014 Photron Camera Camera Names The cameras manufactured by Photron are sold under the following product name: • FASTCAM Application Start At application start, this camera is in ARM mode and the recording starts on the first memory block.
- Page 235 OPERATION MANUAL Multicam LSM 12.05 Cue Points Management • When a new ARM/REC command is issued on a block, all its cue points are cleared. • If the Last Cue command cannot access the desired TC preroll, the player remains on the current cue point.
- Page 236 EVS Broadcast Equipment SA Issue 12.05.A - May 2014 Parameter Values The tables below list the parameter value, or value range that are specific to the camera. The configuration parameters are defined in the Multicam Configuration window, Operation page, Hypermotion controller section.
-
Page 237: Video Delay
SHIFT+F7 on the keyboard. In this case, only the play channels assigned to user #1 (i.e. the 1 EVS Remote Panel if the base configuration is LSM or maXS, or the 1 protocol if the base configuration is in slave mode). - Page 238 EVS Broadcast Equipment SA Issue 12.05.A - May 2014 For each play channel, the operator can adjust: • the video and audio source (camera angle, and source server if several units are connected on an SDTI network); • the desired delay in hh:mm:ss:fr.
-
Page 239: Sony, Xtendd35, Odetics & Vdcp Protocols
OPERATION MANUAL Multicam LSM 12.05 9.7. Sony, XtenDD35, Odetics & VDCP Protocols These protocols allow the server to be controlled by external devices. Sony BVW75 Protocol This protocol allows the server to be seen as a VTR by the controlling device. On a playback channel, all usual transport commands (play, PlayVar, pause, goto timecode, pause, stop, etc…) are supported. - Page 240 EVS Broadcast Equipment SA Issue 12.05.A - May 2014 Louth VDCP Protocol This protocol is a more complex protocol mainly used by automation systems but also by Sony switchers. It is not based on the Sony BVW75, and can handle clips as well as playlists.
- Page 242 Belgium www.evs.com/contact EVS Broadcast Equipment is continuously adapting and improving its products in accordance with the ever changing requirements of the Broadcast Industry. The data contained herein is therefore subject to change without prior notice. Companies and product names are To learn more about EVS go to www.evs.com...
Need help?
Do you have a question about the Multicam LSM and is the answer not in the manual?
Questions and answers