Table of Contents
Advertisement
Advertisement
Table of Contents

Related Manuals for MASTERFLAME TED25 G3


Summary of Contents for MASTERFLAME TED25 G3
- Page 2 fire, electric shock or injury to persons. licensed tap (outlet/power strip). 19.The heater has a safety device that makes it stop working once the inner temperature reaches 85º (± 2°C). To reset the appliance, turn heater off and disconnect power, let it cool off for 10 minutes and plug back in.
- Page 3 26 3/8 x 7 x 20 inch 67 x 17.9 x 50.8 cm 11.3 kg / 12.4 kg...
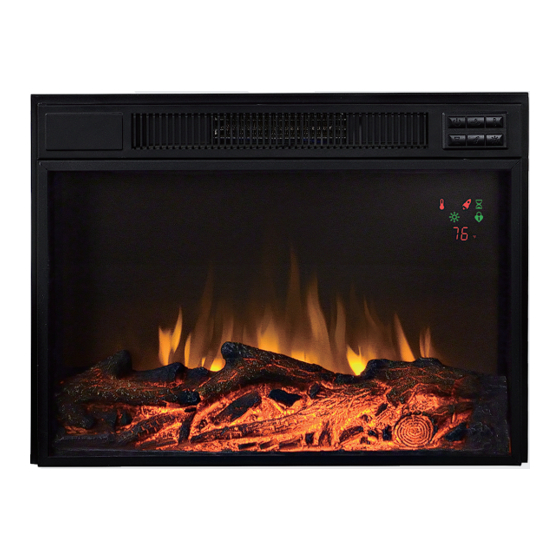
- Page 4 OPERATING INSTRUCTIONS Control Panel Indicators Figure 2 When a function is changed from the control panel or remote there will be a corresponding indicator displayed. The indicator shows the function changed and the level selected. When the function is turned off, the corresponding indicator will fade off. Figure 3...
- Page 5 OPERATING INSTRUCTIONS FUNCTION ICON DESCRIPTION This button will not only put the fireplace insert in a standby mode, but also you can see the flame effect through the screen. This will turn off all functins at once. POWER Note: Holding the POWER button for 3 seconds will turn on the Child safety lock. It disables or enables all functions on the control panel and remote control.
- Page 6 TROUBLESHOOTING GUIDE PROBLEM POSSIBLE CAUSE CORRECTIVE ACTION Inspect the heater and check that the air inlets and outlets are not blocked as this may cause overheating. Unplug the heater Manual Reset overheat Display shows “E1”. for 10 minutes and allow it to cool down. Plug back in and turn protection has triggered.
- Page 7 REPLACEMENT PARTS LIST AND EXPLODED VIEW For replacement parts, please call 1-888-463-5698 or visit www.homestarna.com, 7:00 am –5:00 pm CST, Monday – Friday. Part Part Name Flame Generator Drive Motor Heater/Blower Assembly Main Circuit Board Thermostat Sensor Control Panel Circuit Board Control Panel Buttons Emberbed with Log Emberbed Circuit Board...
- Page 8 INSTRUCTIONS cleaning the appliance. REPLACING THE REMOTE DISPOSING OF USED CONTROL BATTERY BATTERIES When the remote control stops operating or its range seems reduced, The batteries may contain hazardous substances that could it is time to replace the battery with new ones. endanger the enviroment and human health.
- Page 9 Contact us at www.homestarna.com or call our customer service department at 1-888-463-5698, 7:00 a.m. – 5:00 p.m. CST, Monday – Friday. Make sure you have your warranty, your sales receipt, location of purchase and the model / serial number of your product. FOR CUSTOMER SERVICE: MADE IN CHINA CUSTOMER@HOMESTARNA.COM...
- Page 10 19. Cet appareil a un dispositif de sécurité qui l'arrête automatiquement si la température interne atteint 85º (± 2°C). Pour réinitialiser l'appareil, mettez les commandes en position d'arrêt (off) et débranchez l'appareil de la prise murale. Laissez l'appareil refroidir durant 10 minutes, puis rebranchez-le et remettez-le en marche.
- Page 11 26 3/8 x 7 x 20 po 67 x 17,9 x 50,8 cm 11,3 kg / 12,4 kg...
- Page 12 INSTRUCTIONS D’OPÉRATION Panneau de commande Indicateurs Figure 2 Lorsqu’une fonction est activée à partir du panneau de commande ou sur la télécommande l'indicateur correspondant apparaîtra sur le panneau de verre. L’indicateur montre la fonction qui a été choisie et le niveau sélectionné. Lorsque la fonction est désactivée, le témoin correspondant s'éteint.
- Page 13 INSTRUCTIONS D’OPÉRATION FUNCTION ICÔNE DESCRIPTION Ce bouton met le foyer en mode de veille et l’effet de flames est visible. II arrêtera aussi toutes les fonctions. ALIMENTATION Remarque: Maintenez le bouton POWER pendant 3 secondes pour allumer le verrouillage de sécurité pour enfants, désactiver ou active toutes les fonctions sur le panneau de commande et la télécommande.
- Page 14 GUIDE DE DÉPANNAGE PROBLÈME CAUSE PROBABLE ACTION CORRECTIVE Inspectez l'appareil et vérifiez que les entrées et les sorties d’air ne sont pas obstruées car cela peut causer une surchauffe. La protection à réinitialisation L’affichage indique “E1”. Débranchez le foyer pendant 10 minutes et laissez-le refroidir. manuelle contre la surchauffe Rebranchez-le et remettez-le en marche, en le surveillant pour s’est déclenchée.
- Page 15 LISTE DES PIÈCES DE RECHANGE ET VUE ÉCLATÉE Pour obtenir des pièces de rechange, s'il vous plaît appelez le 1-888-463-5698 ou visit www.homestarna.com, entre 7 h et 17 h, HNC, du lundi au vendredi. Pièce Nom de la pièce Moteur du générateur de flamme Ensemble Chauffage/Ventilateur Circuit imprimé...
- Page 16 DIRECTIVES D'ENTRETIEN foyer. câblage REMPLACEMENT DE LA PILE MISE AU REBUT DES DE LA TÉLÉCOMMANDE PILES USAGÉES Lorsque la télécommande s’arrête de fonctionner ou sa puissance Les piles peuvent contenir des substances dangereuses qui semble réduite, il est temps de remplacer les pile. pourraient mettre en péril l’environnement et la santé...
- Page 17 Contactez-nous au www.homestarna.com ou appellant le service à la clientèle au 1-888-463-5698, entre 7 h et 17 h, HNC, du lundi au vendredi. Assurez-vous d'avoir en mains votre garantie, votre reçu de vente, le lieu d'achat anisi que les numéro de modèle et de série de votre produit. SERVICE À...
- Page 18 FOR CUSTOMER SERVICE: / SERVICE À LA CLIENTÈLE : CUSTOMER@HOMESTARNA.COM 1-888-463-5698 WWW.HOMESTARNA.COM IF YOU HAVE ANY PROBLEMS OR QUESTIONS, EMAIL OR CALL CUSTOMER SERVICE BEFORE YOU RETURN THIS PRODUCT TO THE STORE WHERE IT WAS PURCHASED. SI VOUS AVEZ DES PROBLÈMES OU QUESTIONS, ENVOYEZ UN COURRIEL AU SERVICE À...
- Page 19 1609R2...
- Page 22 Ф 5.8X30mm Ф 7X25mm Ф 13X11mm Ф 7.8X30mm Ф 15X12mm Ф 7.5X36.3mm C x 18 F x 10 A x 14 B x 14 D x 21 E x 18 Ф 3X16mm 6.5X76mm Ф 5X50mm Ф 4X40mm Ф Ф 7.8X50mm J x 2 K x 12 H x 4...
- Page 23 160˚~185˚...
- Page 24 A x 2 B x 4 C x 7...
- Page 26 A x 2 B x 4 C x 7...
- Page 28 D x 5 E x 4 F x 2 G x 2 H x 2...
- Page 30 D x 5 E x 4 F x 2 G x 2 H x 2...
- Page 32 I x 8...
- Page 34 A x 7 J x 2 K x 4...
- Page 36 D x 3...
- Page 37 L x 2...
- Page 38 D x 4 E x 5 F x 1...
- Page 40 D x 4 E x 5 F x 1...
- Page 43 B x 6 C x 4...
- Page 45 A x 3 F x 4...
- Page 46 X x 1...
- Page 47 K x 8 Z x 8...
- Page 48 M x 1 N x 1 O x 2 P x 8 Q x 1...
- Page 49 M x 1 N x 1 O x 2 P x 8 Q x 1...
- Page 50 P x 8 R x 8...
- Page 51 S x 1 T x 2 U x 2 V x 2 Y x 2...
- Page 52 L x 2 T x 2 W x 2 Y x 2 WARNING : Young children may be injured by tipping furniture. The use of a tipping restraint is highly recommended. This hardware, when properly installed, could provide protection against the unexpected tipping of furniture due to improper use.
- Page 53 IMPORTANT INSTRUCTIONS / INSTRUCTIONS IMPORTANTES ASSEMBLY INSTRUCTIONS / INSTRUCTIONS DE MONTAGE Step 30 / Etape 30 MAXIMUM LOAD 110.0 lbs (49.9 kg) CHARGE MAXIMALE 110,0 lbs (49,9 kg) MAXIMUM LOAD 80 lbs (36.3 kg) CHARGE MAXIMALE 80 lbs (36,3 kg) MAXIMUM LOAD 13 lbs (5.9 kg) CHARGE MAXIMALE 13 lbs (5,9 kg) WARNING...
- Page 56 1609R2...
Need help?
Do you have a question about the TED25 G3 and is the answer not in the manual?
Questions and answers