Advertisement
Quick Links
READ ALL PAGES BEFORE STARTING TO TUNE!
MaptunerX can be used with vehicles that were previously added to Maptuner 1
Once your vehicle is added to the MaptunerX, do not attempt to use Maptuner1 on the same vehicle.
The screenshots in this manual might differ from the actual screens on your MaptunerX. We are
constantly adding new functions and features. Some functions are not included with your
tuning license and must be purchased separately
This device supports:
2004-2016
600 ACE, 900 ACE , 1200 4tech, 1200 ACE
Maverick . NA & Turbo
SVHO/SHO/HO 2008-2016
300/ 310
Quick Start Guide
1
Updated 7/5/2016
Advertisement

Subscribe to Our Youtube Channel
Summary of Contents for riva racing maptuner x
- Page 1 Quick Start Guide READ ALL PAGES BEFORE STARTING TO TUNE! MaptunerX can be used with vehicles that were previously added to Maptuner 1 Once your vehicle is added to the MaptunerX, do not attempt to use Maptuner1 on the same vehicle. The screenshots in this manual might differ from the actual screens on your MaptunerX.
- Page 2 Parts Required A. RIVA Maptuner X Quickly and easily load performance tunes into your watercraft, ATV or UTV eliminating the need to ship out your ECU for programming. Features a slick, full color, touch screen display. There is no limit to the number of vehicles or tunes you can reflash with the MaptunerX.
-
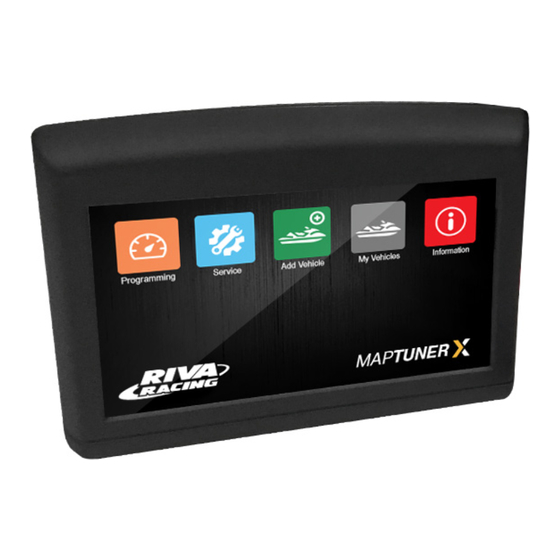
Page 3: Icon Definitions
Icon Definitions Programming Use the programming button to select the files that have been downloaded onto a Riva Maptuner device in order to add to a water- craft’s ECU. Will be able to see all downloaded maps, as well as the watercraft requirements for each particular map. Download as many tunes as you want. - Page 4 Step 1 Download and install My Maptuner software according to your Windows OS version. https://maptuner.se/download/Default.aspx Step 2 Open My Maptuner software. Then click New User. Enter your Email, Full Name, and Software Code that you received when purchasing your license. Your screen should look like this: MyMaptuner MyMaptuner...
- Page 5 Step 3 Plug MaptunerX in to your computer and click the Synchronize button. MaptunerX will now go online and update firmware. To update MaptunerX press the Synchronise button Step 4 Important when tuning 300 HP models When programming to the ECU of 300 HP models its very important that you remove the fuses for the IBR and IBR monitor systems or else the programming might fail and you will need to recover the ECU.
- Page 6 Step 5 Unplug MaptunerX from computer and plug the MaptunerX in to the OBD connector on your vehicle (See Fig. 2 - 7). Fuses & OBD Connector Location Fuses & OBD Connector Location Open the seat and you will see the connector Open the front compartment and remove the close to the fuel tank.
- Page 7 OBD connector location: Open the left side panel so that you can access this area (Fig. 6 & 7). Step 6 When connected, power your craft by: 1. Insert the DESS key/lanyard (Fig. 8). 2. Press start/stop button on handlebar switch (Fig. 9). 3.
- Page 8 Step 7 Now press Add Vehicle button. Press the Add Vehicle Button to begin. Your craft will now be identified and stored on the MaptunerX. This may take several minutes depending on the ECU. Press to add this vehicle to your collection of vehicles.
- Page 9 Your screen should look like this: My Maptuner Logout... Options My Maptuner My Maptuner TECH SUPPORT: M-F 9am-6pm EST/US 954-785-2684 Select Maptuner Select Maptuner Choose Your Maptuner: Choose Your Maptuner: Select MaptunerX Connect MapTuner... Connect Maptuner 1 Maptuner X Cancel Logging My Maptuner v2.3.64.42540...
- Page 10 Step 10 You will now need a license code.This can be bought from rivaracing.com or an authorized RIVA Racing dealer. My Maptuner Request software for XXXXXXXXXXXX Logout... Options Seadoo 300 1630 CC My Maptuner 0420864374 78 300 1600 Racing TECH SUPPORT:...
- Page 11 IMPORTANT- Installing the wrong tune for your performance package may lead to poor performance and/or engine damage. RIVA Racing is not responsible for any substitution in parts or other modifications that lead to poor performance or engine damage. Step 11 Unplug MaptunerX from computer and plug the MaptunerX in to the OBD connector on your vehicle (See Fig.
- Page 12 Step 12 1. Insert the DESS key/lanyard (Fig. 14). 2. Press start/stop button on handlebar switch (Fig. 15). 3. Be sure the gauge cluster is ON (Fig. 10). PRESS Step 13 Press the My Vehicles button to confirm that your craft’s ID or VIN is active.
- Page 13 Download IMPORTANT- Installing the wrong tune for your performance package may lead to poor performance and/or engine damage. RIVA Racing is not responsible for any substitution in parts or other modifications that lead to poor performance or engine damage.
- Page 14 Step 16 For 300 HP Models Only: Once the programming is finished, replace the fuses that you removed at the beginning of the flashing process. (Fig. 16) Step 17 You now need to remove Error Codes from the craft. Press Service Button to enter the Service Section.
- Page 15 Step 18 Press the Fault Codes button to read and clear error codes on your watercraft. Press the Fault Codes button to read and clear errors. Step 19 Press the Read button to identify all fault codes, Read and then press the Clear button to remove all the Clear codes.
- Page 16 Step 20 Once the Error codes are cleared, disconnect MaptunerX from vehicle (Fig. 18) and re-insert the OBD connector to it’s original position (Fig. 19). The tuning process is now complete! How to recover ECU if flash fails MaptunerX has a recovery option built in, so you can always recover an ECU if a flash fails. If a flash fails then you can try to download the same file again or the stock file.
-
Page 17: Technical Support And Warranty
Additional Limitations RIVA Racing agrees to repair or at RIVA’s option, replace any defective unit without charge, if product is returned to RIVA Racing freight prepaid within the warranty period. Any equipment returned which, inRIVA’s opinion, has been subjected to misuse, abuse, overheating or accident shall not be covered by this warranty.
Need help?
Do you have a question about the maptuner x and is the answer not in the manual?
Questions and answers