
Summary of Contents for Makerfire BNF Micro FPV
- Page 1 Makerfire BNF Micro FPV Racing Quad With F303 Betaflight Flight Controller Version 0.1 Website: www.crazepony.com Email: info@crazepony.com...
-
Page 2: Table Of Contents
Content Key Features............................. 3 Specifications............................ 3 Set up..............................6 Binding Procedure........................6 Status LED............................7 Flight Controller Set Up.......................7 Flight Modes Settings........................9 Accelerometer and Gyro Calibration..................9 AIO FPV Camera Setup......................10 Ready to Fly..........................11 Flash Firmware..........................12 Binding & Betaflight Setup Procedure with External FrSky RX..........15 Note &... -
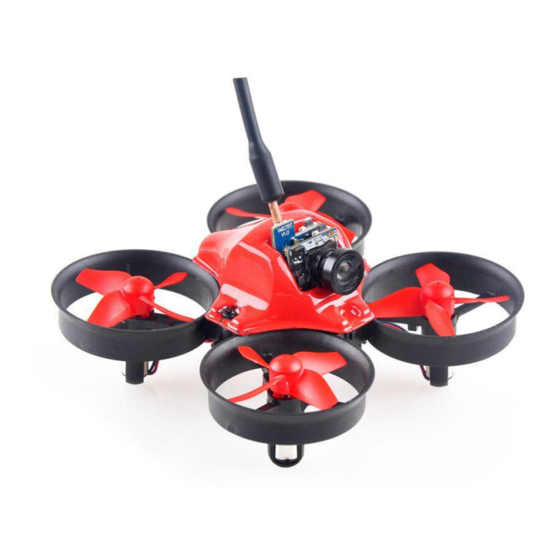
Page 3: Key Features
Makerfire BNF Micro FPV drone integrated F3 EVO Brushed FC ,Frsky D8 or Spektrum DSM protocol receiver, 25mW AIO camera, special sauce edition motors and 200mAh battery, this MICRO FPV is capable of flying in the smallest of places with ease and much more like a racing quad than a toy quad. - Page 4 F3 EVO flight controller: Fully programmable through Betalfight using the on board USB port! Tune all the parameters, PID's, and rates to your perfect settings! 17500kv these motors: Considerably more powerful than almost all of the motors used for Tiny Whoop style aircraft,without encountering considerable oscilations.
- Page 5 10°tilt camera mount: Perfect angle for Tiny Whoop flight. At this angle the pilot can still see everything ahead in full-blown fast forward flight.
-
Page 6: Set Up
Set up Getting set up and ready to fly is a quick and simple task.Follow these easy steps and you will be shredding the sky in just a few minutes! Binding Procedure Step 1: Click the bind-button meanwhile powering on the Drone, either by connecting the battery or USB power. -
Page 7: Status Led
The flight controller board comes pre-flashed with Betaflight and proper settings for the Makerfire FPV Micro Drone already set up but you still need to configure the receiver settings. Also if you upgrade the firmware or reset settings, you will lose the receiver settings and need to set them up again. - Page 8 if you cannot seem to bind your controller to the FC board then make sure that these settings are set correctly. ESC / Motor Settings ESC/Motor protocol, click and select BRUSHED, switch on MOTOR_STOP(optional) Other Configuration Section Settings Set Minimum Throttle = 1050 ...
-
Page 9: Flight Modes Settings
Flight Modes Settings Most pilots will prefer to fly in HORIZON mode as that allows for both stabilization and also flips and rolls. The other modes to use are: ANGLE - full stabilization, no flips, ideal for first time pilots ... -
Page 10: Aio Fpv Camera Setup
Open BetaFlight and hit “Connect” Put a spirit level on a surface and make it level, place the Micro FPV drone on the level surface In the first tab, click “Calibrate Accelerometer” Using radio sticks Power up the radio and Micro FPV drone, remaining disarmed for the duration of this ... -
Page 11: Ready To Fly
Ready to Fly With the receiver bound to the radio, video feed set up, and battery charged, you are ready to fly. -
Page 12: Flash Firmware
Flash Firmware If you wish to flash a different firmware or update Betaflight to the newest version, please follow these steps. 1.Click the Firmware Flasher tab 2.Select “SPRACINGF3EVO” as the board, and pick the version of Betaflight you wish to flash (latest is 3.0.1) Do not use “SPRACINGF3”... - Page 13 Situations 2: If reboot sequence (also called bootloader) exit and work well, you could flash the firmware without jumper the BOOT pins. This is the the state when the stock firmware works well and you want to upgrade to the latest version.Do as following. a:Disable “No reboot sequence”...
- Page 14 Click “Replace Driver”. Some times the Replace progress will be slow or no response, you can close it and do it again. Restart Chrome (make sure it is completely closed, logout and login if unsure) Now the DFU device should be seen by Configurator Also you could see USB Flashing section of Betaflight/Cleanflight manual for details.
-
Page 15: Binding & Betaflight Setup Procedure With External Frsky Rx
Binding & Betaflight Setup Procedure with External FrSky RX a.Turn on transmitter, create new mode and enter setup, the Mode must be D8. b.Power on the quadcopter by connecting the battery,red LED at the tail of the drone will flash rapidly on receiver after 6 seconds, the receiver is in ready for binding mode.Then turn on the transmitter, enter the binding mode, the red LED will turn solid, this means it has binded successfully with the default mode in SBUS. - Page 16 Configuration Tab:Receiver Mode, choose RX_SERIAL; Serial Receiver Provider, choose SBUS.And click the Save and Reboot button in the lower right corner.
-
Page 17: Note & Faq
(rate). You can also enable airMode and be able to control the quad at any speed and attitude Makerfire team comes with a detailed manual that is reviewed and maintained by the developers and community. No more out-of-date wiki pages and second-hand information from official website.Also you could send email to...
Need help?
Do you have a question about the BNF Micro FPV and is the answer not in the manual?
Questions and answers