Advertisement
Advertisement
Table of Contents

Summary of Contents for Alpha SPY DRONE
- Page 1 4.5CH 2.4GHz LIVE FEED VIDEO RC HEXACOPTER...
- Page 2 PRECAUTIONS INDOOR AND OUTDOOR FLIGHT PRECAUTIONS This drone is designed for outdoor flight. Please make sure there are no obstacles in the flight path of the drone. Colliding into an obstacle while flying may damage the drone. Make sure there is little to no wind when flying outside. Only fly the drone when people are a safe distance away.
-
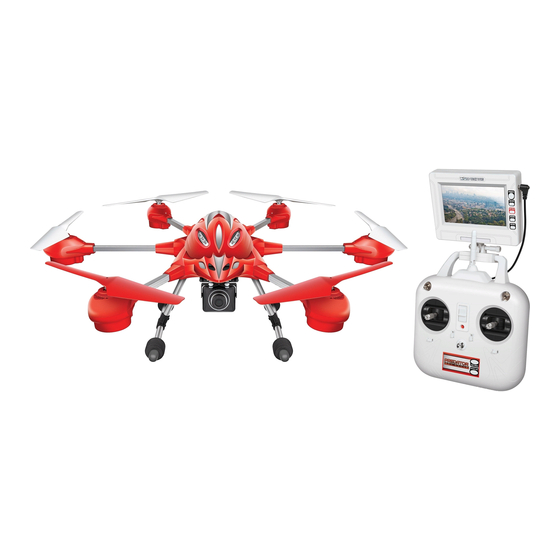
Page 3: General Specifications
GENERAL SPECIFICATIONS Length: 21.15 Inches Built-In Battery: Width: 81.5 Inches 7.4V 1500mAh LiPo Battery Height: 8.26 Inches Weight: 1.14 Pounds RC Controller Battery: Flying Time: 7 To 9 Minutes 6 x 1.5V AA Batteries Charge Time: 180 Minutes or less (Not Included) TRANSMITTER DIAGRAM 2.4GHz ANTENNA... -
Page 4: Drone Diagram
LIVE FEED VIDEO SCREEN DIAGRAM VIDEO SCREEN POWER PLUG MINI MEMORY LIVE FEED VIDEO SCREEN CARD SLOT VIDEO SCREEN POWER CORD POWER ENTER UP/RECORD DOWN MENU MOUNTING BRACKET LOWER MOUNTING BRACKET DRONE DIAGRAM 6 MAIN ROTOR BLADES LED LIGHTS 6 METAL ARMS 720p 6 ELECTRIC HD VIDEO/PICTURE... -
Page 5: Camera Installation
LANDING SKIDS INSTALLATION 1.) Take the landing skid and place it into the support frame. Make sure the screw hole on the landing skid lines up with the hole in the frame. 2.) Firmly screw in the landing skid to the frame with a screwdriver. -
Page 6: Installing Transmitter Batteries
INSTALLING TRANSMITTER BATTERIES Slide open the battery cover and install 6 Replace the battery cover once the AA Batteries. Please note the polarity. batteries are properly installed. INSTALLING LIVE FEED VIDEO SCREEN 1.) Place the lower mounting bracket underneath the carrying handle. 2.) Place the video screen assembly on top of the carrying handle so the mounting brackets surround the carrying handle. - Page 7 MINI MEMORY CARD INSTALLATION MINI MEMORY 1.) Locate the mini memory card CARD SLOT slot on the right side of the live feed video screen. 2.) Grab the included mini memory card. The gold contacts on the mini memory card should be facing you when you insert it into the slot.
- Page 8 CHARGING THE DRONE BATTERY PACK 7.4V 1500mAh Li-Poly Wall Charger Rechargeable Battery Pack The drone battery pack can be recharged with the included wall charger. 1.) Open the battery cover on the bottom of the drone and disconnect the battery pack from the drone.
- Page 9 REPLACING THE ROTOR BLADES Rotor Blade A is designed to rotate counter-clockwise while Rotor Blade B is designed to rotate clockwise. Make sure that you replace the Rotor Blades in their corresponding position. Wrong placement will greatly affect its performance. FLIGHT CONTROLS LEFT JOYSTICK...
-
Page 10: Adjusting The Trim
ADJUSTING THE TRIM When hovering, the drone may turn or move left or move right or move forward or backward without your control input. To correct this you will need to adjust the trim on the transmitter. MOVE LEFT / LEFT TURN / RIGHT TURN TRIM MOVE RIGHT TRIM... - Page 11 ADJUSTING THE TRIM CONTINUED PROBLEM: CORRECTION: The throttle control is too Click the THROTTLE TRIM down sensitive. until the throttle C is to your liking. PROBLEM: CORRECTION: The throttle control isn’t Click the THROTTLE TRIM up sensitive enough. until the throttle sensitivity is to your liking.
- Page 12 LIVE FEED VIDEO SCREEN / RECORDING VIDEO CONTINUED Pressing the menu button on the live feed video screen will bring up the menu screen. Press the up and down button on the screen to cycle between adjusting the screen and playback options.
-
Page 13: Post Flight
VIEWING YOUR VIDEO ON A COMPUTER If you would like to view the recorded video on a computer you’ll need to use the included USB adaptor. MINI MEMORY USB ADAPTOR CARD 1.) First remove the mini memory card from the live feed video screen by pressing it in until it clicks and sliding the card out. -
Page 14: Troubleshooting
TROUBLESHOOTING PROBLEM CAUSE SOLUTION Transmitter is not syncing with Quadcopter is unresponsive. The Repeat the power up process. quadcopter. Transmitter light keeps flashing. Quadcopter is unresponsive. Turn both transmitter and quadcopter ON. Transmitter and or quadcopter is not powered ON. Transmitter batteries are Install the batteries with the installed incorrectly.
Need help?
Do you have a question about the SPY DRONE and is the answer not in the manual?
Questions and answers